
How to turn any photo into a watercolor painting in Photoshop
People just love taking their favorite photos and making them look like traditional water color paintings. The only caveat is the default watercolor filter in Photoshop looks like a filter was slapped on a photo. I have looked at a number of real watercolor paintings and experimented quite a lot. After some time in the “lab” I have emerged with a potion! I have devised a nice easy way to get a water color effect that is sure to impress. Now I’m going to share this with you. Watch the video and then read the steps and bookmark them as a reference to come back to whoever you need that magical watercolor effect. Spoiler alert, this is fun and addictive!
Making a water color painting out of a photo in Photoshop
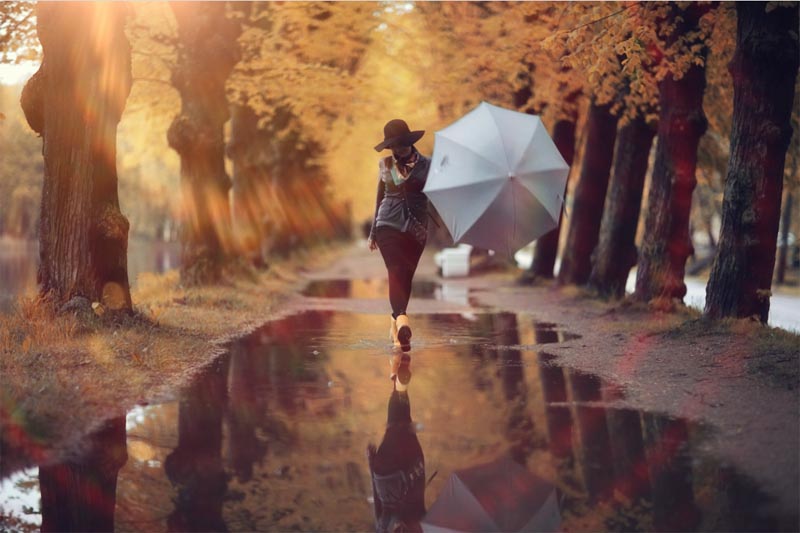
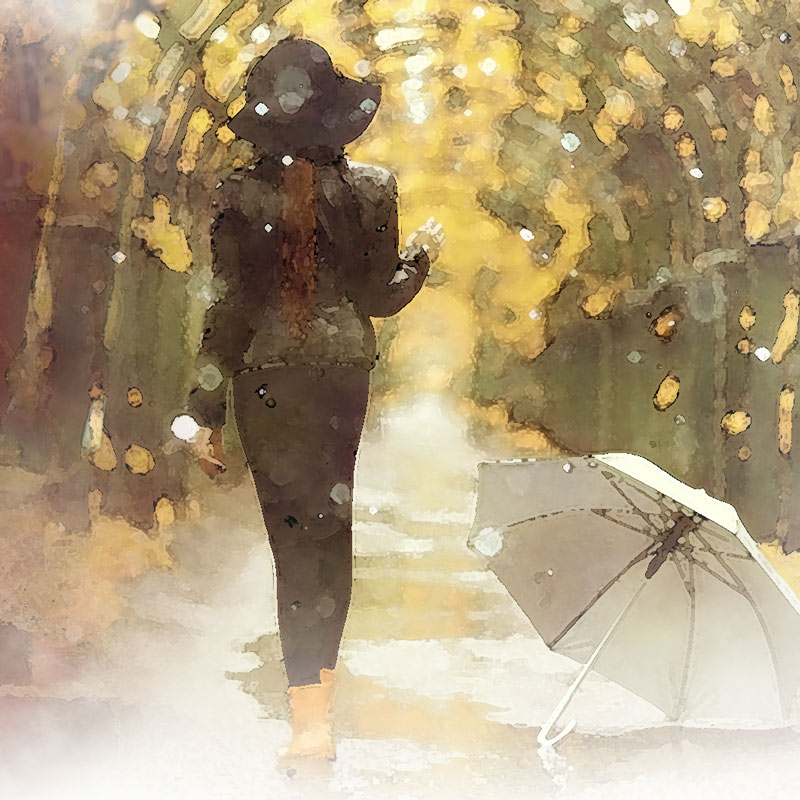
Let’s start with this photograph that I got from Adobe stock.
You can find it here picture of woman with umbrella | How to use photos from Adobe stock in Photoshop
Step 1
Duplicate the Background layer (Ctrl/Cmd+J)

Step 2: Applying the basic watercolor filter
Let’s apply the basic effect. Filter>FilterGallery

Choose the top category, Artistic.
Click on Watercolor
- Brush Detail = 3
- Shadow Intensity = 0
- Texture =1
Click OK

You now have the basic water color effect (as seen in preview above). There is so much more we can do to add to realism from the basic filter and this is what will set your work apart from the rest, let’s go!
Step 3: Adding an outline
Duplicate the background again and drag it to the top of the layers stack. Name it OL (outline).

Choose Filter>Stylize>Find Edges (an oldie, but a goodie).
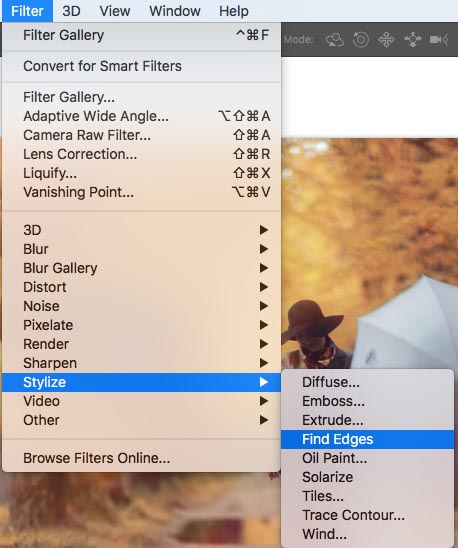
You will now see a colored outline.

Step 4.
Lets make it black and white. Press Cmd/Ctrl+Shift+U (desaturate)

Step 5
Let’s use layer blending modes to hide all the white and just show the black, In the layer’s panel, change the mode from Normal to Multiply. (See more about Layer Blending Modes here)

and here is the result.

Let’s hide the outline for now, click the eye to the left of the layer to hide that layer.

Step 6: adding a watery color effect
This step is going to add to the overall painterly effect. Create a new layer by clicking on the new Layer icon at the bottom of the layers panel.
Move the layer between the background copy and OL layers as shown.

Choose the eyedropper tool
Click on the nice bright yellow color from the image. This will set the foreground color
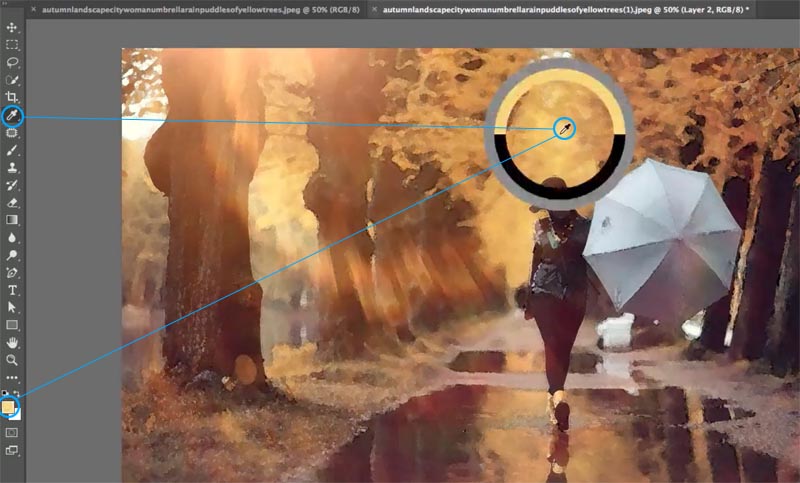
We now want to set the background to another color in the photo that will complement the yellow. Lets choose the Orange brown, but wait!
We want to set the background color, so hold down the alt/option key when you click and the background color will be set.

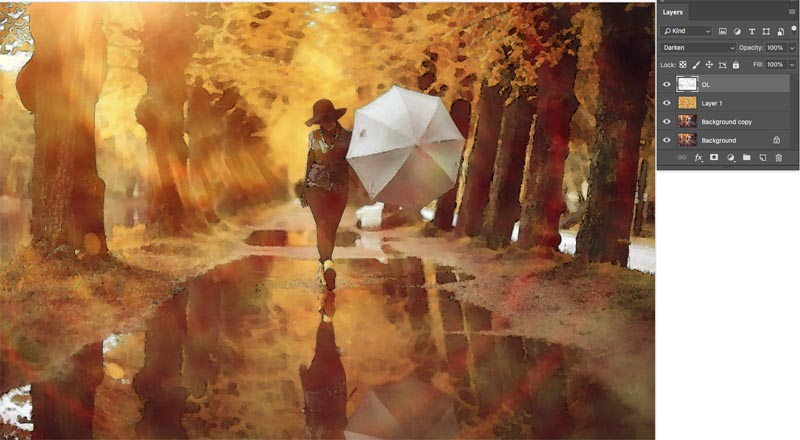
Choose Filter>Render>Clouds

Let’s blend the new colors in.
Change the Layer blending mode to Soft Light

See the nice effect we are starting to get?

Sometimes you can still see the pattern of the clouds, so let’s soften that effect. Choose Filter>Blur>Gaussian Blur. I set it to about 8.

Step 7.
Turn the Outline layer back on (OL). If it seems too dark, change the blending mode to Darken like I have done here (optional).
Step 8. Making the water color look dabbed on with a brush
This is the very best part of the tutorial and something else you won’t find anywhere else (Don’t you just love the original tutorials here at PhotoshopCAFE)? We are going to make it look like this was all painted carefully with brushes and sponges.
Unlock that background layer by clicking on the padlock. (Turns it into a regular layer).

Create a new layer at the bottom of the stack. (Choose the bottom layer and hold down Cmd/Ctrl while clicking the new layer icon, This creates a layer underneath the existing layer)

Fill it with white, or a faint color. This will be the new canvas color. (you will see soon).

Step 9: Creating a brush
Let’s create a new document. Set it to1920X1080 with a white background.
File> New
Use the legacy dialog box

Or the newer one, doesn’t matter.

Click ok to create the new document.
Press the D key to reset the color swatches.
![]()
Choose Filter>Render>Clouds

Let’s make the shape of our brush.
Choose the elliptical Marquee tool.

Draw an oval. Tip: start in the center and hold down the Alt/Option key as you drag to draw from center.

Let’s soften the edge of the selection
Choose Select>Modify Selection>Feather
Set it to a nice big number like 100

Now it’s time to make it into a brush!
Choose Edit>Define Brush Preset
Name it Watercolor soft, or whatever you like really.

When you fill the page with white and tap once with black, this is what the brush should look like.
You can now close this new document, weldon’t need it any more, we have our brush.

Step 10: Using the brush to get amazing results!
Alright, back to our water color image (Thank goodness we only have to create this brush once, and we will always have it for the future).
Select all the layers except for the background: Click on the top layer, hold shift and click on the Layer 0, all the layers between are now selected as shown.

Let’s put all the layers into a Layer group. Press the G key and you will see they are all nicely tucked away in a folder.

We want to add a Layer Mask, but a mask that will hide all the layers. Hold down Alt/Option as you click the new layer mask icon and you will see a black mask has been created. This hides everything. Learn about Layer masks here.

Choose the B key to select the brush tool. Our cloud brush should still be selected. (If not, choose it from the Brushes panel).
At the top, drop the opacity to 30%. We want to gradually paint and build up the effect.
![]()
Choose white as the foreground color
![]()
Dab once on the canvas with the brush (layer mask selected). You can see that that it looks like we lightly painted on the page with real brushes and sponges.

Keep dabbing the effect, keep it lighter around the edges. You can use [ and ] to make the brush larger or smaller.

And here is the result. Pretty neat huh? Don’t forget to watch the video at the top for a walkthrough and a few extra tips.

Here is another example from a different photograph.

Thanks for watching, and until next week!
Good to see you here at the CAFE
Colin
PS Don’t forget to follow us on Social Media for more tips.. (I've been posting some fun Instagram and Facebook Stories lately)
You can get my free Layer Blending modes ebook along with dozens of exclusive Photoshop Goodies here

59 thoughts on “How to turn any photo into a watercolor painting in Photoshop”
Leave a Reply

We will look at the top four annoying changes in Photoshop and how to fix them. Including Save as, save...

Colin Walks through the entire process of creating large panoramas in Photoshop and Lightroom. Shoot, and edit, every step explained...

This tutorial touches on the best new features in the October 2014 release of Photoshop CC Learn about Libraries, Guide...


Excellent photo to watercolor tutorial.
Colin great tutorial!!! Love the new added steps to it. Ingeniously clever.
Hey, Colin why don you show us some video tutorial? Like resizing for different formats and the final rendering. Thanks
Colin this is a great tutorial. I can’t wait to try it. I take photo’s of just about everything. My camera is a Panasonic Lumix, DMC-FZ 1000. I joined the Café about a month ago. So glad I did. I have enjoyed and learned so much.
Thank You!!
Thanks for the kind words, so glad to have you here at the CAFE!
Thanks for another terrific tutorial! I photograph wildlife professionally and for fun I shoot and paint cowboys/Indians as well as high school athletes. I use Canon equipment for my photographs. I use Corel Painter and a Wacom tablet to paint with.
Definitely like the tutorial. I use a Canon 5D (the original one) thinking of buying the Canon 7D Mark II.
Thanks for your great tutorial. When I tried it, the Filter Gallery was greyed out. I discovered that my camera (Nikon D750) takes photos in 16 bits/channel. When I changed it to 8 bits/channel the Filter Gallery became live. It might be worth mentioning to users.
Thanks for bringing up this point!
I liked your presentation of water colouring. I don’t have CC at all have stuck with photoshop 7 as for me @ 80 plus years that is satisfactory. I do read every thing you send through
Loved this tutorial – I own a WACOM but unfortunately never really learned how to use it so haven’t used it for a few years. Sigh !
Well, drat. I didn’t make it past Filter>Filter Gallery because my Filter Gallery is grayed out.
Make sure you are in 8-bit not 16-bit
Thanks again for brilliant tutorial with watercolor tips.
You asked about Wacom tablet. I have one for my Mac and my old one is still being used by my husband, who is still on Windows XP, enjoying photo editing. I mainly use my Wacom (Intuos) tablet for drawing new pictures for my books and others’. I adore my Wacom and Intuos pen. I still have all my nibs intact. I bought my first Wacom tablet in 2009 and the second one when I bought my iRetina Mac in 2015. I adore your tutorials and use your hints all the time. Thanks heaps. Marie 🙂
Hey Colin,
Excellent Tutorial! I would have never thought to use the black outline … very clever! I use a Canon 7DMII and mainly shoot landscape, architecture, and wild life. I do use a wacom tablet. I had a Intuos 4, but after watching your tutorial on the new Intuos Pro I bought it. I love it!
Thanks again for all your Great Tutorials and time to make them!
Dennis
Hi, very good tutorial, can’t wait to get home and try it, and by the way I have a Wacom tablet.
Hi Colin,
I really love this tutorial. I bookmarked this tutorial on my web bookmarks. Right now I just use the phone camera of my LG Phone. I have a bunch of photos taken with a variety of cameras, both digital and film. Thank you for this tutorial, and I am already a subscriber, which how I ended up with this tutorial.
Excellent tutorial, Shoot whatever looks good, more free-lance
Nikon D610
Keep up the inspiring tutorials
I have been following you for years, and you never cease to amaze. Thank you for sharing. I shoot with several cameras, but my best images are with a Nikon D800E. I use a Wacom tablet all the time. I am always looking to create something different, but my major interest is in nature and floral prints.
Excellent tutorial. Have enjoyed and learned from all of them.
Thanks.
Nice tutorial – going to give it a try on one of my fall color images. I mostly take landscapes with a Canon T3i and own a small Wacom but not managed to master it so rarely try to use it.
Colin E
Very interesting tutorial Colin. Will try this for sure.
I mainly take landscape photos with my Nixon D5500 and rework them with my Waco tablet. I really like the feel and accuracy of the pen compared to a mouse. Cheers.
Great tutorial. I just used this to salvage something interesting from a photo that was slightly out of focus. Mostly shoot landscapes and coastal scenes. Canon 5DSR
Great tutorial Colin! I’ve played with watercolor on my own, but your techniques take watercolor to a whole new level. I use a Nikon D500 and enjoy landscape photography, but mostly shoot portraits, head shots, events, and real estate because that’s where the money is.
Hi Collin,
I am happy with this tutoria and want to play it on my own picture to day
Super tutorial! I shoot landscapes,macro and non or slow moving subjects. Fuji X-t1 (to be upgraded soon, thinking of switching to Sony)
Collin, what a great tutorial! Learned a lot here. I generally shoot landscape, but love botanical macro. The cameras I use are Canon 5D Mark iii as well as Fujifilm XT-2, which is now becoming my preferred camera. Thanks again for these wonderful lessons.
Amazing. It’s great to have these tutorials in video, especially with all the steps in completing a lesson. Great job and it really looks like liquid water. Thanks appreciate it.
Thank you very much, Colin. You are an excellent teacher! I’m going to try the effect right this minute. I shoot with an Olympus OMD EM-5, mainly landscapes and street photography. I don’t own a Wacom.
Every time I think I’m getting wise to Photoshop and follow one of your tutorials I realize “I’m still a big-time rookie”! It is astounding how insightful your tutorials and tips are. You are laying down challenges for aspiring image editors.
p.s. I shoot a Nikon F6 with Fujichrome Provia 100F film and scan selected slides on a Nikon Super Coolscan 5000 film scanner. I love having the slides and not having a gazzillion digital images to wade through or toss after any shooting sessions. Thanks so much for your generosity in making these tutorials and sharing them with I suppose your millions of fans by now!
You are very welcome!
Great tutorial Colin. I enjoy exploring PS effects that blend visual mediums so I was excited to see this one in your bag of tricks. I currently shoot with a Pentax K1 DSLR. I’ve bounced around from streetscapes to landscapes to strictly composites, but I’m focused on botanical macro right now as I hone my studio skills. Keep ’em coming!
Hey Colin, Great Tutorial as usual! Love your stuff, it’s almost always easy to fillow. Thank you!
I shoot Nikon; D3, D750 & I use a Wacom Cintiq 22HD (I Love it!)
Hey Colin, Love the Tutorial! As usual it was very easy to understand & follow. Love your stuff!
I shoot Nikon D3 & D750 as well as using a Wacom Cintiq HD22 (I Love it!)
Loved this video
Hey Colin,
My grandson is doing photography to help pay his way thru college. One day he asked me if I knew where he could rent a smoke machine because he had a client who wanted to be photographed in a cloud of smoke (I can’t understand why).
I used your watercolor painting tutorial to show him how to make a cloud brush to create the smoke effect that worked for him and his client.
This brings me to this related question: Do you know of a technique for creating a realistic smoke or fog effect?
Keep up the good work!
Thanks,
Clyde S
Yes, I use the cloud brush and get very realistic results
I am following your steps with Photoshop Elements 18 and am getting stuck when creating the new document. After I draw the eliptical effect all my layers disappear. HELP?
Elements is different, unfortunately, I don’t use it so I don’t know.
Hi Colin, I loved the tutorial and love you ones on YouTube also, but I cannot make the last part of this effect work. I made the brush and it works find on other files. I held the ALT and made the mask in black, have the brush chosen and it is white with the 30% and nothing happens. I tried 100% opacity and still nothing happens. I cannot find anything I did wrong after going back over all the instructions several times. Any ideas as to why I can’t get the dab effect? I have the masked selected. Thanks Julie
Thank you so much for this tutorial..
You did it great. L over it.
Would you please help me to create about 10 pictures with different images but all in Similar treatment? If you would, please let me know how you want to charge.
Thank you
Hi, I’m not taking any new commissions right now, maybe someone else at the CAFE can?
Super – I came across this whilst looking for a watercolour action, but it is clear from reviews that actions only work if Photoshop is setup exactly as required. This procedure can work with any version, is well explained, has taught me some useful things about Photoshop as well and can easily be varied.
really excellent written tutorial and I like having both the written and video tutorials. I use a Canon Eos 500D and an Iphone 6S
thank you! watched the video and then followed the step by step explanations and it all worked brilliantly….I am so pleased with myself
everything was looking good until the step to unlock the background layer, the layer remains partially locked and will not allow a new layer below it, ahhh!!! any guidance would be great (just a hiccup?)
Option click on the padlock to unlock the layer
I’m stuck on the Gaussian Blur part with the fourth layer. I get a message that says “Could not complete the Gaussian Blur command because no pixels are selected”. Am I doing something wrong?
I managed to sort out the issue with Gaussian Blur but now when I am trying to do the dabbing part with the brush on the black mask layer nothing happens. I have white selected.
Great tutorial, I found some of them very difficult to follow but this one was quite simple and end result looked great
Thanks for this! I have a Nikon D500 and I would love to turn some of my African wildlife pics into watercolors. Do you have any tips on having photos professionally printed?
Thank you so much! Finally a tutorial without actions (they never work for me no matter I do).
Great tutorial, I enjoyed the simplicity of your description. Olympus EM1 MIII. I photograph birds and nature
Merci Colin,
Merci pour tous ces super tutos , je n’ai que cs2 et parfois je galère, Mais je me régale,
A 76 ans je ne vais pas changer
I want to learn how to convert photos into watercolour using photoshop
I use a Canon R10 and I like to photograph travel and landscape. Thank you for this tutorial on digital watercolor painting. I am just now beginning to experiment with different methods. Liked it so much that I purchased your Photoshop 2026 for Digital Photographers | Photoshop Secrets.
Rob Tatham
Thanks so much! I really appreciate the support
I am thrilled to have this opportunity to make a watercolor from a PS photo. I have been looking to see how you can make an photo look different… not real crazy about how they look just using LR.
Have fun and experiment!