
How to Use Layer Masks in Photoshop and 7 Layer Masking tips
Layer Masks in Photoshop: the ultimate guide
The most important tool in Photoshop for creatives is Layer Masks. There is confusion, but Layer masks are very easy once you understand how they work.
In this Photoshop tutorial, I will show you exactly how Layer Masks work and how to take pinpoint control over them. Then I will share 7 tips on using Layer Masks. In the process we will have a little fun and create a lion woman.
Layer masks are a better way of cutting out layers and photos than using the eraser tool. They are non destructive and provide much more control.
The images I used from Adobe Stock
How layer masks work in Photoshop
Once you create a layer mask, it is white. White has no effect on the layer, painting with black will reveal the underlaying layer.
To mask a layer, select it and then click the Layer mask button at the bottom of the Layers panel.
Note: You can’t apply a layer mask to a background. You need to unlock it first by clicking the pad lock icon on the background in the layers panel.
![]()


Once you have a layer mask, you will notice it is white. This has no effect on the layer.
Choose the mask and paint on the image with a black brush, you will notice it hides the layer and you can paint it away. This is better than the eraser, because of you paint with white, the layer will come back.
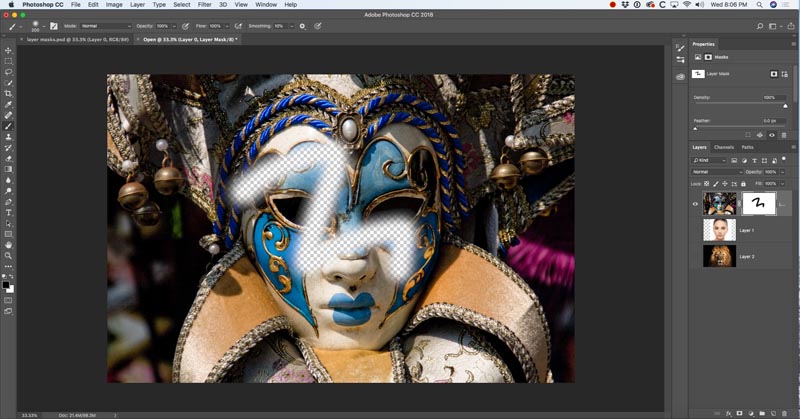
Different shades of gray will produce corresponding opacity; 100% white is 100% opaque. 0% white (Black) is 0 opacity, and thus fully transparent. 50% gray would yeild a result of 50% opaque. 25% gray would be 25% opaque etc. Watch the video above to see why I use the gray color, rather than the obvious tranparence slider on a black brush.

Masking Layers in Photoshop to make a lion woman composite.
Here I am using the layer mask to punch out holes for the eyes to show through in the layer underneath. Just paint with a black brush, make sure the layer mask is selected.
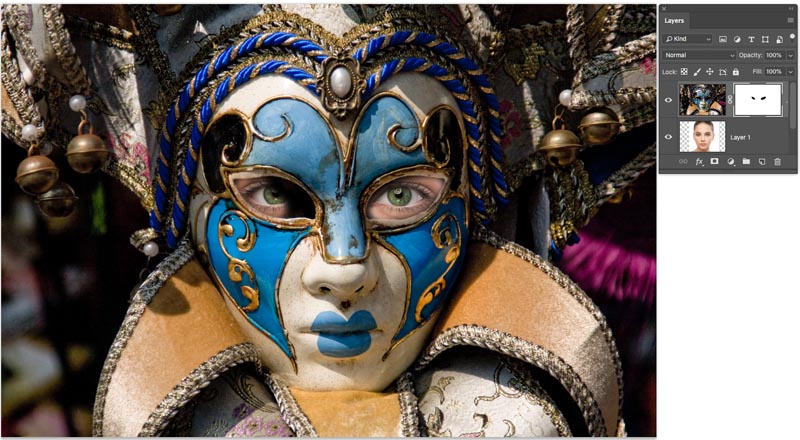
If I hide the layer of the woman (click the eye icon next to the layer) You can now see the lions face showing through.

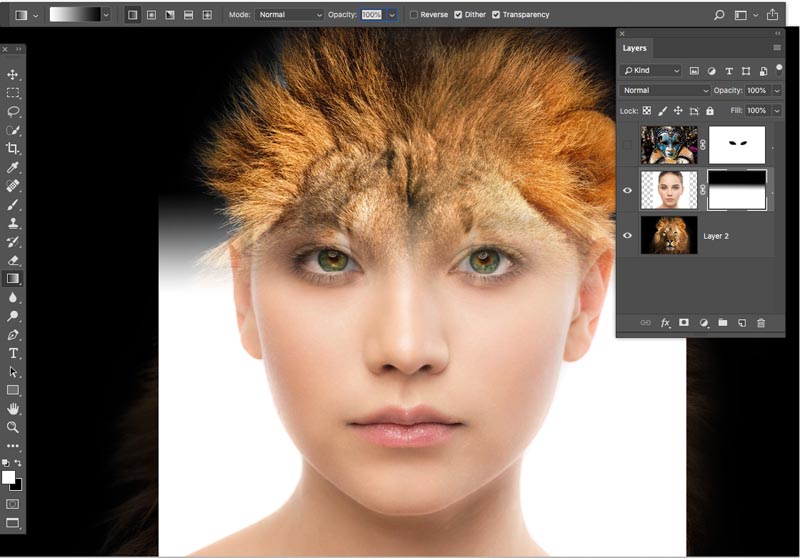
Let’s hide the top layer for now and work on blending the woman face with the lions (Link at top of the page to find these images) If you want to preview the alignment, use Layer Blending modes, this tutorial explains Photoshop Blend modes.
Choose the layer mask next to the woman’s face.

Press the D key, to reset the colors to black and white
Choose the gradient tool, set it to foreground to background. Linear, mode normal and transparency to 100.
Click and drag the gradient through the image. You will see a blend. (If you are lost, look at the video, this text is best as a reference).

Now, try dragging the gradient in the opposite direction. Completely different result.
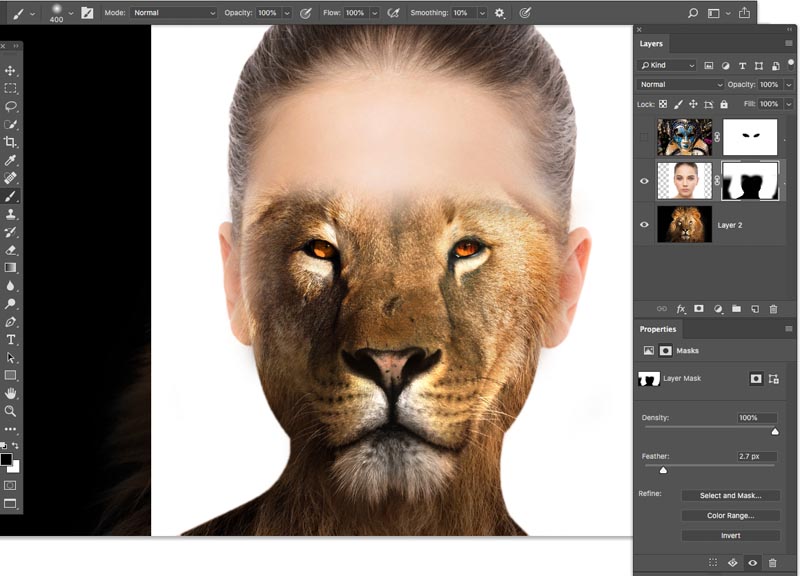
I’d like to keep the gradient, but remove the lion for the eye area and just have the woman eyes showing nice and clean. Guess how we do it?
Yes. We paint with a white brush to bring back the layer we are working on. (Black hides the layer and lets what’s underneath show through. White shows our layer and hides the layers beneath).

Here is what it looks like when we have finished painting the eyes back.

Let’s [aint more and show more of the lion and hide the background.

And the other side, Obviously this is too much and needs to be refined a bit. One of the things you will also notice is that its a bit rough around the neck. Let’s use selections to help.

Tip 1: Shift+Click on the layer mask to hide it.

Use the quick select brush to select the face.

Shift+Click on the mask once again to turn it back on. Now we will use the selection as a guide for better mask painting.
With the mask selected and a white brush, paint inside the neck and chin area to paint away some of the lion fur.

Select>Inverse to swap the selection to the outside of the face.
Use a black brush and run around the edges of the neck to make a nice tight masking job and fill in the little holes.

Tip #2 View just the the mask on canvas. Press The Alt/Option key and click on the layer mask to see it on the document. Alt/Option click on it again to bring it back,

Tip #3 View the mask overlay on canvas. Press the backslash key \ to toggle mask overlay

Tip #4 Feather the mask.
The edge of the neck and cheeks is too hard and abrupt, let’s soften it.
In the properties panel, move the Feather slider up just a little bit. You will see it softens the edge. (We used to do this by adding a Gaussian blur to the mask, which you can still do if you want to soften it in some areas only).

Tip #5 Invert the mask.
Choose the Invert button for the Properties panel, or select the mask and press Cmd/Ctrl+I to invert or swap the mask.
Tip #5 Use Blending modes
Let’s turn our top layer back on. It’s hiding everything. It’s really easy to bled everything in using blending modes.
Choose the top layer. In the layers panel, where it says normal, click and change it to overlay.

Oh my! Look at that! We barely had to do anything and Layer Blending magic is hard at work. See a tutorial on Layer Blending modes here

Grab a black brush and paint away the areas of the mask that you want to hide. Obviously this isn’t final art, the top mask needs to be nudged to the left a transformed a little. But this is a great starting place for you to continue playing around!

Useful Resources
► Download Layer Blending Modes e-book:
► Photoshop Secrets for Digital Photographers course:
Thanks for checking it out
Add a comment and subscribe for more tutorials!
(Don’t forget to check out all the hundreds of Photoshop and Lightroom tutorials here at PhotoshopCAFE).
Colin
PS Don’t forget to follow us on Social Media for more tips.. (I've been posting some fun Instagram and Facebook Stories lately)
You can get my free Layer Blending modes ebook along with dozens of exclusive Photoshop Goodies here


34 thoughts on “How to Use Layer Masks in Photoshop and 7 Layer Masking tips”
Leave a Reply

Time-lapse photography is enjoying a spike in popularity. In this tutorial, you will learn what time-lapse is, how to shoot...
This new Photoshop feature makes it easy for you to work with multiple layers

This Photoshop tutorial shows you how to replace a boring blue sky with a dramatic cloudy sky.


your the BEST buddy
Great info Thanks buddy you are the BEST
Very informative. Yes I primarily use lightroom for my initial editing then photoshop to complete. I am very experienced in both but did see something I had not used and that is gradents in a layer mask. Learn smithing new each day!!! Thank you
Yes: Photoshop CS6 and Lightroom 4.4.1
Thanks Colin, really enjoy your tutorials, and insights. Always something new to learn. Photoshop never gets old
Thanks for every thing.
I do not use Lightroom; I find the requirement of catalogs restricting. I have my photos well organized and can find the ones I need easily. Editing is done more completely within PS.
I use L/Room & P/Shop together — I feel it brings out the best in both apps [at least thanks to Photoshop Cafe 😉 ]
FWIW, love the versatility of layer masks… Restoring a bunch of old photos, the Dust & Scratch filter is often necessary, but it also can lose a ton of detail — duplicate the layer, add the D & S filter, add a layer mask & invert, & I can paint just those [sometimes tiny] areas where I want & need to. Then I use the healing tools on things like faces.
Hi Colin,
I love your tutorials especially those dealing with basic techniques. Everyone needs a refresher course and your explanations are very easy to follow and replicate. I have used Lightroom almost from its inception and find I use Photoshop less and less, usually for cloning or healing. Do you think they would ever combine the two programs and get rid of Camera Raw ?
Great as always, Colin. Thanks for these tips. I always used Ph. A great tool to get things done.
Very helpful! Thanks! I already knew most of the tips but I didn’t know about the gradient.
Another helpful tutorial! I don’t use Lightroom either only PS. The tip I learned from this video was about using 50% gray in the foreground color rather than changing the brush opacity. That is so much better, as I don’t get the results I want when I change the brush opacity. Thanks for these great videos.
Thank you Colin for your easy to follow tutorials. Layer Masks is so powerful and your tuto. so great.
Hey, Colin! I do not use LR, but I appreciate how you simplified PS layer masking in this tut. Thanks for the tips!
I do not use lightroom.
I always enjoy your tutorials and do learn something new most of the time.
I was not aware of changing the brightness in HSB to maintain a constant opacity color when masking, I always used the opacity slider in PS. Does the density slider in the masking panel do the same thing as using HSB opacity setting ?
Thanks for another great Cafe tutorial.
Hi Colin. Great video. I was unaware how powerful layer masks were. Many thanks.
Always increases my knowledge. Excellent as always
I did not know all of the methods used for the layer mask, thanks for the tutorial my workflow will be even more effective.
really enjoyed this I didn’t know much about masks.
cheers Belinda
Collin:
Long time subscriber.
Love this update to previous layer mask videos. Will be using this in my intro to graphic design class in Cincinnati, Ohio.
You can also use the alt/option key (on Mac) and click and drag the mask from one layer to another which is the same as copying and pasting the mask between layers.
Hi Colin! I use both Lightroom and PS-CC. I used to use LR 90% of the time and only use PS for 10% for things like masking and removing stuff. Lately, I’ve move to using PS almost all the time. Just got tired of move back and forth between LR and PS. I think the only tip I didn’t know was the Gradient … that always confused me for some reason. Also using the the feather in the Mask properties was new to me. Great stuff … Thanks
Dennis
great video. didn’t know a lot about masking. love the way you explain things. Thank you for your help.
Am taking the course of Dave Cross on Advanced PS and am on lesson of masking – I have been using ‘masking’ for a while but not to the extent you demo’d in this tutorial. I found your instructions on ‘masking’ extremely helpful – was having a hard time following along w/ Dave, not to say I am not learning f/ Dave, but on ‘masking’, this tutorial was superior. I LOVE YOUR instructions and have bought only one so far – but I will be back for more.
An excellent tutorial. I learned everything I wanted to know about layer masks.
I learned a few new things. Thanks
I really like the layer mask tutorial, I have not used it much but will have a go now.
I always use PS cc
You are ALWAYS a needed source for learning more and inspiration for doing more ! Thanks.
thanks collin your the best , am really impressesd with layer masks.. can i use layer masks to erase a background?
no, you have to float it as a layer first
Colin, your videos are superb and I and I always come away inspired! Can I do away with Lightroom all together and rely on Photoshop completely? Thanks!
You could, but Lightroom is also great for organizing your images and working on multiple images
Excellent presentation I haven’t visited before like as photo design
I don’t process in lightroom
How do I download the text version of this tutorial and where it the thumb button?