
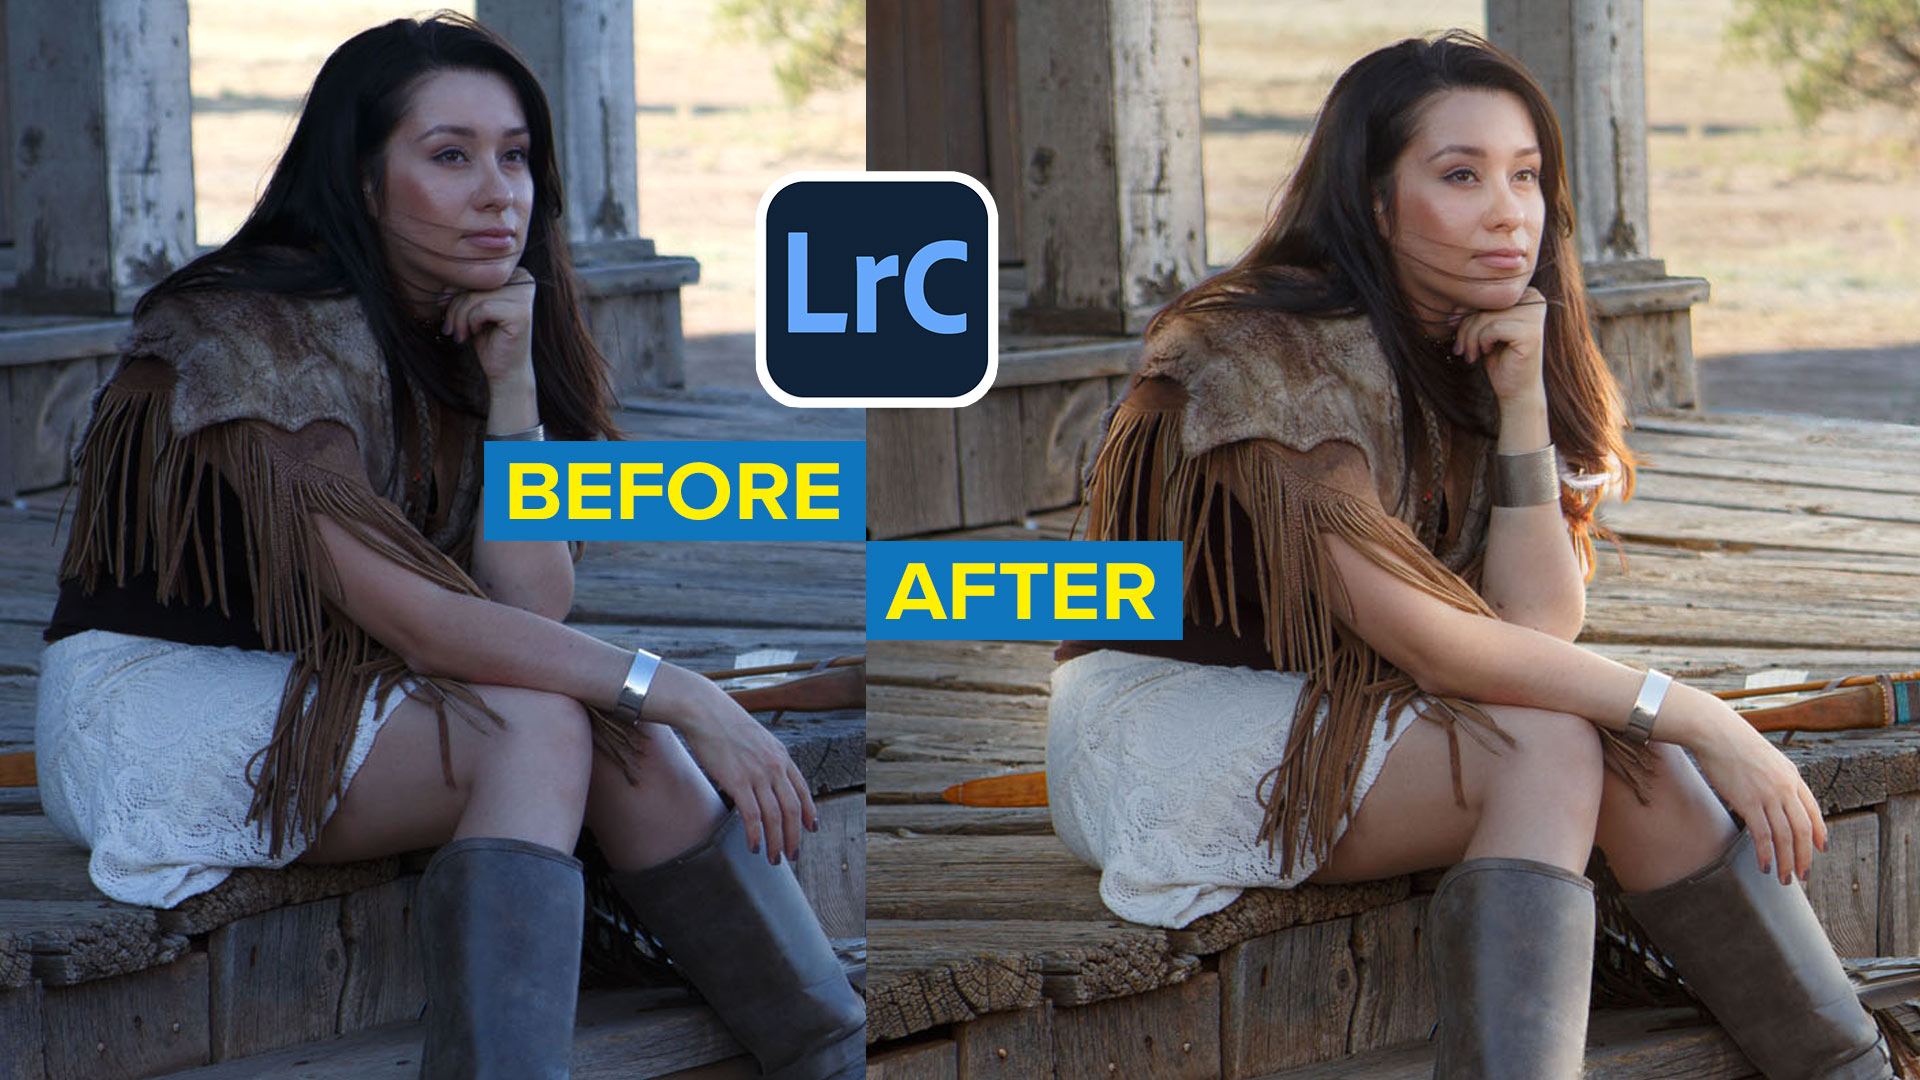
How to Light up a Photo in Lightroom or Adobe Camera RAW
How to add Light to a Photograph
In this tutorial, I’ll show you how to add lights, rim lights, flood lights and warm sunlight to a photo using Lightroom. If you don’t use Lightroom, this works identical in Photoshop Camera Raw. The develop module in Lightroom shares the same tools as Camera Raw.
There are 4 steps to this tutorial, in each we will be using different masking tools in Lightroom and camera raw. By the time you finish this tutorial, you will have a better understanding of how all the masking tools work together. This tutorial idea came about as I am working on a comprehensive course on Adobe Camera RAW.
Part 1. Adjusting the background

If you look at this image, the background is a lot brighter and warmer than the foreground.

The first step is to push the highlights to the left, this will darken down the bright area
Push the Shadows to the right to brighten the dark areas.

Now we want to even out the color.
Click on Mask and Background

Everything except our subject is selected. We want to use different settings on our model.
I also want to exclude the sunlit areas from the selection

Click on Subtract>Brush

As we paint with the brush we can remove areas from our mask. Watch the video above to see this in action and how I got a perfect edge on the posts

To even out the lighting, move the temperature slider to the right to match the background better.
Also move the texture slider to the right to enhance the texture in the wood. (This is why we didn’t include the model in this selection, you pretty much never want to add texture to skin).

Let’ Adjust the basic settings on the model

Click the + Create New Mask
Choose select subject

Our model is selected

Increase the Temp to warm up her skin tones

Play with exposure and reduce contrast a little bit.

Time to add the RIM light in Lightroom
We are also going to step away from working with global light (across large areas). We will add local light (selected areas).

You are going to learn how to use intersect to make quick and easy rim lights.
Intersect will only apply adjustments to where 2 tools or masks overlap.

Hold down Alt/Option in Lightroom (Shift in Camera RAW) to turn the Add and subtract buttons into an intersect button.

Choose Brush

When you start to paint with the brush you will see that only the overlapping areas will receive a mask. This is nice because you don’t have to worry about going over the edges of the model
I turned the exposure up on the settings, this will lighten the areas we are painting.

In my mind, the light source is coming from our right (Camera Right) and parallel or slightly behind our model. This where I would position a light if I were going for this effect.
I also would put a reflector to the left and behind the model, to bounce some light to get a bit of a rim on the camera left side.
With the lighting direction in mind, paint around the rim and surfaces like her arm that would be facing the light source.

I’m also adding some light on her face. Be careful to add most of the light to camera right, and not too much on the left (where you see my cursor in the image), which would be in a bit of shadow.

Let’s cast a beam of light.

If I had a light source on the right, it would cast a beam of light, let’s add it now.
Choose mask + Objects. We will use the amazing object selection.

Paint over the area you want to select.

The adobe magic will automagically make a mask over the area that you want to select.

If you want to add to the selection, choose Add>Objects on the mask

Painting a little bit on the left. We want to let a little light spill behind the model to the left.

Choose Intersect>Brush (like we did before)

Paint onto the deck to the right of the model. Let a little light come behind her and to the right (Looking at it now, I probably made that bit of light too strong. Just as well this is just a tutorial and not a masterpiece).
Also be sure to hit the right side of the columns with a little light too.

And thats how you can relight a scene in Lightroom or camera RAW
Here is before

and after (I removed the light behind the model left).

If you are interested in Learning Lightroom Classic, I mean, REALLY Learn Lightroom Classic check out my best-selling course Lightroom Classic 2023 For Digital Photographers.
I hope you enjoyed this tutorial.
Let me know if you are interested in More Lightroom or Camera Raw tutorials.
Thanks
Colin
PS Don’t forget to follow us on Social Media for more tips.. (I've been posting some fun Instagram and Facebook Stories lately)
You can get my free Layer Blending modes ebook along with dozens of exclusive Photoshop Goodies here

26 thoughts on “How to Light up a Photo in Lightroom or Adobe Camera RAW”
Leave a Reply

Preparing your files for printing. Prepress and steps to prepare file for a commercial printing job, tutorial
In this tutorial I will demonstrate how to place a person inside an image using the "paste into" command. You...

Learn how to make the colors look the same on different photos on different layers in Photoshop. This is a...


Yes, continue to provide selected photo corrections. Love It, Richard Freeman
It’s been a while, your tutorials are always very clear, concise, and useful. Thank you.
Yes! Bring on the deep dive ARC tutorial.
Love this one. Totally a technique I have never explored. Thank you again and yes I would be interested in an ACR course.
Since APR is one of the primary apps for photo processing it would be greatly appreciated if you would do your magic (your clear explanations) with it. With so many new functions in APR a new course is mandatory.
I would be interested in. Camera Raw course.
INSPIRING!!! Will need to rewatch to catch on to the details! Thank you!
Thank you. You always do a great job of explaining
Very nice, Colin. Keep the tutorials coming. Thanks much.
yes i be very intrested in the camera raw
Learned a bunch, kind of new to using LR even though I’ve been around a while. Mostly learning PS, now LR is looking like something I’d like to learn more about. And you ae so easy to understand.
Always happy to see these type of tutorials as well as photoshop, most of us who create compositions are also photographers so using LR and PS is our day to day, and having this type of expertise just adds strings to our bow. More indeed Colin. Thank you.
Great information – thank you for the easy to understand and see how each of these types of masking in LR (or RAW) work. I am interested in camera raw, but might be more likely to do some of this in LR.
I would also be interested in camera raw.
Hi, I would be very interested in the Camera Raw module that you mentioned. Love the learning that you offer.
Yes, interested in the ACR course
Camera Raw please
Would like more Lightroom tutorials.
Many Thanks for this tutorial,
Kathy
Noted, thanks
Yes interested in new camera raw course. These techniques can shorten time is PS it seems. Great easy to follow video as usual. Thanks!
Thanks
Fantastic as usual thank you.
Easy to follow – like all your other courses. Got the ACR Handbook a while back and would get the updated version as soon as it was released.
Next week hopefully!
Colin~ really appreciate your clear and precise approach to instructing ‘how to’ steps and videos! Thank you!!
Thanks again Colin…your lessons are always easy to understand and timely.