
How to use Adobe Denoise AI In Lightroom and Camera Raw
The latest addition to Adobe’s ai powered tools is Noise Reduction. Denoise is one of the most useful, practical tools that Adobe has released in a while. In the past, Adobe’s Noise reduction was a bit lack luster, but this isn’t the case anymore. This new feature is added to Lightroom and Camera Raw. This is the 3rd of the Enhance features that Adobe has delivered. The first was Raw Details, which worked best on Xtrans raw files (Fuji). Then came Super Resolution, and now Denoise. Denoise has recently been updated to cover all RAW files as well as no longer needing to create a new file anymore. So it currently doesn’t work on DNG and other formats. Adobe says they are working on these limitations. The good news is the Denoise works extremely well and it’s easy to use, although processing may take a little longer than you are used to.
Noise us usually found in recovered shadows, or with images shot as a very high ISO. Lets look at both.
Here is an image with a lot of noise in the shadows.This is shot on a Sony A1 at ISO 5000, with very aggressive shadow recovery.

In the Details Panel in Lightroom and Camera Raw, you will now see Denoise.
If the image isn’t compatible, it will be grayed out.
Click on Denoise, or Right-Click on your image and choose Enhance.

The enhance menu will pop up.
lick denoise and choose an amount.
Click enhance

A new file will be created and then name appended to ..enhanced.
But, look at the result. Its really clean without softening of the details.

If you want to use the old noise reduction, choose Manual noise reduction (expand the arrow in the details panel

This is a result from the old noise reduction, not as good.

Here is a comparison, click to see a larger version.

On an night sky shot at ISO 128,000 on a Sony A73

Traditional Noise reduction

Adobe denoise

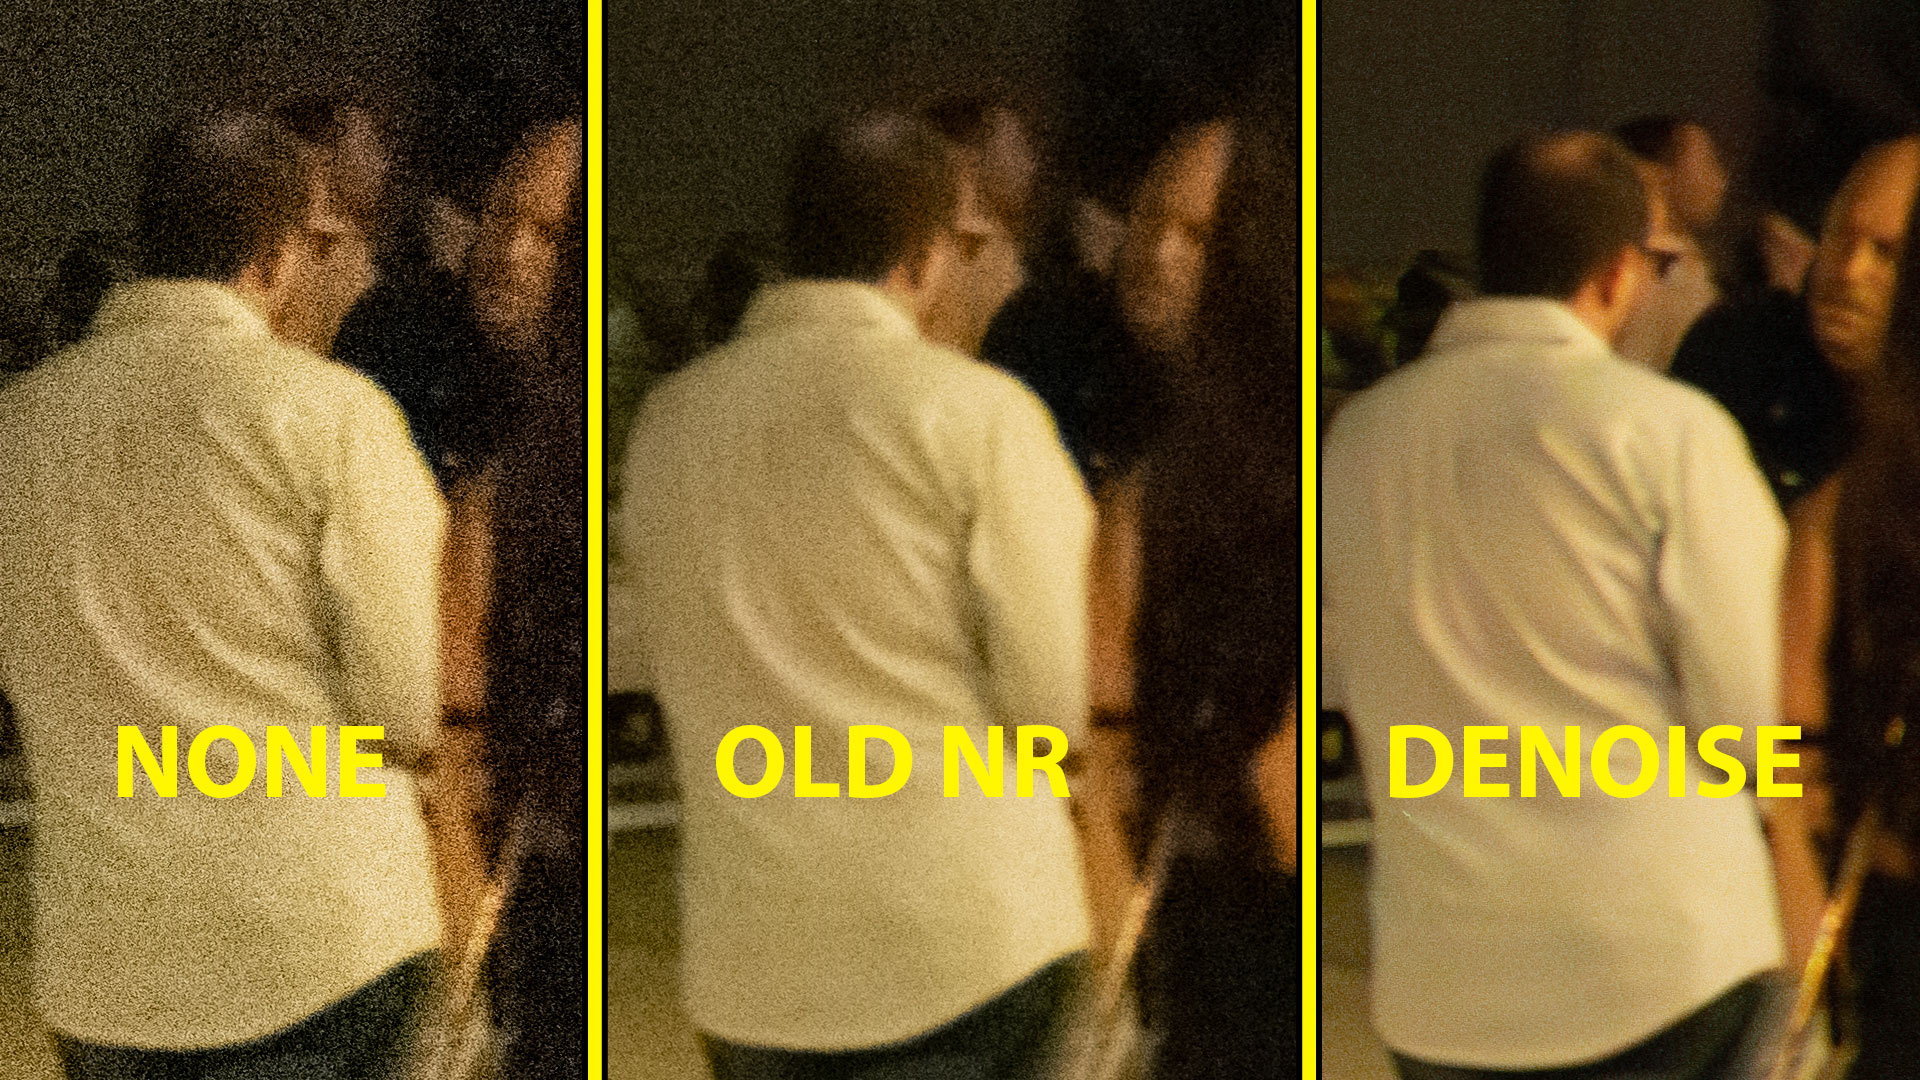
Lets look at an outdoor night scene. show with a Sony A73 at 102400

Traditional Noise Reduction

Denoise

Here is a close up 100% of the details. Click on the image for full size.
Removing Moire Patterns
Another thing this does well is fixing moire patterns.
These patterns will show up in repeating patterns such as fabrics (Why they always tell you to wear solid colors on TV and video).
These used to be a filter in Photoshop that fixed this, but it’s long gone.
Look at how well Denoise zaps the moire!
before

after

I hope you fond this weeks tutorial useful, stay tuned for more tutorials on the new Photoshop and Lightroom features! I really wanted to do this one first because I think its very important.
Great to see you here at the CAFE
Don’t forget to check out all our other free tutorials and courses!
Colin
Lightroom Classic New Features
I have made a series of tutorials on the newest Lightroom features. Check out these other Lightroom 2023 Tutorials.
What’s new in Lightroom 12.3
Curves in Masks in Lightroom
Denoise in Lightroom
Open Multiple images as Smart Object layers from Lightroom to Photoshop


(These courses are how I fund everything here at the CAFE, notice that there are no ads)
PS Don’t forget to follow us on Social Media for more tips.. (I've been posting some fun Instagram and Facebook Stories lately)
You can get my free Layer Blending modes ebook along with dozens of exclusive Photoshop Goodies here

9 thoughts on “How to use Adobe Denoise AI In Lightroom and Camera Raw”
Leave a Reply

nano banana is now in Photoshop beta. How to use nano banana in photoshop, hot tips!

One of the most exciting Photoshop plugins to come out in years is the Painter ParticleShop plugin that makes it...

5 Lightroom Classic Tips you probably don’t know Lightroom Classic is the industry standard used by many photographers to manage...


It’s nice to see Adobe address noise reduction. Per your examples, the old noise reduction SW is rather old and tired when compared to plugins available for third parties. It will take a while to really understand whether the Adobe product works as good as those or not. I have tried it a few times on low light images, which were shot at high ISO, and I am impressed.
It’s interesting that they didn’t reorder the default order of the sections in Lightroom. I guess they feel that might be too disorienting. But, if they now suggest that AI Denoising be done first, they could change the default order or sections. Of course, all users can do that anyway.
Hi,
Useless to me :-(. I need to process files in TIFF (scanned image files) – so I am sticking to Topaz Labs Denoise AI – until Adobe can prove their Denoise works in TIFF and is better than Topaz Lab’s version. Hee hee.
Cheers,
TS
How does it compare to Topaz and DXo? Thanks!
Hi Colin. As always your vids are clear and to the point, but one thing always niggles me is ( and I dont mean just you ) but no one gives any info on the minimum requirements of your operating system? and all these lovely improvements seem to require more and more
That info is on Adobe’s website. But noted.
https://helpx.adobe.com/lightroom-cc/system-requirements.html
I did come across this new feature yesterday when I was editing some photos from a safari I recently took. . I loved it! When you are on a vehicle and the light is constantly changing it is hard to have to correct exposure all round. Thank you for always keeping us updated on the new features. I find your videos very clear and easy to follow.
Hello, newbie here!!
Do we know if this will affect images that your clients will print, or has this issue come up for you?
Hello! I get that it has to create a new file but where do I pull that file from to keep editing? It does its thing and nothing happens. Do I have to open the new file?
Wow, huge step change, well done Lightroom