
June 2014 Update to Photoshop (CC 2014)

Photoshop CC 2014 Release
(June 2014)
Adobe has announced the 2014 Release of Photoshop CC. This isn’t exactly the next “version” of Photoshop. With Create Cloud the promise was for incremental and frequent updates, rather than one huge update once a year, and there have been regular updates every quarter, The 2014 moniker is more of a mile marker, or reference point to creative Cloud. All the major apps in the Creative Cloud all have new features released on the same day, so it does allow a syncing point between the different applications and allows integration between some different applications.
We have been following the updates and covering the new features here at PhotoshopCAFE. So, as to be expected, I have assembled all the new features on Photoshop CC 2014 release (June 18 2014) and providing this “day of launch” guide so that you can be up to speed with what’s new and hit the ground running. I will be following up with more CC content as well as video based training.
There are actually quite a few new features in this Photoshop release and I will walk you through them here, as well as providing my opinion from time to time.
A good place to start is to watch the video below with an overview of my favoriate features. Then read the more detailed notes in the rest of this article.
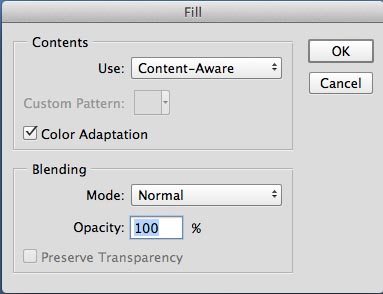
Content Aware
I’m going to kick-off with the content aware tools because this is what majority of people will get the most out of. If you are doing any retouching and haven’t been using Adobe’s amazing content aware tools, you are doing too much work! Content aware tools, such as Content Aware Fill are close to magic. You make a selection around an object that you want to remove and choose the fill option. Instead of filling with a color, content Aware tries to fill with the background as if the object wasn’t there in the first place. Its great for getting rid of blemishes, objects, people, power lines and a whole lot more.
As updates come out, content aware gets better and better. The biggest short-falling is when you are trying to remove something in a gradient or large area of solid color, but at a different tone than the pixels nearby.
The new secret weapon is called Color Adaptation. This tries to match the color as well as the tones and it does a really nice job. You can find it as an on or off option in Content Aware fill. It appears as an option setting in Content aware patch and content aware move.
Let look at some examples
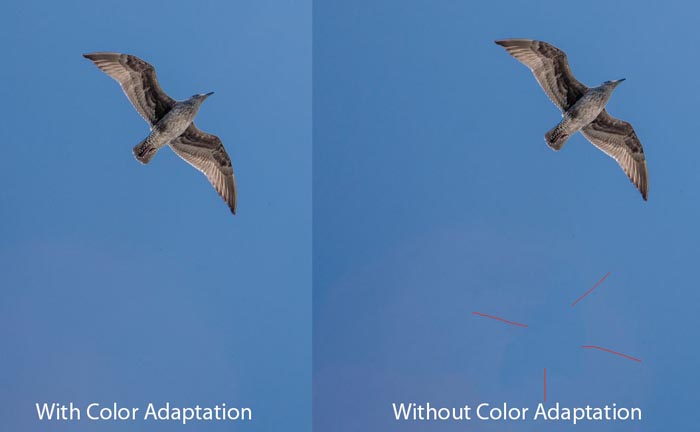
Let’s try a simple one first; we want to reduce the lens flare in this photo.

Make a selection around the 2 flares and choose Fill>Content aware (Shift+Delete / Shift+Backspace on Windows) choose content aware from the “use” option. This is the typical result. Not bad, but not perfect.
This time, turn on the Color Adaptation option, by clicking the box.

Notice the different result. Much better
Here is a side-by-side comparison. (Interestingly, these 2 images are the same brightness, the gradient in the blue is very deceiving)
Let’s look at something a bit more complex. In this wild-west picture it looks a bit strange to see the con-trails in the sky, considering airplanes weren’t supposed to have been invented then.

In this Image I have used the Patch tool in content-aware mode to remove the trails. Not bad, but far from good.

This time, open the options and see Structure and Color. I left structure alone and changed the color to 7.
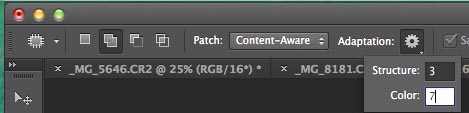
Notice the difference?

I am sure that you will get as much use out of this tool as I will.
Here is another thing about content aware in Photoshop CC 2014. The speed has been improved, a LOT! For larger areas that used to take a Month of Sundays, it’s now 400% faster than it was before. On smaller patches it’s so fast that it’s almost interactive.
If this was the only update, I would be glad, but alas, there is more.
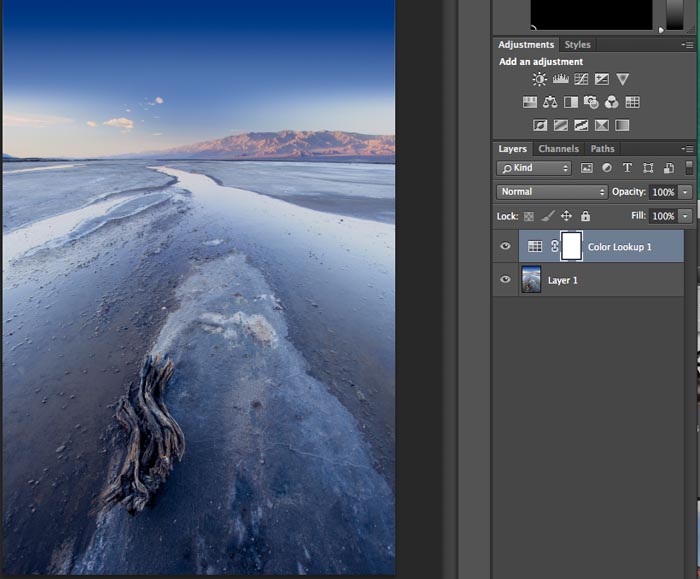
Color LUTs
A very overlooked feature that is huge in my opinion is the ability to create LUTs in Photoshop. LUTs are color Lookup tables. Used for a long time in video and visual effects, LUTs are relatively new to Photoshop and are like presets on steroids.
Imagine creating a “look” by stacking a number of adjustment layers on top of each other and varying the blending modes and opacity to get a particular “look” or feel for an image effect. This is something that compositors do all the time. Here is where a LUT comes in, you can now (for the first time) save all of this indo a files called a 3D LUT. This LUT can be imported into Photoshop as an adjustment layer and be reused, not just in Photoshop, but also in After Effects and Premiere Pro. This is huge!
Here is how you do it.
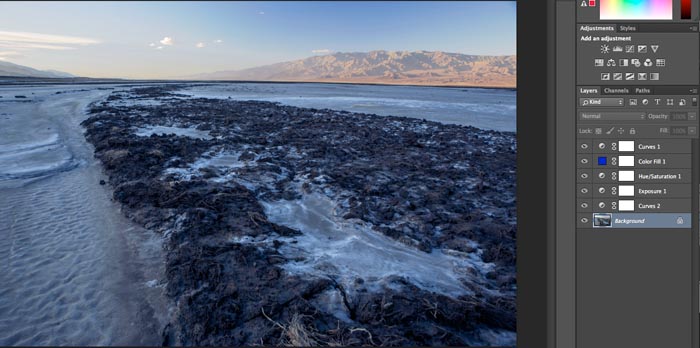
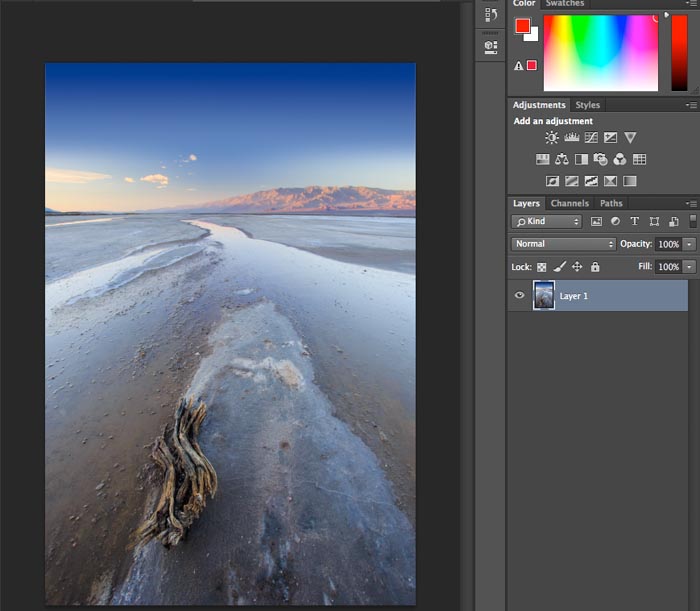
Here is an image where I have applied a number of adjustments, essentially creating a look. Note: You have to have a background layer for this to work.
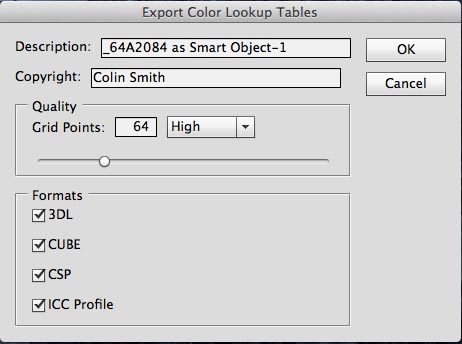
Choose File>Export>Export Color Lookup Tables
I chose High for Grid points. The default is medium. Higher number provide more accuracy, but they take longer to apply. However, compared to actions, they are fast.
Add description and copyright if you like. Choose the desired format (3DL for RGB) Click OK
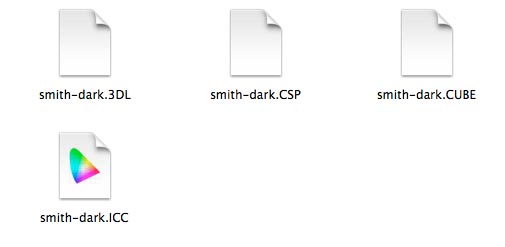
Because I had all the formats selected, you can see 4 Luts. The 3D lut is the format that works with an RGB file.
Open a photo that you want to apply a LUT to
In the Adjustment Layer choose color lookup…
Click Load 3D LUT
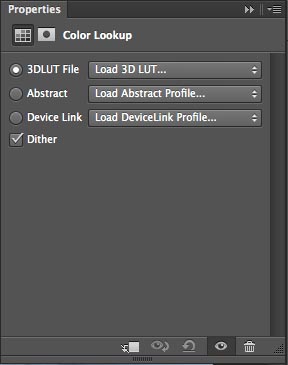
Navigate to your saved LUT and it will load up as an adjustment layer and you have an instant look. This is the Rolls Royce of Presets. I’m sure that all kinds of LUT packs will be springing up all over the internet soon. (I’ll probably add some to my next preset pack).
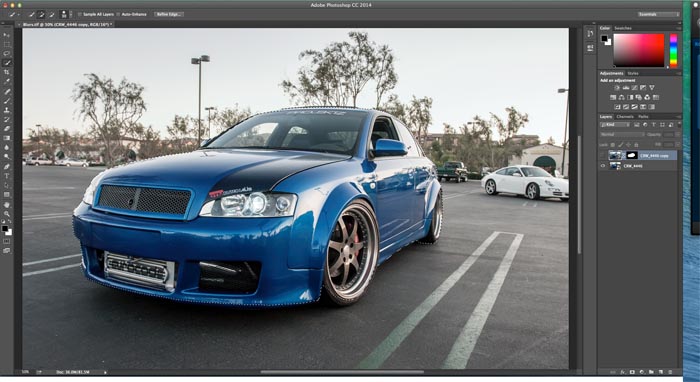
The latest Blur Gallery
A really great addition to Photoshop CC is the non-destructive Blur Galleries. Previously we had Field blur, iris blur and tilt shift. In the 2014 release of Photoshop CC, we have 2 new members of the family; path blur and radial blur. Rather than go into a detailed explanation, let me demonstrate what the new blurs do.
Path Blur
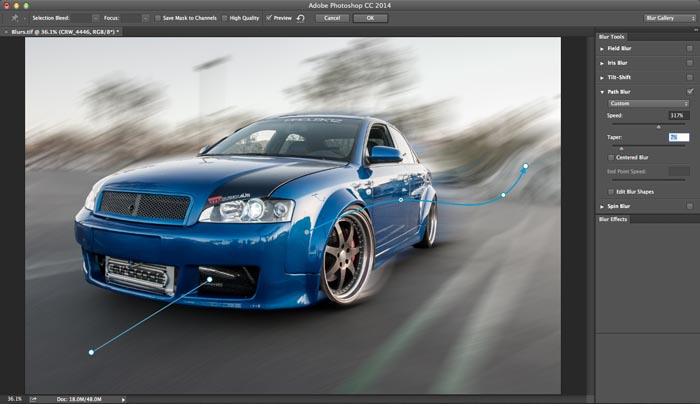
Here is an image of a stationary car in a parking lot. We are going to make it look like it’s in motion, going down a road. The first thing I did was to separate the car from the background using quick selection. So we are starting with a layered document. The background is the original photograph and the top layer is car by itself.
Select the background and Choose Filter>Blur Gallery>Path Blur
You will see an arrow with 2 points. This determines the direction of the blur and it’s strength. You can click a point and change the speed to change the blur.
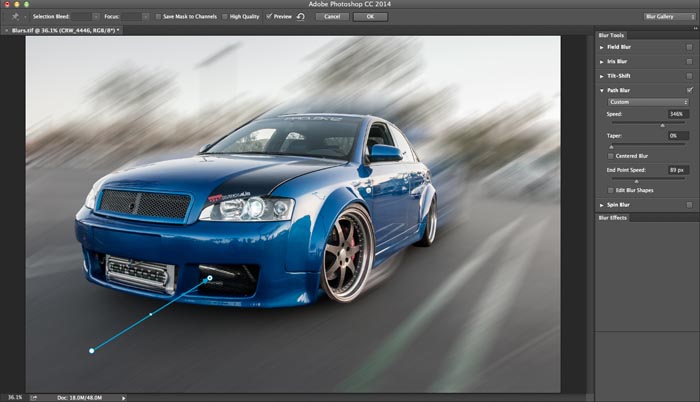
In this case, I turned off the centered blur option, so that I can control the streaks on the car. In this case, the blurring is constant.
Adjust the end point speed and the taper to change the way the blur works. In this case the Taper allowed me to control how much motion blurring occurs.
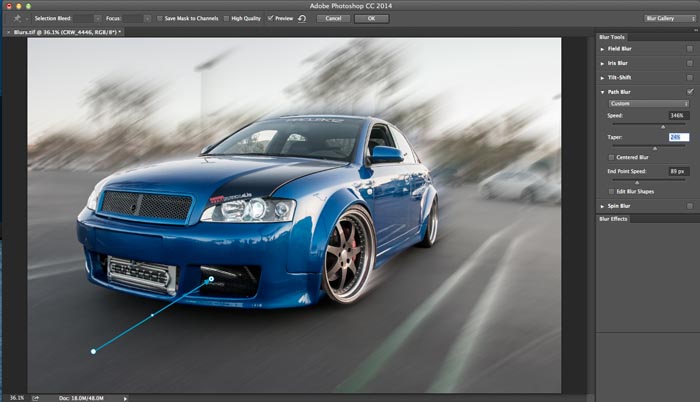
This is where the path blur gets interesting. I added a second blur and clicked on the middle of the path to create a point. Drag the point and you can bend the blur. I think the ability to apply blur to curves will prove very useful.
There wasn’t really a way to do this in Photoshoppreviously without a lot of time spent in liquefy, but you still couldn’t get the quality of the results with the path blur.
Radial Blur
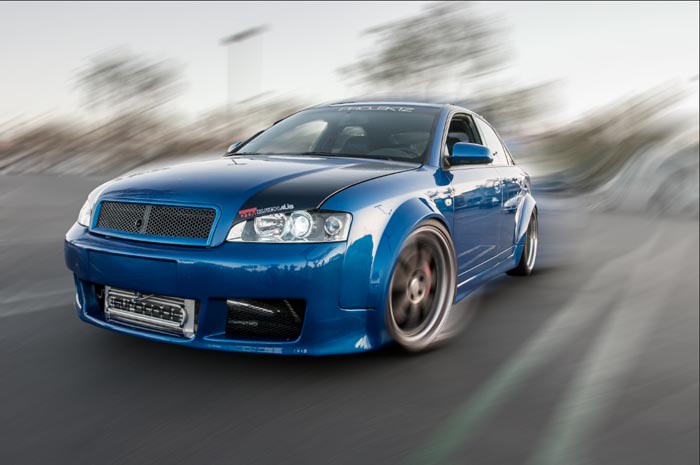
Continuing with the same example that we used before, lets make the wheels spin.
This time we are working on the top layer of the car.
Choose Filter>Blur Gallery>Radial Blur
You will see a round area of blurring.
I chose this angled image to really test the blurring, as it would be easy with a car that is side-on. (See it in action on the video at the top of this page)

Grab the points to change the location and shape of the oval.
Adjust the on screen slider to change the amount of blur and its feather. (The 4 dots control the feather).

I won’t get any awards for this driverless car, but you can see the capabilities of these new blur tools. I’m very excited to try them on real-artwork and I’ll post results in the galleries and create more detailed tutorials on these tools at a later date.
These tools take a little bit of getting used to, especially the path blur, but the results and potential are enormous.
Focus Mask
A new selection tool is always welcome in Photoshop. One of the most demanding tasks in Photoshop is masking. This enables us to remove a subject from its background, or isolate areas to apply filters to.
The Focus Mask is a tool that creates selections based on depth of filed, or areas that are in focus. I can really see this tool shining when combined with other selection tools in Photoshop. Let’s have a look and see how it works.
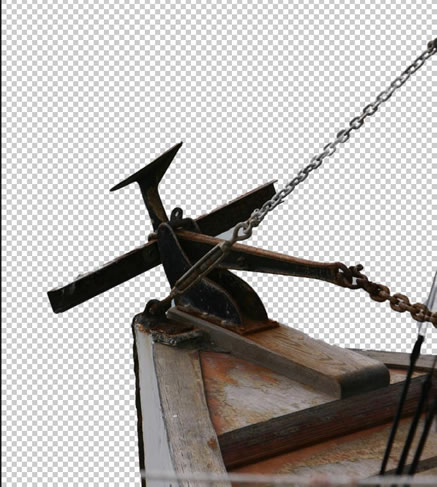
Let’s start with this image of the front of a boat. This was shot at f 2.8 so it has a shallow depth of field

Choose Select>Focus Area
The focus area is starting in auto made to try and get a selection. Turn on Auto if it isn’t.

This the result it gets without me doing anything. It’s not perfect, but I think it’s pretty impressive considering I haven’t done anything yet.

Change the In Focus range to see what you get. Moving to the left with select less whereas moving to the right will select more.
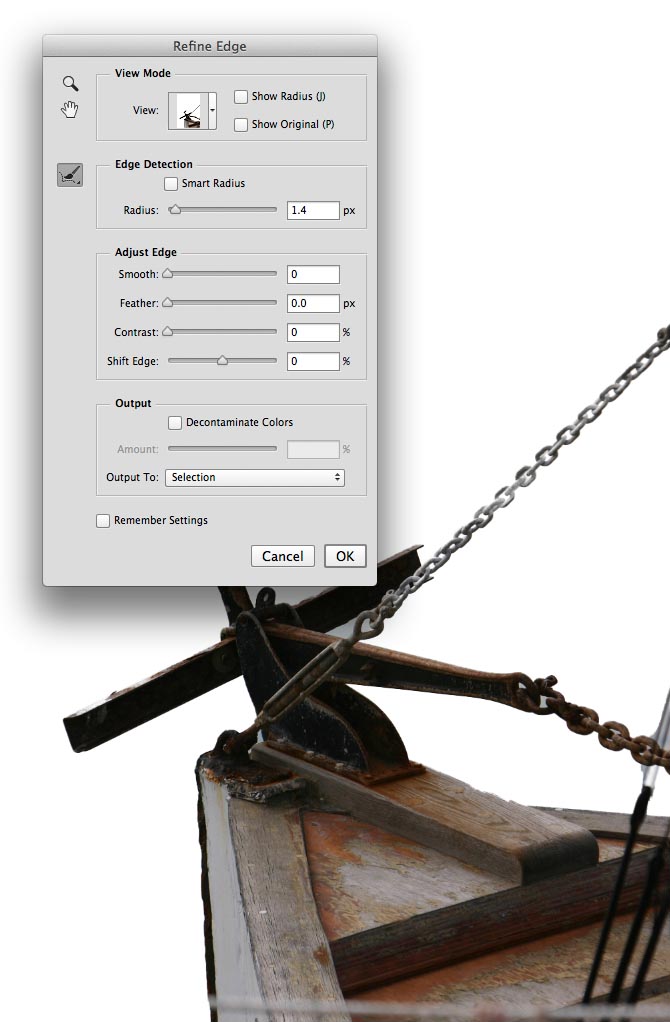
There is a brush that works just like the refine brush in Refine Edge.
Click and drag on the photo to add to the selection, or hold the alt/option key and paint on the image to remove for the selection.
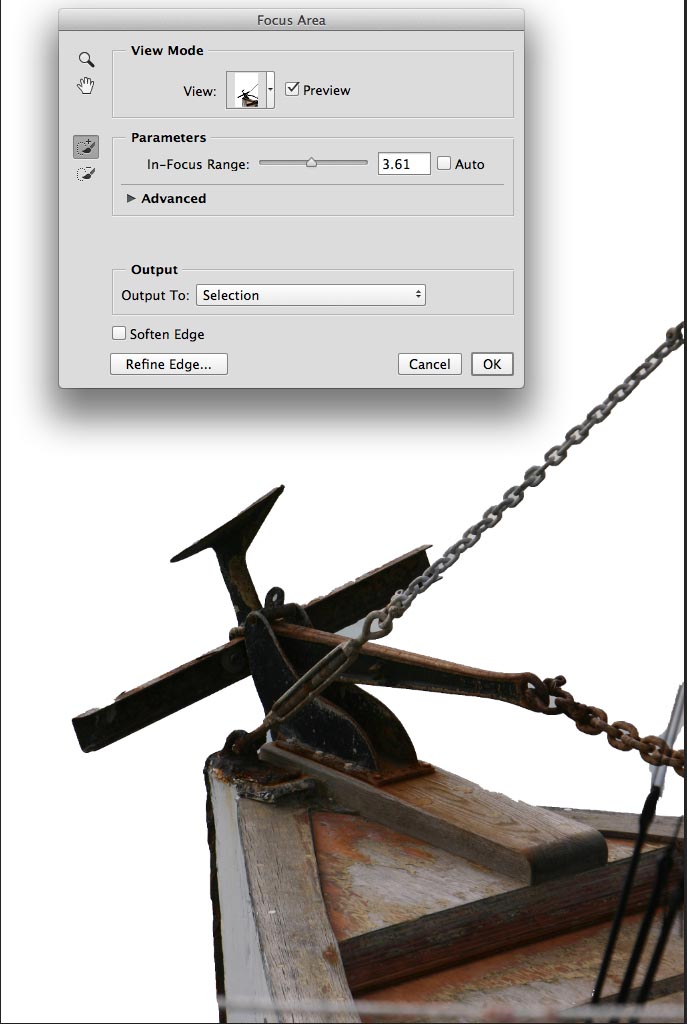
Notice that there is a refine edge option in the Focus Area, When you have the best selection you can get in the Focus area, choose refine edge to further enhance the selection.
Smart Object Enhancements
Smart objects are containers that hold a layer or a group of layers. They can also contain Illustrator files, Raw files and PDFs among other things. They are useful for making complex things simple by working on a single layer, rather than a lot of layers. They also allow for non-destructive smart filters and lots more. Adobe has really been working on Smart Objects in Photoshop Lately.
In an update earlier this year, the option to add a linked smart object was added. A linked smart object lives outside of Photoshop and the file can be shared with other Photoshop, InDesign and Illustrator documents.
This works much like it does in InDesign. The linked files can be updated and the update will ripple though all the documents that host it, much like a domino effect. This is useful for things that might be updated such as logos and placeholders that are works in progress. Update once, and all the documents are updated.
The new enhancements bring more of an InDesign-style flexibility to the Smart Objects. Let’s look at them now.
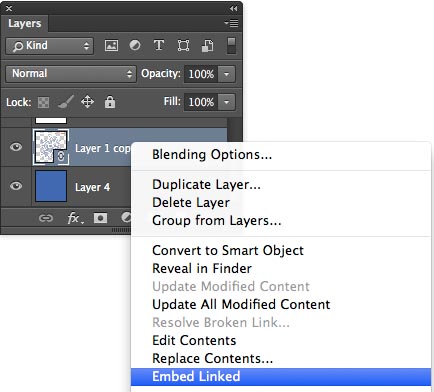
1. The way that Smart Objects have always been treated is as embedded, where all the files live inside the Photoshop Document. What if you want to extract these smart objects and turn them into their own files that can be used in other PSDs? Enter the Convert Embedded to Linked Smart Object.
With a smart Object Selected, right click and choose >Convert To Linked.
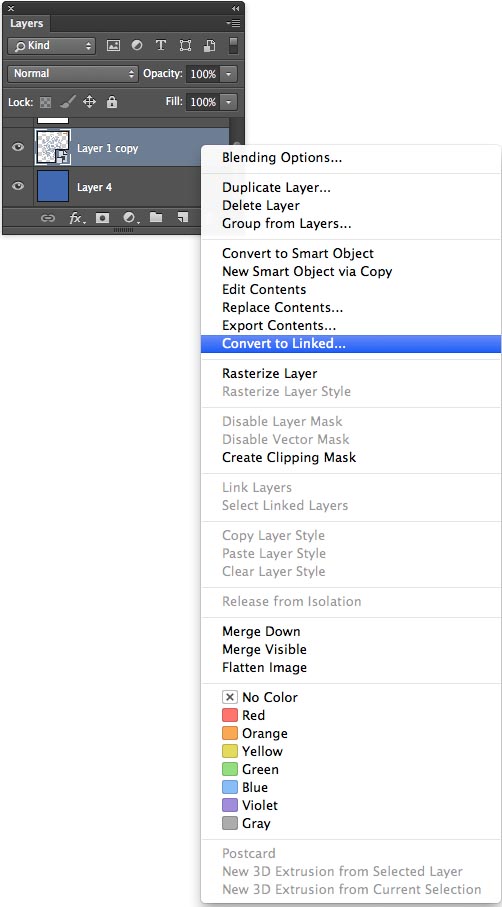
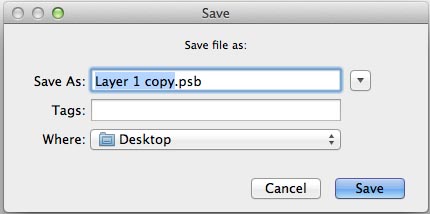
You will be offered a dialog box where you can choose a name and destination for the contents. They will be saved as a .psb file.
Of course this option is best if it can be reversed, so the option to Embed a linked Smart Object is also there.
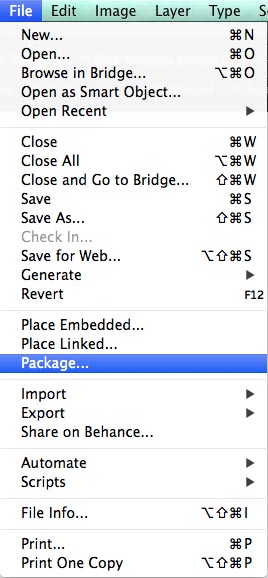
The final enhancement, which is very useful, is the ability to Package the contents. What does that mean? Say you have a Photoshop Document, with a linked logo, a linked Photo and a design that is a linked Illustrator file. You now have 3 separate files as well as the actual PSD that you’re working on. If you wanted to share the document in the old “embedded only” days, you just share the PSD, even if it does start to get very large with all the embedded content.
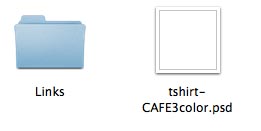
With a package, Photoshop grabs all the linked files and places them into a single folder along with the PSD, so that everything lives in one place and you can share the folder that contains all the assets.
To accomplish this, choose File>Package and then choose a location for your package,
Here you can see the psd alongside the folder of linked assists. This is useful for sharing as well as for archiving your projects.
Font enhancements
There are 3 main font enhancements.
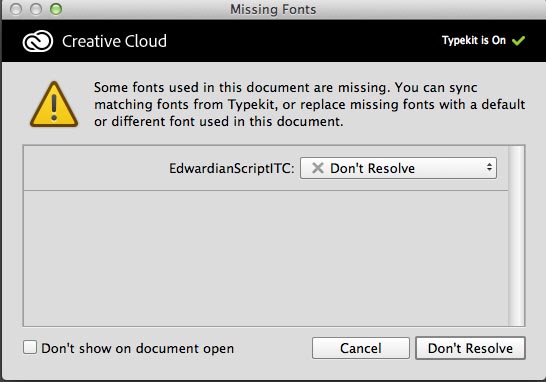
Replace missing font with typekit
If you open a document in Photoshop and it detects that fonts are missing, you have the option to get the font or a similar one from typekit. (Typekit is included in your Creative Cloud Subscription). If you choose this option, the font will be downloaded and installed for you.
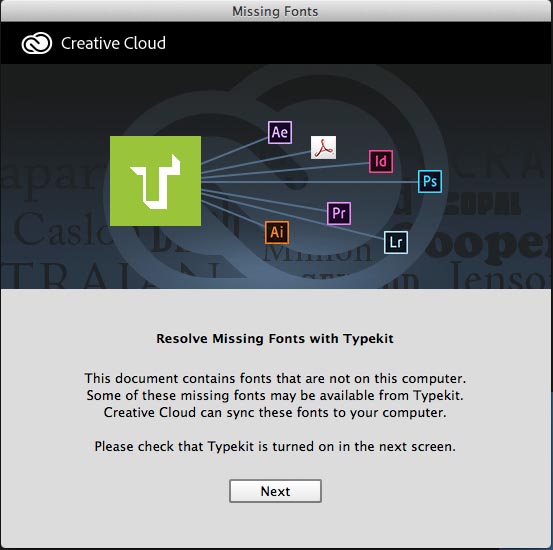
If you prefer, you can ignore this option and open the document as before and replace fonts as you need to.
Live Font Preview
Here is my favorite feature for fonts. It’s a live preview. As you scroll over the fonts, they will appear in your document in place of the selected type. This gives you a real preview of what the font will look like in your document. Tip: This also works for the font panel, so you can position things to your liking onscreen.

Font Search
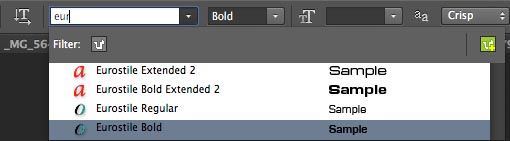
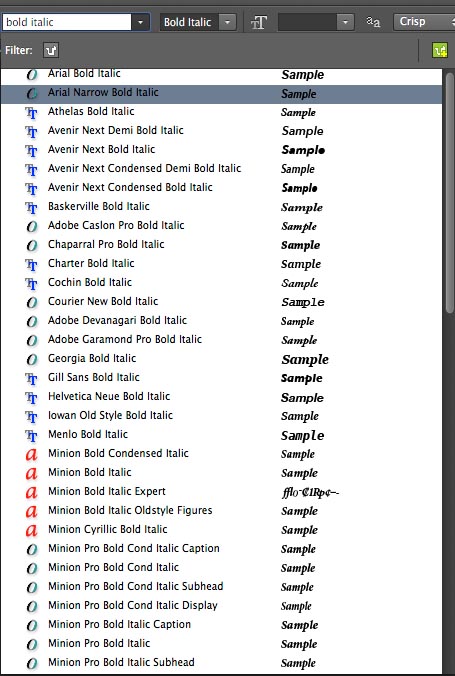
The 3rd enhancement is font search. You can now type in the name of a font and Photoshop will search all the installed fonts. If you are looking for the search button, you won’t find it. This is so simple, you may miss it. Just start typing into the font field in the options bar or in the Font panel. You can even search by font weights (bold, italic etc)
Sync Settings
Sync settings are very useful if you work with any actions or custom presets, such as brushes etc. You have the ability to share all your presets across different computers. This makes you right at home on another machine without missing some important presets that you may rely on.
The sync settings have really been improved in 2014. Previously, you could click in the bottom left of your Photoshop screen and have some of your presets sync with the cloud. Now more options have been added along with the ability to choose what you want to sync.
Choose your Preferences>Sync Settings.
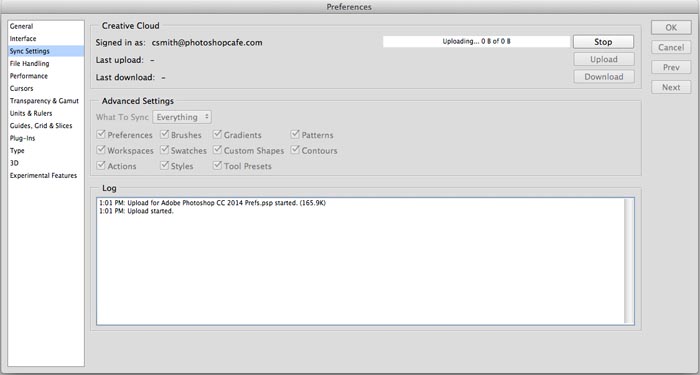
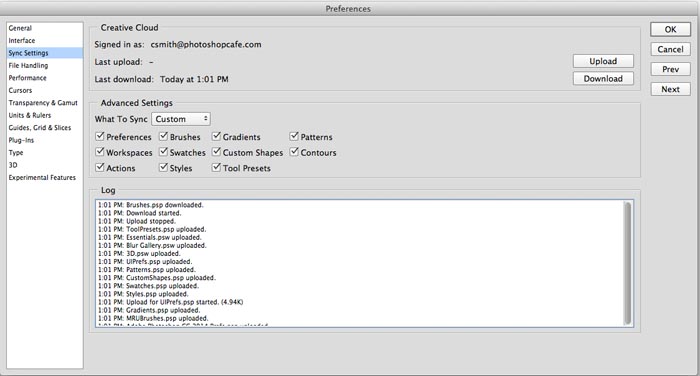
You will see options in the window including upload, download a log and advanced settings.
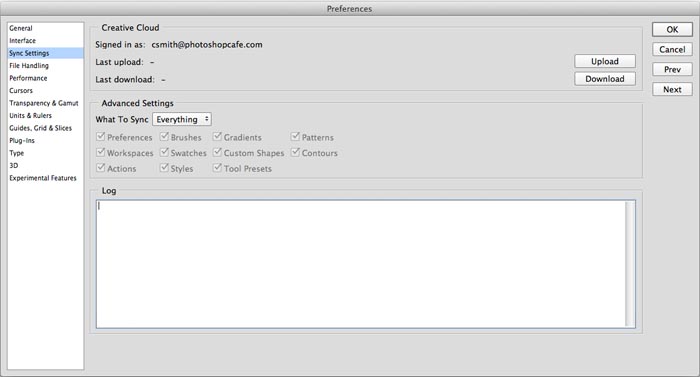
When you upload your settings they go up to Create Cloud where they are available for your other computers. If you download, you can bring down all your presets and set them up on your current machine. The progress bar will show activity when you are syncing, as well as a log of what’s synced.
The advanced settings allow you to choose which presets to sync. They are:
Preferences
Workspaces
Actions
Brushes
Swatches
Styles
Gradients
Custom Shapes
Tool Presets
Patterns
Contours
Change the options from everything to custom, so that you can turn individual preset syncing on and off.
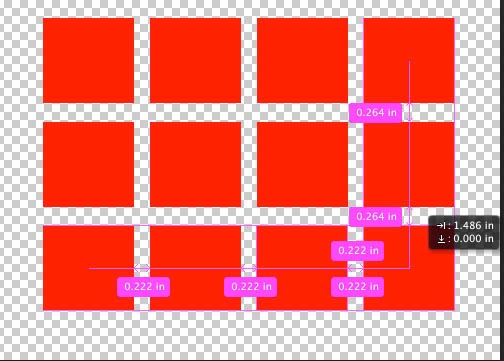
Smart Guides
Smart guides have been in Photoshop for a little while now. They provide a visual clue about the spacing between different things and help snap to things like edges and the center of objects. By default they are now turned on as opposed to being turned off before. This can be changed from View>show>Smart Guides.
There are 2 new features with Smart Guides.
1. When you Hold down the Cmd/Ctrl Key and hover over an object, you will see it’s spacing for the edge of the page. You can also nudge with the arrow keys to move the layer (when it’s selected).
2. When you are duplicating something in Photoshop, the fastest way to do it is to hold down alt/Option and drag out a copy. The Smart Guide will actually snap to an equal distance when you have more than 2 objects. It will also show you the edges, distance and center of each. This makes it very easy to create a grid objects that are all aligned perfectly.
Experimental Features
While in the preferences box. You may have noticed a tab called Experimental features. This is where Adobe can put in features that are still a work in Progress (AKA beta). If you see features in there, you can kick the tires on them and have fun, provide feedback, but they aren’t ready to rely on for production work yet. So use at your own risk.
Out of the current experimental features, I do use the Scale UI 200% for High Density displays. This basically makes Photoshop usable on the Microsoft Surface Pro machines. Previously, the interface was too small to be of much use. Kudos to Adobe for supporting the Surface Pro.
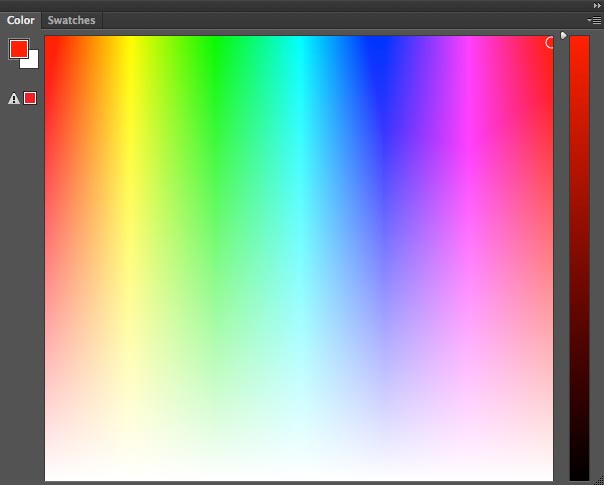
Color swatch.
You can now resize the color panel to create giant color swatches and select foreground and background colors right in the panel. Hue and Brightness color cubes have been added, This is useful for choosing a particular color with better visual accuracy,
There are more features in this release including: (From Adobe)
Improved Layer Comps (sync comps, select displayed comps in Smart Objects, new icons in panel to show what is tracked)
Expanded 3D printing capabilities (wider printer support, print in multi-tone, view mesh repair)
Improved Mercury Graphic Engine (OpenCL for Upsampling)
Other improvements and JDI:
- Basic SVG export supported through Generator (add .svg extension to vector layers)
- Ability to export to a subfolder through Generator
- Layer Copy CSS now supports Inner Shadow layer effects
- Added highlight to brushes to show last selected brush, and when modified
- Access most recently used Brush Presets in Brush context menu and Brush Presets panel
- Spectrum color picker in the Color Panel is now resizeable
- Added ability to export 3D LUTs
- Allow gradients with a single stop (saved single stop gradients will not work with previous Photoshop versions)
- Allow transparency dithering in gradients
- Create new gradient stop sampled from current gradient preview (option-click in preview)
- Native support (import only) for MPEG-2 and Dolby audio
- Support for new video formats including Sony RAW and Canon RAW
- Added Pin Edges to Liquify for warping in from the image edges

Top feature in Photoshop CC 2018. Check out the videos and written tutorials on the new features in Adobe Photoshop...

Explore the top new features in Photoshop 2026, Full release

By Jeff Foster Adobe has addressed many user requests in the release of After Effects CS6 and provided several powerful...


