
Photorealistic Interface – Part 3, creating the Liquid Crystal Display – Photoshop Tutorial

This is Part 3 of a 4 part tutorial
We are now exactly at the half-way point in finishing our interface, once you finish this tutorial though we will be 3/4 of the way through. If you have no idea what I’m talking about, you better go back and start at part 1.
This week we are going to create the Liquid Crystal display, complete with one of those cool VU meter doo-dackies. Yes we are making an MP3 player. Ok secrets out now.
1
Open the interface where we left off last week.
You should have a layer that is the shape of the screen. In this case its layer 2.
(If you don’t have it, use the magic wand tool to make a selection in the open area of the iface and create a new layer and fill with gray.)

2
Lets give it that LCD background look.
Filter>noise>add noise (no, that not how you play music in the mp3 player)
3
Now we need to give it a slight green tint.
Filter>adjust>Hue/Saturation or Cmd/Ctrl+U
Check colorize and use the settings shown here.

4
Your screen should look good now. (Look at the preview in step 5)
We want to add some of the display elements now.
Choose the custom shape tool, its under the rectangle tool if you hold down your mouse button. Choose the direct pixel option on the top toolbar. Click the shape and choose a triangle.
(If there is no triangle available: Click the arrow by the shape and the library will open, choose the arrow at the top right and choose all)
![]()
![]()
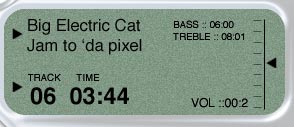
5
Create a new layer and add some arrows as shown.

6
Turn the right side of the screen into a balance meter.
Here is the easy way to create all the tick marks:
Create a single short dash using the line tool set to 1 pixel (under custom shape tool)
Hold down the alt/option key and drag out a copy of the dash. Repeat this until you have all the marks as shown. Don’t worry if its not perfect looking, we are now going to fix that.

7
You should see that each tick mark is on its own layer. Link these layers and only these layers. (In Photoshop CS2, the link icon has moved to the bottom on the palette, however you don’t need to link. In CS2 Hold down the Cmd/Ctrl key and click on all the layers to select them )
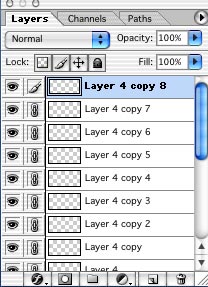

8
Now use the align/distribute buttons to align them perfectly. Choose the distribute vertically button. Don’t worry if you click the wrong button, that what the Cmd+Z button is for (undo)
When you are happy with the tickmarks, you can merge its layers of you wish by choosing merge linked.
![]()
![]()
9
Add the rest of the text such as play list etc, using the text tool.
10
Now it gets really exciting. We are going to make our VU /Level meter. There are lots of ways you could do this, but this is my method:
Make a selection around the area we want to add the meter.
Create a new layer.
11
The next step comes from my book: 101 different things to do with scanlines. Kidding, there is no such book. But if you don’t know how to make scanlines please take this quick primer:
Fill the selection with some scan lines.

12
If yours have black and white use the magic wand – turn off the contiguous setting – select the white and delete.
In short we just want some black scan lines.


13
Make a selection with the marquee tool and delete vertical strips.

14
Make more selections with the rectangular marquee tool/ Choose parts of the meter and hit delete. Ok this is very scientific, but it works!


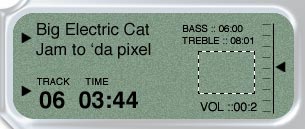
15
Finally you should have something that looks like this.
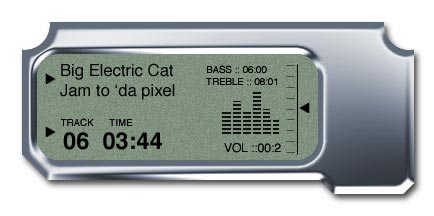

See that wasn’t so bad was it?
Tune in next week to the thrilling conclusion of the Interface Super-Tutorial.
We will be adding all the buttons and doing something to the screen to really make it look photo-realistic.
Will the interface escape the lab of the evil flatland? Will it get depth and texture? Will it ever see buttons and features? Tune in next week to the same channel and same time. Hang on to this psd, because we are going to continue with it next week and give it depth and texture.
If your having trouble , download the PSD here. iface-3
Photoshop VAULT
Access valuable Photoshop extras and goodies for free and much more a

PS Don’t forget to follow us on Social Media for more tips.. (I've been posting some fun Instagram and Facebook Stories lately)
You can get my free Layer Blending modes ebook along with dozens of exclusive Photoshop Goodies here

How to use Gradient Maps in Photoshop to instantly add a high-end color-grade to your photos. Free Photoshop tutorial.

NEW features in Lightroom Classic 9.3 June 2020 HUGE update! Learn how to use all the new Lightroom Classic features.
How to use the new features in the frame tool in Photoshop.


