
How to edit your photos in Photoshop CC. Any photo better in 4 easy steps
Enhancing photos in 4 steps in Photoshop CC
In this tutorial, I show you the 4 distinctive steps I take for every photo that I edit. This will enable you to make your photos pop with life. This is a mini masterclass in Photo editing in Photoshop.
I believe in this day and age, just really good shooting isn’t enough. Even documentary photos, have basic adjustments to correct tone, color and sharpening. After all, if you shoot in RAW you are getting a pretty flat photo compared to a jpg. However, raw gives the latitude to do more in post. Now, how far you push these techniques is entirely up to you. Maybe you just want to add minimum polish, and keep the photo “authentic”, or maybe you want to push hard and create a fine art print. I say authentic in quotes because what really is “authentic” in digital photography? Each camera is processing your photos through different filters and technology and producing an image that is distinctive to that brand. I shoot with a Canon 5D Mk4, Sony A7II, Fiji XT-10 and an iPhone and they all process images differently. // endRant. Also worth noting, I am not a purist, never have been and never claim to be. I want the best image I can get and I’ll use whatever I can to get it, including Photoshop.
Mini masterclass in Photo editing in Photoshop.
The video above walks though the entire edit and I also explain WHY I make the moves I do, I highly recommend watching the video. These written steps should serve as notes for you to use when you are processing your own photos. I also want to add, this is MY process. I don’t claim it’s the only process and it may vary from how you edit your images and that’s totally fine. After editing thousands of photos, this is the basic workflow I use. I may use different tools to tackle specific challenges or to get certain looks, but the building blocks are the same.
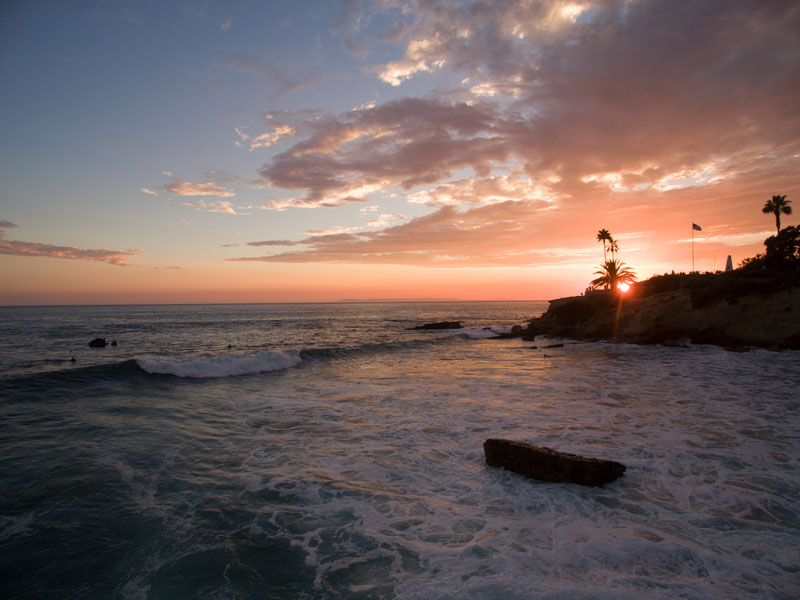
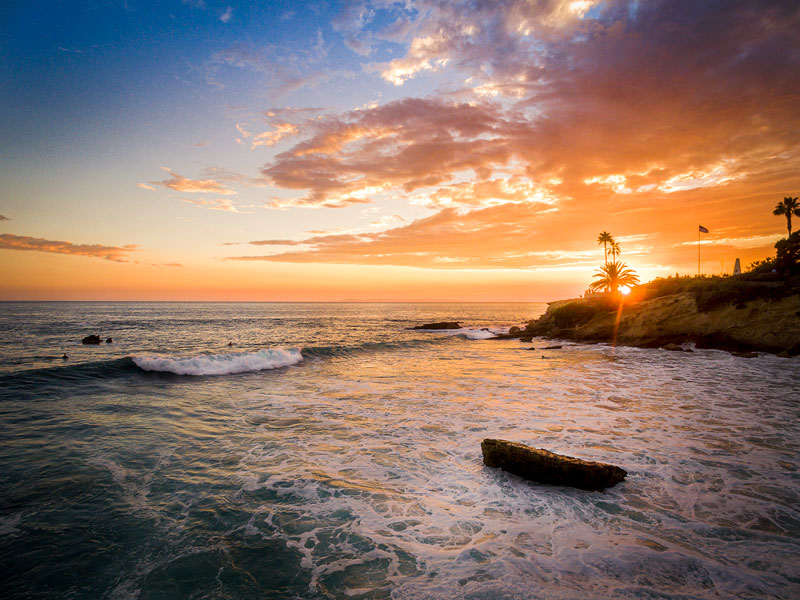
Here is the starting image, its an aerial photo that I shot several years ago from my DJI Phantom 3 drone. This isn’t a particularly great camera, The quality on my DJI Mavic 2 Pro is much better. My point here is that I’m not starting with a pristine photograph from the best and latest gear. These steps will work just as well for low end cameras and mobile phones, as it will for the latest and most expensive gear. I even follow these steps on commercial jobs working with a $50,000 medium format Hasselblad camera (But that wouldn’t be as relatable to the average photographer).
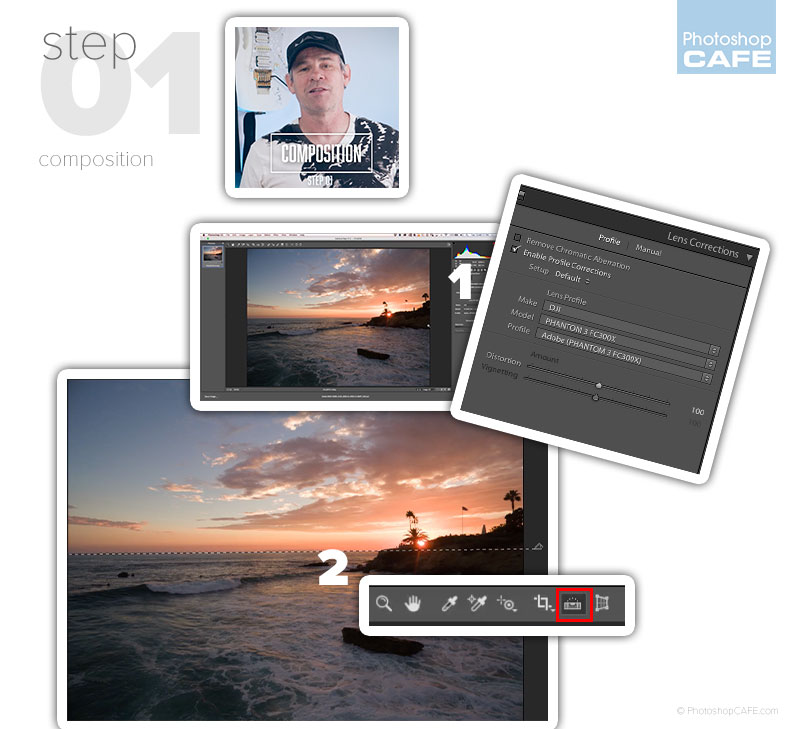
Step 01. Composition
The first phase, I call composition, This is where Ill do lens correction, straightening and cropping. I’m basically getting the basic photo ready.
Choose, Filter>Camera Raw filter. (If you opened a raw photo in photoshop CC, you will already be in Camera Raw).
(1) Go to the Lens Correction Tab. Turn on Enable Profile Corrections,
(2) Choose the straightening tool. Drag across the horizon to level the photo if crooked.
(Optional). Sometimes I’ll crop the photo, either to remove distractions, to make a better composition or prepare for a certain format such as instagram. (If you are posting to different formats such as IG or FB crops, then leave the cropping until the end, so you can also save a final uncropped image.
This is also where I would do any retouching if it were required. Object removal etc. I have so many tutorial on this, please search PhotoshopCAFE for those, or browse our library of free tutorials.
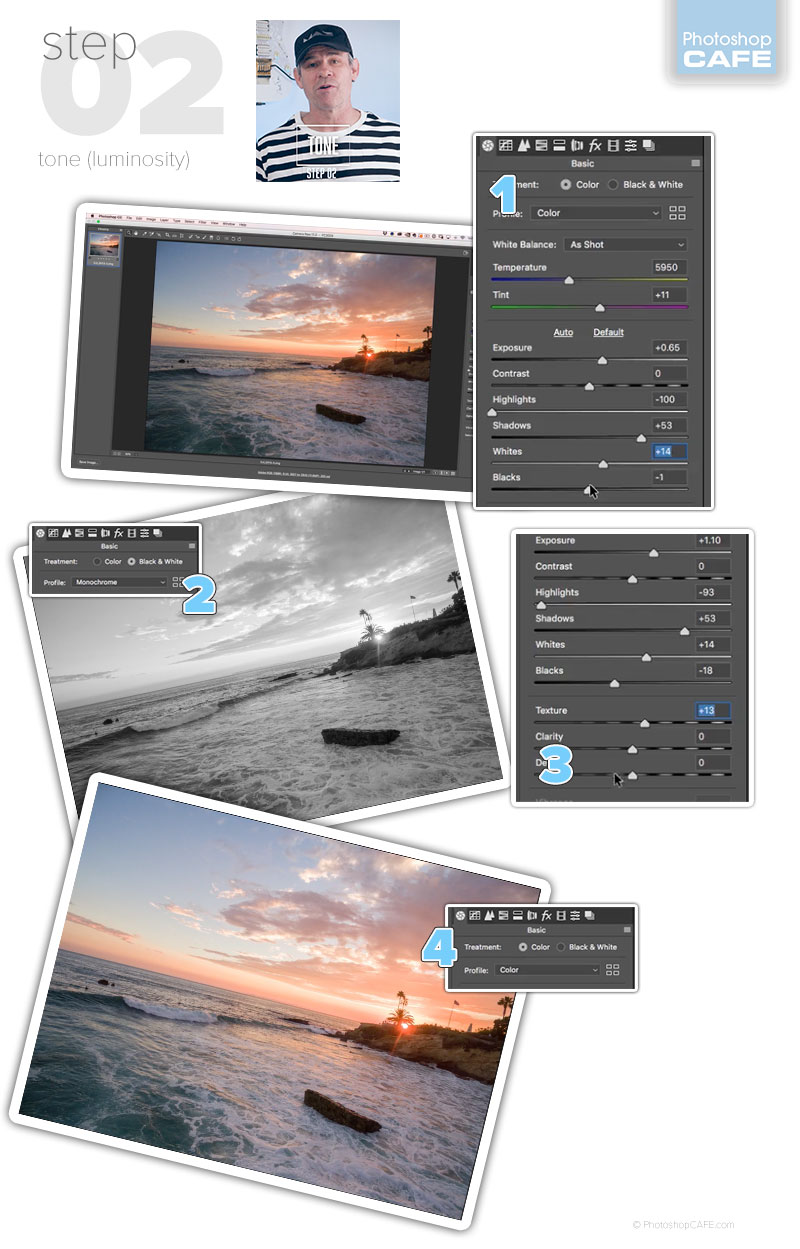
Step 02. Tone adjustments
The next phase is tone. (Notice in the video, I wear a different shirt for each step, this makes it easy for you to scrub through the video).
Tone is getting the brights and darks set. The light and dark values are also commonly called: Luminosity, luminance, luma or brightness.
(1) Here are the settings on the Basic panel.
- Choose an overall brightness with exposure
- Use highlight to recover detail in bright areas such as sky.
- Shadows open up the darker areas and bring out shadow details (Tip: I like to go easy on this slider and opt to push the exposure up and compensate with a high Highlights setting, it often gives a more natural result).
- Set the blacks and whites to set the overall contrast of the photo (the punch).
(2) Here I have clicked on black and white. This hides the distractions of color and enables you to more accurately adjust the tones.
(3) Add a little texture (added in CC 2019) I prefer this to clarity, because clarity makes the outlines too thick in my opinion – personal taste.
(4) turn the color back on
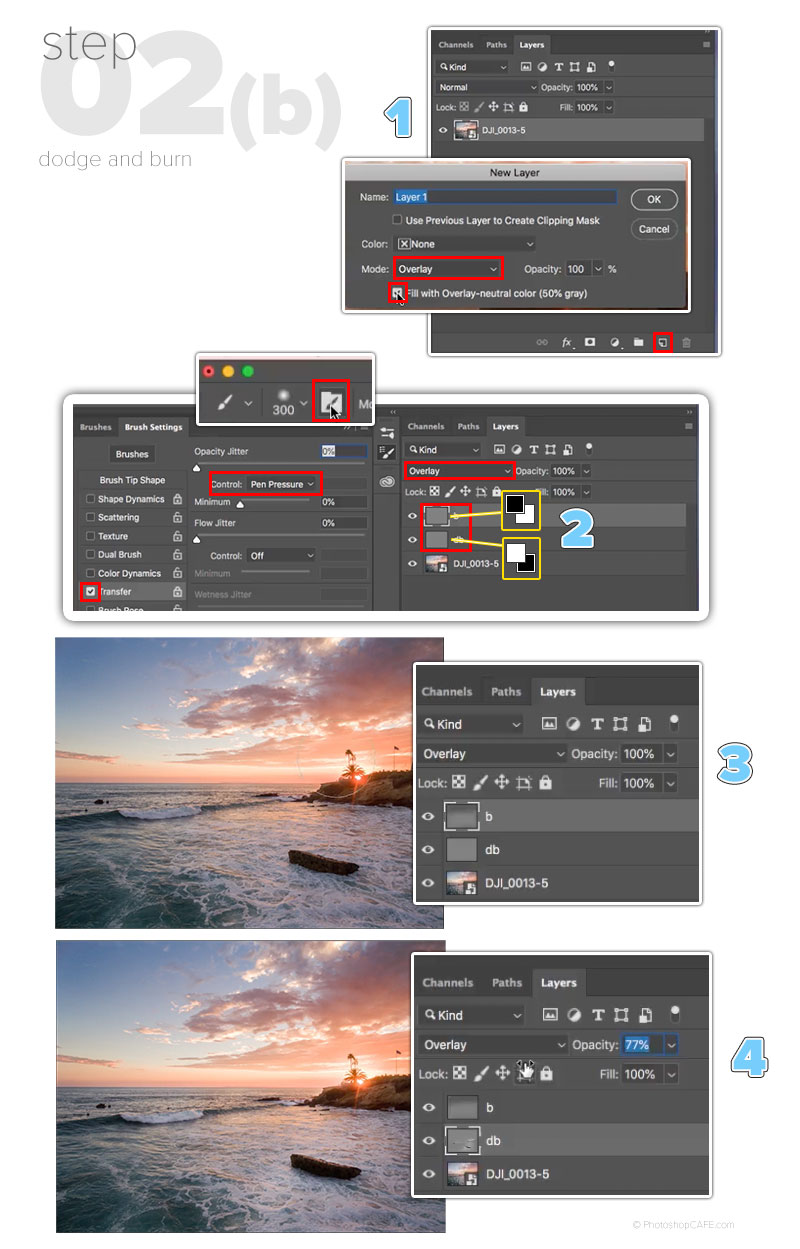
Step 02b. Dodge and Burn
You may have heard the term dodge and burn. Its a darkroom term, more detailed tutorial on D+B here. This is lightening and darkening the photo as well, but instead of the whole photo (global), we paint on the light and shadows exactly where we want them (local), so we can target smaller areas, or change the overall light distribution in the photo. You can dodge and burn directly in Camera Raw, but I prefer the control I can get with layers and Photoshop brushes.
(1) Hold down Alt/Option as you create a new layer. This brings up the new Layer with options.
Change the blending mode to overlay mode + optional: Turn on Fill with gray (In-depth tutorial on Layer Blending modes, and free ebook here)
(2) Click ok and you will have a gray layer. Name it Dodge, or lighten. Press Cmd/Ctrl+J copy the layer and name the new layer Burn or Lighten.
Choose a soft edged brush and set the opacity low, to around 10%. If you are using a pressure sensitive tablet, such as a Wacom, choose Transfer from the Brush options and set Opacity to pen pressure.
(3) You will paint with black on the burn layer to darken the photo or paint with shadow. With a large brush, darken the top of the sky and bottom of the image to draw the eye into the action.
(4) You will paint with white on the dodge layer to lighten the photo or paint with light. Here, I’m painting a light path, where the sun is illuminating the subject. This is explained a little better in the video at the top of this page.
Step 03. Working with your photo color in Photoshop
The tones should be set now. Lets work on the color.
(1) The first thing we are going to do is wrap up the Dodge and burn layers into a smart object. Select all the layers and right click in the layers panel and choose Convert To Smart Object. (Click the padlock on the background to unlock the background if Convert To Smart Object is grayed out). Smart Objects let you adjust all the color together and still have the flexibility to go back to the layers later. I have prepared a tutorial here, where I use potatoes to explain Smart Object, I guarantee, you will understand them after this.
(2) Set the overall color balance with the temperature slider. I have made the sunset photo a little bit warmer. (You can also use color profiles, I have a tut here)
(3) Use the Vibrance to boost the colors a little bit.
(4) here we have used HSL to make the sunset and water pop a little bit more. For some peoples taste, I may have gone too far, but I like this and am known for it with my style of aerial photography. You will develop your own style over time and don’t be put off by varying opinions of others, If we all liked the same thing, there would only be a single flavor of ice-cream, or jam in the world.

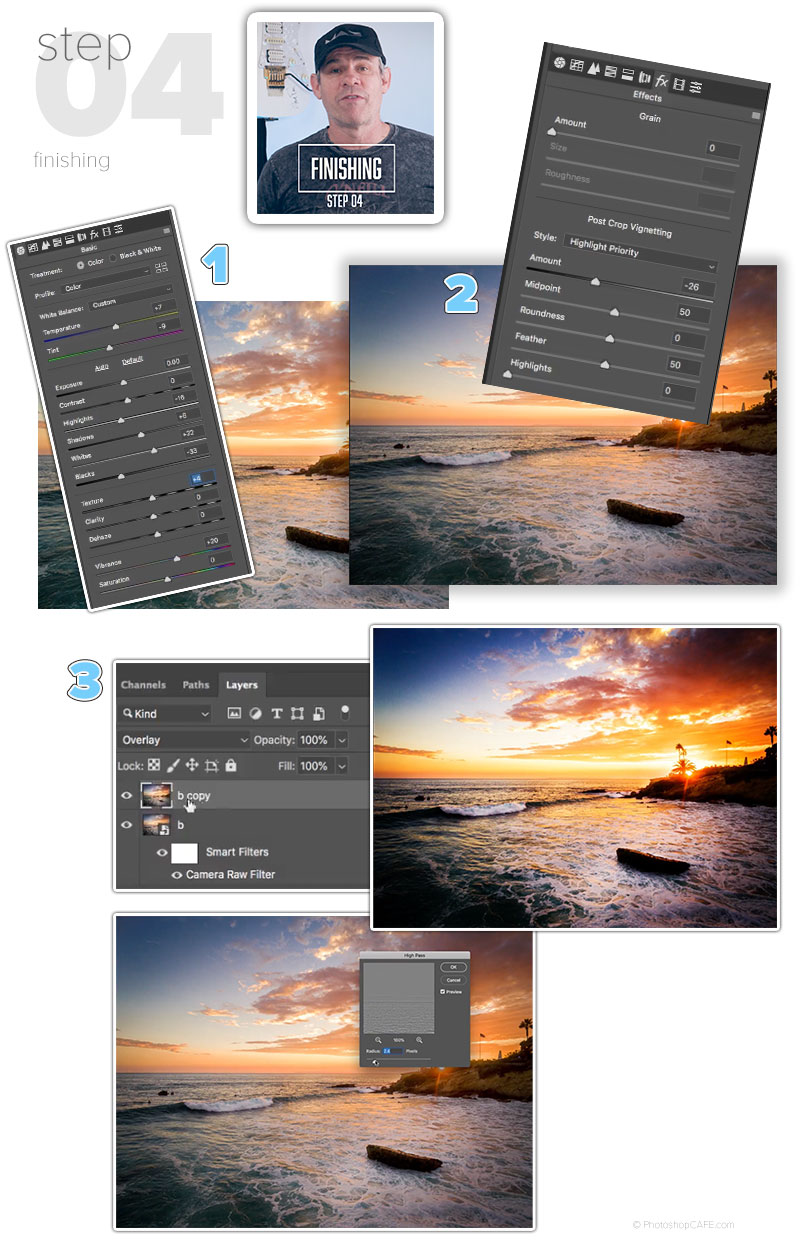
Step 04. Finishing
This is where we take another look a the photo as well as applying all the finishing touches. One thing I often do, is take a break, I walk away from the screen for a while, so I can see the image with fresh eyes.
Choose Filter>Camera Raw. Back to Camera Raw.
(1) Take another look at the Basic adjustments and make tone and color tweaks.
(2) Sometimes a Vignette can make a photo look good by darkening the edges. Not always, but sometimes.
(3) Now we are going to use an advanced technique to sharpen the photo, This in High Pass sharpening, full tutorial here.
Press Cmd+Shift+Option (mac) Ctrl+Shift+Alt (Windows). This will create a new flattened layer of the visible image on the top of the layers panel.
Change the blending mode to Overlay
Choose Filter>Other High Pass.
Move the slider to control the amount of sharpening. The advantage of this layer, is you can easily make out the sharpening exactly where you want it (You can also do this with smart filters) and I think it looks a little bit better than unsharp mask.
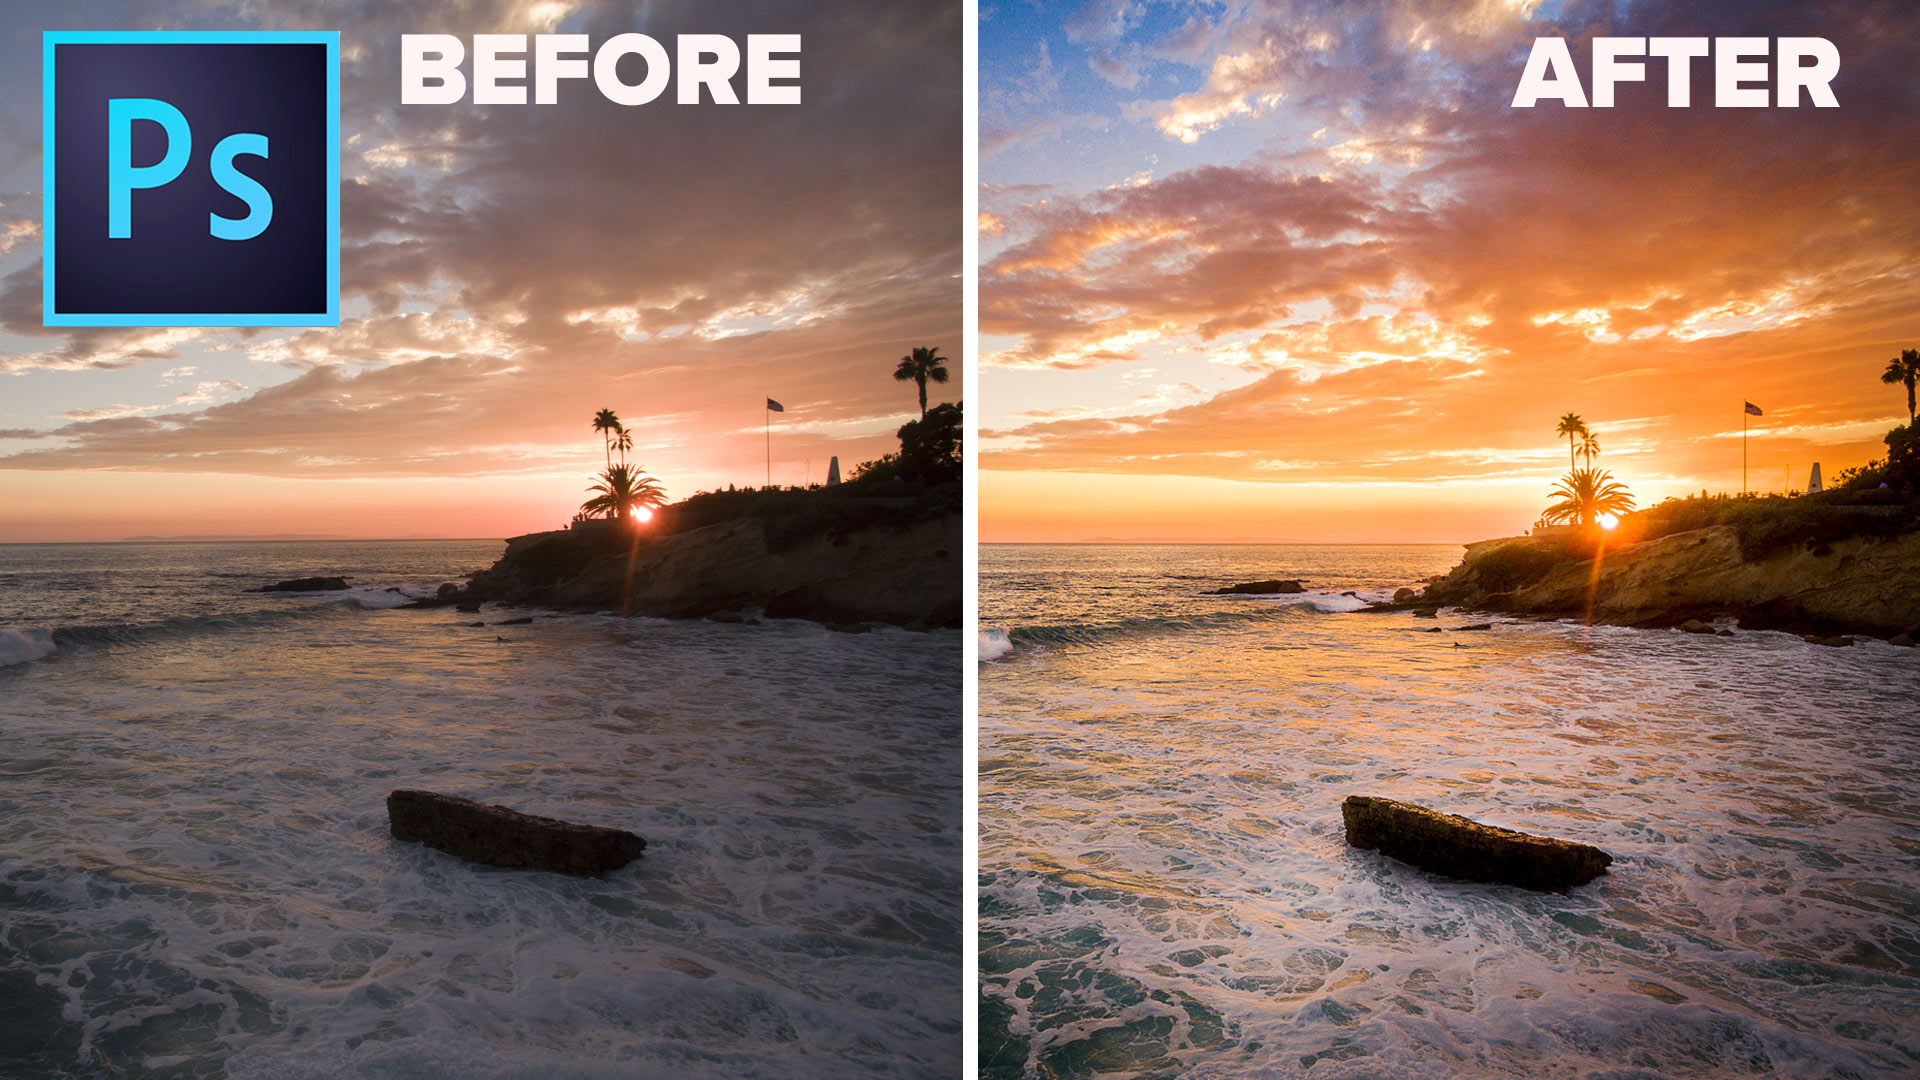
And here we have our finished photograph.
You can see before and after side by side here.
I hope you all enjoyed this weeks written and video tutorial here at the CAFE.
I enjoy making these for you. As time permits, I’ll keep making one each week. Drop a comment and let me know what you would love to learn in photoshop. Also don’t forget to check out my premium tutorials, it’s what supports this website and enables me to do what I do,
Thanks
Colin
PS Don’t forget to follow us on Social Media for more tips.. (I've been posting some fun Instagram and Facebook Stories lately)
You can get my free Layer Blending modes ebook along with dozens of exclusive Photoshop Goodies here

3 thoughts on “How to edit your photos in Photoshop CC. Any photo better in 4 easy steps”
Leave a Reply

An essential, but unknown tip for using Harmonization to match colors between layers in Photoshop. Match image color in Photoshop...
How to edit a photo and give it a fine art, painterly effect in Photoshop.

Check out all the new Photoshop features in Photoshop 2024 July update


Love the sky changes!
Could not believe the number of uses of Camera Raw instead of using adjustment layers…excellent!!
I really liked your content and subscribed your youtube channel, so keep it up and keep moving on, and stay blessed