What’s New in Adobe Camera Raw 19 (2027) New Features Explained

What’s New in Adobe Camera Raw 19.0: All the Big Features
VIDEO COMING LATER TODAY!
Check out the other 2027 updates:
Adobe Camera Raw just got one of the biggest updates I’ve seen. Not just some big features, but the sheer amount of new features is staggering.
I’m going to show you what’s new in Adobe Camera Raw 19.0 (2027), including some features that have been requested for years.
I’ll move through them fairly quickly. If there’s a feature you’d like me to explore in more detail, let me know in the comments and I’ll consider making a dedicated tutorial.
Let’s jump in.
A new workspace in Adobe Camera Raw
Let’s start in Adobe Bridge, this is how you get multiple images into ACR. Select several photographs, right-click, and choose Open in Camera Raw.
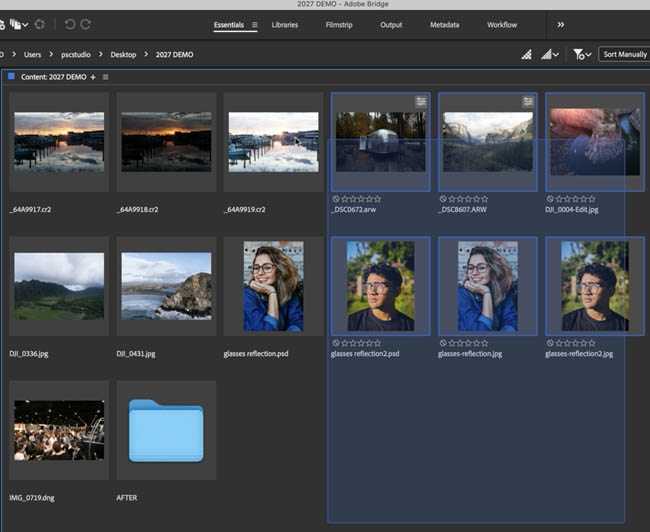
Here we are in Adobe Camera Raw 19.0.
Notice something new at the bottom of the interface? We now have a grid view.

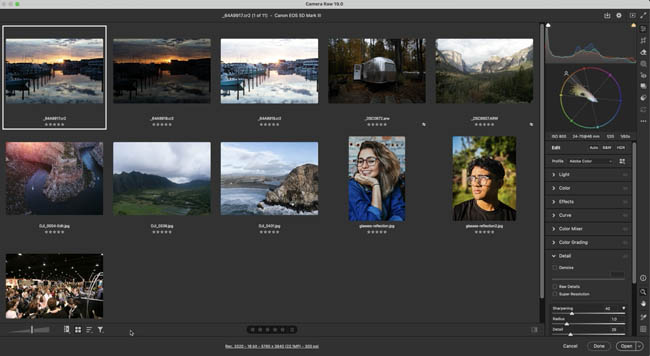
Yes, we’re still in Camera Raw, but this is starting to look a little like a mini Lightroom or Bridge.
Instead of only editing one photograph at a time, we can view and organize multiple images right inside Camera Raw.
Create stacks in Camera Raw
One of the new features is the ability to organize images into stacks.
In the grid, click the first photograph.
Hold Shift and select the other photographs you want to group.
I’m selecting three images here.
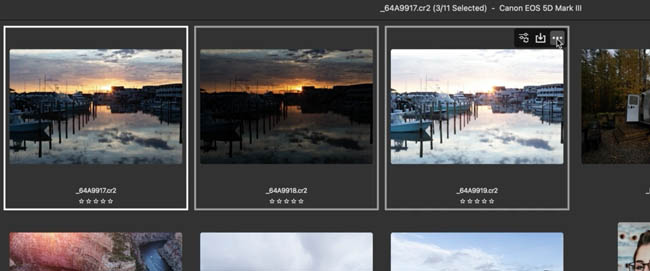
Right-click and choose the option to Group into Stack.
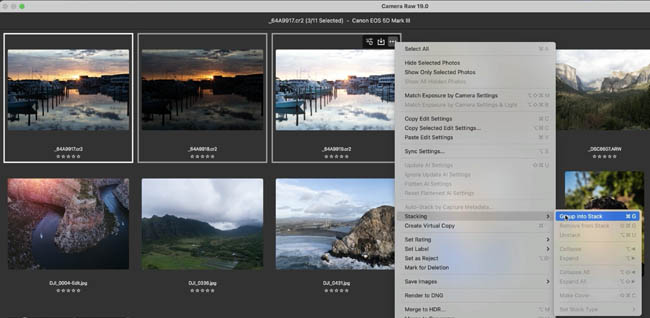
Look at that. We now have a stack inside Camera Raw.
We can collapse the stack to keep the workspace clean, or expand it when we want to see the individual photographs.
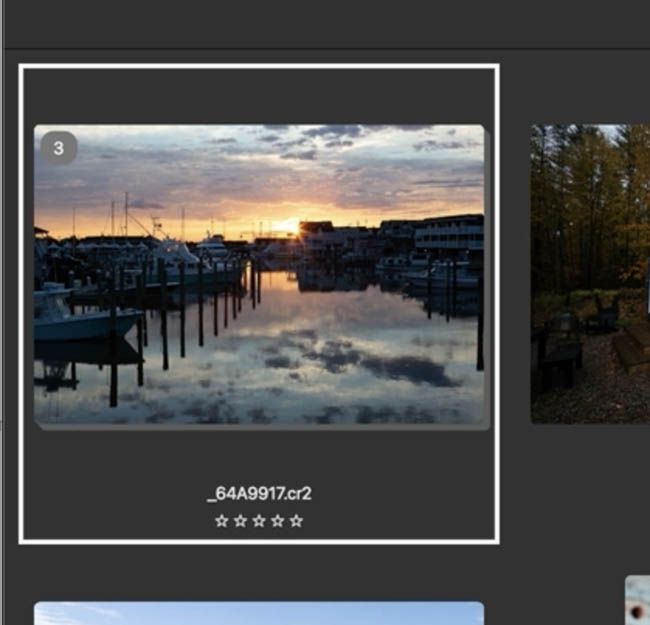
Camera Raw remembers your stacks
You might think these stacks are temporary and will disappear when you close Camera Raw.
I test it in the video above and the stack information is preserved, so we don’t have to organize everything again each time we open these images.
Virtual copies are finally in Camera Raw
Here’s another big one.
We’ve had virtual copies in Lightroom for years, but now we can create them in Camera Raw.
Right-click on a photograph and choose Create Virtual Copy.
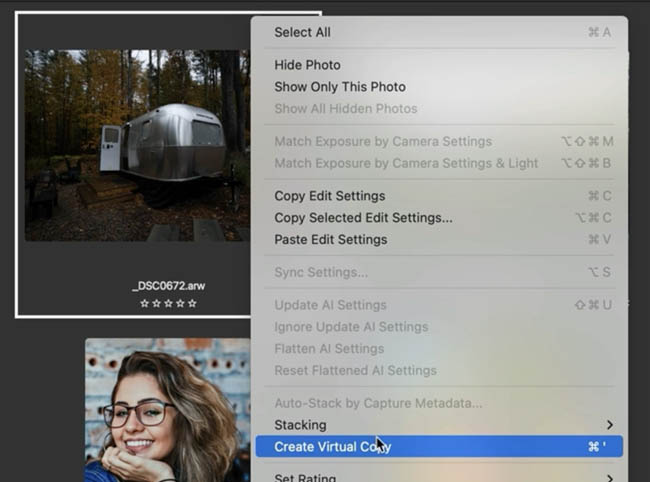
Notice that we now have another version of the photograph.
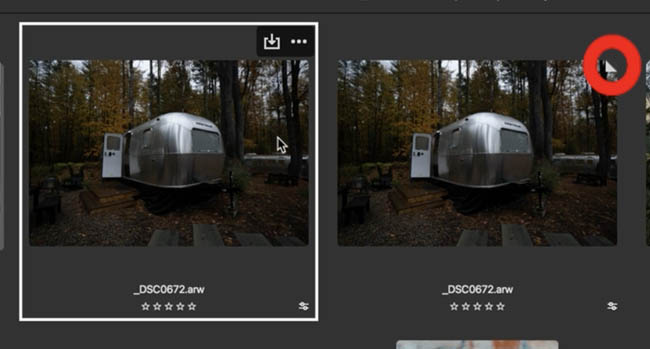
A virtual copy lets us experiment with a completely different edit without duplicating the original image file.
I could try an edit with the Virtual Copy, and still preserve the original.
Where are virtual copies stored?
For a proprietary raw file, this information is stored in the XMP sidecar file. With a DNG, it is stored inside the DNG itself.When we reopen the photograph with its saved settings, our virtual copy is still available.
Tip: If you’re moving a proprietary raw file to another computer or drive, remember to include its XMP sidecar file when applicable. Otherwise, the Camera Raw settings and virtual-copy information won’t travel with the photograph.
One more thing I like about the new workspace: we can still access the editing controls while viewing our photographs in the grid.
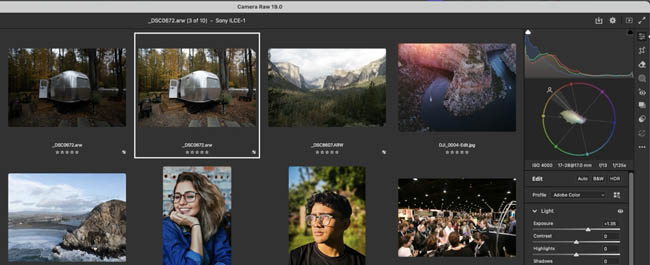
We can zoom in, zoom out, make adjustments, and continue working without constantly changing views.
All right, let’s move on to some image editing features.
AI Denoise now works on JPEGs
I’m opening a photograph that was taken at a high ISO. Zoom in and look at the noise.
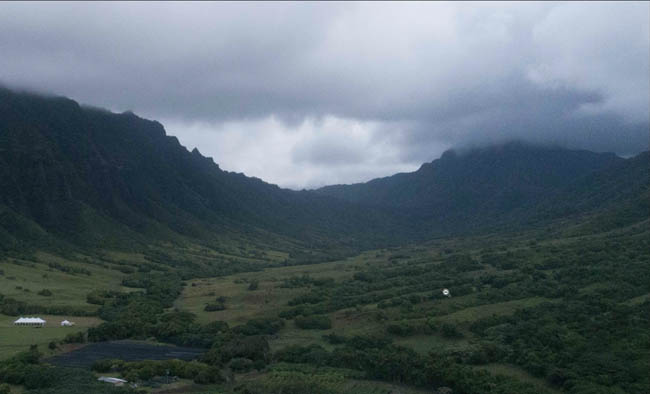
There’s quite a bit of grain and unwanted noise in the image. Normally, we’d use the noise reduction controls to clean it up since it’s a jpg.
Go to the Detail panel and find AI Denoise is now available for Jpg, not just Raw anymore.
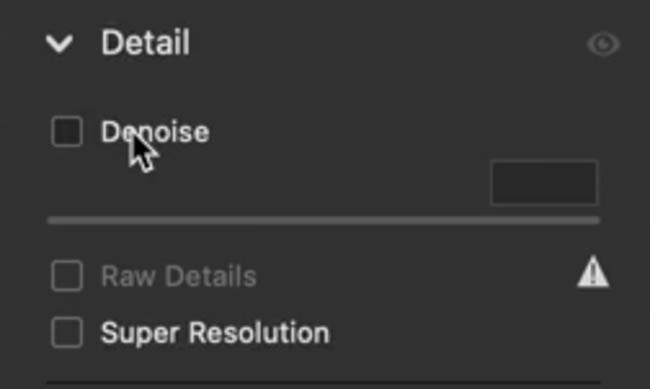
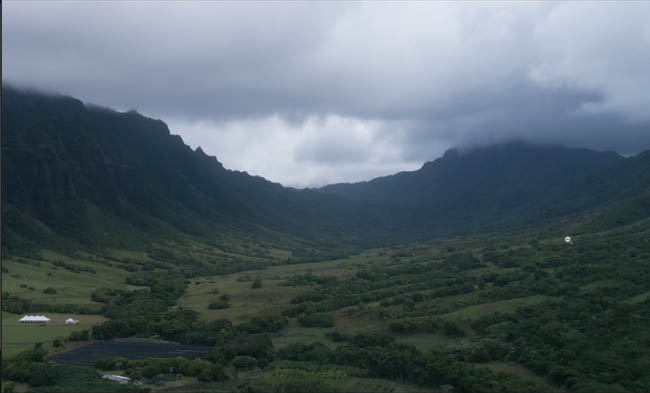
Notice how Camera Raw cleans up the noisy areas, you can use the slider to adjust the amount of noise.
Depth Range masking no longer requires a camera depth map
Let’s look at another really useful addition.
Open the Masking panel and create a new mask. You may already be familiar with Range Masks.
We can restrict adjustments based on color or luminance, and we’ve also had Depth Range for photographs, usually shot on portrait mode on a mobile phone, because they create a depth map.
But here’s what’s new.
We can now use Depth Range on ordinary photographs, even when the camera didn’t capture a depth map.
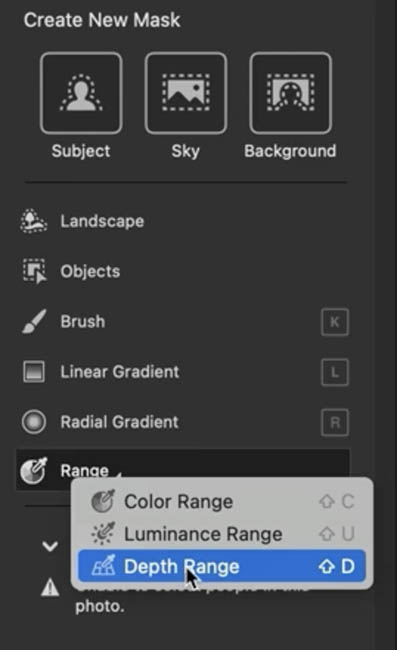
I’m using a JPEG for this demonstration.
Choose Depth Range.
Camera Raw analyzes the scene and creates its own estimated depth information.
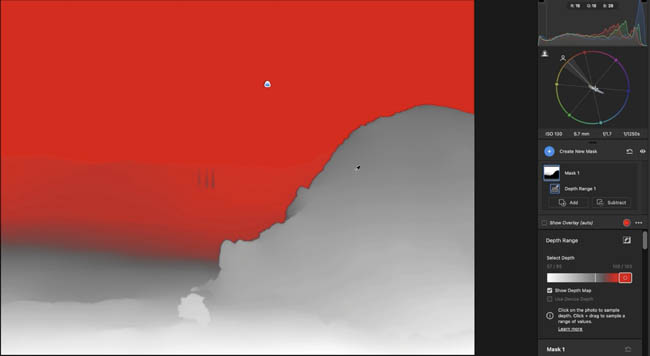
Look at that. We’ve got a depth map.
Instead of selecting an object based on its color or brightness, we can now select areas based on their estimated distance from the camera.
Adjust the background using a depth mask
Let’s create a mask that affects the background.
With the depth range selected, adjust the mask until it covers the area we want. I go a little deeper into this on the Photoshop 2027 new feature tutorial here.
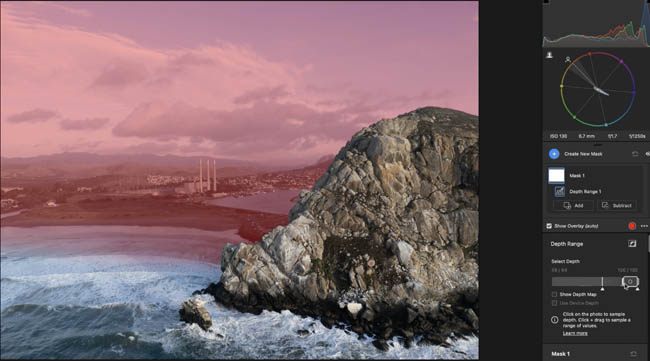
Now we can change the exposure or color of that area.
For example, I could darken the background a little to create more separation from the foreground.
Or I could make the background cooler or warmer.
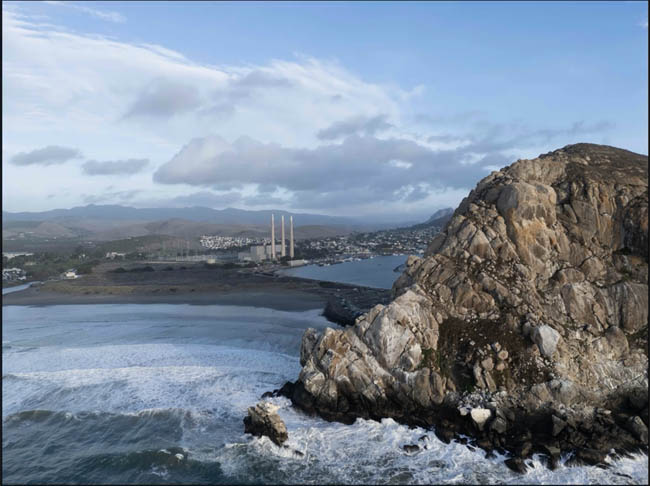
Notice that we’re not painting around all the objects individually.
We’re using Camera Raw’s depth map to help separate different parts of the photograph.
This is another way to create masks, and it’s particularly useful when color and luminance don’t give us the separation we need.
Tip: Because Camera Raw is estimating the depth, check the mask around overlapping objects and complicated edges. The estimated depth won’t always be perfect.
Remove eyeglass reflections automatically
Here’s something people have been asking about for a long time. Removing reflections from glasses.
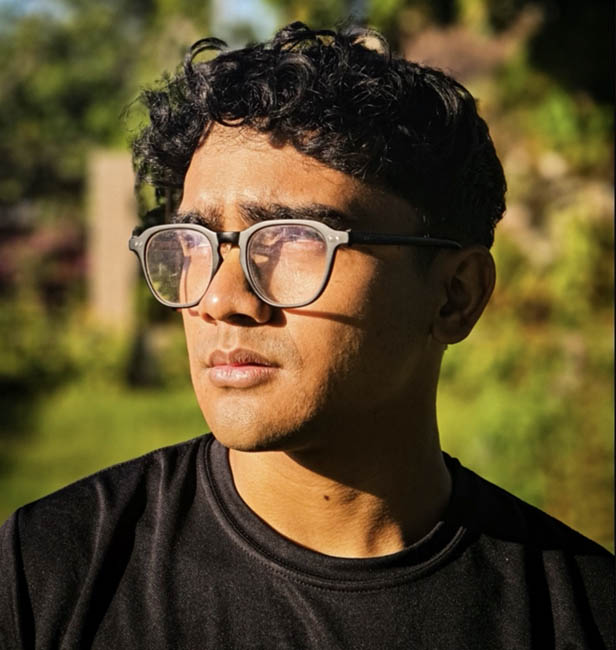
Look at this portrait. We’ve got visible glare across the eyeglasses.
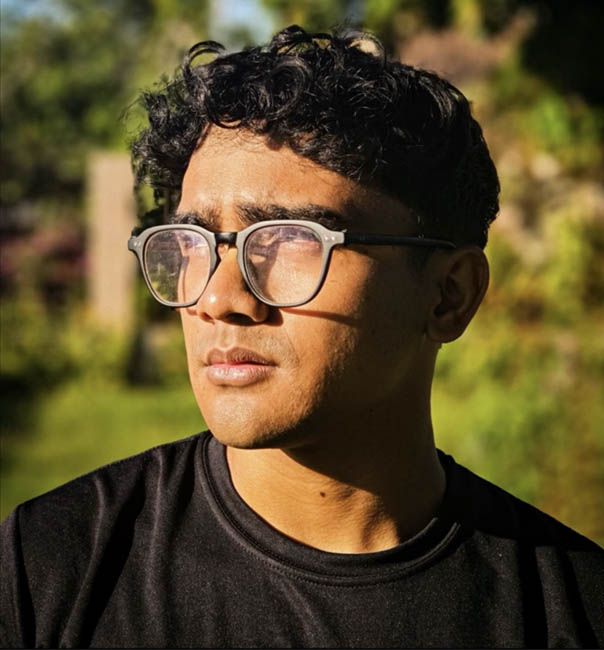
Open the Remove tool.
You’ll notice several options here, including Eyeglasses Reflection.
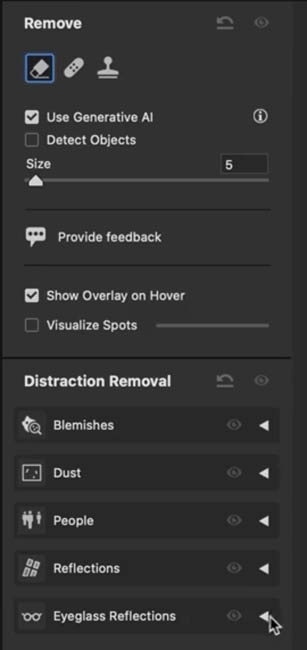
Turn it on and let Camera Raw analyze the photograph.
And it removes glare quite well.
What about really strong reflections?
Let’s try another image.
This one has stronger, more concentrated specular reflections.
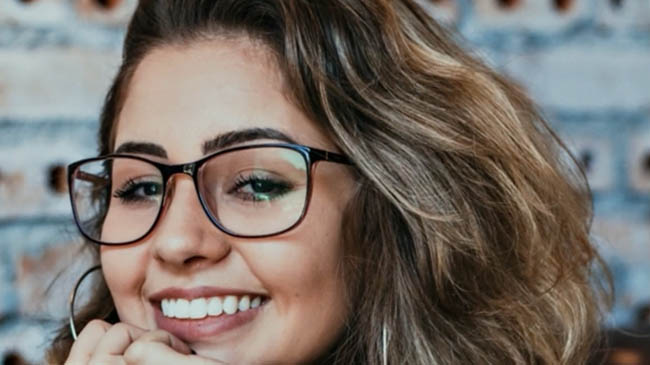
Apply Eyeglasses Reflection again. Notice that it does improve the area around the eyes.
But if we look carefully, there’s still some reflection remaining.
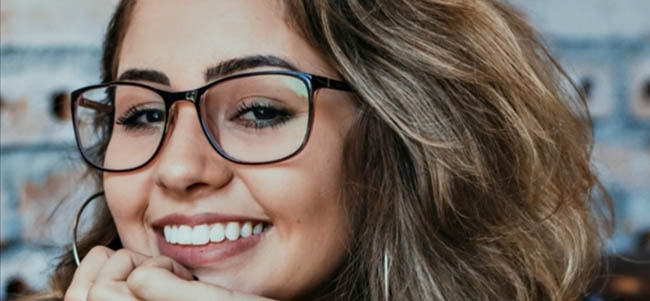
So it doesn’t work equally well on every photograph.
I’m not finding it’s working very well on glasses that have high specular highlights. So this one is a bit hit or miss at the moment.
Color Grading is now available inside masks
Here’s a feature that I’m really excited about.
Let’s start with a photograph containing a large rock.
Create a Range Mask to isolate the area.
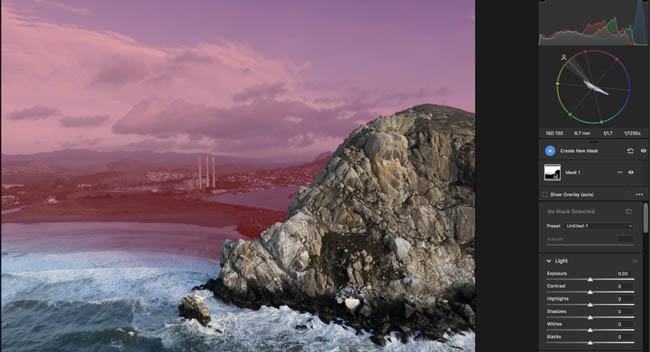
I’m going to invert the mask so that it affects the rock instead of the surrounding area.
Now scroll down in the masking adjustments.
Notice that we have Color Grading available. Yes, Color Grading now works with masks.
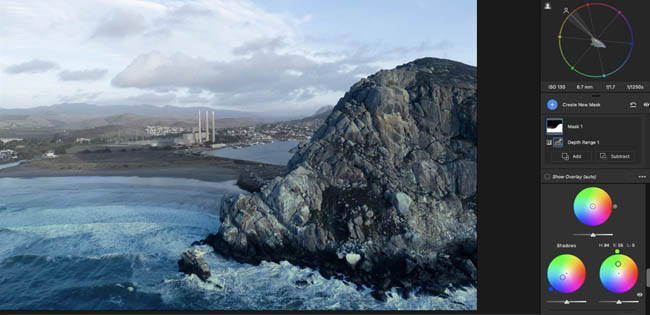
Let’s change the colors. Notice that the color grading is only affecting the rock.
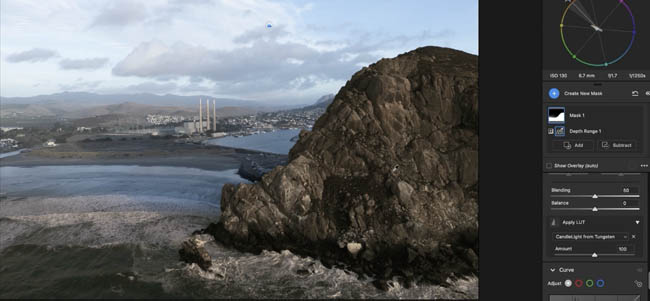
It gets even better.
LUTs are now built into Adobe Camera Raw
Remember that rock we just isolated? We’re still working inside its mask.
Notice, we now have the option to apply a LUT, to a mask!
We can also use them globally, across the entire image.
If you’re not familiar with LUTs, they are Look Up Tables, which map existing color values to new ones.
They’re widely used in video color grading, but they’re also very useful for creating different photographic looks.
Let’s start with a single LUT.
Open the LUT controls and choose a look.
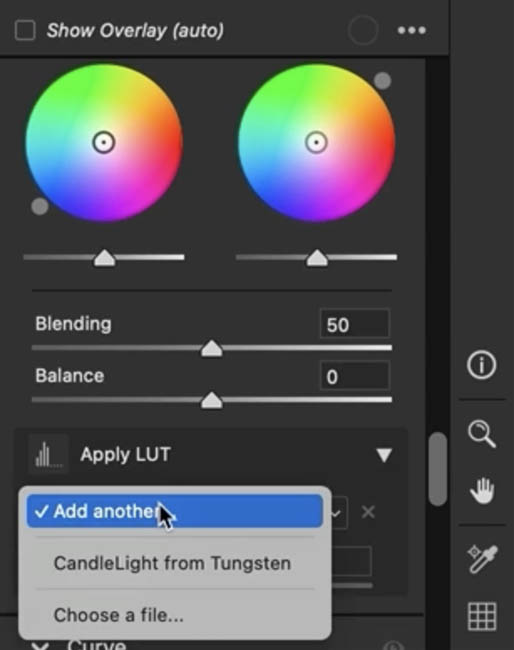
Notice how the colors change.
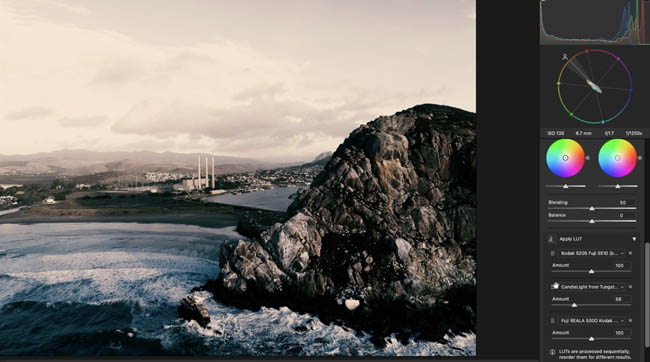
We can use LUTs to create different looks without manually building every color adjustment.
Load your own LUT files
We’re not limited to the LUTs included with Camera Raw.
Click on Choose a file to load a LUT file.
You can download some LUTs here.
I’m going to load a Fuji LUT.
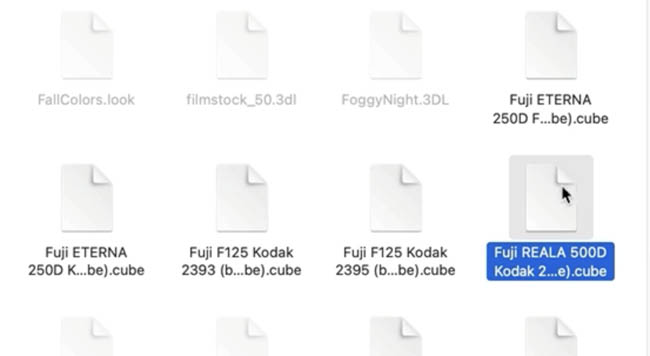
Now we have another LUT in the stack. Let’s add a Kodak LUT as well.
Look at that. We now have three LUTs applied to the photograph, we can use up to 3 at once. Most of the time, you’ll probably just use one though.
And we can reorganize their order. Because LUTs transform colors based on the values they receive, changing the order can change the final result.
We can also adjust the Amount to control how strongly each LUT affects the photograph.
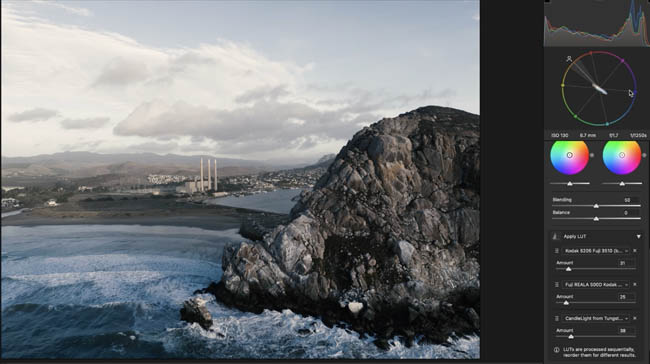
This means we can mix different LUTs together and fine-tune the result rather than being locked into one fixed look.
Open Camera Raw masks directly in Photoshop
Here’s another feature people have been requesting for years, and I wasn’t sure we would ever see it. Seems like Adobe are listening and reading comments.
We can now use Camera Raw Masks and bring them into Photoshop.
But there’s an important detail about how we open the photograph.
You have to open a raw file directly from Photoshop so that it opens through Camera Raw. Choose File>Open and choose a RAW file, this will only work with a RAW file.
Because it’s RAW, it opens directly into ACR. The masks won’t carry though if you open the Raw file from Bridge.
Let’s create a few masks. Choose the Masking panel.
For this example, use Landscape masking.
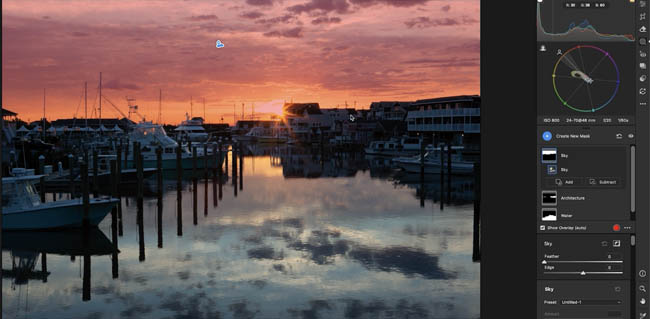
We could start adjusting these directly inside Camera Raw, just as we normally would. But this time, we’re going to take them into Photoshop. (Alternatively, you can begin adjustments in ACR and finish in Photoshop)
Click the arrow to the right of the Open dialog. Choose Open with Masks.
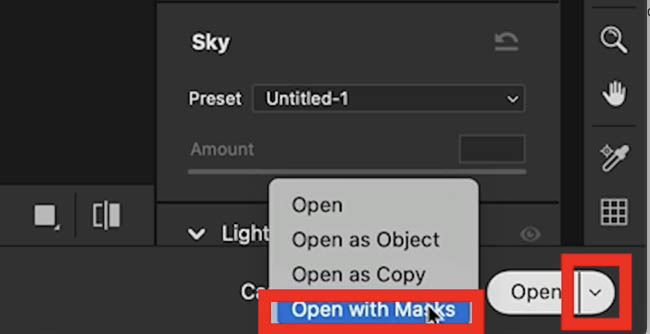
Photoshop opens our photograph and makes the Camera Raw masks available as alpha channels.
Open the Channels panel.
Look at that. We can see the individual masks we created in Camera Raw.
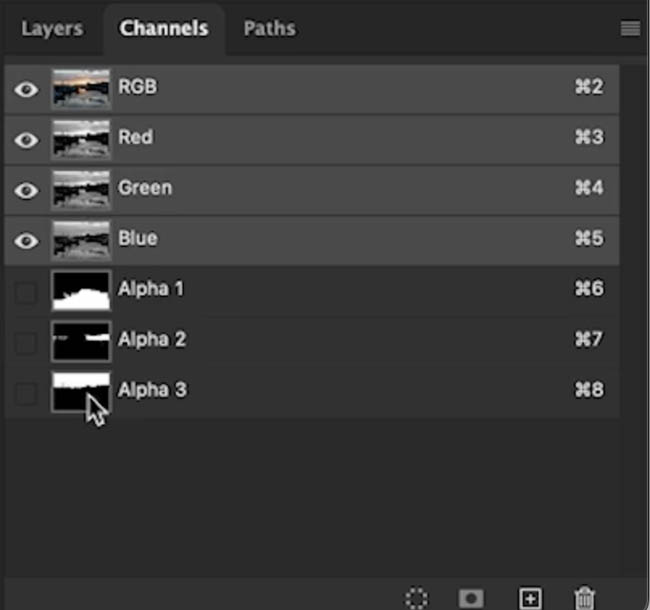
This is a big deal because now we can use those masks with Photoshop’s own tools and adjustment layers.
Use the sky mask for a Photoshop adjustment
Let’s start with the sky.
Hold Ctrl on Windows or Cmd on Mac and click the sky mask thumbnail in the Channels panel.
This loads the mask as a selection.
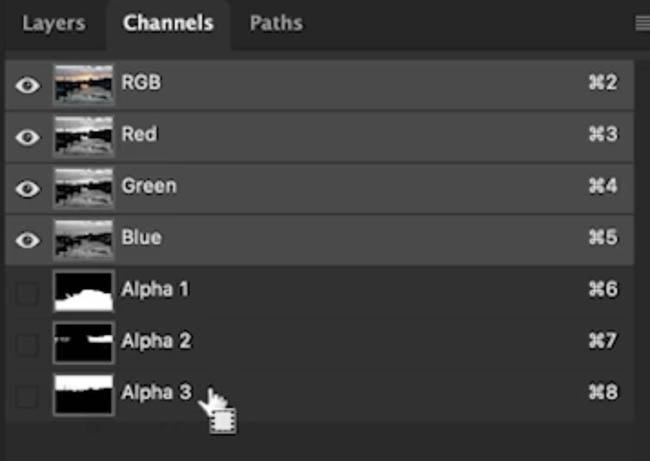
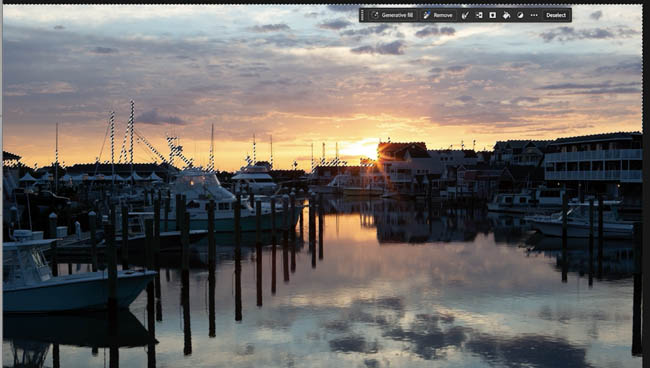
Now let’s create a Vibrance adjustment layer. Increase the vibrance a little.
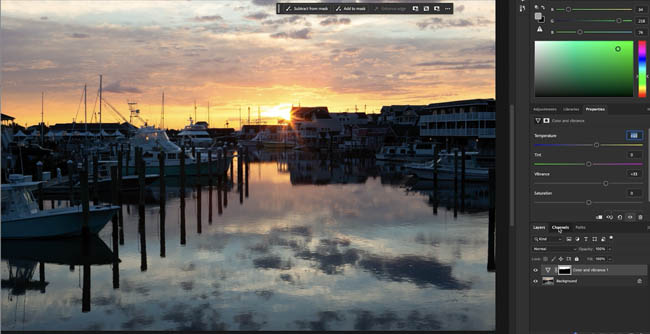
Notice that only the selected area is being adjusted.
We’re taking advantage of Camera Raw’s masking technology, but using Photoshop’s adjustment layers to make the changes.
Use Camera Raw masks with Photoshop filters
Here’s another possibility, and it’s something that we can’t do in Camera RAW, that’s filters.
Right-click the image layer and choose Convert to Smart Object.
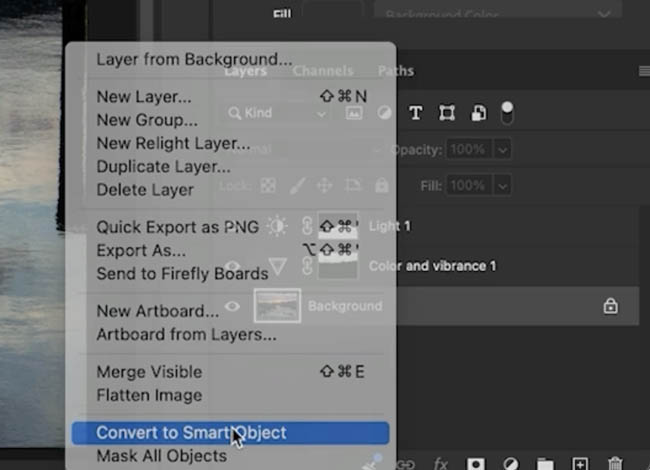
Now load the water mask as a selection from the Channels panel.
Let’s make the water look more glassy.
Filter>Motion Blur
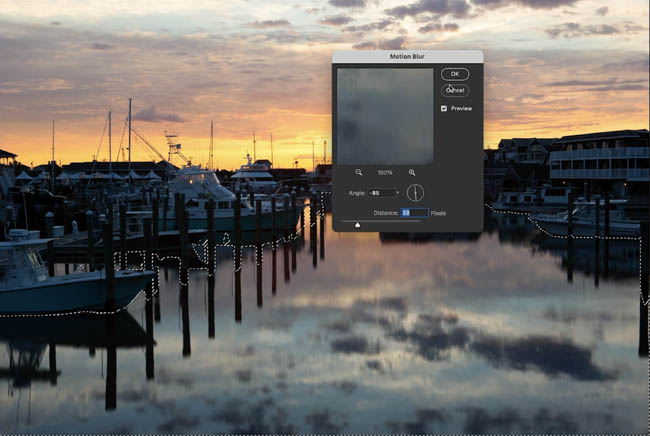
Because it’s a Smart Object, the Filter will be applied to the selection and a mask is created from the selection.
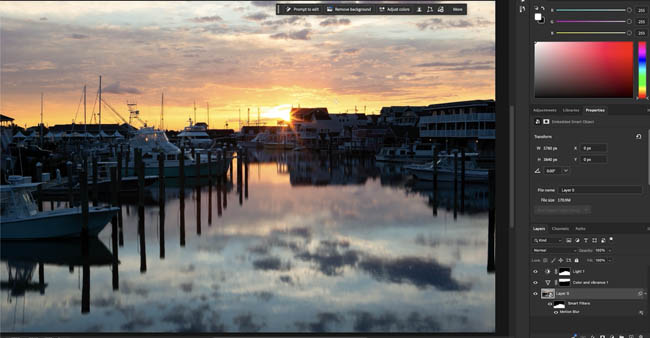
Another good example is Dodging and Burning, we can make these quick masks in ACR and use them as stencils as we Dodge and Burn with the better brushes in Photoshop.
New Glow effects: Motion and Streak
You might remember the Glow effects that Adobe recently added to ACR.
We’ve already looked at Bloom, Diffusion, and Halation in an earlier tutorial.
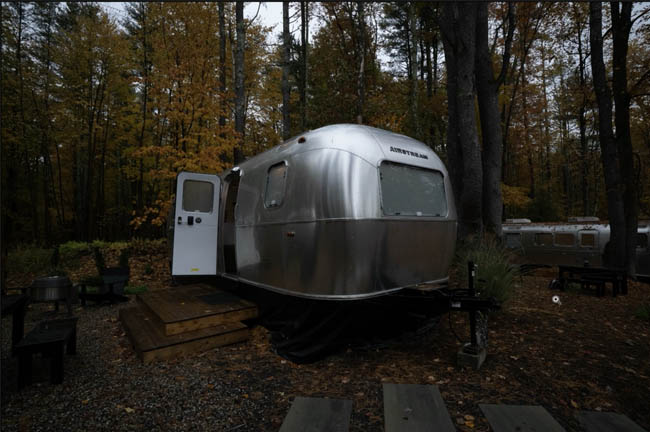
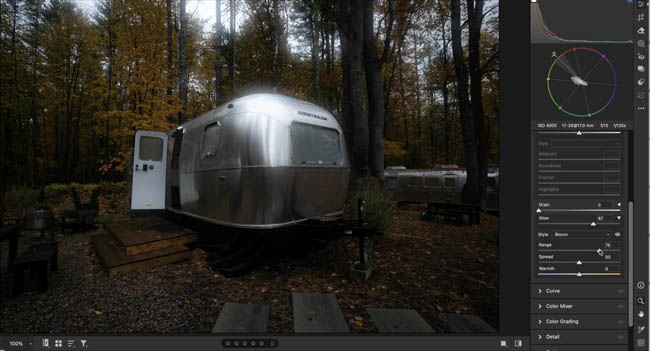
Let’s look at two new additions: Motion and Streak.
Motion Glow
Open the Effects panel and enable Glow.
Choose Motion.
Notice how we can create a directional glowing blur.
We can change the direction to move the effect across the photograph.
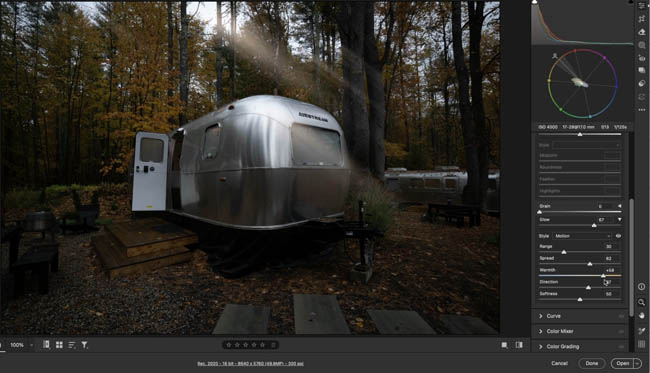
For this image, I’m adjusting the direction so the light appears to be coming from the sky.
Now it starts to look like sunlight coming through the scene.
This can create some interesting atmospheric effects.
Streak Glow
Let’s try the other new effect.
Choose Streak.
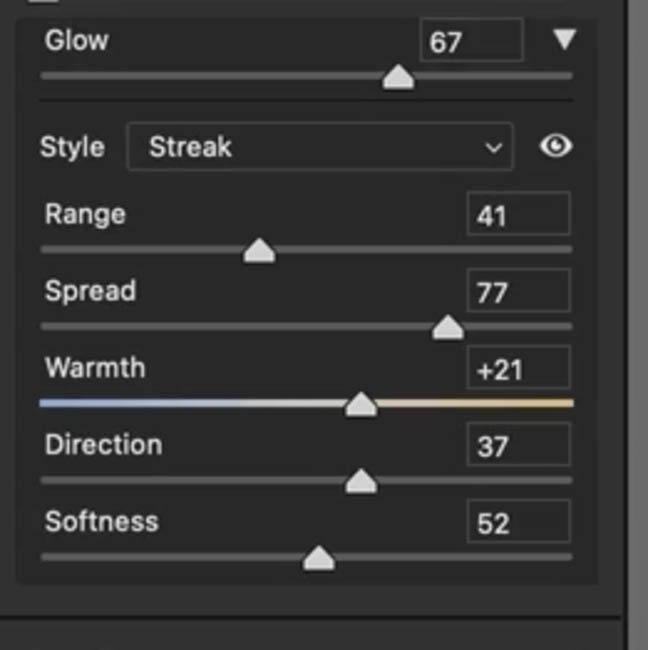
This creates a different kind of directional glow.
It’s useful for creating effects that resemble lens flares, including the long streaks of light you might see with anamorphic lenses.
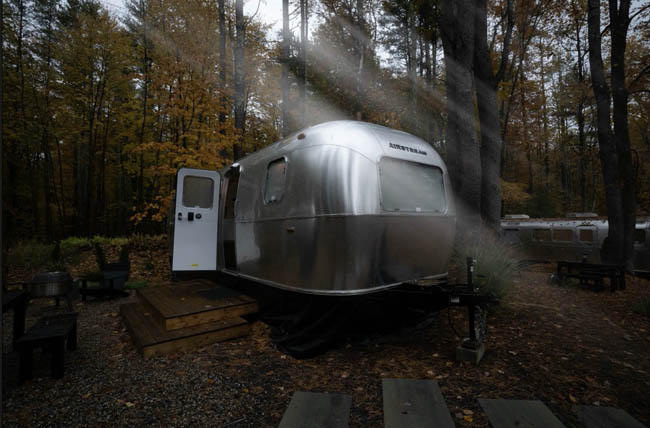
Of course, the look will depend on the highlights and lighting already present in the photograph as it picks up the brightest areas.
Glow presets
There’s another easy way to explore these looks. Open the Presets panel and find the presets for Glow.
Roll over the different presets to preview their effects.
I’m using an old photograph of the PhotoshopCAFE booth at WPPI for this example.
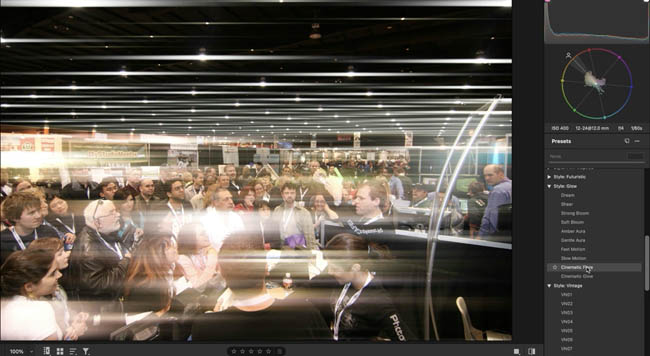
Notice how the different presets create different lighting effects.
You can refine the settings afterward to get the effect you want and you can make your own presets that contain the glow effects.
Fix stretched people with the Projection slider
While we’re looking at this photograph, let me show you another useful improvement.
Have you ever taken a photograph with a wide-angle lens and noticed that the people near the edges look stretched? And it’s always bothered me.
Look at the people toward the edge of this photograph.
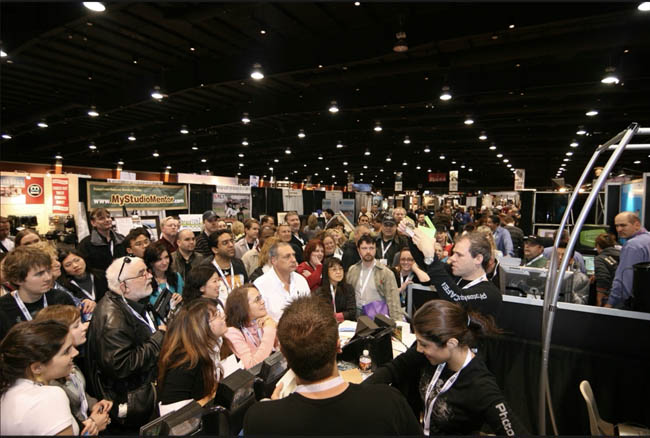
Now choose the Crop tool and expand the Geometry controls.
Find Projection.
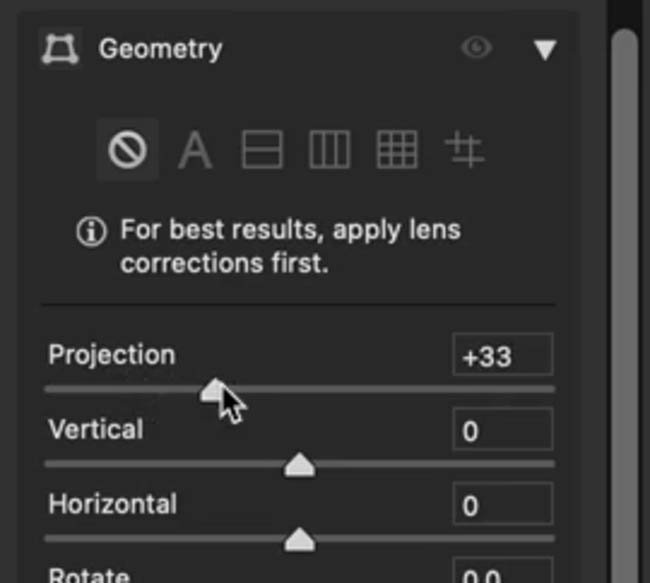
Move the Projection slider and watch what happens.
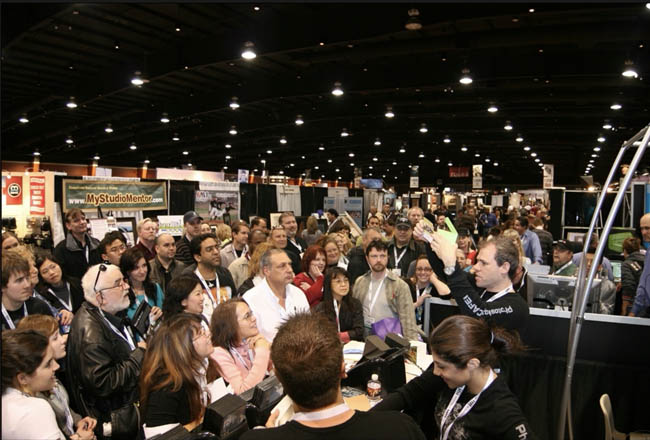
Notice how the people near the edges start to look more natural.
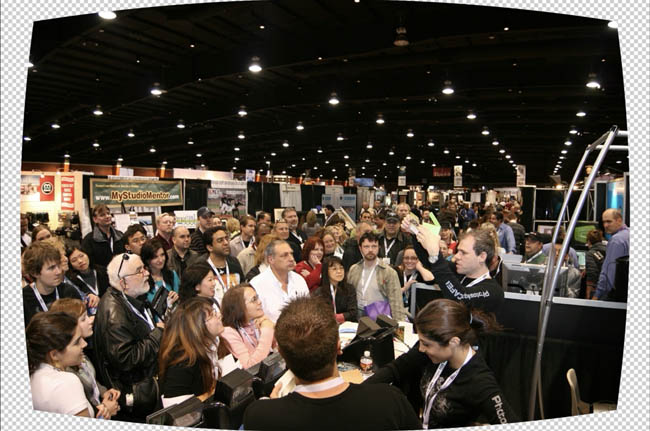
That’s much better.
We can then crop the photograph to tidy up the edges if necessary. (This feature is also in Lightroom Classic and you can do an auto Crop there).
Vectorscope and Histogram together
The Vectorscope was recently added to ACR, but we could only display it or the Histogram, now we can see both at once.
If you’re familiar with video editing and color grading, you’ll probably recognize the Vectorscope. It gives us a way to visualize color information. You can use it to fix skin tones as I show in this more in-depth tutorial on the Vectorscope.
Now right-click in the scope area.
We can display just the Vectorscope, just the Histogram, or both together.
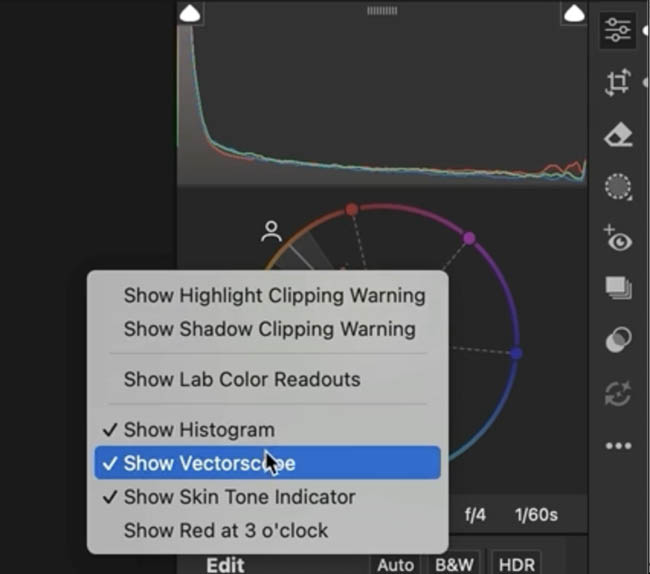
This is particularly useful if you want to monitor both the brightness information and color distribution while you’re editing.
Improved automatic blemish removal
Let’s look at an improvement to the retouching tools.
I’m going to zoom into this portrait.
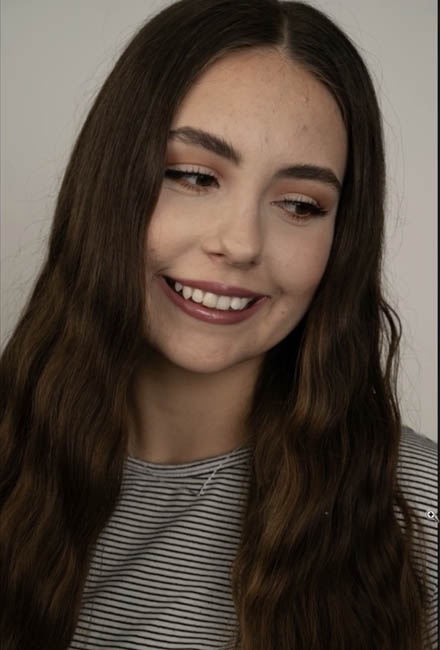
Open the Remove tool and choose Blemishes.
Click Apply.
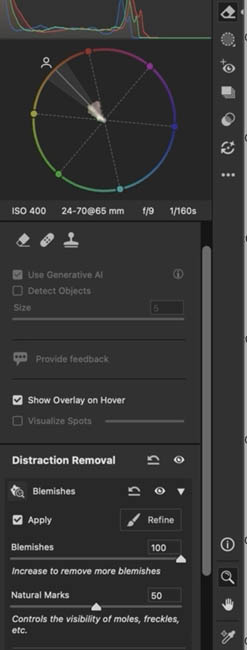
Camera Raw analyzes the photograph and automatically removes the detected blemishes.
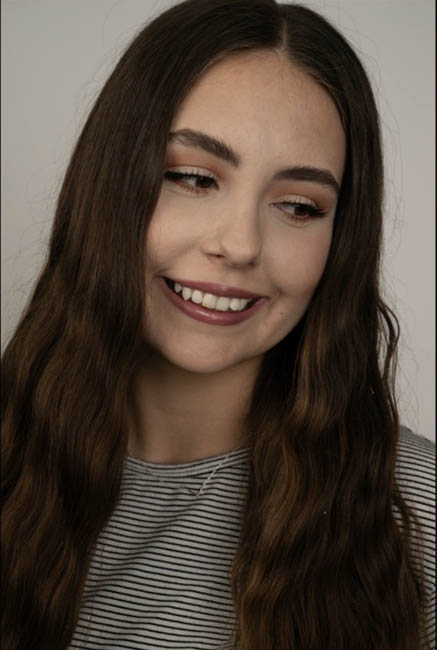
This part isn’t new, it was added in a recent update, but this is new:
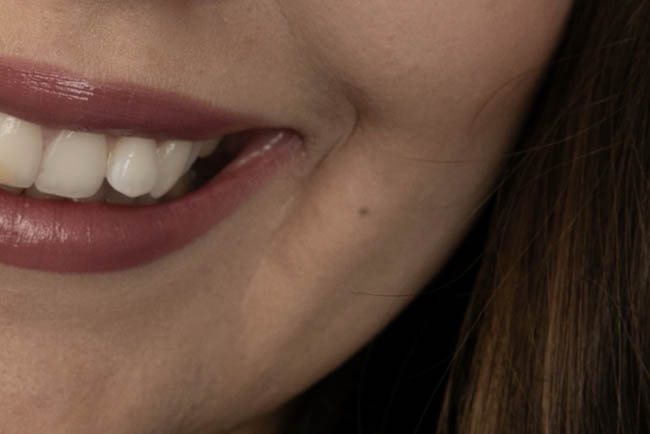
There’s an important distinction between temporary blemishes, such as acne, and natural facial marks, such as freckles and moles. Imagine removing Cindy Crawford’s mole?
By adjusting the natural marks setting we can preserve freckles and moles.
Removing temporary blemishes while preserving those permanent features gives us a more natural-looking result.
Customize the Masking panel
Here’s a smaller improvement, but one that can make a difference to your everyday workflow.
When we’re working with masks, Camera Raw displays a number of adjustment sections.
But maybe we don’t use all of them that often.
Or perhaps there’s one we use constantly, and we’d like it closer to the top.
Now we can customize the Masking panel.
Right-click inside the panel (over the adjustments section) and choose the masking panel customization option.
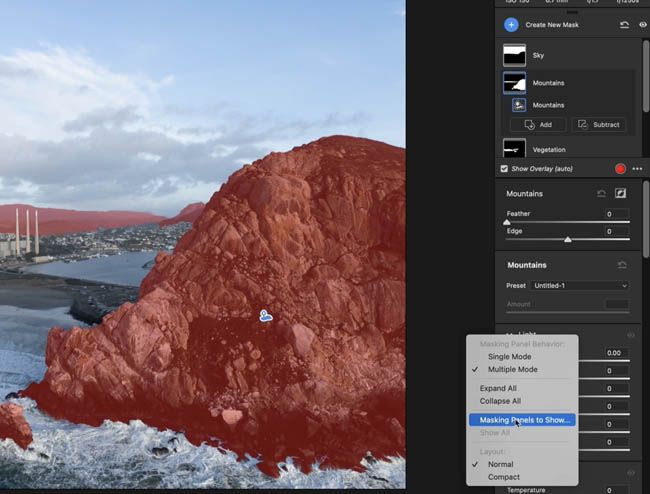
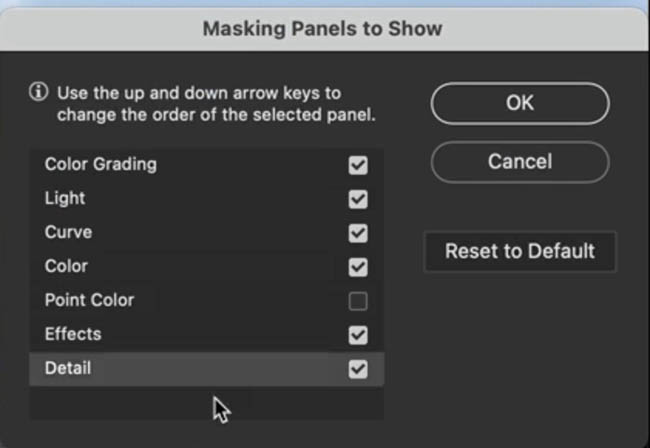
You’ll see a list of the available adjustment sections.
We can choose which sections are visible.
For example, I might want to keep Color Grading available but hide some controls I rarely use.
We can also change the order.
Select Color Grading and use the up arrow to move it higher in the list.
Click OK.
Now the controls can be arranged in a way that better suits how we work.
Tip: If you don’t see your new layout immediately, try reopening Camera Raw.
Extended Temperature slider range
Previously, the slider’s adjustment range started at -100 in this control.
Now we can push it beyond that previous limit. It now goes to -150 (or 1500K if you are using a RAW image)
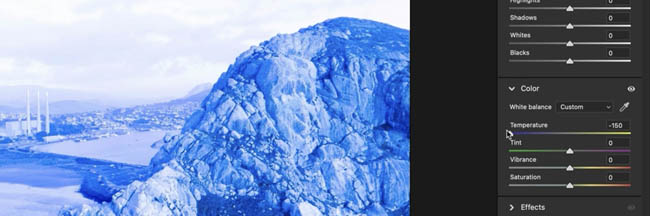
This gives us more room to create stronger cool color adjustments in those rare cases when we need it.
Final thoughts on Adobe Camera Raw 19.0
This is one of the biggest Camera Raw updates I’ve seen, and there’s plenty more to explore. I’ll be creating deeper tutorials on selected features, particularly the new workflows between Camera Raw and Photoshop.
Check out the other 2027 updates:
- [What’s New in Photoshop 2027]
- [What’s New in Lightroom Classic 2027](COMING TODAY)
Join Me LIVE for XAM!
Thursday, November 12 at 1 PM Pacific
Join me as we explore the new Photoshop and Camera Raw features, try practical editing techniques, and answer your questions live. I’ll also show how some of these tools work in Lightroom Classic.
Sign up for free livestream notifications and I’ll send you the viewing link when we go live.
Which Camera Raw features would you like to see covered in more depth? Let me know in the comments.
It’s great to see you here at the CAFE!
Colin
Recommended for this tutorial
Learn Masks in Lightroom and Camera RAW
Make precise local adjustments in Lightroom and Camera Raw with every type of mask.
$59.99 · one-time purchase · instant download
Free for you
The Photoshop Vault
Get my free Layer Blending Modes ebook along with dozens of exclusive Photoshop goodies: actions, brushes, presets and cheat sheets.
You're on the list, so your free goodies are waiting for you in the Vault.
Get Free Photoshop Goodies Open the Vault
What’s New in Photoshop 2027? All the New Features Explained
Explore the new features in Photoshop 2027, including Relight Layer, Quick Compare, the Spectrum interface, Generative Restyle, and improved Remove tools. See... Read tutorial
How to Use the Light Adjustment in Photoshop: In-Depth Guide
Colin Smith shows how to use Photoshop’s Light adjustment layer to recover highlights and shadows, control tone, use masks and stack adjustments. Read tutorial
5 big new features in Photoshop 2026 August update
5 New Photoshop 2026 Features You Need to Know Adobe has added a number of new features to Photoshop 2026, and some... Read tutorial
5 New Photoshop Beta Feature You Need to See
Photoshop Beta has some interesting new additions, including a redesigned interface, an improved Color Picker, Restyle Layer video generation, Quick Compare, and... Read tutorial
New in Adobe Camera RAW 17.3
New Features in Adobe Camera Raw 17.3 ACR in Photoshop 2025 April update. Landscape Masks and reflection removal updates Read tutorial