When you combine photos together, realistic cast shadows are the trick to making it look real. In this Photoshop tutorial, Colin Smith shows you different ways to make shadows to blend people with the background environment. Scroll down to see the written tutorial and more tips.
Here is a simplified cast shadow video, using a basic shape on white.
Watch the 14 minute video that goes more in depth right here.
Step 1
© Photography and tutorial by Colin Smith
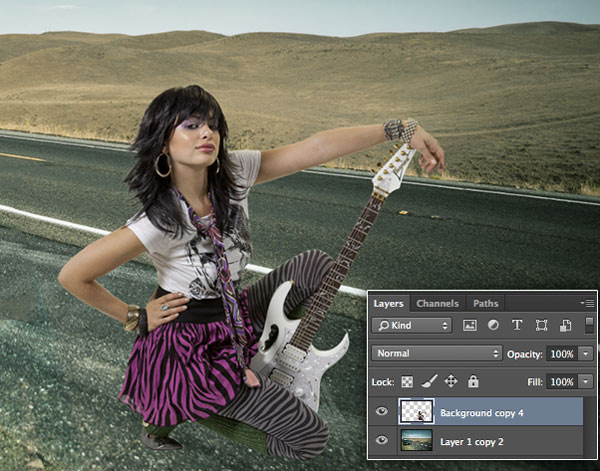
Open your image and remove it from the background.
Here we have the background plate and the extracted subject that we need to apply a shadow to. Without the shadow, there is no visual clue as to the scale and position of the object. The shadow also serves to anchor the object to its surface.
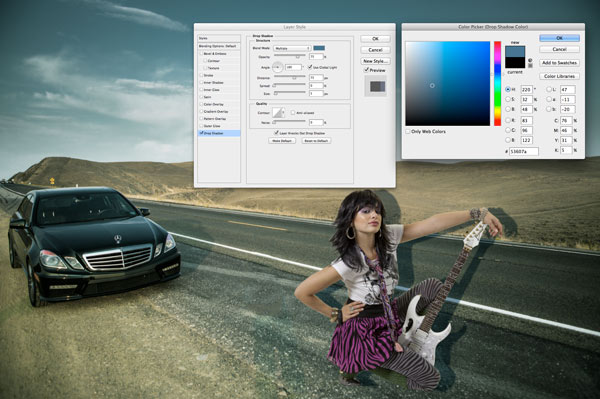
The first thing that we are going to do, is to create a standard drop shadow.
Choose The Layer style button at the bottom of the Layers panel (looks like a little “f”) Select Drop Shadow.
At the moment, it looks more like a person standing in front of a billboard, rather than being integrated into the scene. That’s the difference between a drop shadow and a cast shadow.
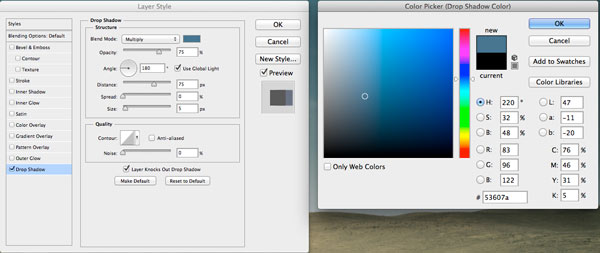
For some realism, let’s first choose the correct color for the shadow. Click the black rectangle to the right of the blend mode in the Drop Shadow dialog box. You will see a color picker. I changed it to a blue color to match the color of the shadow on the car.
Also change the “size” to match the softness of the other shadows in the scene.
Click Ok to apply.
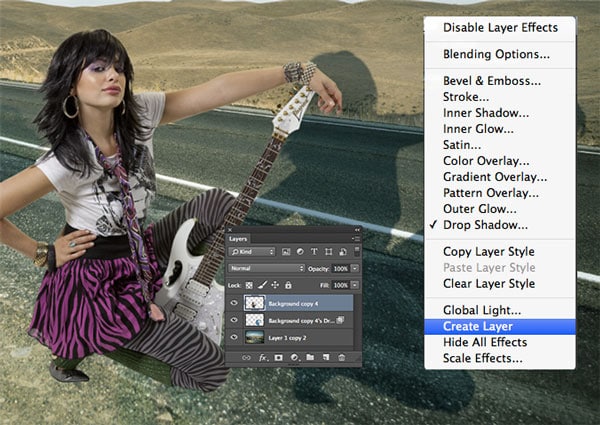
We now have a pretty good drop shadow, but we want a cast shadow.
We are going to separate the layer style from the layer, so that we have the shadow by itself on its own layer.
In the Layers panel, right click on the little “f” on the right of the layer name. You will see a drop down menu.
Choose the option called Create Layer
The layer will now be spilt into 2 layers. The shadow will be moved to its own layer directly underneath the original as shown in the screen grab. (I moved our guitar girl to the left of her shadow, just do you can see the separation in the image here).
Now to distort the shape. (If you are going to do this to text, you must render the type first)
Press Ctrl/Cmd+T, this will bring up the free transform tool. Right click on the selected object, (Mac:Cmd click). Select “Distort” from the pop-up menu.
You will see a bounding box with 8 little squares. Drag in the middle of the box to reposition it. Click and drag the top right square (called handles) until it looks similar to the picture.
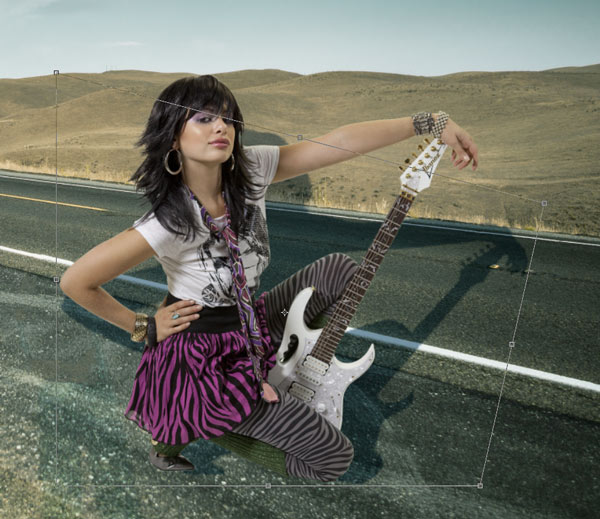
Click and drag on the left top handle to match the angle on the road behind our model.
Reposition any of the handles if you need to.
Press Enter/Return to apply the transformation.
You now have a basic cast shadow. However its missing some realism that we are going to add now.
If you look at a shadow in the real world, you will notice, as the subject that’s casting the shadow gets further away from the surface that receives the shadow, 2 things happen. The shadow will soften with distance and lose intensity (or darkness).
We now want to make the shadow softer as it gets further away.
Duplicate the shadow layer by dragging the layer into the “new layer icon” in the layers panel, of press Cmd/Ctrl+J.
Turn off the visibility of the bottom shadow layer and select the top shadow layer, This is the one we are going to soften.
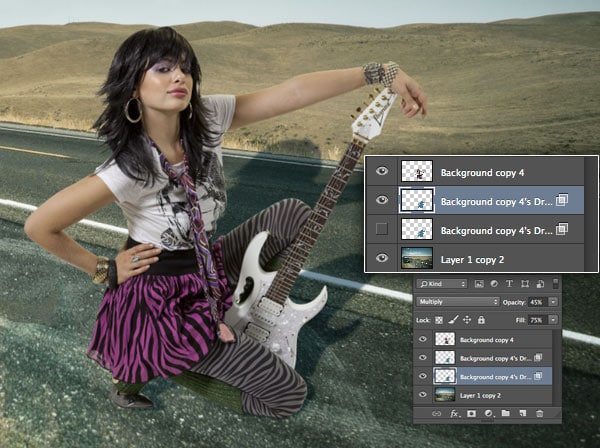
Let’s set this second shadow to the softer end of things. (We are going to blend 2 shadows together)
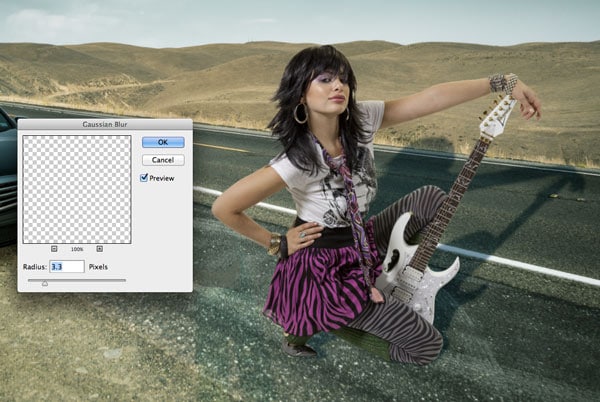
Choose Filter>Blur>Gaussian Blur. Add enough blur to make the shadow softer, the setting will vary according to the size of the image that you’re working on. Press ok when done.
Time to blend the 2 shadows together. ![]()
![]()
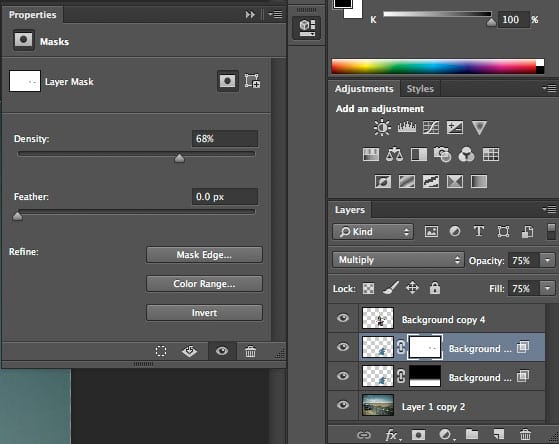
Add a layer mask to the top shadow layer by clicking the Layer mask button in the Layers panel.
Grab the gradient tool and set the colors to black and white (D key). Choose linear, foreground to background.
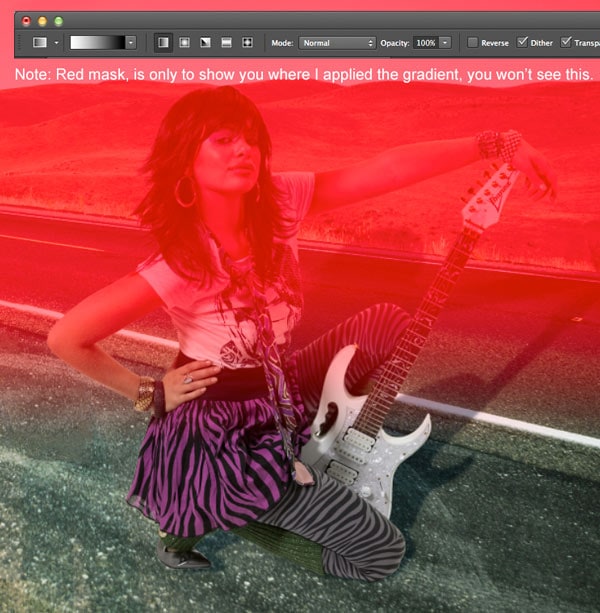
Make sure the mask is selected and using the gradient tool drag it from about 1/4 way to the the bottom of the shadow to about 3/4 of the way up to blend the 2 shadow layers. (The red in this image shows where I dragged the mask)
For more details on this technique see here
Finally Set the shadow to multiply mode and the opacity of the top shadow layer to about 50%-75% and the bottom shadow to about 30%
Experiment and see what looks best for your image.
You now have a basic, realistic cast shadow, but read on.

One of the things I’m often accused of, is being a perfectionist. I believe its the extra little things that really make a difference between a good effect, and one that is believably realistic.
There are two little issues in this particular image. #1. The shadow at the tip of her head wouldn’t stay the same over the lip of the road, as there is distance there in the background plate. #2 The color of our girl doesn’t quite match the colorizing of the plate. (The background plate was adjusted with a slight color cast for effect.)
Let’s deal with these 2 using some quick-fix techniques that I have developed.
Let’s fix the shadow where its going over the edge of the road (This is very important for skies, as a subject doesn’t usually cast a shadow into the sky (unless its foggy or cloudy).
On the top shadow layer, create a layer mask. Paint away the portion of the shadow that you want to hide with a black brush on the mask. If you want to still have some shadow showing, but reduced; double click on the layer mask to open the properties panel (Mask panel in Photoshop CS6 or earlier).
Slide the density slider to adjust the opacity of the masked area. (Apply a levels adjustment to earlier versions of Photoshop that don’r have a mask panel).
Here is a little trick that I often do to composites. To pull all the layers together visually, I apply a color cast to the entire image.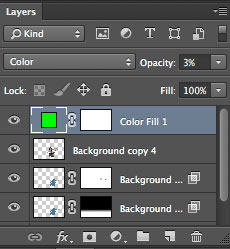
Create a new Solid Layer by clicking on the Adjustment layer button at the bottom of the Layers panel and choose Color Fill.
Set the color for the mood that you want.
Change the Layer blend mode to Color and drop the opacity to a low amount.

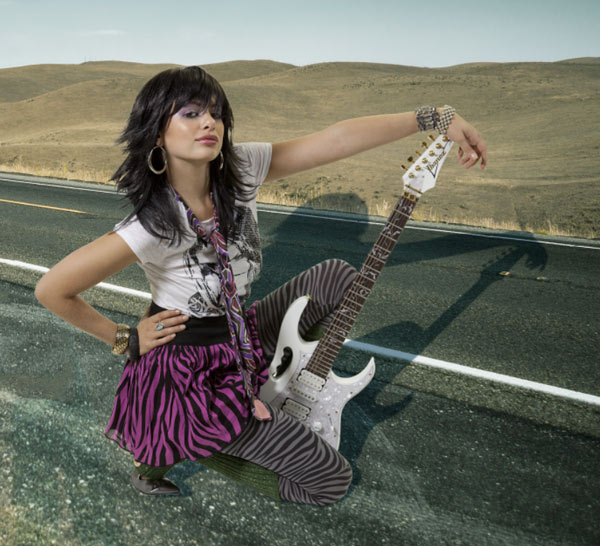
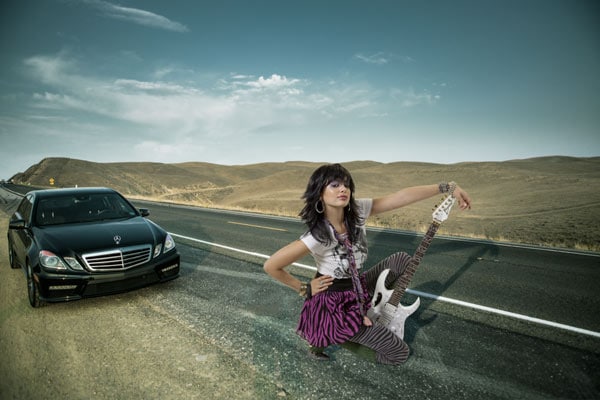
I made a few finishing touches to make it look a bit more realistic and punchy.
First of all, I scaled her down a little bit to fit better (I made her big earlier, so you could easily see the shadow being created). I also rotated the shadow clockwise, to better match the direction of the car (Maybe I could still go a bit more, but hey, it’s just a tutorial, not a work of art). I also added a little bit of “Self Shadow” (shadowing on the subject itself) with a touch or burning (see tutorial on dodging and burning here).
I also adjusted the contrast in Camera Raw and just for fun, aded a little bit of a blur to the hills at simulate depth of field.

Take some time to observe the world around you and see how shadows work in the real world.
If you want your artwork to look realistic, then you have to spend time and become a student of observation. Your ability as an artist is linked in how closely you observe the world around you.
So, there you have it. The steps to creating a realistic Cast Shadow in Photoshop. If this kind of training interests you, check out my Compositing in Photoshop premium training that includes a section on “Layers and Channels, Deep Dive” where you will learn a ton more. (This training is fundamentals of Photoshop and most of it applies to any version of Photoshop).


This site uses Akismet to reduce spam. Learn how your comment data is processed.

Photoshop 2020 Problems and Solutions Thanks for checking the out. Check out out Photoshop 2020 Superguide The best way...
How to use Layer masks and selections to interlock objects in Photoshop, free photoshop tutorial by Colin Smith. ...

How to customize the appearance of Photoshop and customize the interference....

Notifications


Great explanation. Although, the final edit looks fake because of:
1. the girl is sized too big in the picture.
2. the shadow of the girl does not align properly with that of the car.
I believe this tutorial would look better using a plain white background.
Its just a tutorial, not supposed to be final art, so it wasn’t put up there to be judged as art, please see my gallery for that. It’s on a photo so people can learn to match shadow color and direction with existing shadows, so plain white wouldn’t do that. Also the girl is big so people can clearly follow the lesson.
“I believe this tutorial would look better using a plain white background.”
Once again, its not final art. it is designed to teach a technique only. Im not trying to show off my artistic ability here, Im trying to clearly and simply teach a technique.
Don’t worry – always people who need to find something to nitpick. I for one got quite a lot out of this tutorial. Thanks for the post.
thanks!!!! Tweeted!!
Thanks for the technical help, but someone should really edits these posts for typos!
Thanks for brining it up. I have fixed the typos.
How do you get your shadows to bend on certain objects?
You can use liquify, warp or puppet warp to do that
Great explanation and very useful tutorial.
How perfect work. Step by step you done this job very carefully. Thanks for the technique.
Wow. What a great tutorial. Step by step with great details.
You say make a “white” layer mask in the early step but don’t say how. For us beginners, we need to know things like that. Please let us know “How” and not assume we already know. Do you just start a “new” background file that comes out white?
On the written steps or the video? Just scanned the text and didn’t see the step you were referring to, they are numbered, can you let me know the step number you are having problems with?
You click the layer mask icon in the Layers panel and it makes a layer mask on the selected layer. All Layer masks are white by default.
Hi Colin, in the video you remove the model with the guitar and put her on a layer with a white background, and then make a copy of her and delete it to get your black silhouette for the shadow. In the video you have a white layer pre-made but it doesn’t say how to make a white layer as when you produce a new layer it’s usually transparent. It’s probably a really lame question and something you do automatically without thinking being so experienced with Photoshop. But being a beginner it’s those little things that I need to know.
Thanks, I have learnt so much already from you, thank you, but I feel I have barely scratched the surface.
Kind regards,
Jen
I have just added a simpler tutorial to this page, Do the one with the cog first 🙂
Thanks that made things much clearer. I appreciate you doing this, thank you.
I’m glad it helped!
Colin! Many thanks for the step 3… Actually I didn’t any idea about it.. Thanks so much!
always good share hare, thank you.
Really appreciate here !! Obviously creative work. I don’t know it before. I will try to make this as your step by step instruction.
thanks Collin Smith for making this easy for us. Kudos
nice tutorial.. thanks a lot.. 🙂
Nice post and wonderful tools for growing business . I have learn lot’s . thanks
Ok. So am I the only one to notice the scale is off? Judging by the shadow of the car, her shadow is far too long. It needs to match the length of the Car’s shadow, not extend beyond. Altho, it does look like she is almost 10′ tall. Or am I the only one to notice that?
I’m trying to demonstrate a technique here in a couple of minutes, not create a work of art. Sorry, if I sound defensive, but it gets really annoying. Im trying to focus on showing the steps to do something as clearly and simply as possible for people to learn. Its very easy to sit back and say “this is off,” sure it is, but when Im making a final piece it spend a LOT more time doing it and Im not talking at the same time trying to teach. When Im NOT recording a video its easy to go back and fix it,
Its just supposed to be a tutorial, not a final work of art, However, I just added a final image after a little tweaking 🙂
No problem i understand. Its always the little details that get me, and what keeps me up all night trying to get it perfect. It was a good tut, and gave me an idea on how to do what i wanted. Thank you. And that looks a lot better!
Blending a blurred shadow and a crisp one isn’t giving a realistic shadow. At best it’s an OK shadow. I have been looking for a plugin or similar that can gradually increase blur over distance but haven’t seen anything yet.
Thanks so much for this. Your instructions are very clear. I tried it and it worked great.
Excellent work Sir. Very good explanations and you make it look so easy!
Going to give this a shot now! Awesome work, thanks a lot for the heavy detail in the explanations.
OK so that was interesting!! enjoyed the tutorial of how the picture was changed into its final touch. going to work on my own picture. thanks for the tutorial really helpful blog. thanks
Thanks so much for sharing your expert knowledge with us! Honestly, you should delete William Wijaya Lo’s comment. Apparently his parents never explained to him that “if you don’t have something nice to say, don’t say it.” He learned how to cast a shadow in Photoshop — without having to pay a dime for it– and all he could do was criticize you? (I am shaking my head!) Please know that the rest of us are super grateful!
Wow! Really Great Tutorial. Thanks for sharing with us. Excellent Stuff. I found your tutorial extremely amazing. Keep it up.
Hello Colin
Thank you very much for a great tutorial, I have been struggling with shadows for ages.
However I cannot find the link to written instructions.
Could you possibly help in this respect?
Once again thank you for your time and expertise.
Regards
Mal Leach
The link is in the article, but here is is again: https://photoshopcafe.com/tutorials/cast_shadow/cast_shadow.htm
Very nice tutorial as usual. I really like these written tutorials. Please keep them coming.
Earl
Hey Colin!
Thank you so much for the step 3 and 8. Actually, I didn’t any idea about it.I appropriate your sharing.
Great explanation.
Glad I found this. Very helpful!
Thank you very much for a great tutorial. I really like these written tutorials
I know how to you solve it! awesome man
I have nothing to say about this awesome photoshop tutorial, thanks for this good advice
Thanks for this awesome photoshop tutorial.
Fantastic video! It worked! Thank you so much for your clear instructions.
Thank you for this tutorial – I had watched a video that shared a lot of this information, however I like to see the written steps more than a video that I have to keep stop/back up/start/stop/back up/start….you get the idea. Videos are great, but when you’re trying to do each step, for me the written word is better!
Thank you soooo much for this ! I love trying new things & this is one I will start working on to-day. Can’t thank you enough for sharing your expertise… gives me something to stay busy during this pandemic.
Thanks!
great tutorial. Step by step with great details.
Great explanation