
Create Panoramas with Lightroom & Boundary Warp
How to create seamless panoramas in Adobe Photoshop Lightroom and fix the edges with Boundary warp, new feature added in Lightroom CC 2015.4
Lightroom has been my weapon of choice for making seamless panoramas lately. You can see why by checking out the video above and also this more in depth tutorial here.
It’s really nice to be able to see a preview before committing to stitching all your photos together. I love that it all goes into one DNG file which maintains the dynamic range of a raw file as well as the added features that make it quick and easy to do. I used to go into Photoshop and do Content Aware fill after stitching a pano to recover the edges of the photo without cropping out important details. This can now be done in Lightroom as well as in Camera Raw.
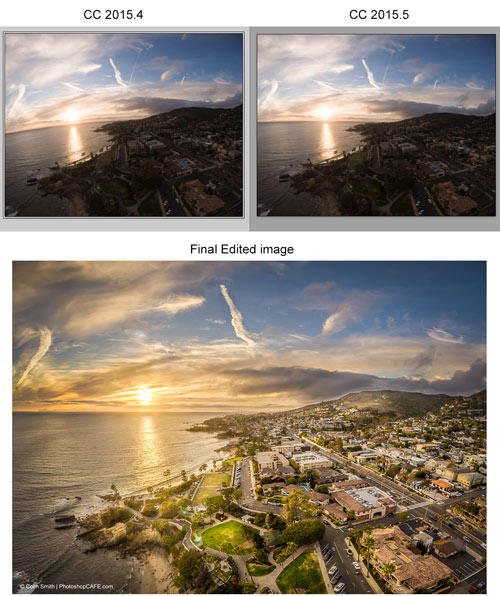
Lightroom CC 2015.5 test
Adobe updated Lightroom CC yesterday, it’s a free update to CC users.
The new update (2015.5) has some improvements on Boundary Warp for Panoramas. Here is an example I tested. I shot 20 image panoramic HDRs. They were 4 5-image HDRs. The photos were a little mis-aligned, so not an easy stitch. I stitched them together in the old Lightroom and the new update. I pushed boundary warp all the way to 100 and you can see the difference in this image. I also included the final edited image, so you can see where I took it.
PS Don’t forget to follow us on Social Media for more tips.. (I've been posting some fun Instagram and Facebook Stories lately)
You can get my free Layer Blending modes ebook along with dozens of exclusive Photoshop Goodies here


2 thoughts on “Create Panoramas with Lightroom & Boundary Warp”
Leave a Reply

Photoshop CC 2017 has a search tool, templates, updated face aware liquify, refined select and mask, a new, new workspace...

How to make textures in Photoshop, add them to your library and use textures to make your photos and art...
Learn how Photoshop 2026 integrates Topaz Gigapixel and Topaz Bloom into Generative Upscale.


Colin,
Do you think the Mavic 2 Pro takes as good a picture as your Inspire?
Honestly, I like it better 🙂