
Photoshop Layers 101 Photoshop Tutorial

Beginners guide to Layers in Photoshop
Here is a Layers in Photoshop crash course for you. Layers were introduced in Photoshop 3.0.
Layers totally revolutionized Photoshop. For the first time you could do complex compositions easily without having to be a channels guru. I remember before layers, if a client wanted to make changes to a composition, or even change a font you were in big trouble. This article will teach you what layers are and what all the part in the Layers panel do.
There is a lot to layers in Photoshop and they take some time to master. But they are not that difficult once you understand how they work. In this tutorial, I explain the concept of layers, describe the features and walk you through a simple tutorial. Along the way I throw in a few cool tips to help you work faster and easier.
Photoshop Layers Basics
Part 1. What is a Layer?
A layer is simply one image stacked on top of another. Imagine I have a piece of paper and I paint it red. Then I take a peice of clear celophaine and paint a yellow circle, and lay it over the paper. Now I take another peice of cellophane and paint some blue type and lay that on top of the yellow circle. I now have a background (red) and 2 layers (yellow and blue.) Just like in the picture below.
A background with 2 layers.

This is how your image will look on the screen or when its printed.
Broken apart so you can see how the layers work, Each layer stacks on top of the previous one.

That is it! The concept of layers is that simple. Photoshop uses the Layers Pallete to allow you to do this with your images. More than one layer is called a composition. or a composite.
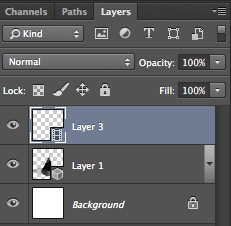
Layers Panel
Photoshop’s layers Panel is a powerful tool that allows you do many special things to your layered compositions.
The different features of the Layers Panel.
Layer Filter: This enables you to hide layers based on different things. Makes it easier to find the layers that you want to work with.
Opacity: 0= transparant 100 = fully opaque. press number keys on keyboard to instantly set to multiples of 10, or adjust the slider for an exact amount of transparency on each layer.
Blend Modes: Change these to change the way that the selected layer blends with the layers underneath it. Great for compositing and special effects. (With the move tool selected, press Shift+ or Shift- to cycle through Layer blending modes.
Fill opacity: Adjusts the amount of opacity of the pixels only, but any layer styles are uneffected and remain 100% opaque.
visibility: If the eye is showing that layer is visible. Click on the eye and the layer will still be there but invisible until you click on the eye again.
Locked: The padlock means that something is locked in the layer. (Also click in the 4 icons in the “lock” next to fill opacity to make certain things editable of locked). Here are the different things that can be locked/unlocked.
Lock all: If the box is checked the layer is totally protected from any editing.
Lock Position: You can make any changes except for moving the image.
Lock Image pixels: You cannot draw on this layer if checked.
Lock transparent: You can paint on this layer but not where it is transparent.
Useful tools at the bottom of the panel
Link: Enabled you to link layers. These will all move together unless unlinked.
Layer Effects (Styles): Special effects applied to your image layer. Noted by the little f. Each effect will be listed. multiple effects may be used at once.
Add Layer Mask: This is the button to press to add a layer mask to the currently selected layer. Allows you to paint away parts of your layer without damaging your original image.
Add Adjustment Layer: The best way to apply image adjustments. There can change the color or tone of an image. All layers are affected underneath an adjustment layer (Unless clipped). This is a good option to using Image>Adjustments because adjustment layers are non-destructive and re editable.
Layer Groups: A good organizational tool. This puts layers into a folder. You can choose multiple layers and press Cmd/Ctrl+G to put them in a group, or create a group by clicking this icon. Layers can be dragged in or out of groups in the Layers panel.
Create New Layer: Press this icon to create a new layer. Drag an existing layer into this icon to create a duplicate of that layer,
Delete Layer: Drag a layer into this icon to remove it. Or select the layer and then press this icon to get the same result.
Panel Options: This will open a drop down menu that provides a number of options, many that aren’t listed anywhere else.
Types of Layers
In Photoshop there are a number of different types of layers. They are usually indicated by icons, here is what they all do.
Thumbnail: A small picture of the layers contents.
Layer Group: This puts layers into a folder. Layers can be dragged in or out of groups in the Layers panel.
Type Layer: The same as an image layer, except this layer contains type that can be edited; (Change character, color, font or size)
Adjustment Layer: An adjustment layer is changing the color or tone of all the layers underneath it. To only affect th layer directly underneath it (an ignore the other underlying layers): Move your pointer on the line between the adjustment layer and the layer directly beneath it, hold down Alt/Option. You will see a symbol appear. Click to limit the adjustment. (clip to layer) do the same thing again to toggle this option off.
Layer Style: An effect has been applied. Click the eye to turn it on or off. Double click “effects” to open the Layer Styles options.
Layer Mask: Allows you to paint on the mask to show and reveal portions of the image.
Smart Object: A special type of layer that is actually a container that can hold; multiple (or 1) layers, vectors for illustrator, raw files, video, 3D or many other types of objects. To learn about Smart Objects in depth, check out this video,
Art Layer: a regular layer
Background: Always locked, cannot be moved or have layer effects applied to it. The little icon of the padlock on the right, indicates it is locked. Can be changed into a regular layer by simply double clicking on the thumbnail.
Special Types of Layers
There are two different types of layers that have appear in newer versions of Photoshop. These used to only be in Photoshop Extended. With Photoshop CC, there is no longer a seperate Extended version, all the features are now inluded with every copy of Photoshop.
Video Layer: This indicates that there is video on this layer. Photoshop is now able to be used as a video editor, to worki with video, animated slideshows and motion graphics. See Video in Photoshop if you want to learn about video editing in Photoshop.
3D Layer: Photoshop is capable of importing and working with 3D objects. It also has the ability to do 3D printing. The 3D features in the latest versions of Photoshop have all but been retired now.
Layer Tips:
Here are some useful tips for working with Photoshop Layers:
Click to select a layer
Cmd/Ctrl+click to select multiple layers
Drag your curser through the eye incons to turn the visibility on or off on multiple layers
Cmd/Ctrl+ J to copy a layer
Cmd/Ctrl+ J to copy a selection to a new layer
Cmd/Ctrl+Shift + J to Move a selection to a new layer
Click the padlock icon on the background to convert it to a regular layer
Press Cmd/Ctrl+G to Move all the selected layers into a new group
Cmd+Option+Shift+E (Ctrl+Alt+Shift+E windows) to create a new merged layer above all the other layers
Hold Option/Alt while adding a mask to create an inverted layer mask
You can drag elements from the layers panel into other documents
Hold down Option/Alt and click the pane between two layers to clip the contents of the top layer into the transparencey of the layer underneath it
Choose the move tool “V key” Press Shift + “+” to cycle through all the blending modes. Shift + “-” to cycle in reverse.
Ill see if I have time to keep adding to this list. If you like this kinds of tips, subscribe to our newsletter for more.
This has shown you the concepts of layers.
Are you ready to begin actually using layers? Ok Lets go!
Also, check out our ultimate guide to layer blending modes in Photoshop. All the blend modes explained and practical ideas to use them, tutorials, explanations and a video overview.
Layer Blending Modes. Free eBook by Colin Smith (Yes, really free)
PS Don’t forget to follow us on Social Media for more tips.. (I've been posting some fun Instagram and Facebook Stories lately)
You can get my free Layer Blending modes ebook along with dozens of exclusive Photoshop Goodies here

37 thoughts on “Photoshop Layers 101 Photoshop Tutorial”
Leave a Reply

These 7 tips are going to make you kick yourself, that you didn't know them all before. All of these...

New in Photoshop 2020 Object selection and new preset panels. This Photoshop tutorial shows how to easily change the color...

Amazing Adobe AI Photoshop 1-click Season change on your photos, how to use Landscape mixer


Very useful and informative tutorial.
Thanks for explain it.
I finally have the basic idea behind PS, and am more sanguine about moving from Lightroom.
Thanx for sharing really helpful. Now i know about layers.
GREAT!!!LOVED IT!!!
Don’t forget to share your images with the community on our facebook group https://www.facebook.com/groups/53878338135/
Do you have an answer to the problem below?
https://forums.adobe.com/thread/1591592
Without clicking on the link, which I don’t in comments, I see red, that means a mask or channel is being activated somewhere.
amazing teaching ability
Thank you so much for this site.
I know this is an old page, but it is full of typos and misspellings. Hope later ones are better. Good information, though.
Very, very old page, this is from almost 20 years ago.
Was very helpful; just slow down a little bit more. Moving your cursor slow enough so I can see where it is going.
Thanks Collin:
I teach high school Photoshop and we are frequent users of all your tutorials. Just transitioning from CS6 to CC so this will be a great beginning lesson for my students. (and much more interesting for them in your accent! Cheers!
Great! Shout out to your class, Mr. Rogers!
Very well done Colin. So many tutorials move as such a rapid pace, I end up having to stop and go back often. I always enjoy your videos. Thank you,
Very informative. Looking forward to more as a beginner.
Thanks a bunch Colin, i now know layers far better..
Perfectly paced tutorial. Well done!!
Yes I am a newbie and an oldie trying to learn all about Photoshop which is a marathon in it self and am so great full for you going back to basics nothing like seeing it visually and having the written word. Thank you so much Colin now i feel a bit calmer when i go into Photoshop knowing you are not far away for help.
Colin the pace was just right. I can’t wait for Lesson-2
Thanks very much. Sorry it took so long to get around to viewing the video. I now know the basics about layers but I’m expecting there is a whole lot more to learn about them, like everything in that bottom row (groups, adjustment, mask, effects and more) plus how to access the tools and use them effectively in a layer (I’ve been having trouble with some of them, as in non-functioning tools in a layer).
Thats what this series is all about
Great video nice and slow,easy to follow
I have been a CS6 user since its inception (declined to subscribe, so I’m in stasis), and I nevertheless found out a couple things I didn’t know by watching your tutorial. I guess it’s asking a lot, but if you could indicate occasionally what is exclusive to CC and what is universal, that would be helpful. In any case, well done and thank you.
I usually do that
Although I’ve been working with PS for quite a while, I never knew you could move the layer contents, which could have saved me a considerable amount of frustration and revealed unrealized possibilities! Your pace was just right and the material was well described. I especially appreciate the fact that your videos are accompanied by written instructions. Thank you! One problem though – I’ve never been able to find the Like button on your videos!
Brilliant – always been scared of layers but you explained it so simply
Thank you
Good day. I’m currently working on my module and I would like to obtain permission to use the content of this website as part of my materials. I would greatly appreciate receiving a positive response from you. Rest assured that your material will be used for educational purposes only. Thank you and God bless.
Please contact us at the support link at the top of the page.
Thank you for your clear and easy deep explanation; please keep on; it’s one of the best tutorials on YT!. please consider teaching brush tools & path tools & shape tools in depth; as those need your excellent professional explanation… Also Blending options and convert layer to SMART OBJECT Very appreciated. ONE OF YOUR BEST FEATURE THAT YOU TALK SLOWLY and teaching steps organized well so as any person (that the English language is not mother language) can understand you very well; so important to keep that tone for all future lessons
; I will recommend you for anyone who needs to understand photoshop basics in the right way…
Thanks! And noted for future topics
Thanks for sharing this information it’s very useful.
thanks for the tutorial, it really helps a lot
Thank you so much for this site. this is very helpful..
Perfectly paced tutorial. Well done!!
Long time ago, I’m looking for some details about Layers. I’ve got everything here. Super. Thanks a lot.