Set color and tone in Photoshop in 3 clicks with eyedroppers (Easy Advanced color correction)
Using the amazing eyedroppers in Photoshop for single click color, lightness and shadow correction.
An often overlooked tool in Photoshop is the eyedroppers, They really are powerful once you know how to use them. This tutorial will shows you exacly how you can get quick and reliable color and luminance correction is Photoshop. I’m using Photoshop CC, but this will work with just about any version.
Watch the video and then read the step by step instructions, they compliment each other.
The eyedroppers can be found in many places in Photoshop such as Levels and Curves and they often get overlooked.
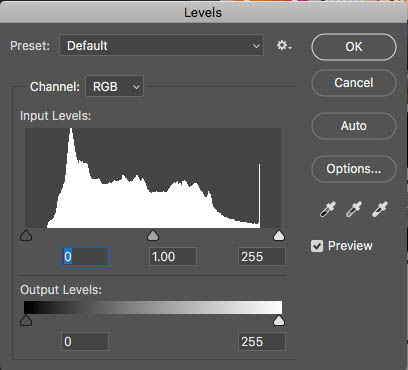

There are three eyedroppers:
- Black: Sets the black point (darkest part of the image).
- Gray: Sets the white balance.
- White: Sets the white point (brightest part of the image).
The eye droppers are also found in the adjustment layers, such as levels and curves.
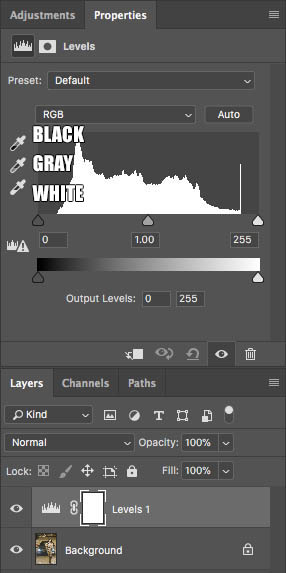
Before we correct the image, we need to calibrate, or more correctly, build in some headroom to the settings. This will allow subtle detail in blacks and whites to show thorugh.
Setting up the Eyedroppers (Only have to do this once)
Let’s start with the black point.
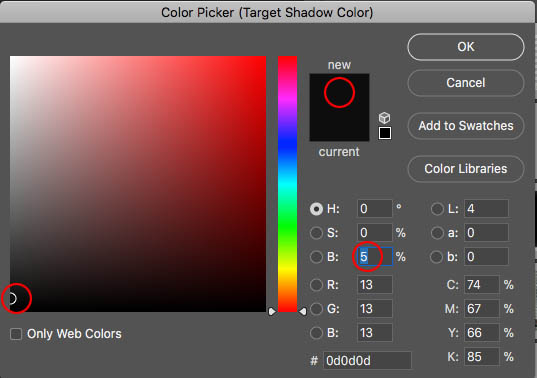
With the levels adjustment layer open, double-click the top eyedropper. (Must have a document open to use Adjustment Layers).
![]()
You will see a color picker. Change the B setting to 5.
Double click the bottom eyedropper (white).
![]()
Change the B setting to 95.
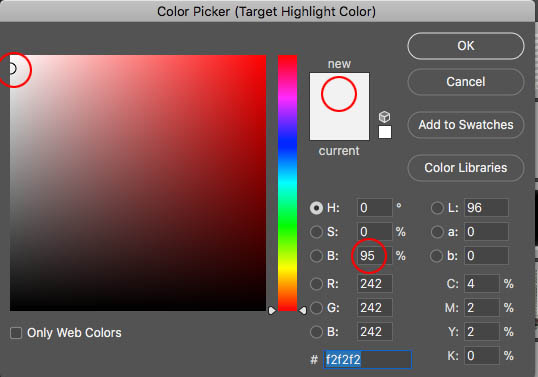
We have now given ourselves 5% headroom in the blacks and whites.
You will see a dialog box each time that offers to save new defaults, Click yes, you will never have to do this again, until you reinstall Photoshop or reset the preferences.

Setting the shadows and highlights of a photo using eye droppers in Photoshop
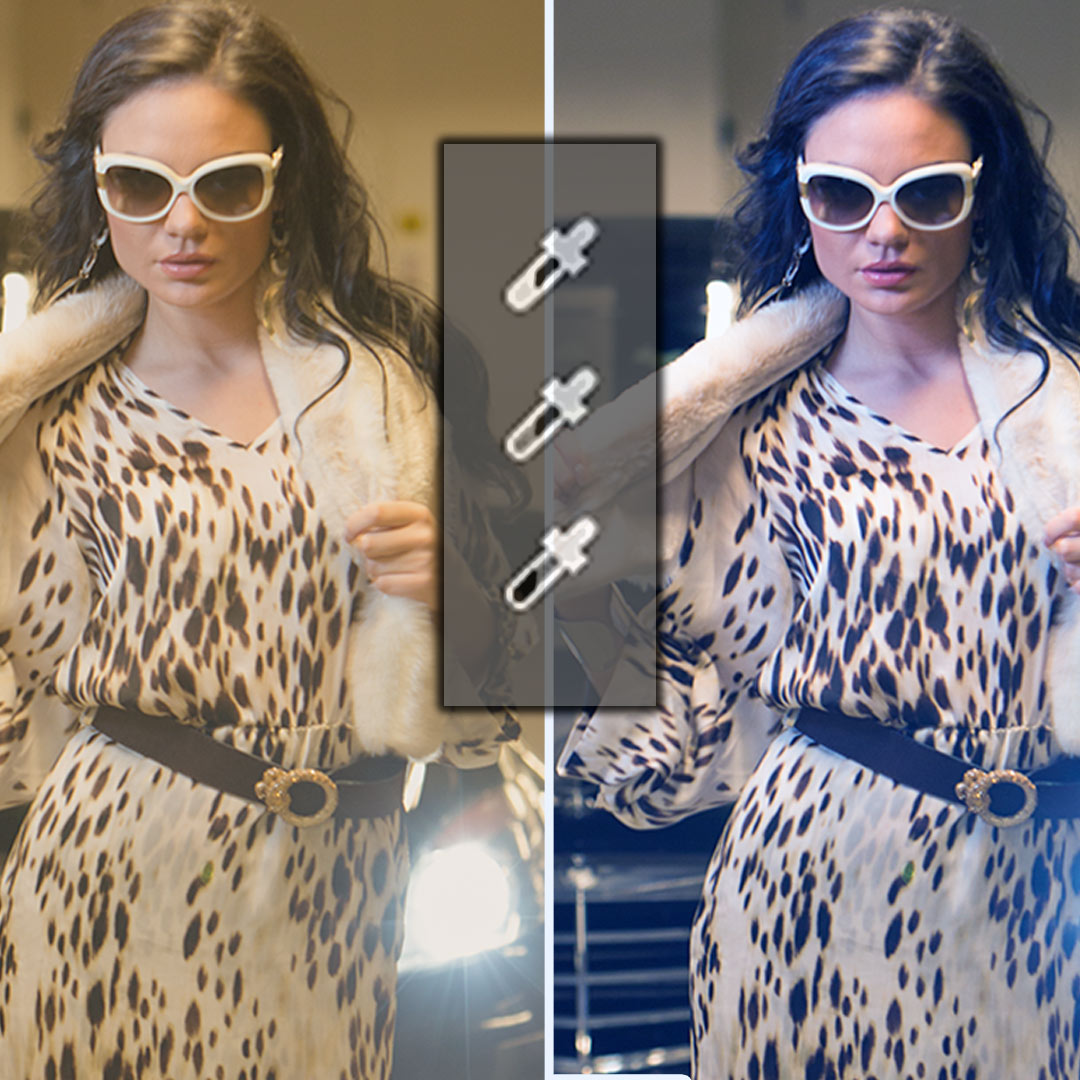
Let’s start with this photo that I shot in an underground parking building. Because of the flare from the car headlights, this image is lacking contrast (stong blacks). It also has a warm color cast. Lets fix it in 3 clicks.

Step 1. Setting the Shadows
Create a levels adjustment layer

Choose the Black eyedropper
Now we neeed to find the darkest point in the photo
Hold down the alt/Option key and drag the black triangle to the right. You will see clipping in the photo indicating where thae darkest points are located.
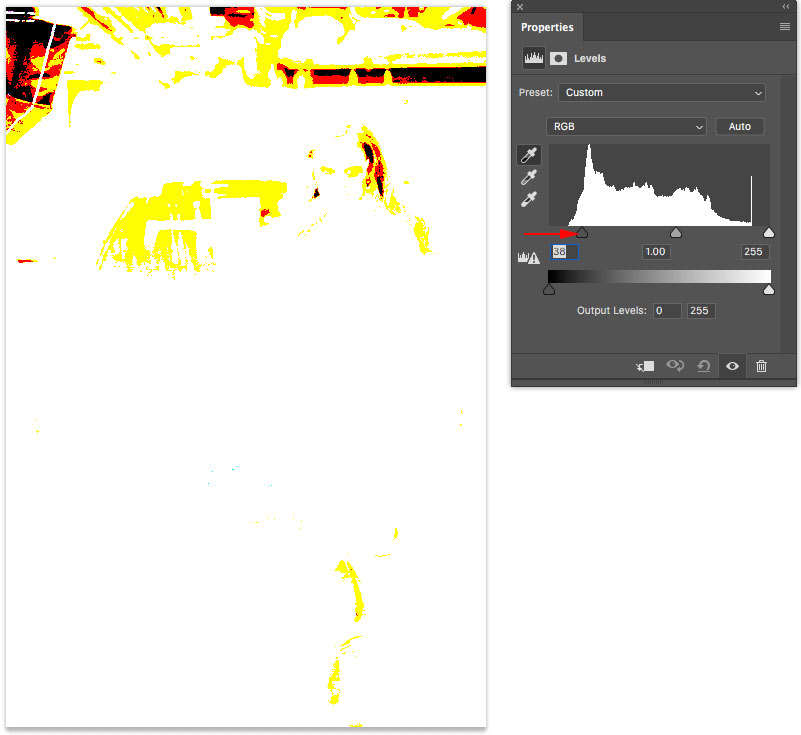
The darkest point in on the A/C duct on the ceiling. Click with the black eyedropper and the blacks now look really nice and rich.
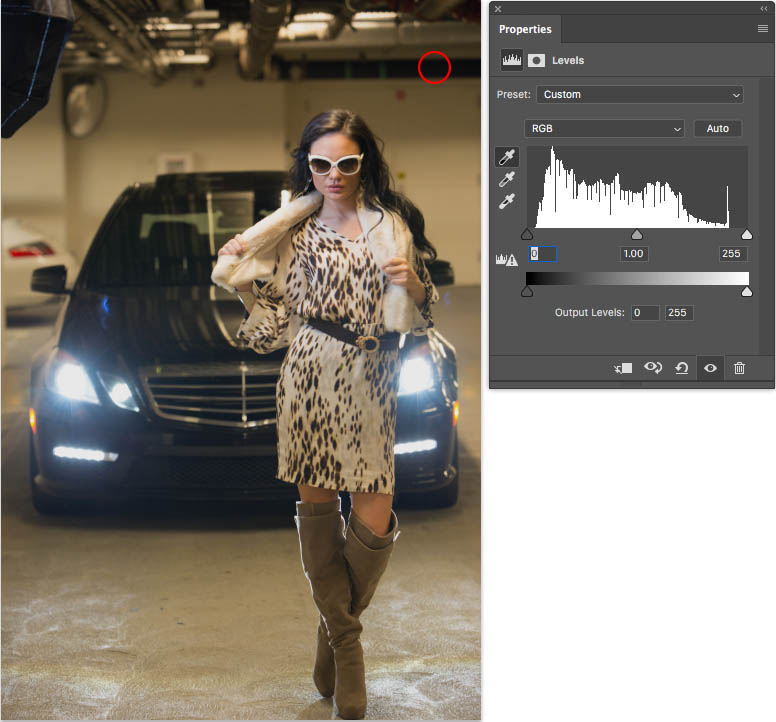
Step 2. Setting the highlights
Let’s locate the brightest part of the photo.
Hold down Alt/Option key and drag the white triangle to the left. You will see clipping about the headlights of the car.
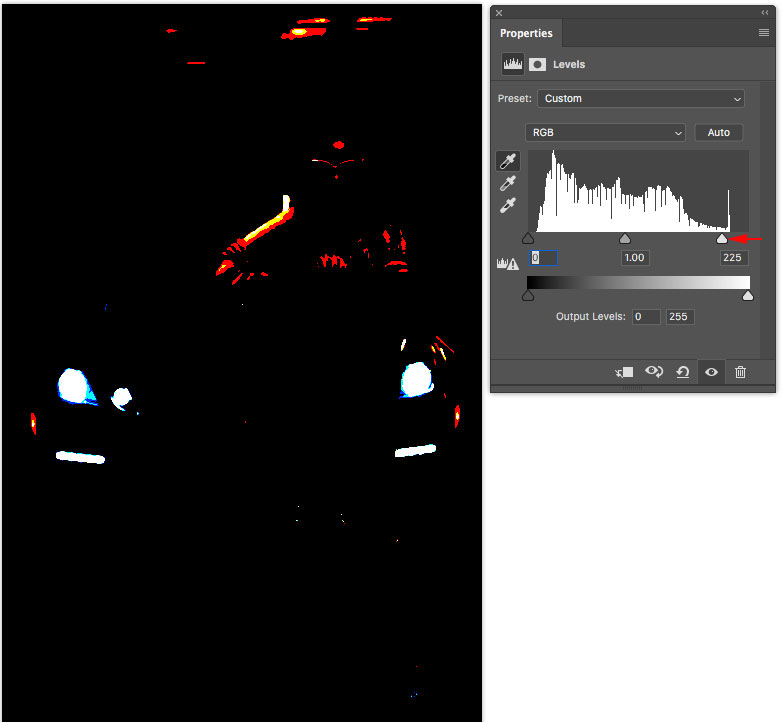
Sometimes, I ignore areas that are producing light (you should try it first) and look for other area that are the brightest but that may contain some pixel value (not blown out).
In this case, I clicked on the reflection in the car windshield with the white eyedropper. This brightens up the photo nicely.

Setting the color balance with Photoshop eye droppers
Now its time to set the white balance and remove the color cast.
Choose the gray dropper.
![]()
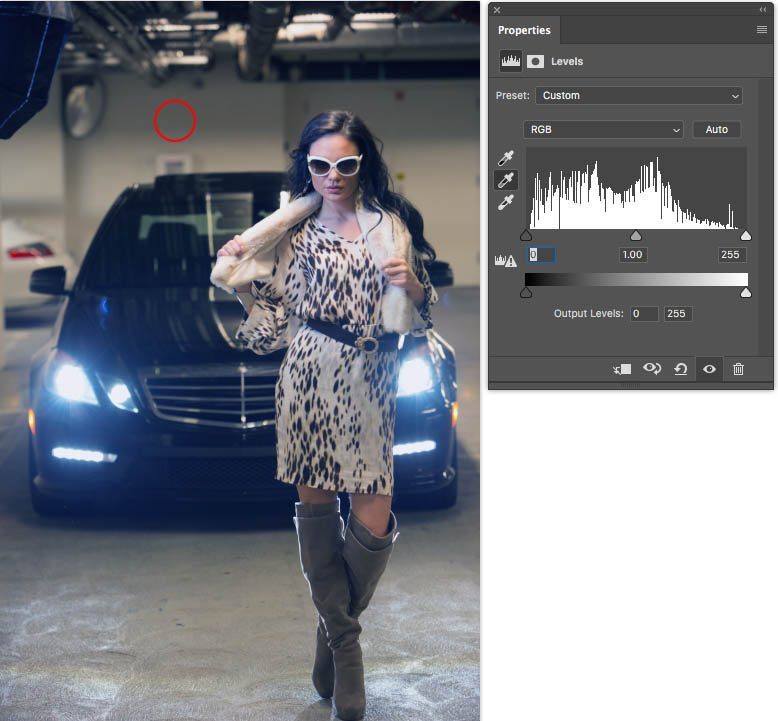
Look for an area in the photograph that should be a neutral gray or white. I know the wall should be gray.
Click on it with the gray eyedropper and look at that, the color cast has been removed.
I hope you enjoyed this little tutorial. The curves tutorial is here
Great to see you here at the CAFE
Colin Smith
PS Don’t forget to follow us on Social Media for more tips.. (I've been posting some fun Instagram and Facebook Stories lately)
You can get my free Layer Blending modes ebook along with dozens of exclusive Photoshop Goodies here

32 thoughts on “Set color and tone in Photoshop in 3 clicks with eyedroppers (Easy Advanced color correction)”
Leave a Reply
New Dust removal in Photoshop ACR automatically removes dust and spots from photos
20 Photoshop 2020 Tips that you probably don't know and should! Photoshop tips, tricks and hacks. Quick tips to make...
7 best new features in Photoshop 2025 April update



I realize this is a Photoshop web site, but could you get the same results in Lightroom using the black and white sliders and the white balance eyedropper? If not, why not?
This is a very easy yet powerful way to make adjustments. Thank you for this valuable information!
Colin, since about a year ago I mostly go to Camera Raw with 90 % of my images, but before that I used Levels most over curves because I usually just needed quick adjustments. Camera Raw gives me a little more variety in the adjustments I do and to me anyway, it is kinda a Curves-Levels combination with more control. I know 12 ways to do the same thing, this is one of my ways…
Thanks for this one. Clarified a few points for me.
I also like to use Alt + auto in curves, which selects further options.
Where is the link to the tutorial using Curves that you reference at the end of the video.
I have used the Auto button in LR to set the black and white points in the past but I will now do as you suggest in the above video. You are fantastic!!
Near the bottom of the page
I have been trying for years to revive old Ektachrome slide duplicates. The copies were made after the colors degraded. I picked one photo at random that was all red and tried your tutorial on it. It worked. The photo went from all reds to one with greens and browns. The sky and water reflections are blown out, but the original from 1961 might not have been any better. Thanks a bunch. Only 499 more photos to go.
Raw!
First and second bits are OK – but knowing which bit should be gray is more difficult. And there are many different grays too!
Thats why I use a color checker or a gray card in the photo
I enjoyed your explanation of the eye dropped tools. Well done.
I love using curves since I know more about it by watching your tutorials.
Thank you, Colin,
I found this helpful, and I have bookmarked it under Adobe/Photoshop/Colin Smith. I have also been editing photos that have discoloring in them and want to match the discolored area with the rest of the areas in the pictures that are not discolored. I am already on your email list and receive your emails. Thank you for your videos.
Another great tutorial Colin! As they say, time is money, so I’m always open to new ways to reliably reduce my editing time – and this method will help me do that. Please keep up the good work! I do basic editing in ACR (including white balance) and I tend towards Levels if I need to tweak in Photoshop.
I very, very seldom use levels. I use curves.
Very good video, Colin. Finding the correct gray tone to click is often tough for me.
Great as usual
Thanks Colin, Enjoy your tutorials. I am older and just so pleased that you don’t rush through them, but take them slowly, enough time for me to focus and enjoy.
Thanks again Colin for the explanation on the eyedroppers. I do use them but sometimes forget we have this simple correction tool…another great tidbit for us to have…thanks for doing the tutorials!
Great! Effective as always, Colin.
Another really great tutorial.
I always use levels and curves for any color correction in photography. You can’t live without them.
I always start in RAW and then will move on to others (curves/levels etc) using masking to refine the photo. I would love to see a tutorial showing how to get the same colors produced on the screen into the printer. I always have variations in color – most of which are not beneficial, and I let Photoshop manage the colors. I have the monitor set as a printer profile but still have issues. Would be great to see something like this added to your educational videos, which by the way, are extremely useful.
Thank you for the eye dropper tutorial. I cannot find a suitable photograph to use, may I please have permission to use the one in the tutorial?
Best regards,
Jack
I play classical guitar, but I wish I could just jam like you.
I have found with some of my images (taken in RAW and manipulated in RAW first) do not respond to black and white set process, using the dropper and ALT. Sometimes when if fails in Levels it works in Curves or not with both. Gray option seems OK.
Any ideas?
Is there a way to do this in Lightroom Classic? That would be amazing!
Thank you for this helpful article keep it up bro.