You know what it’s really like when you visit a popular place. There is never a moment when an unwanted car or a person isn’t in the shot. Usually there are multiple distractions in the frame.
You see the photos with no-one around and wonder how that’s possible. Did they get there super early, off-season? With a little help from Photoshop, you can now visit the busiest of places and easily remove people, crowds, cars and more in Photoshop. I’m going to show you 2 tourist removal tricks in Photoshop. Check out the quick video and then bookmark this page for reference.
This is part 6 of a “How to remove anything from a photo in Photoshop series”. Ill link the rest of the series at the bottom of the page.
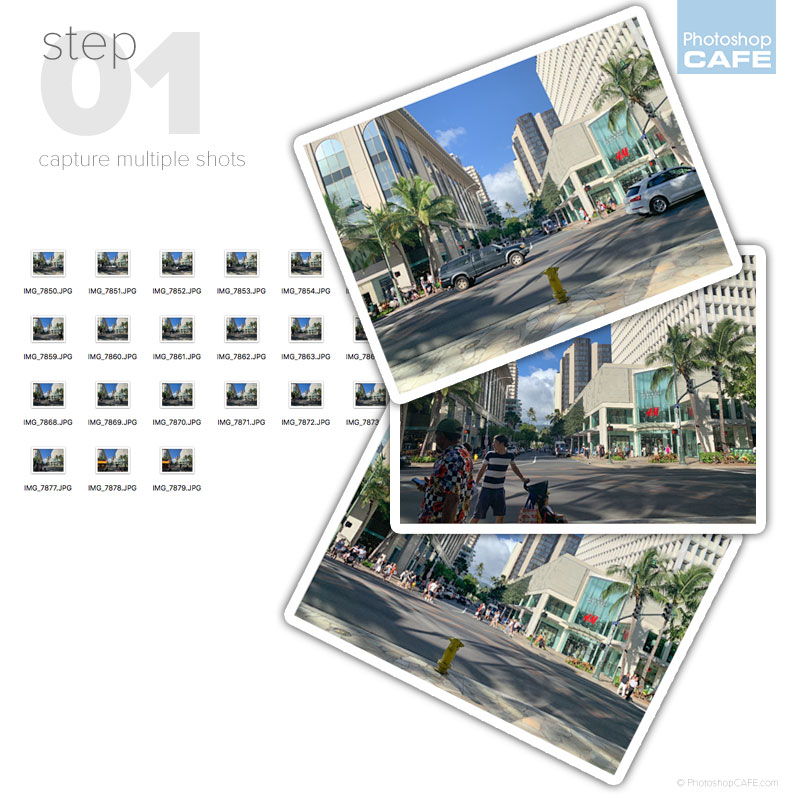
The first thing you need to do is shoot the photos, so its easy to remove crowds and distractions later. For this tutorial, I handheld an iPhone and shot the images, just to show a worst-case scenario (This is why PhotoshopCAFE tutorials, actually work). If you use a DSLR/Mirrorless on a tripod, you’ll get even better results.
When you shoot, you will need moving subjects. Keep shooting until every area in the photo has the background revealed at some point. Sometimes you can get the will 3 shots, sometimes it takes 20 or so. Shoot, wait for things to move and then shoot again. A good opportunity for this series was the people were crossing the street.
Upload all the photos and save them on a folder.
This step only works in Photoshop CC. Don’t worry, I’m about the break it down and show how it also works in Photoshop CS6, as well as give you more control in CC.
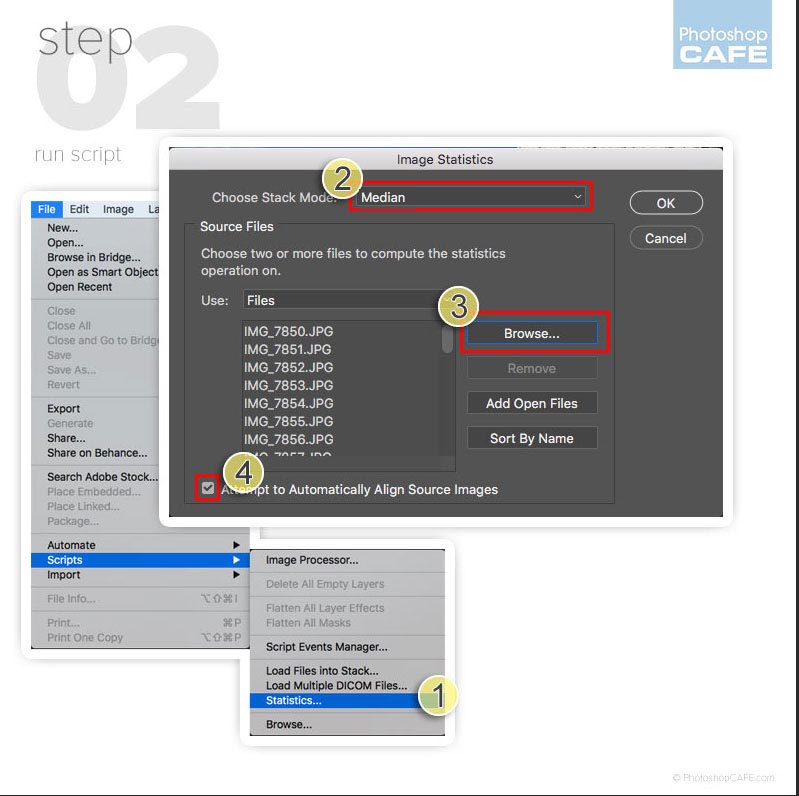
Choose File>Scripts>Statistics
Choose Median as the stack mode.
Select your folder of image Tip: (Cmd/Ctrl+A to select all images when you are in the folder.)
Turn on Auto Align
Click ok and you are done.
Let’s break it down. This works in Photoshop CC and CS6.
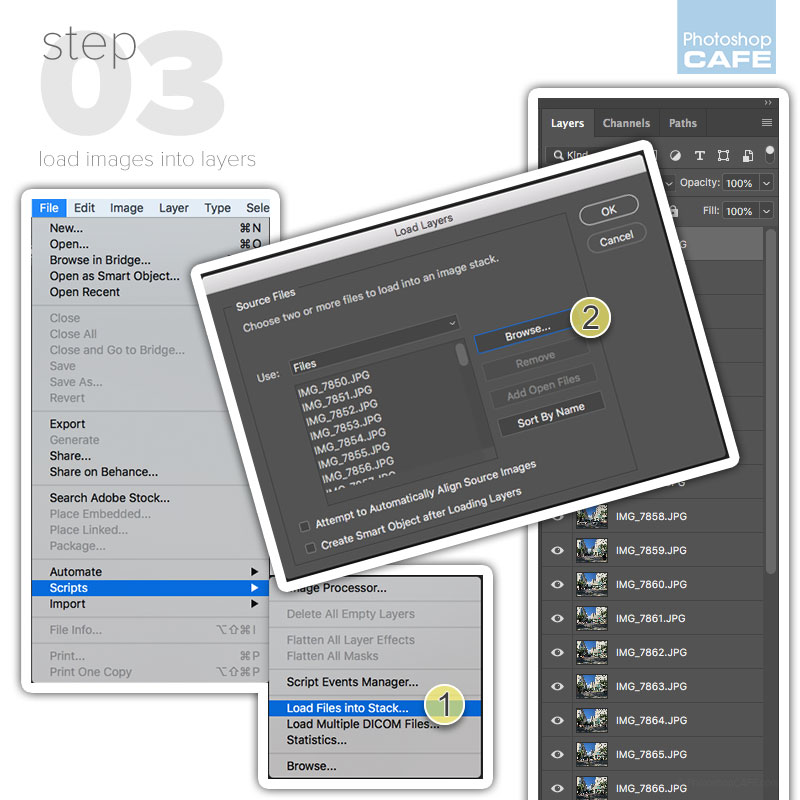
Choose File>Scripts>Load Files into Stacks. (1)
Choose your older of images (2)
Each photo will now be in a layer.
If we don’t align the layers with each other, you will end up with a blurry mess.
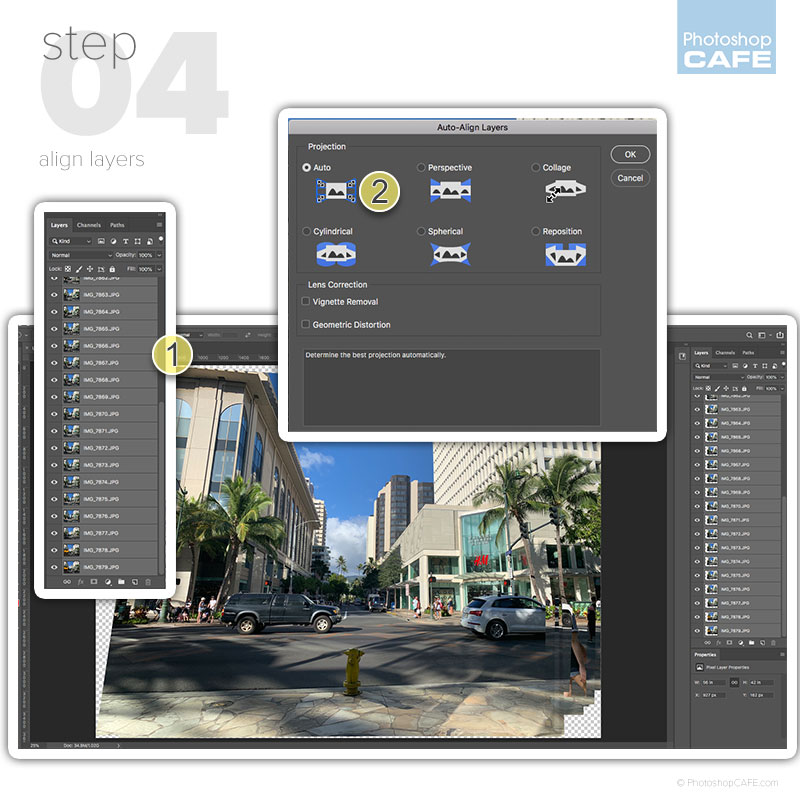
Select all the layers: Click the top layer. Hold down Shift and click the bottom layer. All will be selected. (1)
Choose Edit>Auto Align Layers. Choose Auto. (2)
Click ok and all the layers will now be aligned with each other. (This may take a moment).
This next step will do all the work for you. This was originally designed for medical imaging purposes in Photoshop Extended, originally dropped into Photoshop CS3 extended. See the PhotoshopCAFE Superguide to see every feature introduced into Photoshop since CS3,
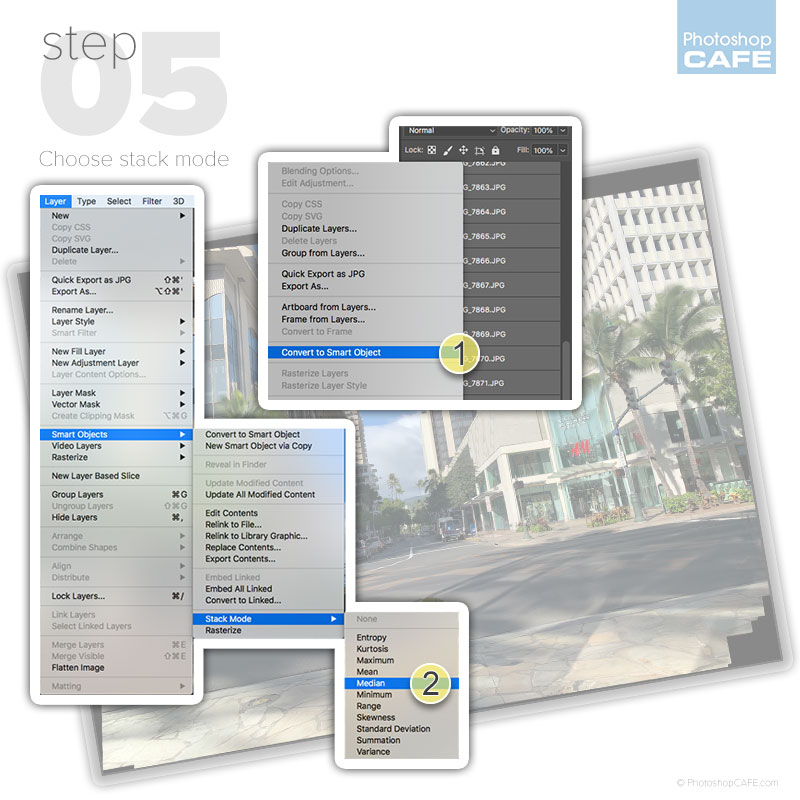
With all the layers still selected in th layers panel, right-click and choose Convert to Smart Object. This is the key to it all working.
Choose Layer>Smart Objects>Stack Mode>Medium.
(The stack modes are like Blend modes for Smart Objects, but way-more sophisticated).
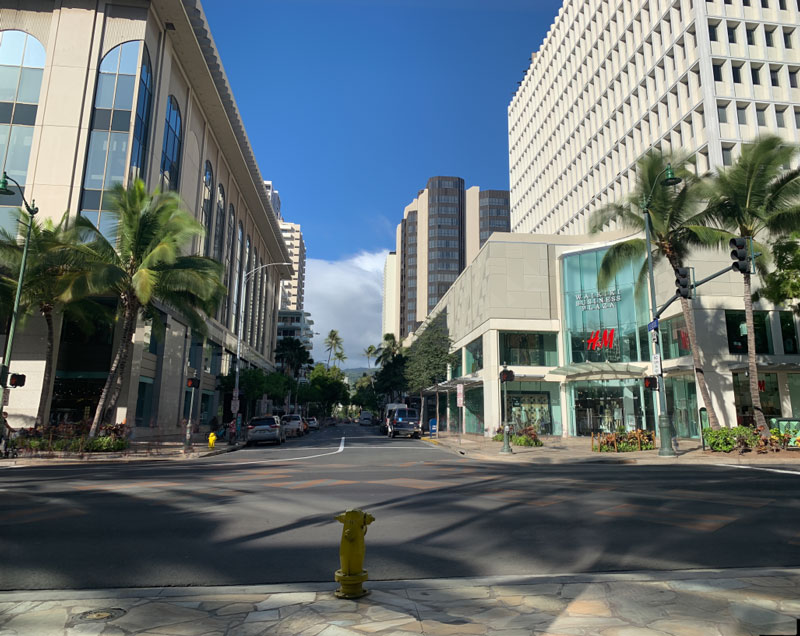
And the result is all the distractions are gone from this merged photograph.

As you can see the Medium Stack Mode did all the heavy lifting and removed all the temporary objects, AKA people and moving vehicles.
You may still have to do some minor touch ups, but most of the work is done for you in just a few clicks.
Here are the rest of the tutorials in the How To Remove Anything From A Photo in Photoshop series. Let me know how you like this series by dropping a comment here, or on our youtube page. (Don’t forget to subscribe).
If you liked this tutorial, please tell your friends about the new and updated PhotoshopCAFE. Its the Same PhotoshopCAFE I started in the year 2000, but I have updated almost all the tutorials and add a new one every week.
Colin
PS Don’t forget to join our mailing list and follow me on Social Media>
(Ive been posting some fun Instagram and Facebook Stories lately)
You can get my free Layer Blending modes ebook here
Stop struggling with selections. Learn how to select and cut out anything from people, hair, trees, complex shapes and even transparency.
Discover how to get perfect edges, without halos and jaggies. Colin shows you exactly how in 18 lessons.
All the images are included for you to follow along.
You will be able to select and cut out anything: faster and cleaner.

This site uses Akismet to reduce spam. Learn how your comment data is processed.
Easily remove things from photos with advanced content aware fill options in Photoshop. When Content Aware Fill doesn't work as...
In this live stream, Colin Smith shows you a number of quick fire effects to make an image look better....
How to use Smart Objects in Photoshop tutorial, learn all the things you can do with Smart objects with 7...

thanks COLIN!!!! this is almost like magic!!!!! ……..and I love it!!!
Thanks for sharing! This tip will come in handy when doing some travel photography in China at the end of the month. Although I will continue to start taking photographs early in the morning to avoid crowds, this technique will enable me to .end up with some great shots even during the day
Thanks so much for that!
I thought you were going to talk about ‘content aware’ and thought, Oh sure 😉
This is so good, thanks.
Michael
I like all your tutorials, every time I learn something new.
Hi Colin, great tutorial. just an observation and a clarification- you have typed and spoken ‘medium’ instead of ‘median’. Mean and Median are 2 different types of averages (The “mean” is the “average” you’re used to, where you add up all the numbers and then divide by the number of numbers. The “median” is the “middle” value in the list of numbers). In your video you have chosen median as the stack mode but in your written instructions (step 2-short version) you have written choose Mean as the stack mode. Typo? Perhaps they both work?
Thanks for pointing that out Christina, I have updated the tut to reflect the correct mode which is Median 🙂 Sorry for any confusion.
This is an amazing video. This will even be helpful in my processing of my flower images on a windy day. I’ll let you know how they turn out.
Wow, Best removal tutorial so far.
Thank you Colin.
Thank you. I never understood “scripts” before your tutorial. Many thanks!
It takes a lot to Wow me in PShop,. Having been Scott Kelby’s assistant at NAPP, as it was known then, I have seen “the” Master of PShop at work. Colin you are amazing, the tutorials are detailed but never boring and your photography is beautiful. Love your HDR work. I really liked your simple removing people from crowds tutorial. Thank You!
Another very useful tool in my box – thank you!