
How to use Selection brush in Photoshop and Quick mask in Photoshop
Photoshop Selection Brush vs Quick mask, when to use each.
The selection brush tool, is a tool that makes selections. Unlike the other selection tools, you just brush this on like a paintbrush, it’s very easy to use. If you have used the selection brush and know Photoshop fairly well, you will notice it’s similar to Quick Mask. If you have never used the selection brush, it’s ok, we will go through ti here along with all its features. We will also look at quick mask and suggest which is the best way to go for different tasks.
How to use the Selection Brush Tool
Choose the tool from the toolbar.
Paint. You will see a colored brush stroke.
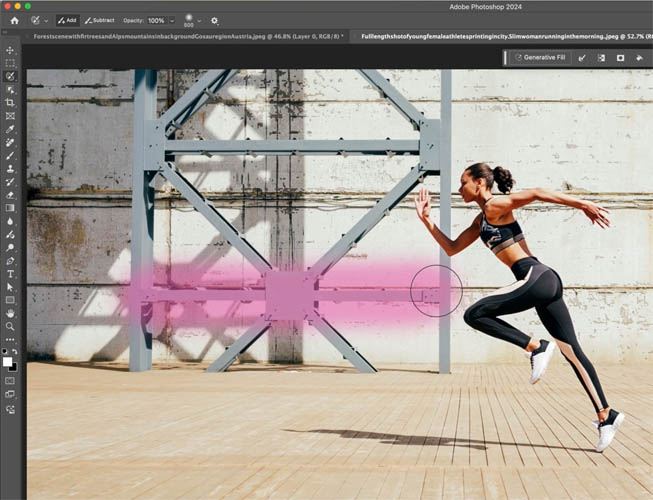
When you choose a different tool, the colored stroke will turn into a selection.
If you choose the Selection tool again, the selection will turn into the brush stoke once again.
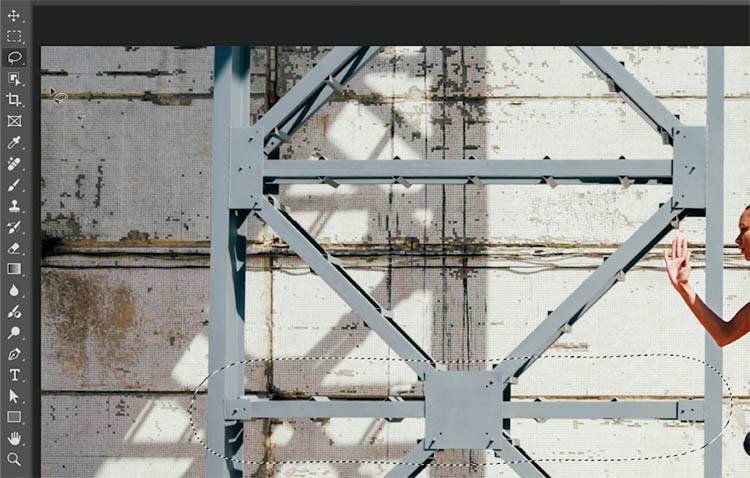
When the selection is active, it’s the same as any selection. You can combine it with other selection tools.
Hold Shift to add to the selection. Hold Alt/Option to remove from the selection.

When you are in the Brush tool, also
Size Hold Alt/Option to remove from the selection.

When you choose the setection tool, the selection will turn back to the colored strokes.
Shortcuts or hotkeys help. (L-key), chooses the selection tool, choose another tool, like move tool (V-Key) to toggle a selection.

There are 2 brush settings
Size ( [ or ] bracket keys)
Hardness (Shift + [ or] brackets)
Being able to create a soft edges selection is unique to this tool. (and Quick Mask, we will discuss soon)

Using the Selection Brush Tool
Lets remove a distraction from the photo.
You can paint freehand to make a selection. Or use this trick to paint straight lines quickly.
With the tool selection, click at the start point.
Release
Hold Down Shift
(Still holding Shift), Click at the end of the line
A line will be drawn between the 2 points.

I used that trick to select the steel girder.

Click on Generative Fill in the Contextual Task Bar.
Leave it blank and click Generate.

The distraction has been removed.

Using the Selection Brush tool with Density
Let’s make a little art using the density art trick. Learn how to make art with ai and density in Photoshop here
Lower the brush Opacity to around 20%

Choose a different overlay color. Here we chose Green.

Paint over the portion of the image you want to change.

In the task bar, click Generate and then enter something like oil painting, or watercolor in the prompt and click on Generate.

You get an oil painting effect

Lower the Opacity of the layer to make the effect more subtle.

Cutting Out tress with Selection Brush and Quick Mask
A difficult task for many people is cutting out trees. I have tutorials on removing background from trees.

Without going through all the steps. They are on the video at the top.
Choose Select>Color Range
Use the eyedropper to select the sky.
Use the + eyedropper to add to the selection
Move fuzziness to get the best isolation of the selected area.
Click ok

You get a selection of the sky.
Cmd+Shift+I to inverse the selection.

Choose the selection Brush. See the overlay.
Paint on the areas that got missed.

Go back to a selection.
You may notice, it’s really hard to see the tiny areas that are missed in the field.

Ok, here’s a better way. Continuing where we are.
Using Quick Mask to refine selections
With the marching ants selection active, Click on the Quick Mask tool, to press the Q key.

You will see a similar overlay, but probably a different color than Selection Brush.

If you double click the Quick Mask tool, you will see you can choose any color and also opacity.

Now with 100% opacity, it’s easier to see the missed areas than with the Selection Brush.

But, it gets even better.
Open the Channels and notice the Quick Mask channel has been created.
Turn off the visibility eye from RGB

Now you can see a black and white mask.

Paint with black and white to clean up the mask. Much easier now. You can also combine other selection tools inside Quick mask.

Press the Q key to go back to a selection. Just like the Selection Brush, you toggle between a selection and painting.
The Quick Mask tool also lets you use any brush you like as well as supporting Pen Pressure.
Quick Mask is more powerful, and is my choice. If you are newer, you may find the Selection Brush easier. So you have options. The selection brush is sometimes quicker for quick fixes and selecting things to use with generative fill.
I have a few tutorials on How to use Quick Mask, here is one.
Just to finish our task. If you click the mask icon to hide the background we can see the quality of our selection.
I dropped a blue solid behind it to let you see the quality of the cutout.

This is the same image, but using Select Sky. As you can see the other method is more work, but a better result.

I hope you found this week’s free tutorial useful.Thanks
Colin
Keep growing with Premium Courses
Photoshop 2026 for Digital Photographers
Learn Photoshop properly, from the basics to pro retouching, step by step.
$129.00 · one-time purchase · instant download

Free for you
The Photoshop Vault
Get my free Layer Blending Modes ebook along with dozens of exclusive Photoshop goodies: actions, brushes, presets and cheat sheets.
You're on the list, so your free goodies are waiting for you in the Vault.
Get Free Photoshop Goodies Open the Vault

How to convert Photos to paintings in Photoshop with Generative Fill AI
how to convert a photo into a painting using Generative ai in Photoshop. Colin Smith also shows how to convert part of... Read tutorial
5 useful tools you didn’t know were in Photoshop | Photoshop Tips
5 photoshop tips that your are going to love. These are very useful, but mostly unknown tools and techniques. Enjoy them! Read tutorial
Powerful selections and effects in Photoshop with Quick Masks
How to use Quick Masks in Photoshop, the secret weapon for easy selections Read tutorial
Hidden settings to get the very best auto Selections in Photoshop
How to get selections in Photoshop as a fast as possible with the best results possible for cut outs and background removal Read tutorial
5 ways to fix selection edges in Photoshop
5 ways to fix every selection edge in Photoshop, the ultimate guide Read tutorial












I don’t see myself using the selection brush and I wish they’d devoted resources to something else. I too frequently accidentally hit a slider during editing, moving the image. I’d love a command that returned it to it’s previous position.
not necessary