
How to cut out Glass, Smoke + Water in Photoshop
How to make see through glass and smoke in Photoshop
Ultimate Free Photoshop tutorial on how to Cut out glass, vapor, liquid and make it see through. Make transparent selections in Photoshop
I think you are really going to enjoy this week’s tutorial. I’ve been working very hard on this because I know that it’s going to be a favorite. So many people don’t know where to start when it comes to cutting out transparent and semi transparent objects in Photoshop such as glass, smoke, water etc. This method that I’m about to tech you is what I have been using for years in my commercial work and with a little patience, I hope this workflow will serve you as well as it has me.
For this tutorial, rather than use my own photos, I decided to grab a couple of images from Adobe stock: This way you can grab them yourself and follow along.
![]()
Extracting Glass and keeping control over the transparency
Step 1
Before I begin, let me proactively address a question I’ll get. “This glass is against a solid color, its easy compared to a complex background.” #1 I’m using Stock, why would you use a stock photo that has a complex background, choose a different photo. #2 if you are photographing it yourself. Why are you photographing objects with a busy background? Its so easy to set up a piece of seamless paper or even hold a sheet behind it. If you have a complex background, it’s better t reshoot or use a different image. However, if you are forced to use a complex image, I have a different tutorial for that here.
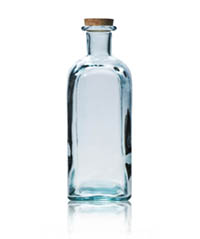
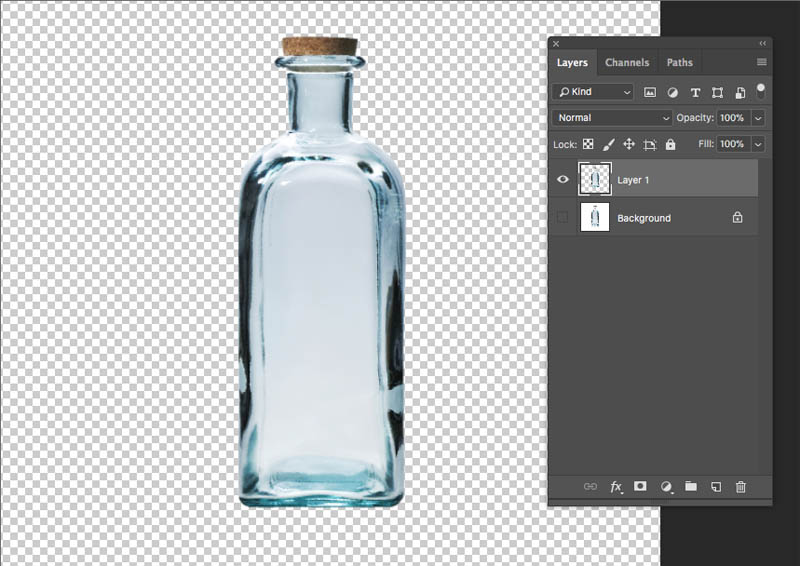
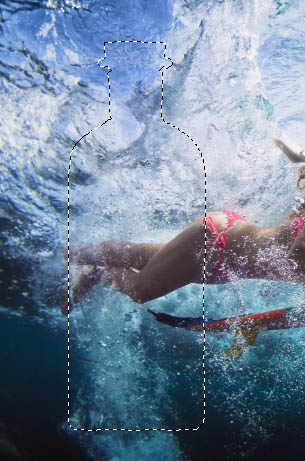
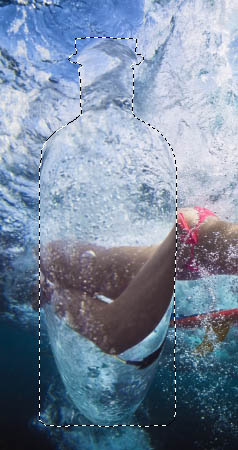
Let’s begin by cutting out the glass bottle. This technique is going to give you a crazy amount of control and make the glass see through, you can control how see through it will be! The first thing, is to use the quick selection tool.
Drag it over the white area to make a selection. If you go too far, you can exclude areas of the selection by alt/option and clicking with the tool.
Inverse the selection: Ctrl+Shift+I (Cmd+Shift+I mac)
Step 2
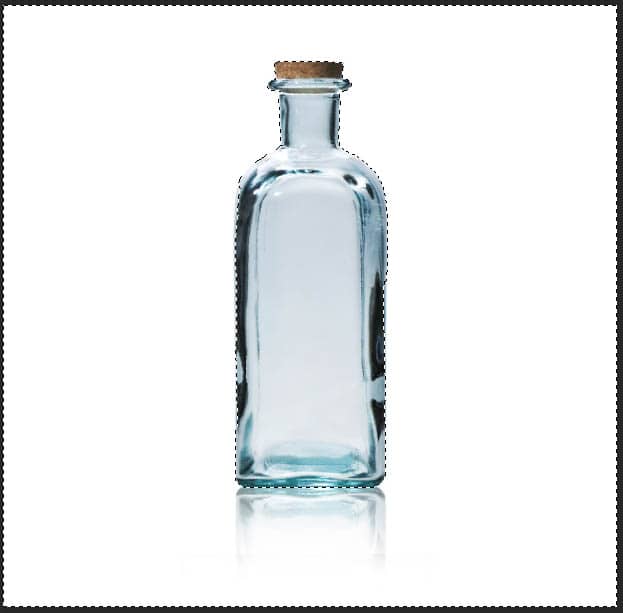
To check how good your selection is, tap the “Q” key for quickmask
Here we need to clean it up a little bit on the edges.

Choose a small hard brush. Set the color to black and paint in the areas to touch up. (Tip: Click, hold down Shift and click again to draw a straight line)
Tap Q again to toggle back to a selection
Step 3
Press Ctrl/Cmd+J to copy the selection to a new layer
We have now cut out the bottle shape, but not the transparency yet.
Step 4
Let’s cut out the transparency, shall we?
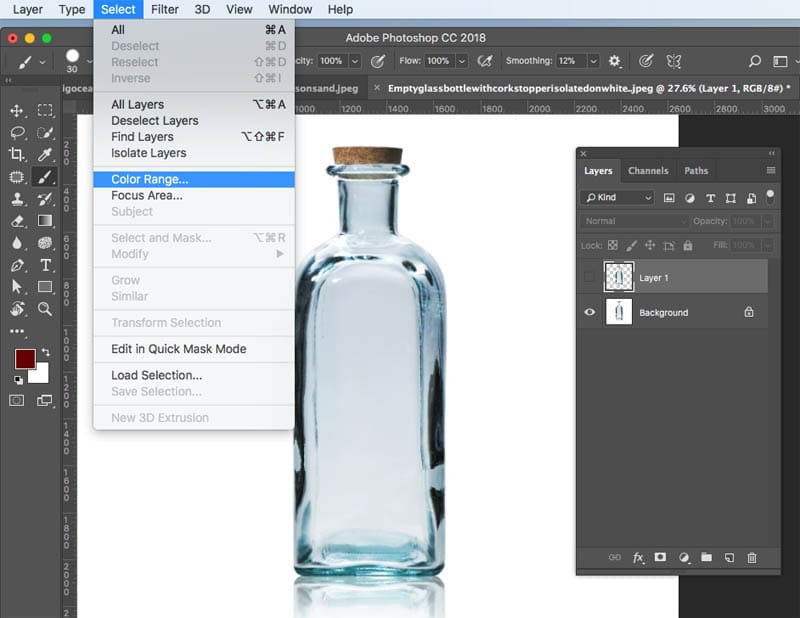
Make sure the background is selected. (Hide the top layer for now)
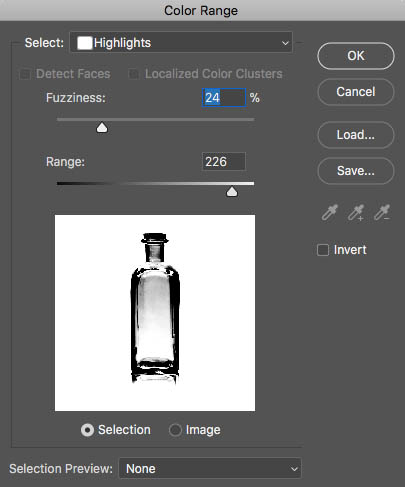
Choose Select>Color Range
When Color range opens, choose Highlights from the Select menu
Adjust the Range until you see a nice clean silhouette of the bottle shape (Fuzziness at 0 for now)
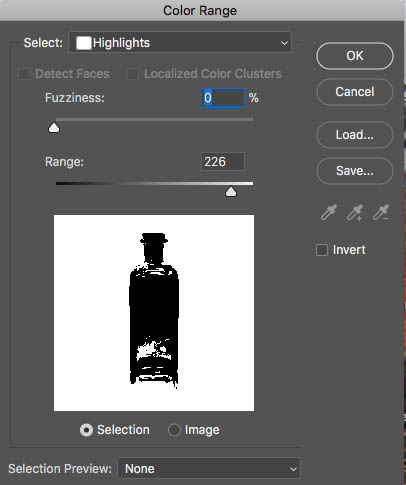
Once the range is set, adjust the Fuzziness until you see a nice gray in the transparent area. (Black is selected, gray is semi transparent selected and white is unselected)
Step 5
Click ok, and you will see marching ants on the bottle. Any areas that are less than 50% transparent won’t show marching ants, but will still be selected.
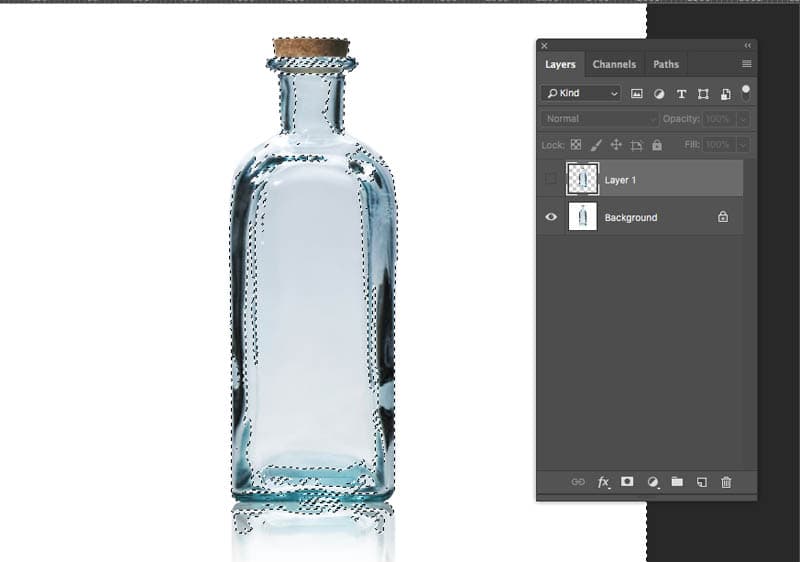
Make sure that the background is the active layer as shown here.
Click on the Mask button to mask out the transparency. (If yours look the opposite, undo, hold down Alt/Option as you click the mask button).
Step 6
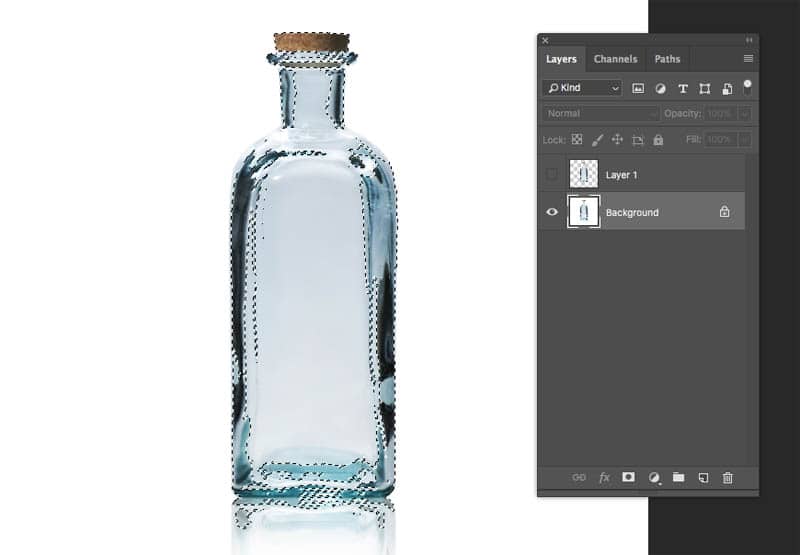
We are missing some key parts to the bottle, let’s fix that now.
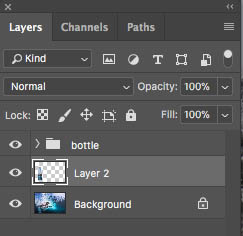
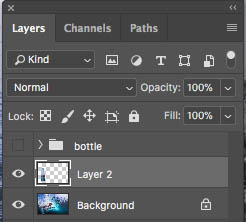
Duplicate the Layer 1 (extracted bottle) layer by clicking on it and pressing Ctrl/Cmd+J or drag it into the new layer icon in the Layers panel
Hide the top layer. You should now see the bottle as opaque again.
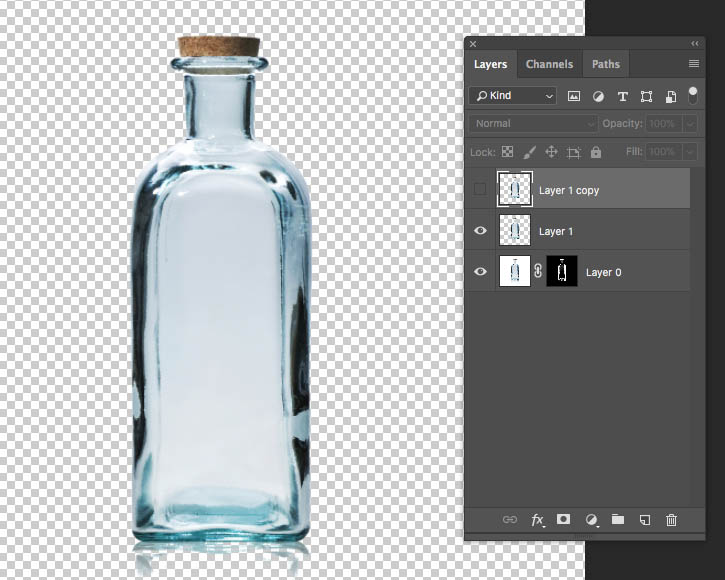
Create a hidden mask, but Alt/Option clicking on the layer mask button.
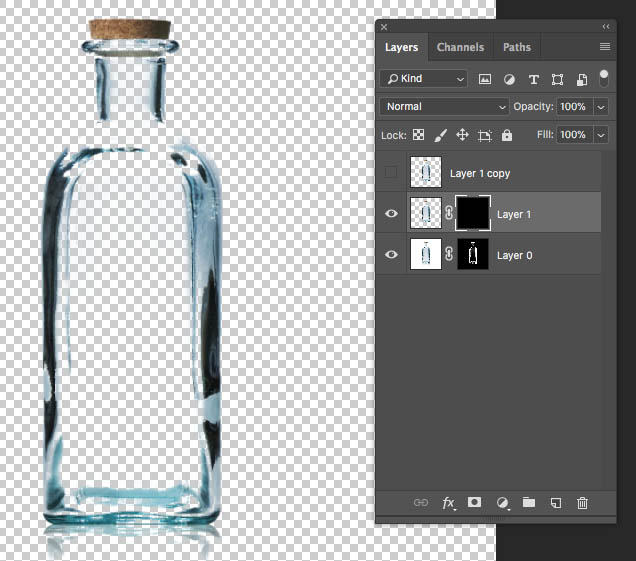
Choose the brush tool and white as the foreground color
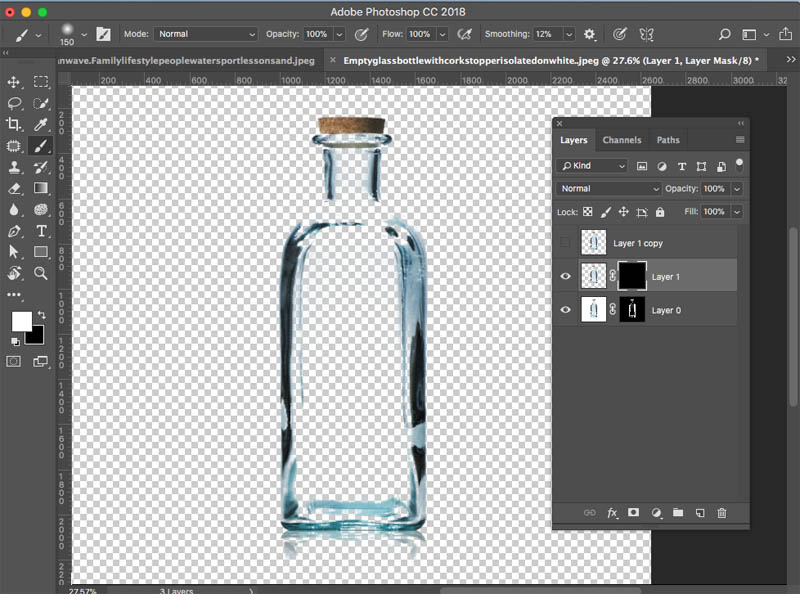
With the layer mask selected on the middle layer, paint around the edges of the bottle to make the important areas fully visible.

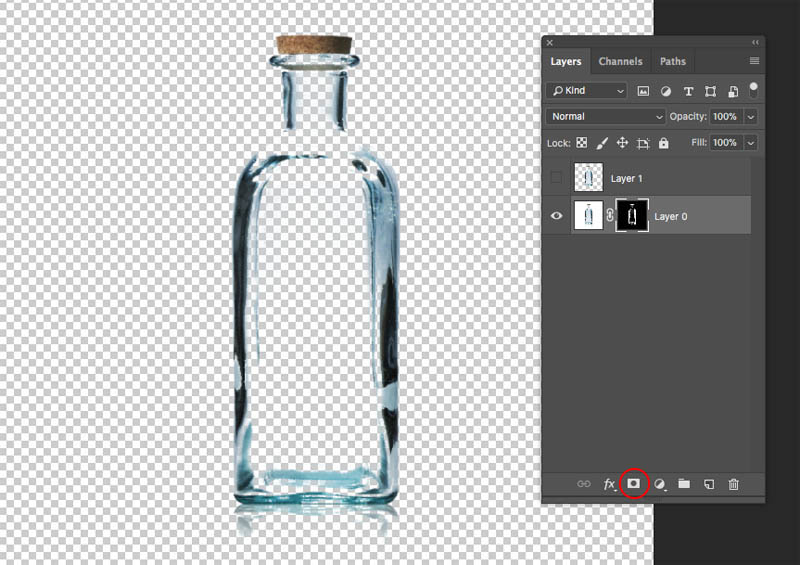
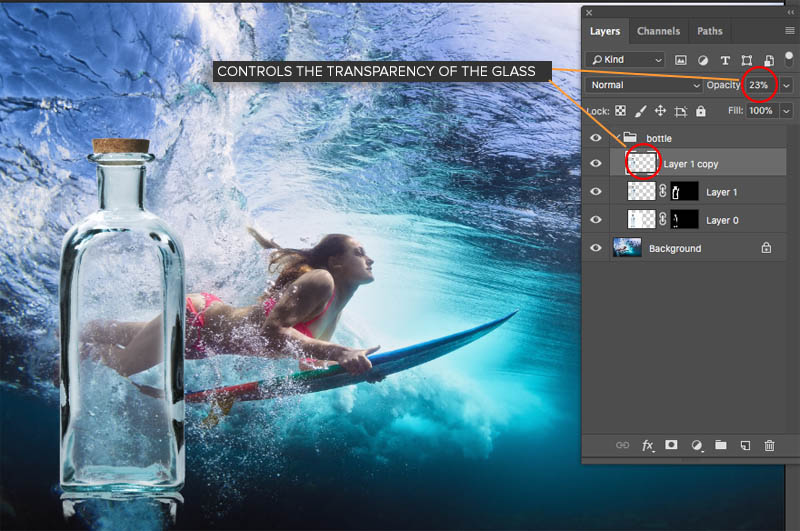
Now we have a really cool setup. Turn on the top layer and adjust the opacity to control the transparency of the bottle. Pretty neat huh?

Step 7
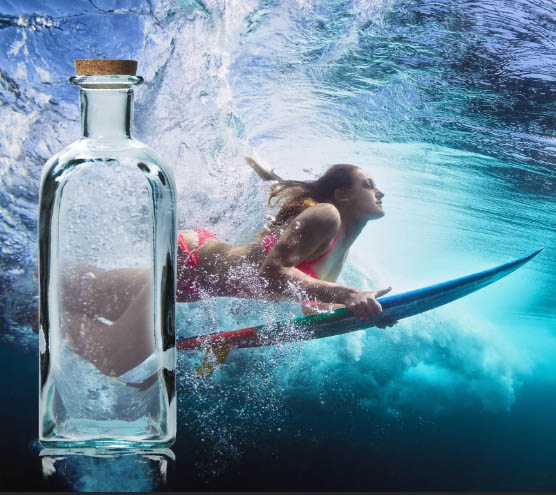
Let’s composite it into another photo, while keeping the setup so we can change our glass transparency.
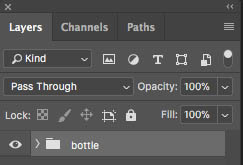
Before we move it into another photo, let’s box everything up, just like you would with your stuff if you were moving house.
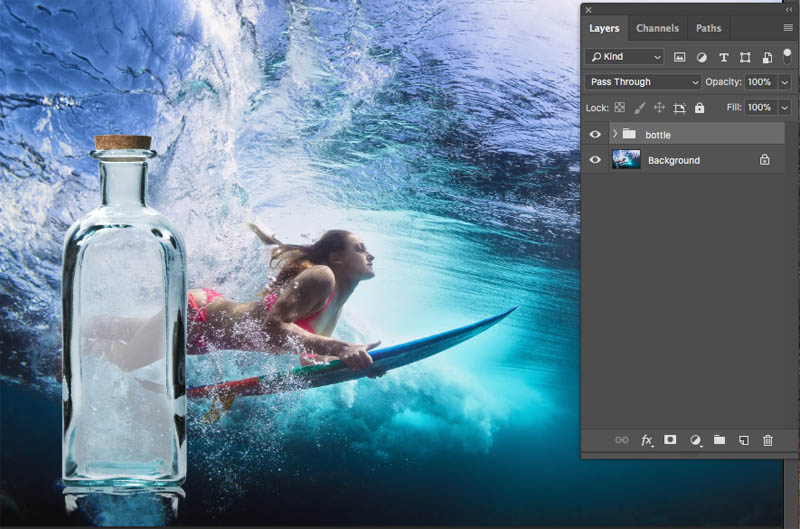
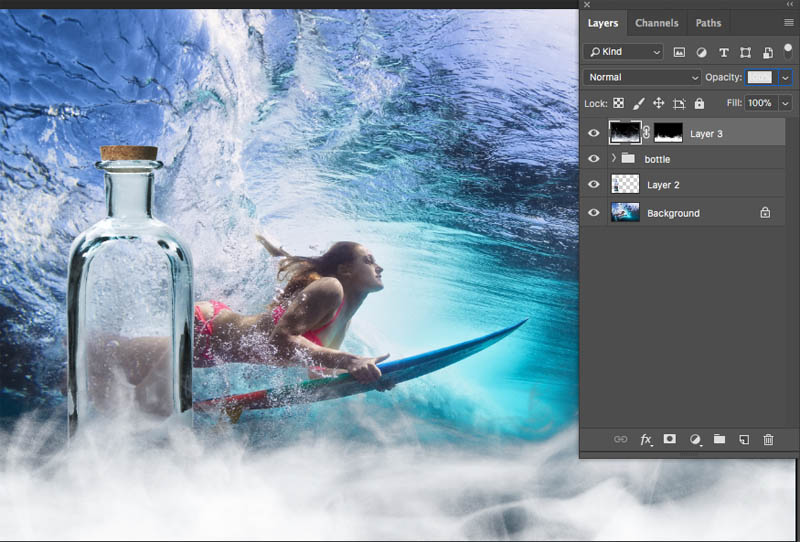
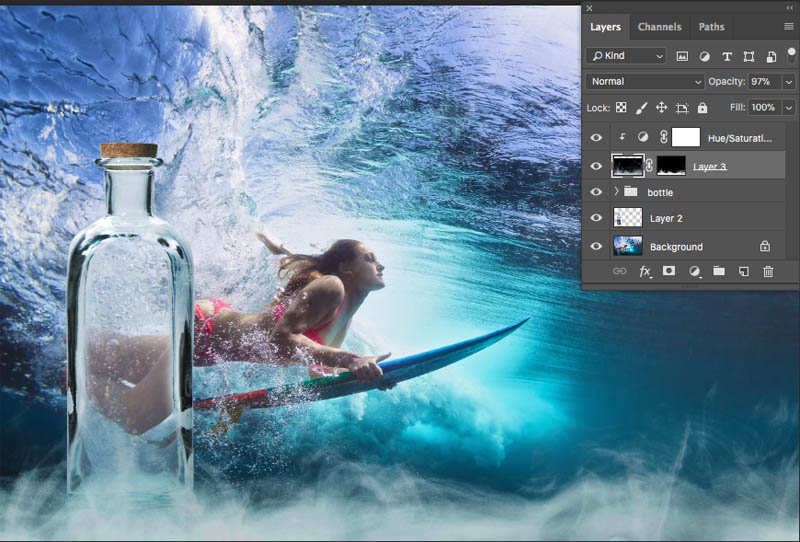
Select all the layers and Press Ctrl/Cmd+G to move it all into a group. I named the group, bottle
Combining photos in Photoshop
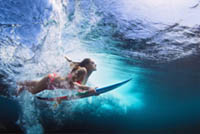
Make sure your destination photo is open in Photoshop. (The surfer girl).
Step 8
With the move tool (V) drag your bottle into the tab at the top for the new image (Don’t release yet) wait for the image to open and then move your pointer into the middle of the new document. Release, and your bottle group has been added to the surfer photo. How to combine images in Photoshop made easy.
Scale and position the bottle (Ctrl/Cmd+T to resize the bottle)
If you expand the bottle group, you will see that you can still adjust the transparency. This is important, because you can see it better on a background and probably want to reduce the transparency a little bit.
Creating Lens Refraction in Photoshop
We have added the bottle, but it’s still missing a little something to make it look realistic. That is called refraction. Refraction is how something distorts through a lens, that lens could be eyeglasses, water drops, glass or any transparent object that isn’t perfectly flat. This will change our image from a bottle slapped on to a photo, into a well composited glass object in a scene. Here we go…
Step 9
Hold Ctrl/Cmd and click on the layer thumbnail of the bottle (top layer) this loads the selection for the bottle.
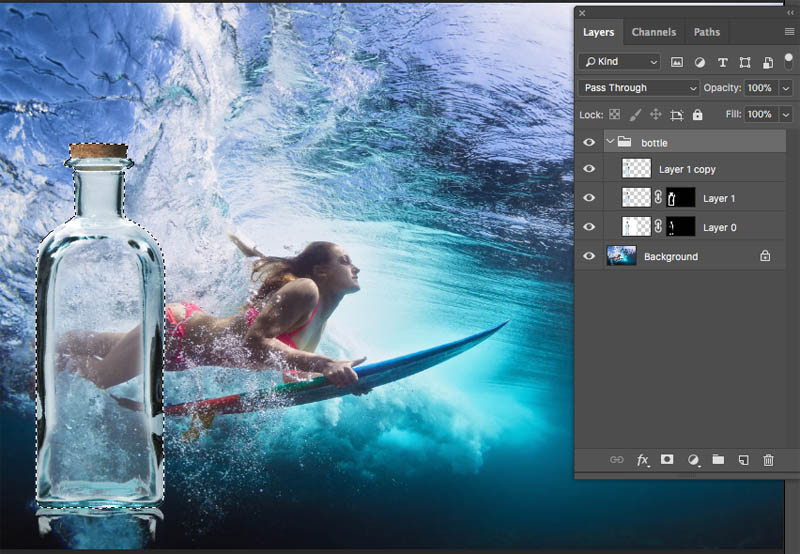
Choose the Background in the Layers panel
Press Cmd/Ctrl+J to copy a selection of the background to a new layer.
Hide the Bottle group so we can see the selected layer (you won’t see anything different yet)
Here is the selected layer in the shape of the bottle. Let’s distort it!
Step 10
Choose Filter>Distort>Spherize (You could use any of the distort tools, including liquify for this step)
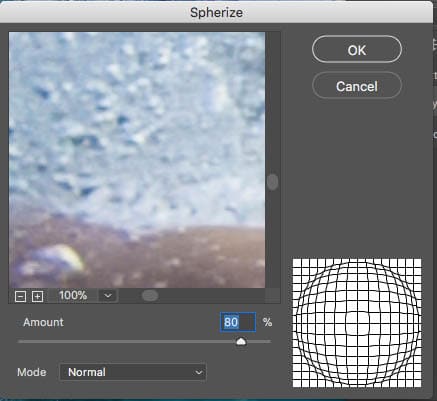
Click ok to apply the effect to the selection. Sometimes you might need to apply it again if the result isn’t strong enough (Ctrl/Cmd+F)
Ctrl/Cmd+D to turn off the selection.
Turn our bottle layers back on and lookie! We have glass refraction. Cool!
Photoshop CC Selection Secrets
New Course by Colin Smith
Stop struggling with selections. Learn how to select and cut out anything from people, hair, trees, complex shapes and even transparency.
Discover how to get perfect edges, without halos and jaggies. Colin shows you exactly how in 18 lessons.
All the images are included for you to follow along.
You will be able to select and cut out anything: faster and cleaner.
More info here
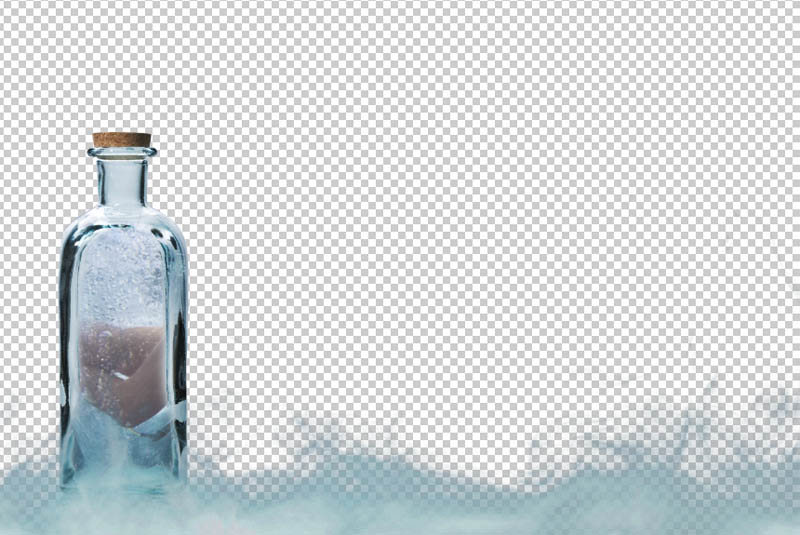
Cutting out Smoke in Photoshop
Now we are going to cut out smoke and do a little tweaking for a cool effect. I’m really doing this so you can see how to cut out vapors in Photoshop as well as a cool creative idea.
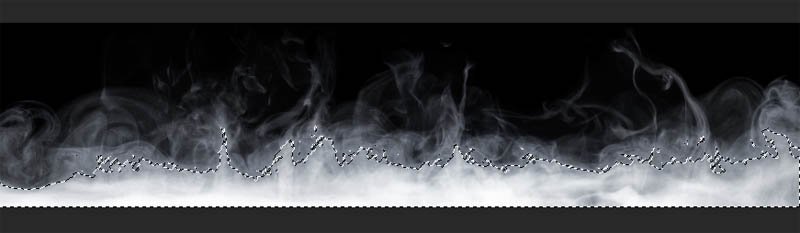
Step 11
Start with the smoke image
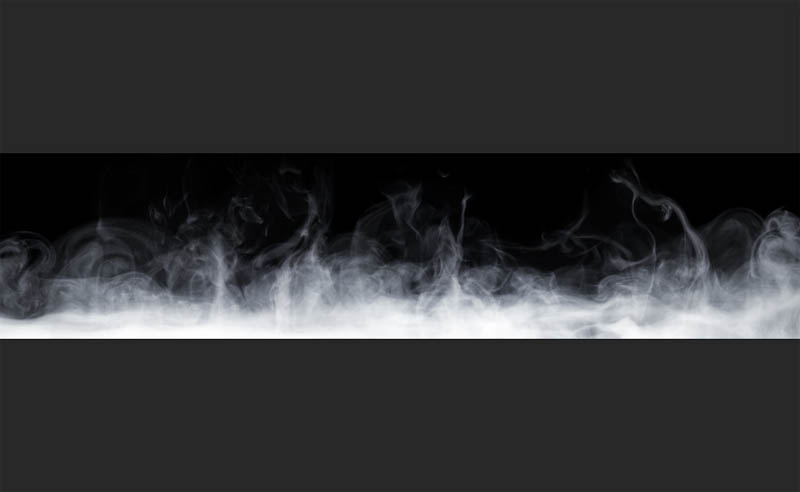
As before, choose Select>Color Range
Grab highlights again and use the settings shown here.
Click ok
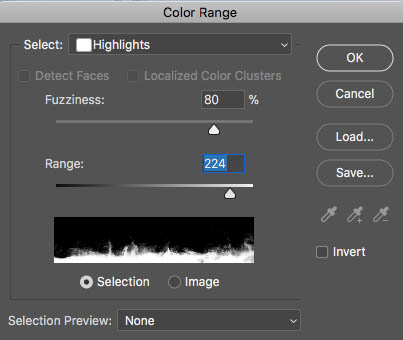
The smoke is selected.
Step 12
Click on the add layer mask button (Rectangle with a circle in the middle)

Now you have the smoke masked out
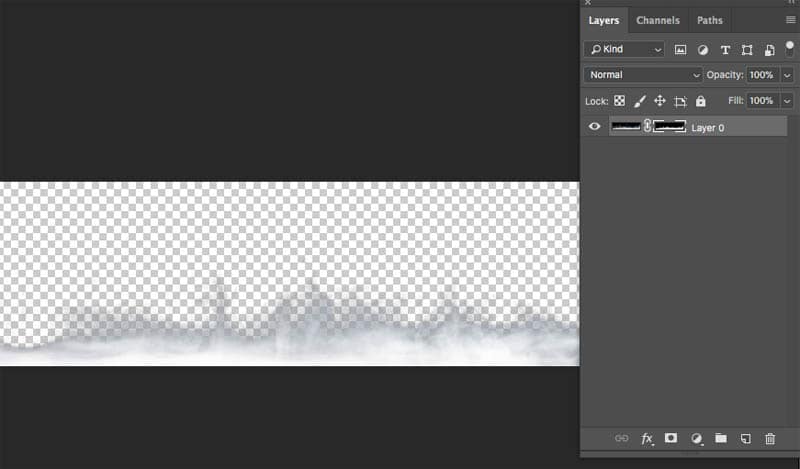
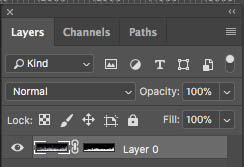
Make sure you choose the layer and not the mask in the layers panel.
Step 13
Drag it into our composite image exactly the same way we did with the bottle.
(Note: The process for selecting water and liquids is identical, but you can easily make liquid brushes, which are great for splashes)
Drag the smoke layer to the top of the layer stack
Position and size the smoke to suit your tastes.
Colorizing vapor in Photoshop.
Let’s add some color to the smoke
Step 14
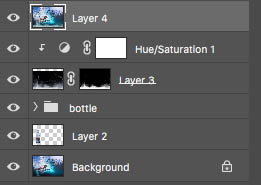
Create a new Hue/Saturation adjustment layer by clicking the yin/yang shape at the bottom of the layers panel and choosing Hue/Saturation
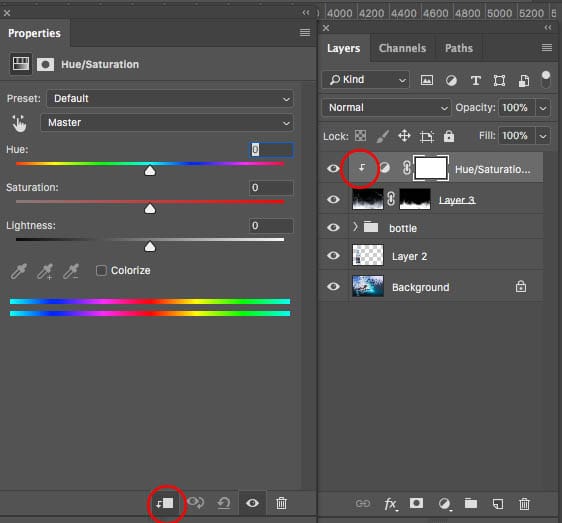
Right now if I make adjustments, it will affect the entire image, I only want to change the smoke
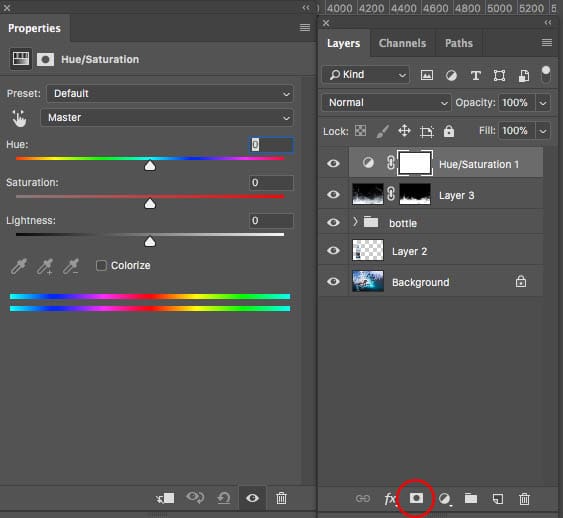
Click the clip to layer icon at the bottom of the properties panel to isolate the adjustment to only the layer beneath the adjustment layer (our smoke layer)
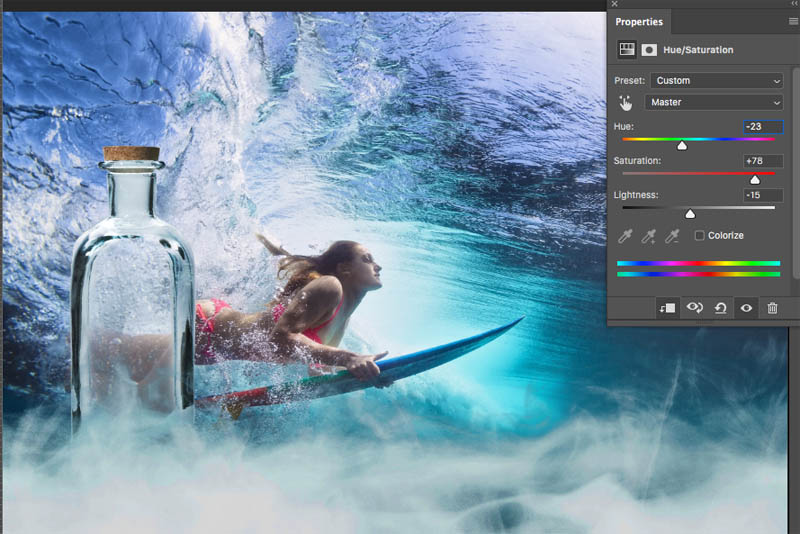
Make some adjustments to add an aqua hue to the smoke. Notice that lowering the Lightness slightly allows us to add color to white.
Step 15
Here is the image and the layers panel visible after the adjustments. Adjust the Opacity of the smoke to blend it in nicely.
If I hide the background you can see the work we have done on the transparency. Didi you think you would be doing this in Photoshop? It’s fun!
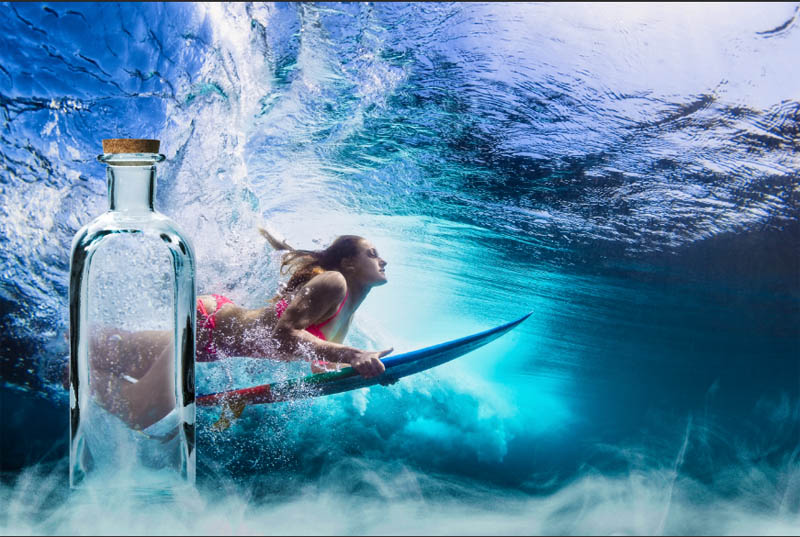
Finishing Touches
Here is a step I like to perform on all my composites (another word for collages). Let’s do some overall grading in Camera Raw (Photoshop CC step only)
Step 16
Let’s make a layer on top that contains all the layers combined.
Select all the layers and Press Ctrl+Alt+Shift+E (Cmd+Option+Shift+E Mac).
With our new, top layer active choose Filter>Camera Raw Filter
You can see the adjustments I made to the color and tone, to give a little more pop to the image.

And here is the final.
Some may ask why I used this method rather than using blending modes. The result is a little different with the modes, Using Screen actually works quite well for the smoke, but we lose a lot of the color in glass if we do it that way. I do have a really good tutorial on Blending modes too, check it out here.
I hope you enjoyed this tutorial, it was more “old school PhotoshopCAFE” with the step by step written instructions to go with the video, Keep checking your favorite PhotoshopCAFE tutorials, because I’m doing this to every free tutorial, to make sure that PhotoshopCAFE continues to have the best tutorials on the internet 🙂
Don’t forget to browse my hundreds of free Photoshop tutorials, you might be surprised by the quality and amount of our free content
Colin
Alternative method for CS6 submitted by Jeremiah Keeneham
I received an email from Jeremiah Keeneham (thanks!), he says that there were problems completing the steps in CS6 and he has figured out a work-around. Jeremiah was kind enough to write out all the steps and I’ll share them with you. (Since I no longer use CS6, I’m unable to provide support on his steps). Here is his tutorial…<< (Colin)
HOW TO CUT OUT A GLASS BOTTLE FROM A BACKGROUND AND MAKE IT SEE-THRU TRANSPARENT FOR USE WITH ANOTHER IMAGE
Like everything else in Photoshop, there’s multiple ways to skin the cat – this being one that seems pretty simple to me – and I love ‘simple’ when it comes to Photoshop.
- Dupe the background layer and name it the ‘Bottle-only’ layer.
- With the Bottle-only layer active.
- Select the bottle from the background using the usual tools (quick selection tool, refine edge and edit mask mode or whatever you prefer) and save it as the ‘Bottle’ selection (I always save selections in case I want to go back to them).
- Select / Inverseand save it as the ‘Background’ selection.
- With the Background selection active: Edit / Clearso the bottle is now on a transparent background.
- Select the inside section of the bottle using your preferred selection tools and save it as the ‘Inside Bottle’ selection.
- With the Inside Bottle selection active: Edit / Clearso the inside of the bottle is now completely see-thru and transparent.
If you want to lower the opacity of the inside of the bottle so it is a little bit cloudy instead of crystal clear, I’m sure there are more sophisticated ways, but you could try this which seems ‘dirt simple’ to me.
- With the Bottle-Only layer active.
- Add a new empty layer above it and name it the ‘Inside Bottle’ layer.
- Load the ‘Inside Bottle’ selection that you saved above.
- With the Inside Bottle selection still active: Edit / Fillwith “White”.
- Lower the opacity of the Inside Bottle layer to perhaps 50pct or whatever looks good to you.
PS Don’t forget to follow us on Social Media for more tips.. (I've been posting some fun Instagram and Facebook Stories lately)
You can get my free Layer Blending modes ebook along with dozens of exclusive Photoshop Goodies here


12 thoughts on “How to cut out Glass, Smoke + Water in Photoshop”
Leave a Reply

Adobe Creative Cloud Changes, pricing, Generative Credits and Creative Cloud Pro

Finally, real retouching is possible from within Lightroom. Join Colin Smith, as he shows you how to use the new...

This Photoshop tutorial has it all; How to make a page peel, how to turn day into night, blending layers,...


This is awesome! I can’t wait to try it!
thanks
Very useful…thank you.
Love it —next project for me
This is way kool. I’m looking forward to using it
This is way kool. I’m looking forward to using it. Thank you, DJ
Excellent tutorial. I love the written material & pics under the video. Really handy for checking while I’m learning.
Great stuff, so much easier to follow with written tut & images. (With YouTube trying to follow a vid & needing to constantly switch between instructions & working in PS is no fun).
Colin, you did it again. This is indeed a very classy series of effects which can be used in many real world instances. It is simple, effective and a great deal of fun!!!
Thank you for an amasing tutorial. Unfortunately the color range selection doesn’t work the same way in CS6. But I managed to make an ok result anyway. So thanks a lot 🙂
Thanks for another great video. We go find some of my own image and try it again
Cool tutorial! Very useful! Thanks always so much