
Double process, stunning photo edits in Photoshop and Lightroom
Get Stunning detail in sky and shadows in Photoshop without HDR, using the Double trick.
In this Photoshop tutorial, I’m going to show you how to process the same image twice and then combine the shadow and highlight detail for a nice clean, detailed photo fusion. We will also be using Lightroom Classic in this tutorial, but I’ll include instructions for Camera Raw if you don’t have Lightroom. This is adapted from an older technique that was used to create fake HDR. As far as an HDR technique it never delivered what people thought it did, but it’s absolutely prefect for this updated technique that I call the Double Trick or Double Process.
What is it?
Basically, we will duplicate a raw image. We will process one to bring out the details in the highlights, this will give us a dark image. We will process the 2nd image to bring out detail in the shadows.
The reason we are doing it in Lightroom/Camera Raw rather than luminosity masks or other techniques in Photoshop is because there is more dynamic range (sky detail) in a raw file.
Even if you open as a Smart Object, you can’t access the full dynamic range without opening in Camera Raw. If you happen to have bracketed shots, use those instead, (Or do an HDR) but you don’t need them for this technique.
To me, this process produces more realistic images than HDR, but HDR still has its place and I use it often. This photo fusion technique works well when there are bright areas such as clouds that you want to aggressively recover without making the rest of the image muddy or noisy. It also works really well for the exposure to the right shooters.
Could you use the sky masking in Lightroom for a similar result? Sure, as long as the mask is good, but it often struggles with detailed tress like in this image. This shows how to fix it when the masking isn’t working right and its a lot faster than trying to fix the Lightroom mask.
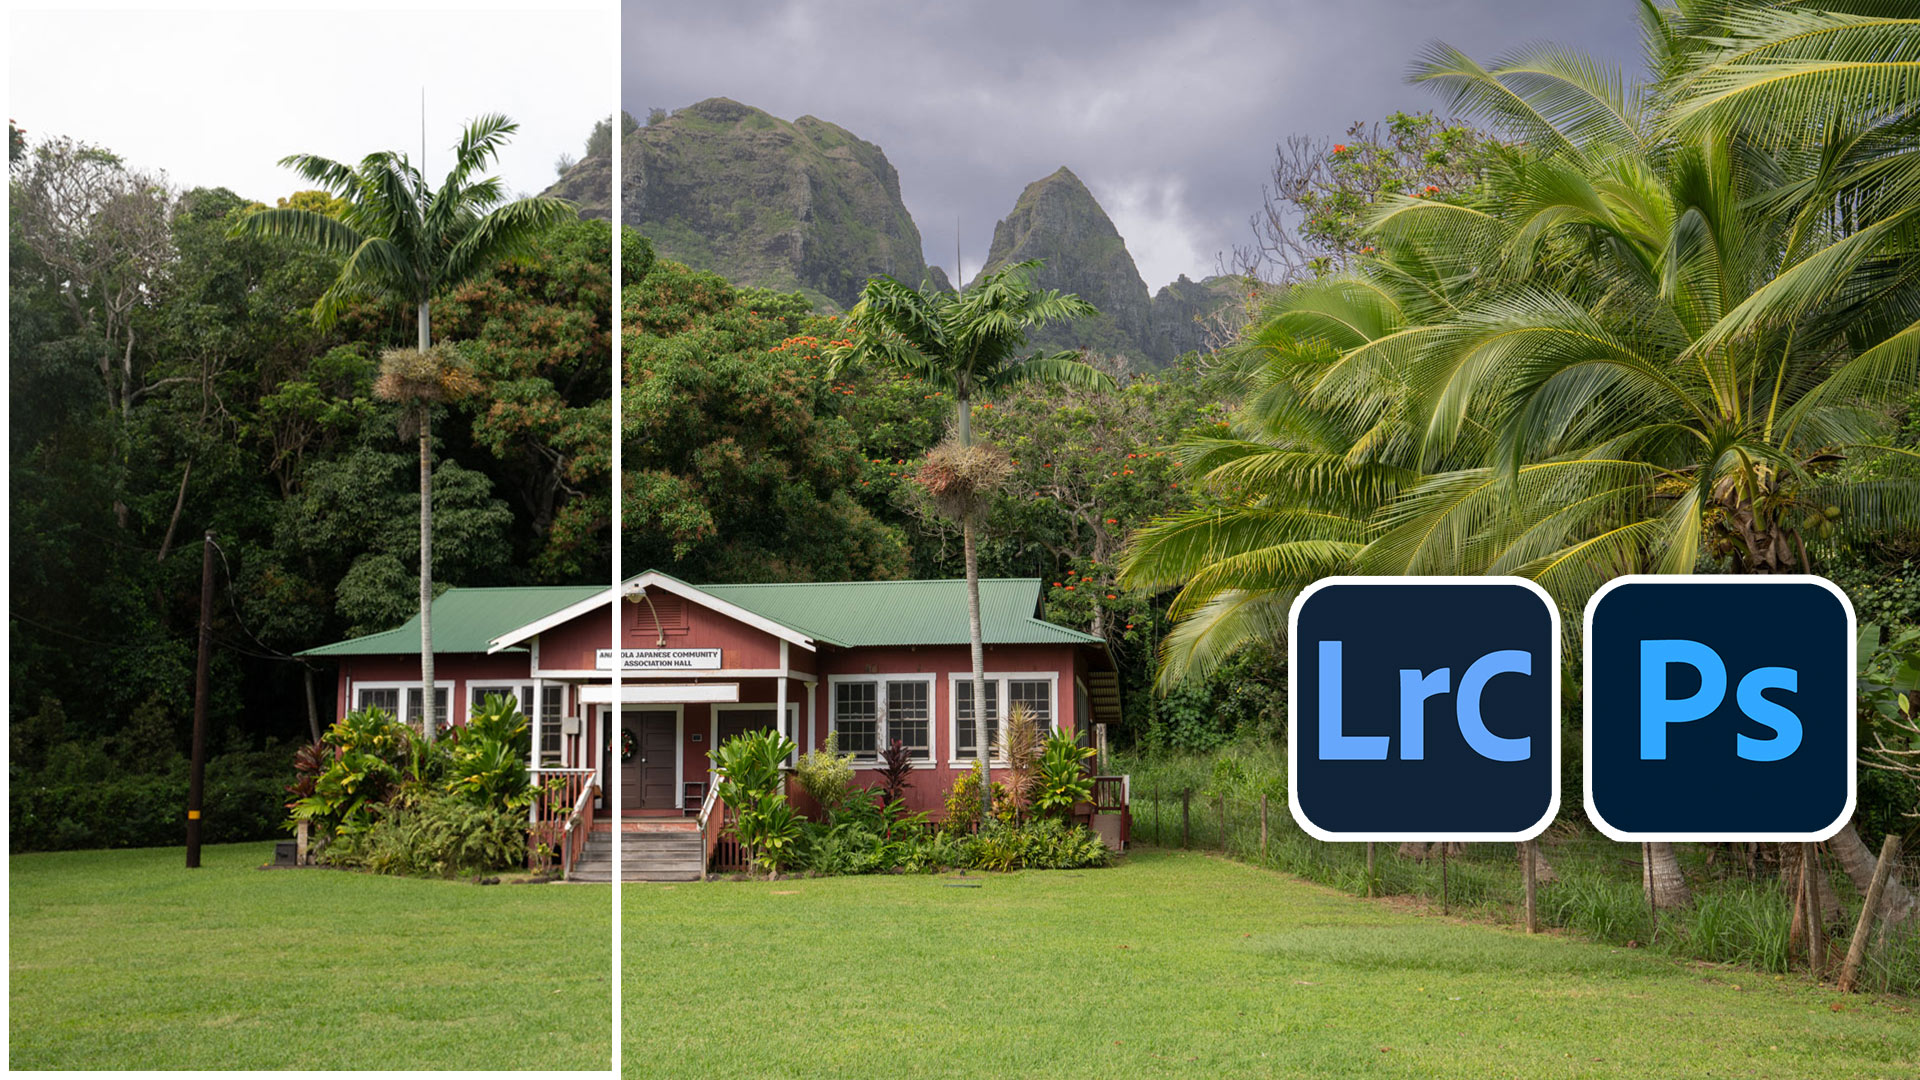
Here is the before image. See how the sky is lacking detail and blown out. Also the shadows to the side of the building are very dark. We are going to recover the original sky rather than use sky replacement.

The after photo uses the recovered sky, but also the shadows are lightened on the rest of the images and the colors are nice and bright and clean. Let’s see how I do this.

Editing Photos in Photoshop and Lightroom
Start in Lightroom or Lightroom Classic (If you don’t have Lightroom, use Camera Raw, instructions below and on the video)
Press Ctrl/Cmd+’ to make a virtual copy (duplicate).

On one of the images, adjust the Highlights and exposure to recover the detail sin the sky (or other bright objects, this works for many types of photography).

Select the second image

Open up the shadows a little bit. Reduce the highlights to make sure there is no “blooming” on the edges, or the mask will have halos. The video above shows this.

Here are the 2 images, side by side. We will combine them.

Select both the images and right click on one of them.
Choose Edit in>Open as Layers in Photoshop.

If you did this in Lightroom, skip the next 2 steps to the merging section.
Using Camera Raw to prepare the images
If you aren’t using Lightroom, this is what you do.
Open the image in Bridge.
Right-click and choose Duplicate.

Choose both of the images and right-click, choose open in Camera Raw
Now, you can make exactly the same edits in Camera Raw that we did in Lightroom (the processing in ACR and LR are identical).
Choose to open both the images and combine them in photoshop.

Step 2 Merging the photos in Photoshop
Now we have the 2 images in the same Photoshop document. The darker one is at the bottom and the lighter one at top. Lets use the sky from the darker image.
Choose the top Layer

Select>Sky
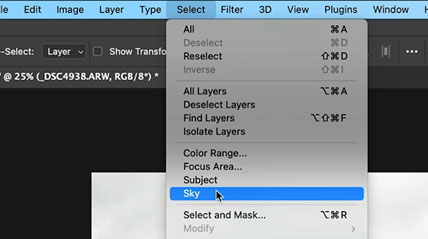
Photoshop AI Sky Select will select the sky,
It’s pretty good, but there are some holes in the foliage that isn’t selected.

Choose Select>Similar
(A gentleman asked me on youtube why I didn’t “just” use sky select in Lightroom.) This is why, Photoshop has better selection tools. However, sky select in Lightroom is amazing when it works well and I do use it often.

Now all the bright areas are selected, looks like we got some extra in the building.
Grab the lasso, hold down Alt/Option and deselect the areas that you don’t want to punch out.

Time to apply the layer mask. Normally you would click the mask button, but we want to mask out the selected area and keep the rest.
Hold down Alt/Option and click on the new mask button.

Now the sky from the bottom layer is showing through and its punchy.

If the effect is too strong, drop the mask density down in the properties panel. Mask density is like opacity, but for layer masks.

And we are all done
There is a little bit of blue sky on the top right of the image, this is actually from the original, the clouds ended right there.I fixed it on the final image below. You can see exactly how I fixed it in the short video above.
And, there we have it. As always, remember the point it to show you the technique and for you to adapt it and use it on your own images. When you are ready to really learn Photoshop, check out my flagship training course, Photoshop 2023 for Digital Photographers, (its highly rated and I’m quite proud of it).
See you at the CAFE
Colin
PS Don’t forget to follow us on Social Media for more tips.. (I've been posting some fun Instagram and Facebook Stories lately)
You can get my free Layer Blending modes ebook along with dozens of exclusive Photoshop Goodies here

4 thoughts on “Double process, stunning photo edits in Photoshop and Lightroom”
Leave a Reply
How to get better selections when cutting out hair and fur in Photoshop

How to use Luminosity Masks in Photoshop tutorial Luminosity masks allow us to target precise tones in your photograph, so...
The Split LUT effect, by Colin Smith, Powerful color grading tool in Photoshop, Split a LUT into color and tone


Nice, but I would think, after selecting the blue area, using the clone tool set to darken, cloning an area of gray sky over the blue selection would be preferable to a guess at a shad of gray.
Nice technique. I always learn something new with the way you use selections and layers. The “Similar” option in the Selection menu was one I’d not explored before.
Thank you for this lesson. I learned a lot today and also was reminded of the the “sky” tool in combination withe the “Similar” command. If you don’t use a command often it is so easy to forget they are there!
You know, another good tip you can provide for your viewers is, that they can go into their Safari Browser on their MacOS and hit file, Export as PDF. That way they can have ready. at their disposal, your lesson, as a PDF on their Desktop for filing purposes to preserve your steps for future review when needed.