What’s New in Lightroom Classic 2027: All the New Features

Check out the rest of our guides: New In Photoshop 2027 | New in ACR 19 Camera Raw 2027
VIDEO COMING WED MORNING!
Lightroom Classic 2027 has just received a big update, with some very useful new tools for masking, color grading, retouching, and creative effects.
Depth Range masking now works on ordinary photographs
Open the Develop module and choose the Masking tool.
Under Range, we have several ways to create masks, including Color Range and Luminance Range.
We also have Depth Range.
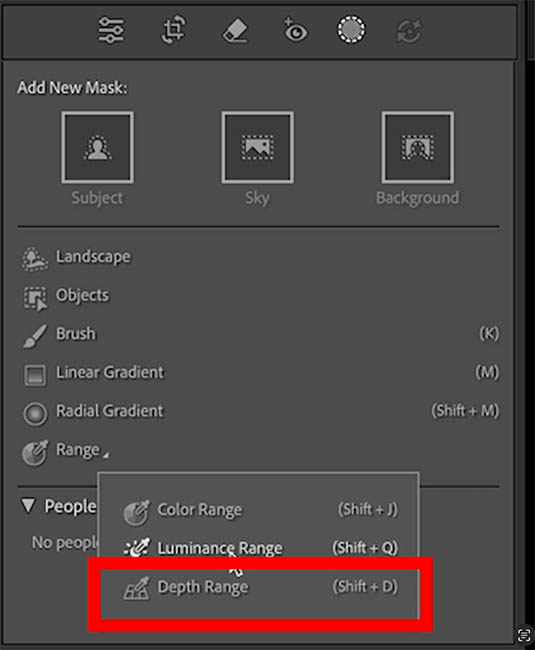
Previously, Depth Range masking required a photograph that already contained depth information, such as certain images captured using Portrait mode on a phone.
Now Lightroom can estimate depth information for ordinary photographs, even if the camera didn’t capture a depth map.
This means we can create masks based on how far different parts of the scene are from the camera.
How the Depth Range controls work
I’m using a photograph containing a large cog.
Choose Depth Range.
Lightroom analyzes the photograph and creates an estimated depth map.
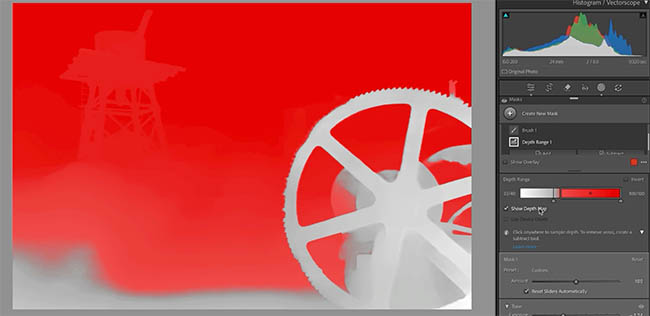
Look at the Depth Range control.
The left side represents areas closer to the camera, while the right side represents areas further away.
As we move the range handles, we’re choosing which distances to include in our mask.
Drag the handles from the left.
Notice how the mask begins in the foreground and moves further into the photograph as we expand the range.
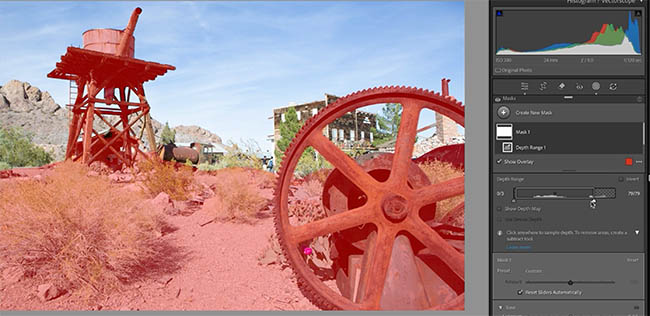
Keep dragging toward the right and the selection moves deeper into the scene.
We can also work in the opposite direction.
Start from the far end and drag toward the left.
Now we’re selecting areas that are further away and gradually including objects closer to the camera.
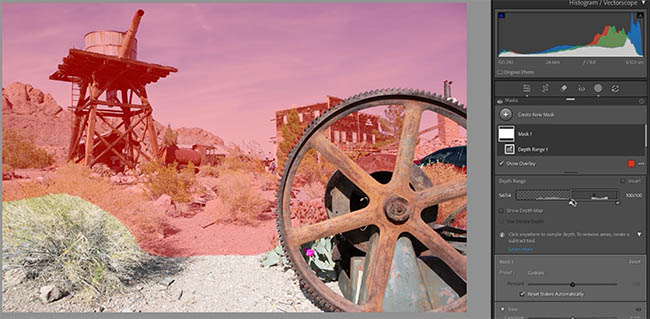
This gives us a different way to isolate objects without relying on their color or brightness.
Feathering the Depth Range mask
Let’s take a closer look at the handles.
We don’t always want a hard transition between the selected and unselected areas.
Drag the feathering controls to soften the transition. That’s the smaller handle within the Depth Range bar.
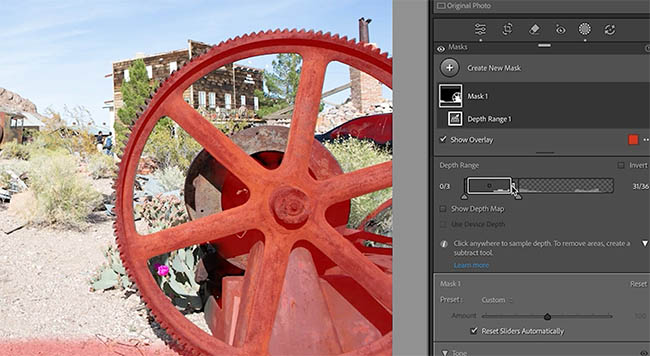
Notice how the adjustment rolls off more gradually instead of ending abruptly.
This is important because depth doesn’t always separate objects perfectly, especially when parts of the scene overlap.
A soft transition often looks more natural.
Darken the background using a depth mask
Let’s use Depth Range for something practical.
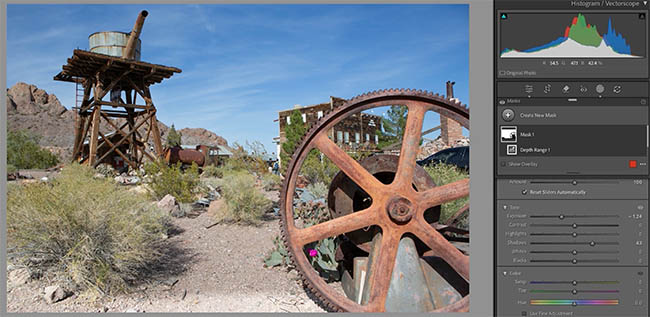
In this photograph, the background is a little too bright compared with the large cog in the foreground.
We want to darken the surrounding area without darkening the cog.
Normally, we might have to create a selection around the cog or use a brush to isolate it.
But here, we can use the depth map.
Adjust the Depth Range handles until the mask covers most of the surrounding scene while excluding the cog.
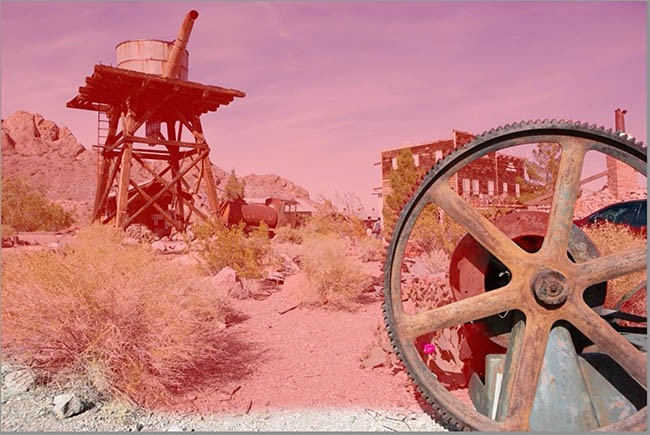
Use the feathering controls to soften the transition near the cog.
Now scroll down to Exposure.
Move the slider to the left to darken the selected area.
Look at that.
The surrounding scene becomes darker, while the cog remains brighter and stands out more clearly.
We didn’t have to draw a precise selection around every edge of the object.
View the depth map to refine the selection
There’s another useful option when we don’t quite have the selection dialed in.
Click the Depth Range component within the mask and choose the option to view the depth map.
Now we can see the depth information Lightroom is using to create the mask. Make adjustments and visually see how it changes the mask.
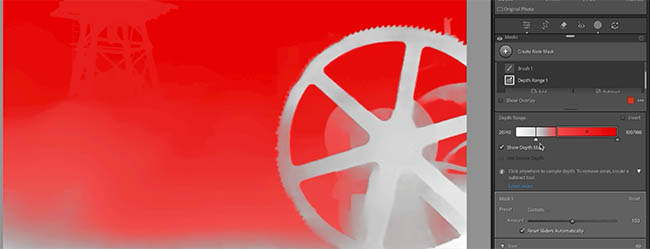
We can adjust the range and feathering while looking at this information.
We can return to the Depth Range controls and refine them even after we’ve already applied our exposure adjustment.
The adjustment remains attached to the mask, so we don’t have to start over.
Color Grading is now available inside masks
Speaking of masks, here’s another new feature I really like.
Let’s open a landscape photograph.
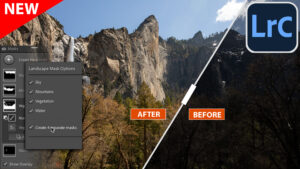
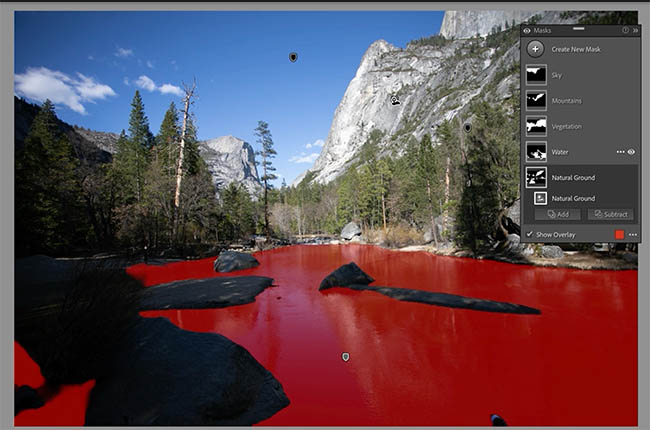
Choose the Masking tool and create a Landscape mask.
Use the different parts of the mask to adjust the different parts of the photo. This is nothing new.
Applying Color Grading to the mountains
Here’s where the new feature comes in.
Select the mountains mask. Scroll down through the masking adjustments.
Notice that we now have Color Grading available inside the mask.
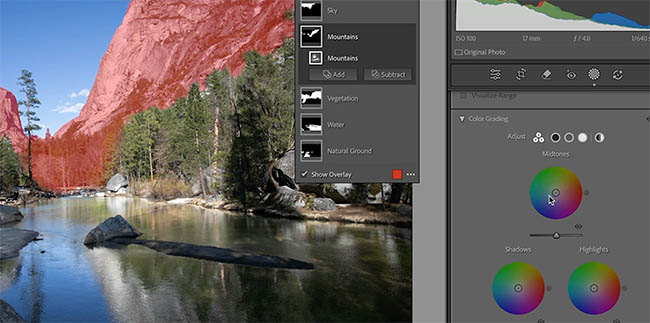
This is a big improvement because we can apply different color grades to different parts of a photograph.
Let’s adjust the color of the mountains.
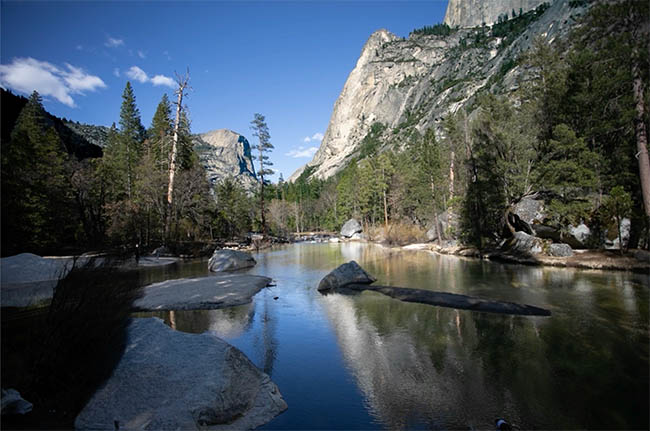
Notice that the Color Grading is affecting the mountains, rather than the entire photograph.
We could create cooler mountains while leaving the foreground warmer, for example.
And because this is a mask, we can go back and refine both the selection and the color treatment.
Previously, we could make many local color adjustments with Lightroom’s masking controls, but now we have the additional flexibility of Color Grading inside those masks.
Five Glow effects in Lightroom Classic
Let’s move on to something more creative.
The Glow effects that were previously introduced in Adobe Camera Raw have now come to Lightroom Classic, along with two additional effects.
Go to the Develop module and scroll down to Effects.
Find Glow.
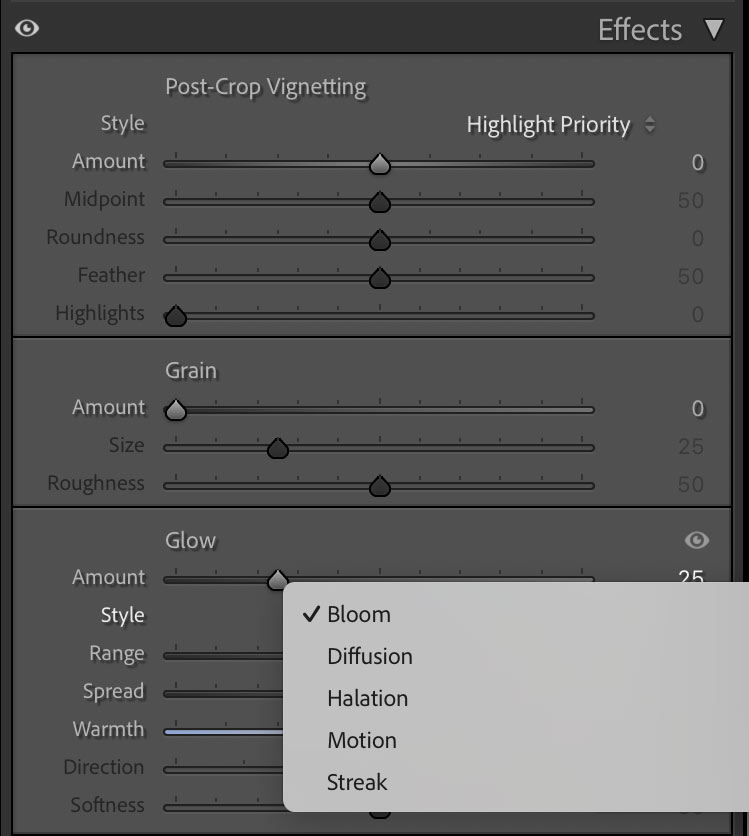
We now have five Glow effects:
- Bloom
- Diffusion
- Halation
- Motion
- Streak
Let’s have a quick look at each one.
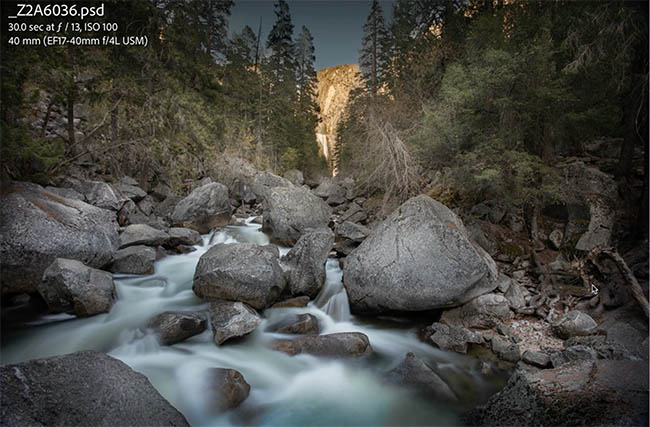
Bloom: Create glowing highlights
Choose Bloom.
Bloom creates a glow around the brighter areas of a photograph.
Think of the way light can bloom around bright highlights, creating a softer, more luminous appearance.
Turn up the effect.
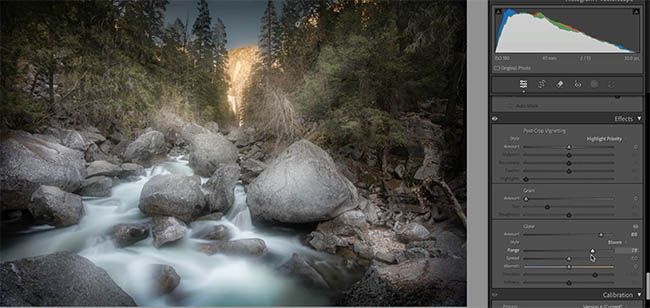
Notice how the bright parts of the photograph start glowing.
Now let’s look at the controls.
Range determines which brightness values receive the effect.
Move Range toward the left to concentrate the Glow on the brightest highlights.
Move it the other way to include more of the image.
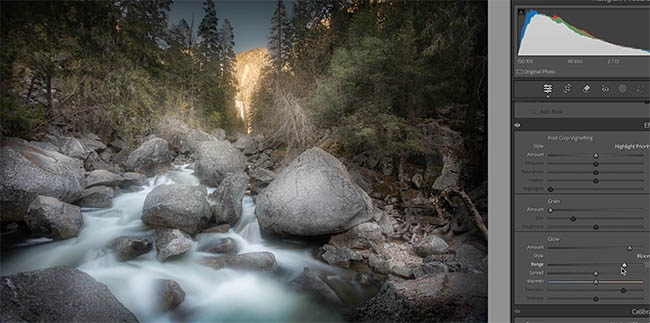
Spread controls how far the Glow extends from those areas.
Reduce Spread for a tighter Glow.
Increase it to spread the effect over more of the surrounding image.
Warmth changes the color temperature of the Glow.
Move it toward the cooler side for a blue appearance, or toward the warmer side for a more golden glow.
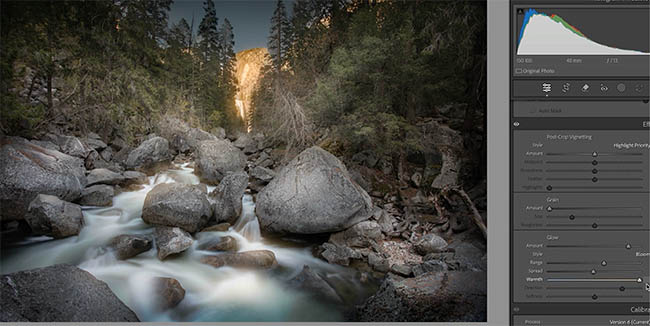
These controls are available across the Glow effects, although their appearance can vary depending on which effect we’re using.
Diffusion: A soft, dreamy photographic look
Let’s switch to Diffusion.
Notice how it produces a softer appearance across the photograph.
This reminds me a little of a slide sandwich or an Orton-style effect.
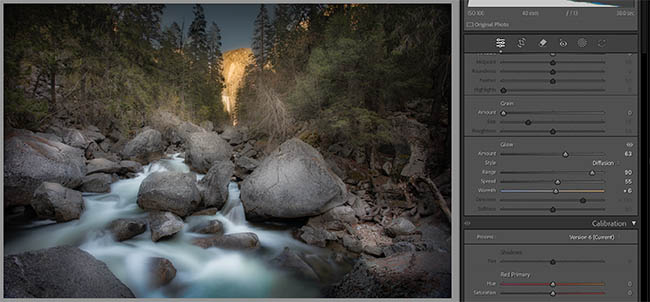
The Range control is particularly important here. Adjust it to determine which parts of the photograph contribute to the diffusion.
This can be useful when you want a dreamy or slightly romantic look.
Of course, it’s easy to go too far with this kind of effect, so use as much as the photograph needs.
Halation: Create a film-inspired glow
The next effect is Halation.
Halation is inspired by a characteristic of photographic film, where bright areas can create a reddish or warm halo around their edges.
Turn up the effect so we can clearly see what’s happening.
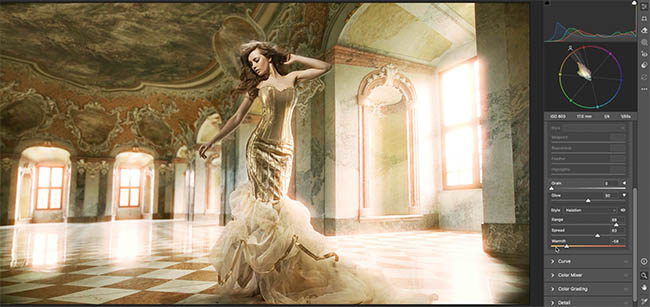
Notice the warmer tones appearing around the highlights.
This is different from simply adding a soft white Glow.
It gives the photograph more of a film-inspired appearance.
Let’s move on to the two new Glow effects.
Motion Glow: Create directional light trails
Choose Motion.
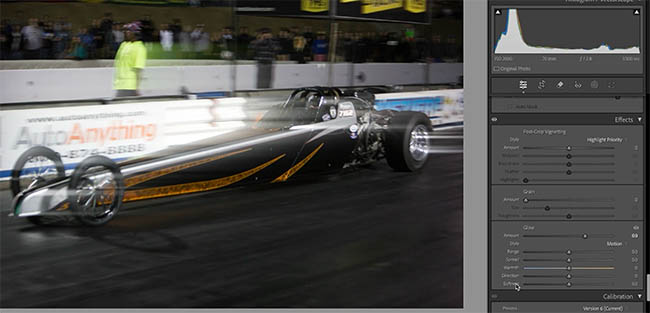
Notice how this creates a directional blur or trail from the brighter areas.
We can control the direction to make the light appear to move across the photograph.
Move the Direction control. Notice how the trails rotate.
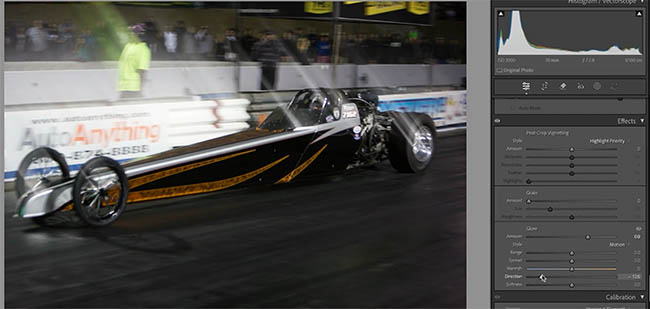
For a moving subject, we might want the effect trailing behind the direction of travel.
Or we could use it creatively to make bright areas of a scene appear as if light is streaming across the photograph.
The Spread control is also very useful here.
Reduce Spread to shorten the motion trail.
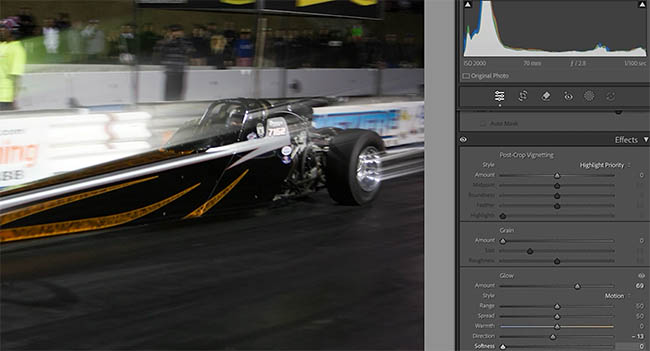
Increase it to extend the effect further across the image.
Streak Glow: An anamorphic-style lighting effect
The fifth Glow effect is Streak.
It’s similar to Motion, but with one important difference.
Instead of creating a trail in primarily one direction, Streak extends the light in both directions.
Choose Streak.
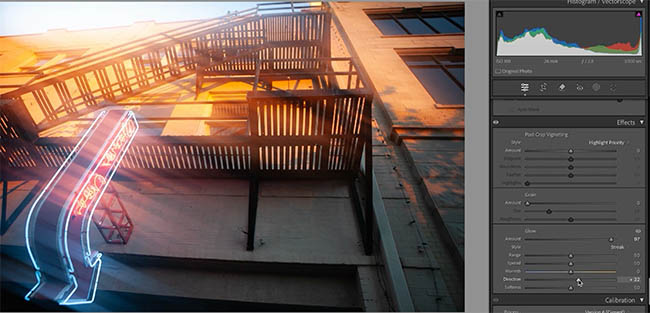
Notice how the brightest areas create elongated streaks of light.
This can resemble the flares you sometimes see with anamorphic lenses.
We can adjust Direction to rotate the streaks.
Softness controls how defined or diffused they appear.
And Spread determines how far they extend.
The result can be quite dramatic, especially in scenes containing bright light sources.
Glow presets
There’s also an easy way to experiment with these effects without adjusting every slider manually.
Open the Presets panel.
Find Style > Glow.
You’ll see several presets using different Glow treatments.
Roll over the presets to preview their effects on your photograph.
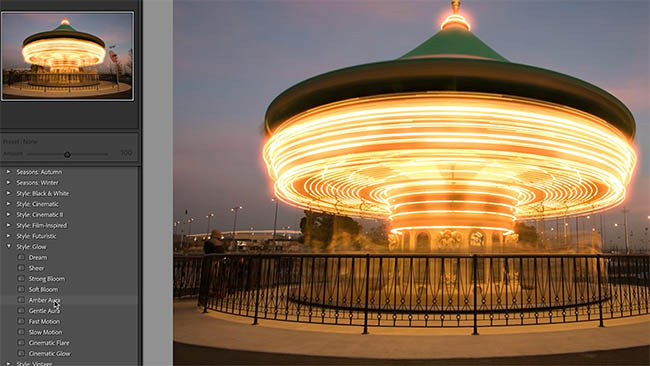
And remember, like any Lightroom preset, we can apply one and then adjust the individual settings afterward.
A preset is just a starting point.
Fix stretched faces with the new Projection slider
Here’s a feature that I’ve wanted for a long time.
Have you ever photographed a group of people using a wide-angle lens and noticed that the people near the edges look stretched?
It happens quite often, especially with wide group photographs.
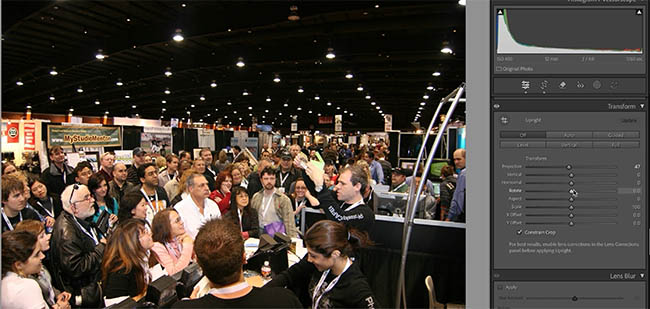
Look at this photograph from the PhotoshopCAFE booth at WPPI a few years ago.
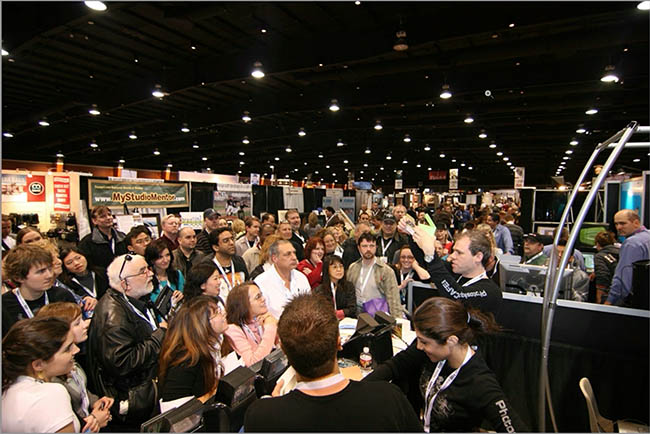
Notice the people toward the edges.
Their faces and bodies appear wider or more stretched than those closer to the center.
Usually, we just accept this as part of the look of a wide-angle photograph.
But now Lightroom gives us a way to improve it.
Using the Projection adjustment
In the Develop module, expand Transform.
Look for the new Projection slider.
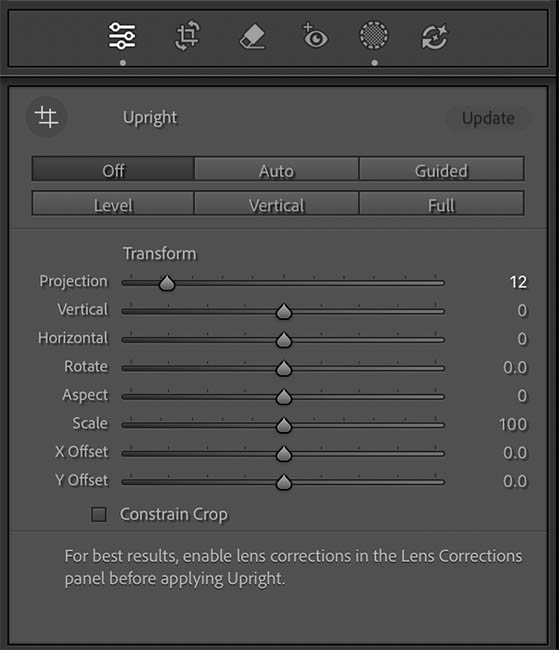
Move the Projection slider and watch the people near the edges.
Notice how their proportions start looking more natural.
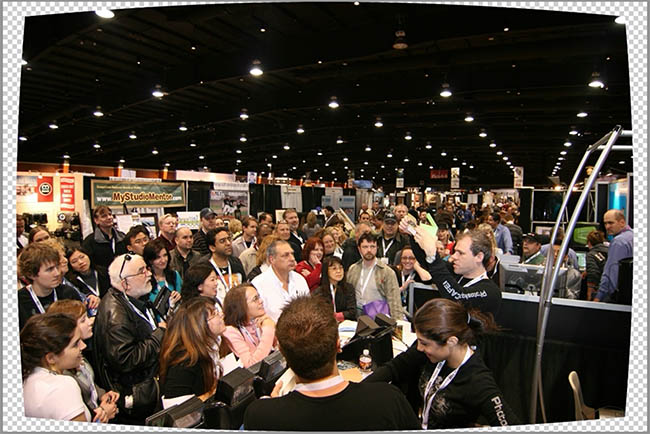
This reduces that stretched appearance near the edges.
One thing you’ll notice when changing the projection is that the image boundaries can shift.
This can leave areas around the edges that need cropping.
Fortunately, there’s a Constrain Crop option.
Enable it to crop away those unwanted edges automatically.
Automatic blemish removal comes to Lightroom Classic
Here’s another feature that has made its way from Camera Raw.
Automatic Blemish Removal.
Open a portrait in the Develop module.
Choose the Remove Tool.
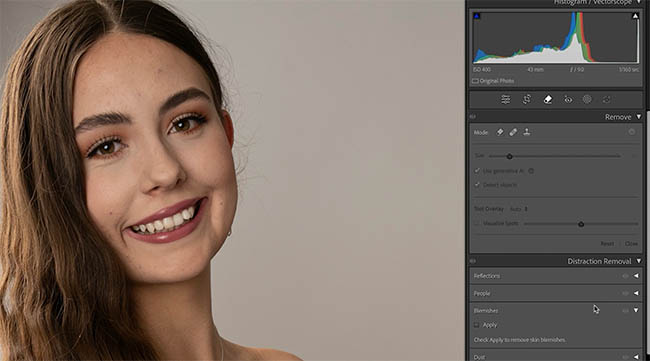
Under Distraction Removal, find Blemishes.
Click Apply.
Lightroom analyzes the image and automatically reduces detected blemishes.
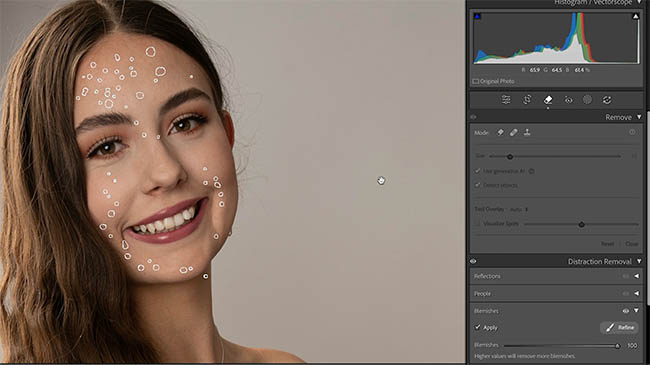
Temporary blemishes versus natural marks
Not everything on someone’s skin is a blemish.
For example, acne or temporary dry skin might be things we want to reduce.
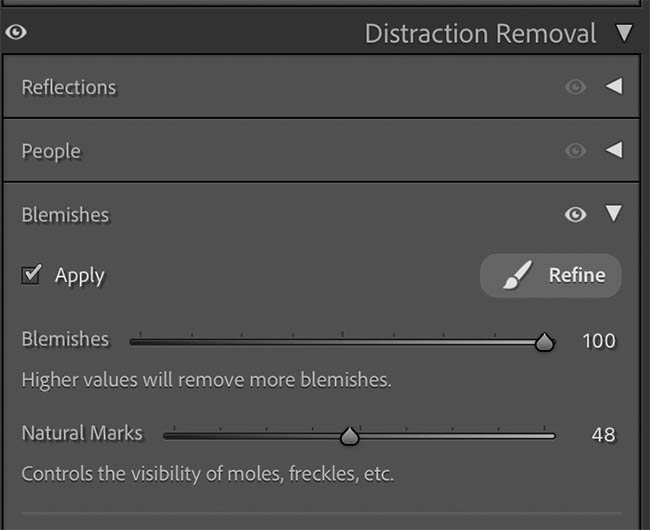
Freckles and moles are natural, permanent features of someone’s face.
We don’t necessarily want to remove them.
That’s why Lightroom now gives us separate controls for Natural Marks.
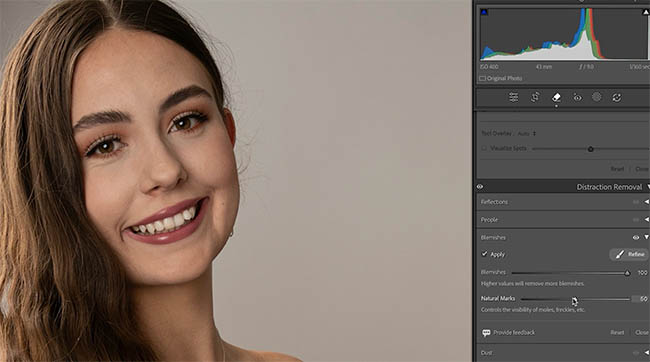
Adjust Natural Marks and we can keep or remove more of those natural features independently of the temporary blemish cleanup.
I like this because it gives us more control over how much retouching is applied.
Vectorscope comes to Lightroom Classic
Here’s another useful addition that was previously available in Camera Raw.
The Vectorscope.
Look at the Histogram area.
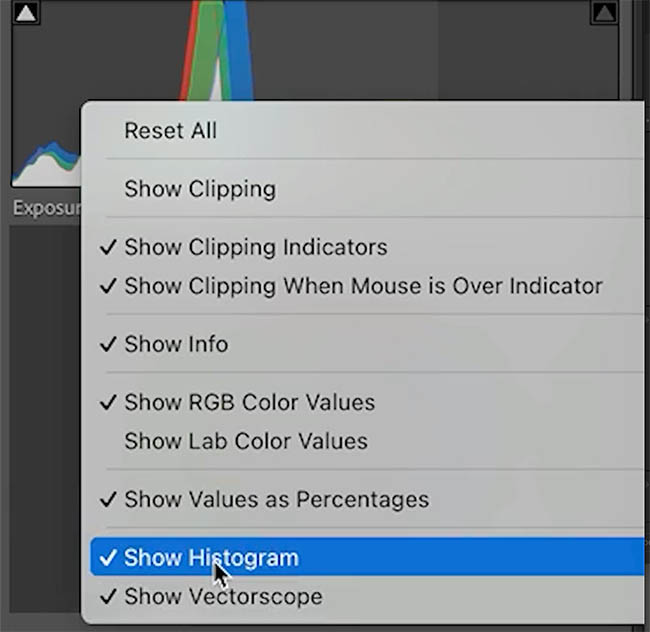
Right-click and choose the option to display the Vectorscope.
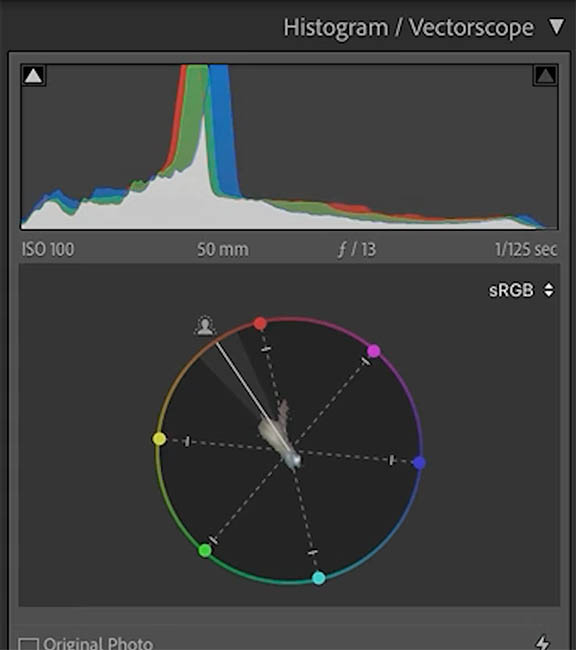
We can show the Histogram and Vectorscope together, or display either one independently.
What is a Vectorscope?
Think of it this way.
A Histogram helps us understand the tonal values in a photograph.
A Vectorscope helps us understand the colors.
It shows the direction and amount of color information in the image.
You’ll notice six color references:
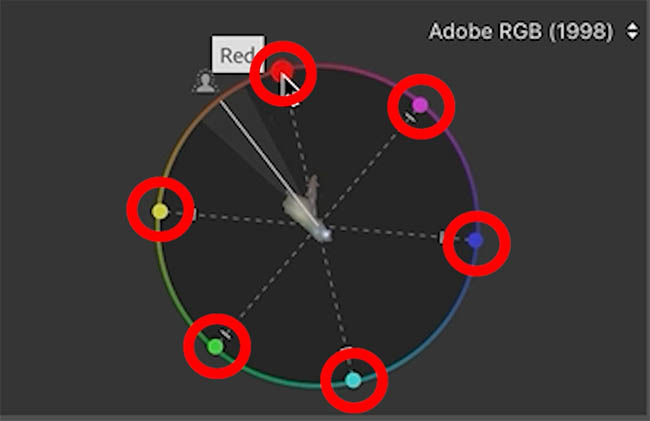
Red, green, blue, cyan, magenta, and yellow (our primaries).
The plotted information shows how the colors in our photograph are distributed.
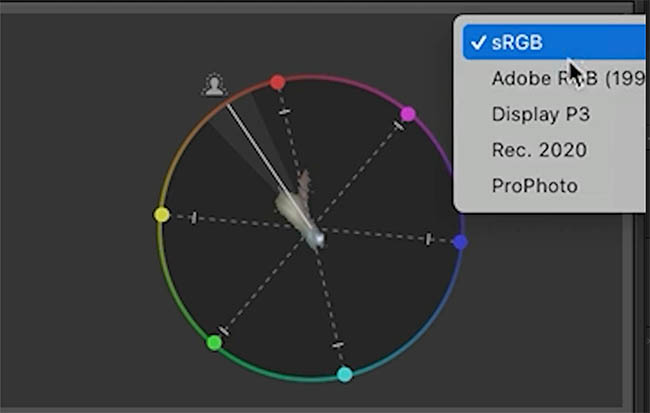
We can also change the scope’s color space.
For this example, I’m going to choose Adobe RGB.
Using the Vectorscope to evaluate skin tones
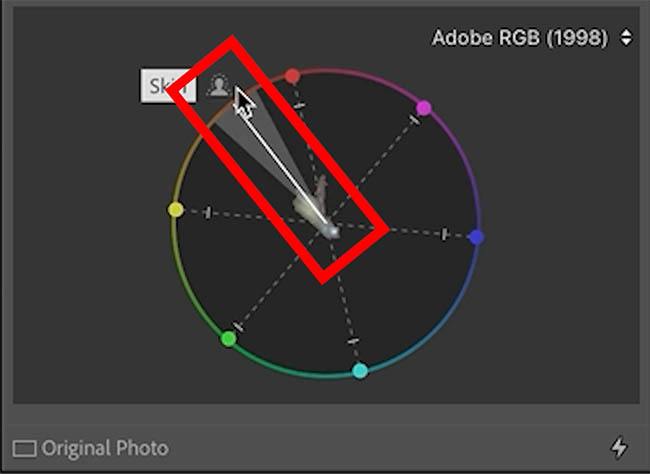
Look at the skin-tone reference area on the Vectorscope.
This gives us a useful visual guide when evaluating skin colors.
In this example, the skin colors are already quite close to where we want them.
Here is a tutorial where I show how to use the Vectorscope to color correct skin tones.
Using Temperature with the Vectorscope
The color temperature goes from Blue to yellow.
Let’s move the Temperature slider.
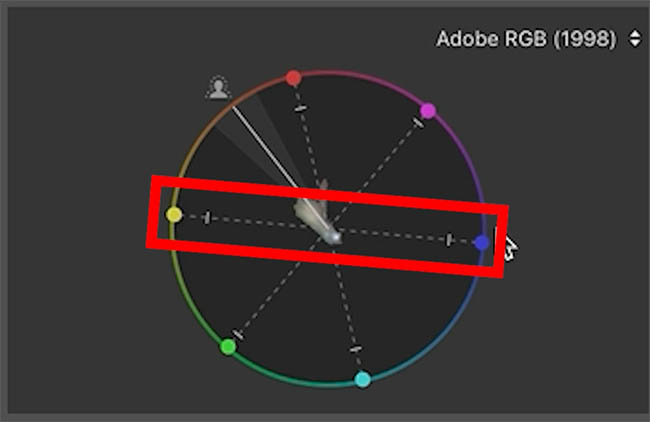
Watch what happens on the Vectorscope.
As we move toward blue, the plotted colors shift in the cooler direction.
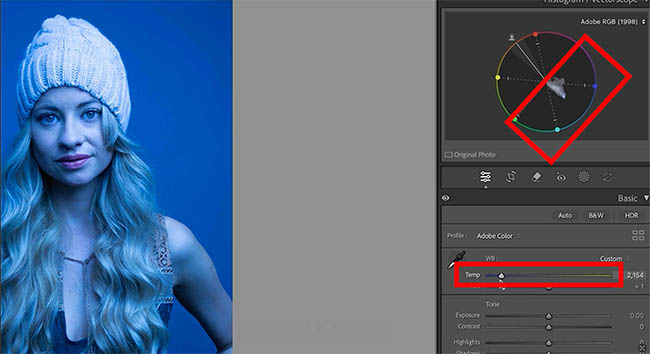
Move toward yellow, and the plotted information shifts toward warmer colors.
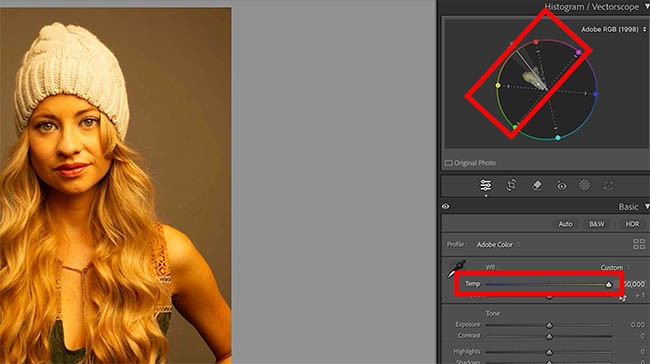
This gives us a visual way to evaluate the white balance.
When the overall color is balanced, the distribution may be closer to the center for neutral areas, although a photograph containing intentionally strong colors won’t necessarily have a centered plot.
Using Tint with the Vectorscope
Now let’s look at the other white balance adjustment.
Tint controls the green-to-magenta balance.
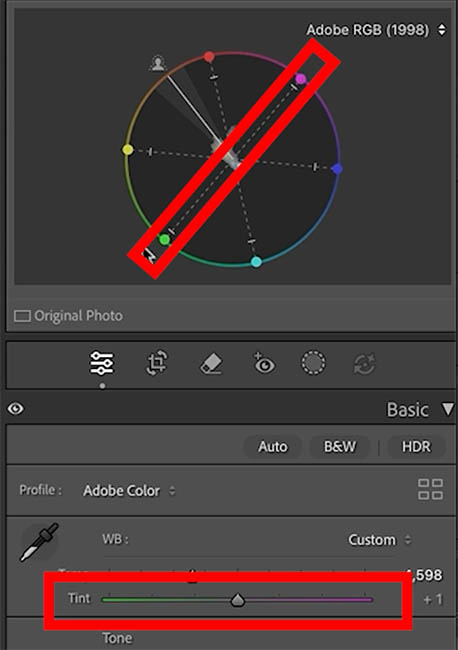
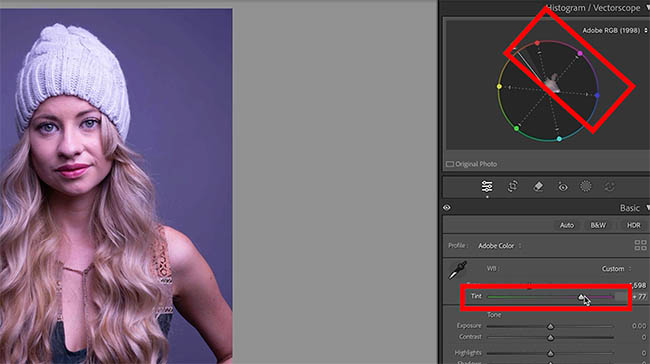
Move Tint toward magenta.
Notice how the plotted colors shift in that direction.
Move it toward green and watch the plot move the other way.
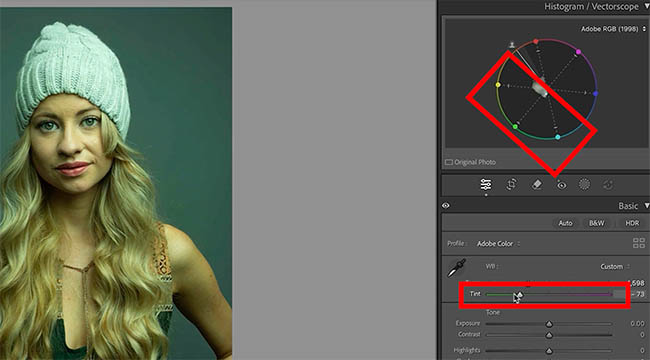
This makes it easier to see the effect of white balance adjustments rather than relying entirely on our eyes.
I’ve made a separate tutorial on using the Vectorscope for color correcting skin, so I’ll leave the deeper explanation for that lesson.
See the camera’s autofocus points
Here’s another feature that I think photographers will appreciate.
We can now display the camera’s autofocus points in Lightroom Classic for supported photographs.
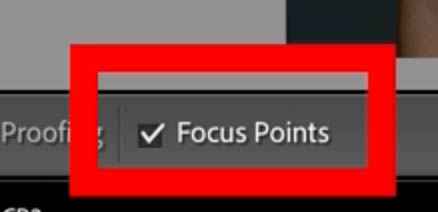
This is useful when reviewing photographs and trying to understand exactly where the camera focused. If you were in manual focus, no point will show.
Look at this example.
The autofocus point isn’t quite on the eyes where we might have wanted it. The point is right on the subject’s nose.
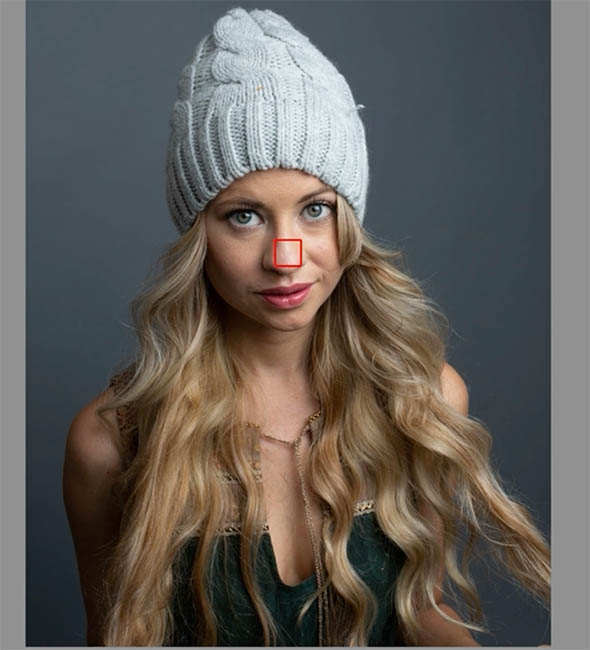
It’s useful information when you’re evaluating focus accuracy and camera performance.
Zoom directly to the focus point
Here’s something especially handy.
With the focus-point display active, press the Spacebar.
Lightroom zooms into the area around the autofocus point.
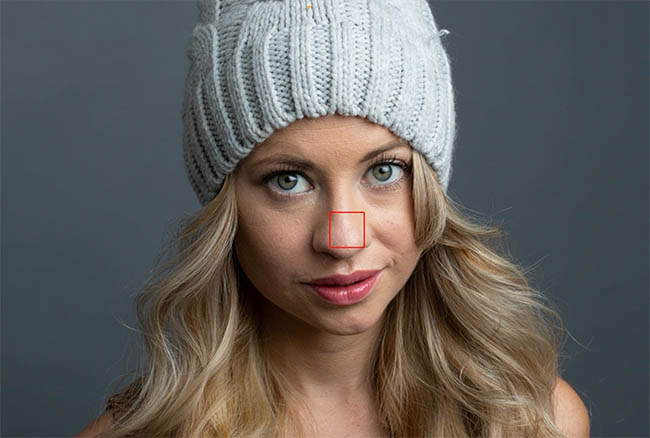
This is much faster than zooming in and searching around the photograph to find the area you want to inspect.
We can zoom in closer if necessary and then zoom back out.
Tip: Autofocus point information depends on the camera and the metadata saved with the photograph. The recorded focus point is a useful reference, but it’s still important to inspect the actual sharpness of the image.
The Temperature slider has a larger range
Here’s a smaller change, but it gives us more flexibility.
The Temperature slider now allows a wider adjustment range.
In the Basic panel, it can extend from 1,500K to 50,000K when displaying Kelvin values on a RAW image.
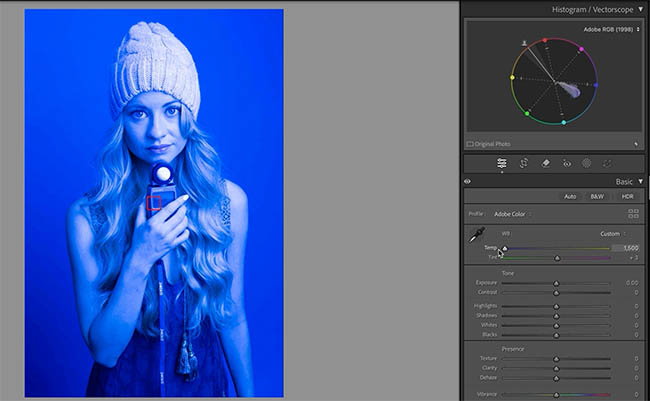
This means we can push an image cooler than before.
It can be useful when experimenting with creative color treatments or working with unusual lighting conditions.
The extended range doesn’t apply inside masks
The extended Temperature range applies to the main white balance controls in the Basic panel. It doesn’t give us that same extended Kelvin range inside the local masking adjustments.
So if you don’t see the same range while working inside a mask, that’s why.
Customize the Lightroom Masking panel
We can now customize the order of the adjustment sections in the Masking panel.
This is useful because not everyone uses the same controls equally often.
Right-click on one of the adjustment section headings, such as Tone, or another section that has the expand/collapse arrow.
Choose the option to customize the Masking panel.
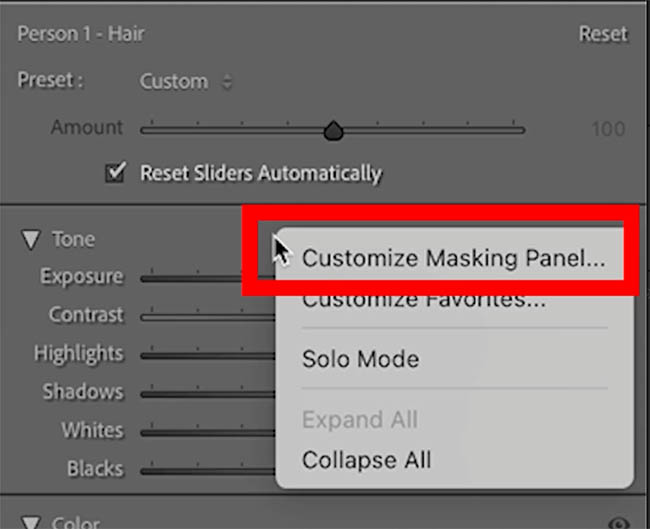
A customization window appears with the available sections.
Let’s say I don’t use Point Color very often.
Select it and drag to move it lower in the list.
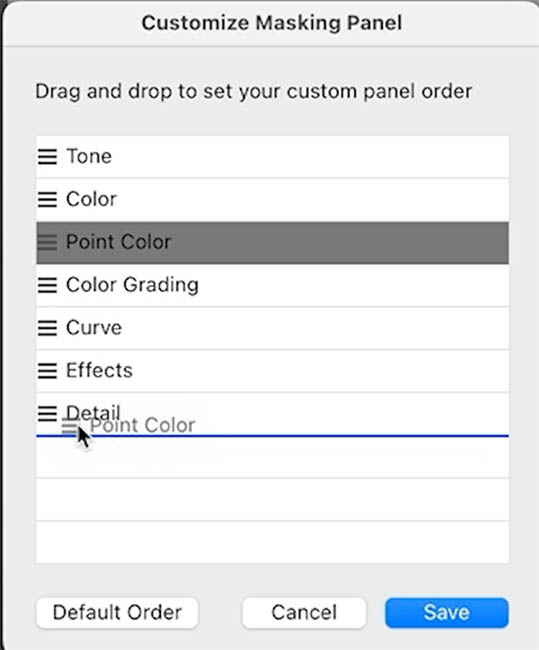
Maybe I don’t use Effects much either.
Let’s move that down too.
But I use Detail frequently, so I’m going to move that closer to the top.
Notice how we can arrange the controls to suit the way we work.
This can save a little scrolling, especially if we’re making lots of masked adjustments.
Reset the original order
And if you decide you don’t like the new arrangement, no problem.
Choose Default Order to restore the original layout.
It’s a small improvement, but I like having the option to customize my workspace.
Final thoughts on Lightroom Classic 2027
There’s a lot in this update.
Some of these features also appear in Adobe Camera Raw, while others work differently between the applications. I’ve created a separate tutorial on the new Camera Raw features if you’d like to explore those in more detail.
As always, the trick isn’t to use every new feature on every photograph. It’s knowing which tool will give us the result we want, and when we don’t need it.
Which new Lightroom Classic feature are you most excited to use, and what kind of photograph would you use it on? Let me know in the comments.
Lightroom Classic 2027 brings some useful new tools for photographers. I’ll be exploring selected features in more depth and adding links to those tutorials here as they’re published.
You can also explore the related updates:
Join Me LIVE for XAM!
Thursday, November 12 at 1 PM Pacific
I’ll be demonstrating new Photoshop and Camera Raw features and answering questions live. Many of these features are also available in Lightroom Classic, so we’ll explore some of those connections too.
Sign up for free livestream notifications and I’ll email you the viewing link when we go live.
Which Lightroom Classic features are you most excited about? Let me know in the comments.
It’s great to see you here at the CAFE!
Colin
Recommended for this tutorial
Learn Masks in Lightroom and Camera RAW
Make precise local adjustments in Lightroom and Camera Raw with every type of mask.
$59.99 · one-time purchase · instant download
Free for you
The Photoshop Vault
Get my free Layer Blending Modes ebook along with dozens of exclusive Photoshop goodies: actions, brushes, presets and cheat sheets.
You're on the list, so your free goodies are waiting for you in the Vault.
Get Free Photoshop Goodies Open the Vault
New Features in Lightroom and Camera RAW, August 2026 update
New Lightroom Classic and Camera Raw features including mask edge refinement, Render to DNG, blemish removal, Generative Expand and vectorscope. Read tutorial
New Features in Lightroom, Lightroom Classic and ACR Feb 2025 update
New Features in Lightroom, Lightroom Classic and Adobe Camera RAW Feb 2025 update. Read tutorial
Big Lightroom update April 2026 New Features
April 2026 Lightroom updates, including AI-powered search, improved performance, smarter culling, and new creative tools. Read tutorial
Lightroom Classic Update Deep Dive: What’s New and What Actually Matters June 2026
Lightroom Classic just got one of its biggest updates ever. See the 10 new features photographers have been waiting for, including Duplicate... Read tutorial
Powerful Landscape Masks, make easy, precise photo editing in Lightroom and ACR in Photoshop
Powerful Landscape Masks, make easy, precise photo editing in Lightroom and ACR in Photoshop Read tutorial