
How to use the Puppet Warp Tool in photoshop Tutorial
Using the Puppet Warp tool in Photoshop
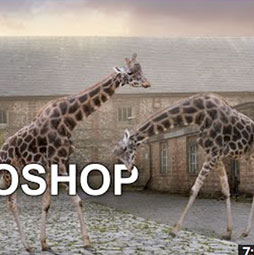
This week we have a special guest. Karen Alsop from Story Art, shows us how to use the puppet warp tool the bend the neck on this giraffe.
How to Use Puppet Warp in Photoshop Tutorial
Hey everyone, I’m Karen from Storyart and I’m here to show you how to use the Puppet Warp Tool. All right, so I’m here to show you the Puppet Warp Tool and there’s some really cool tricks that you can do with this. I’ve got a girraffe here that I’d like to show you how you can move the legs, the neck, everything independently, like you’re operating a puppet.
So, I’m in here, I’ve got my giraffe that I have already cut out and extracted, and I have rasterized that just for the purpose of making this quicker for you to see, but you can do this as a mask as well. So if you have a layer mask on your object, then you can do this Puppet Warp in the same way.
So, Puppet Warp is found in Edit, and Puppet Warp. There you’ll find, when you bring this up, the default settings are Mode, Normal; Density, Normal; and Expansion, 2 pixels. Now, if you’ll leave it on the default settings, you will encounter some problems.
I’m going to show you that very quickly first, before I go into the detail on how to use Puppet Warp. So the first thing that I’ll do is just make some movement. So, by creating some pins on our giraffe, I won’t put too many here yet because I just want to show you what actually happens when you use the default settings.
So I’m going to move my giraffe down, bring the neck down, as you can see, pretty cool feature to be able to do that, but I’ll click Apply. Now when I zoom up on this change, you can see in some areas that there are some jagged edges, and that is because the pixels were set to 2 pixels, so the expansion was set to 2 pixels, which was too close to the edge of the giraffe.
So you’ll find that’s an issue and I actually had this problem for a while and I finally figured out how to fix that. So I’m here to tell you right now how you can do that as well. So let’s go backwards and we’ll go back into our Puppet Warp settings, Edit, Puppet Warp.
Now, you can see here, as I said, the expansion was set to 2 pixels. I’m going to change that to 20 pixels. And what that does is it brings the edge of the mesh outside of our giraffe, which leaves space, and it means that it doesn’t create those jagged edges that you saw before.
Okay, now that I’ve got my draft set up and the Expansion is set to 20 pixels, which gives us space around the giraffe, you can change the density. Now, at the moment, it’s on Normal, and that will work quite well for our giraffe here. If you have a very basic object, you could change that to fewer points, which means there’s fewer points on the mesh, so fewer places that you can place the pins, and less movement.
If you wanted to change it to more points, that will be great if you have some fine detail that you need to change. For example, if you’re playing with hands and fingers, and you need to move fingers independently, and they’re very close together, I would change it to Density, More Points, but for our giraffe, we are going to stick with Normal, and then, we’re going to add our points.
Now you can change the Mode as well and that’s something that I will show you once I’ve added the points. So now that we’ve got our mesh set up, we can just use this pin which comes up when you’re actually in the Puppet Warp Tool and click on the different areas of our giraffe. And we’re going to start with the fit and add pins.
Now if I add one pin to the head, now that I’ve locked down the feet, and move that around, you can see that the feet are staying in place, but the rest of the giraffe is moving. Now, if I want to actually lock down the body, I need to add more pins, so I would add a pin at the neck, at the top of the tail, at the base of the tail, at the knees, and at the hip.
Now, if I move the head by just clicking on that pin at the head and moving it around, we can now see that the rest of the giraffe is locked down. If I want to move the feet, I can do the same thing. The rest of the giraffe is locked down and I’m able to move just one foot independently.
You’ll notice that as I move the pin of the foot here, it curves a little bit. If I want to keep that actually quite straight, you can change the Mode. So we have Rigid, Normal, and Distort. So if we actually change the Mode in Puppet Warp to Rigid, it keeps that area much straighter and you have more control over the shape of your Puppet Warp, so that works well with legs.
Now the other mode that you can change to is Distort and what is cool about this is that you can change the perspective of your animal. So we can actually move the head this way and it looks like the giraffe is coming towards us, like a wide angle shot, so the perspective changes with Distort. So that can be a great option if you’re needing to add some distortions to just one area of your object. You can actually use that, pin the rest of the object, and bring that further forward, or bring that further back, okay.
So now that we’ve got our giraffe ready to move, we’re going to go back to Normal and just make a few changes, so let’s bend the giraffe’s head down like that. We’ll move the feet, put this foot up in the air and further forward, and we move the back foot up off the air like he’s walking.
I want to add another point there, and we’ll move the tail up in the air a little bit as well, just for fun. Now we just need to hit apply, and now you can see we’ve got our distorted giraffe, and if we zoom nice and close, we can see that all of the details were retained, so having the Expansion out to 20 pixels means that we keep all of the detail of our front cut out that we’ve spent so long doing earlier on.
So I hope that you enjoyed this tutorial on Puppet Warp and if you liked this, and you like to check more of my work, it’s at StoryArt.com.au and I also have a tutorial up on the PhotoshopCAFE website, which is Compositing Secrets in Photoshop, the Story Art Method, so make sure you go and check that out.
Check out Karen’s premium training here at PhotoshopCAFE.
Compositing Secrets in Photoshop: The Story Art Method
Don’t forget to check out the website as we add new content every week. You can also find us on social media: Youtube, Facebook, Twitter, Pintrest and Instagram @PhotoshopCAFE.
PS Don’t forget to follow us on Social Media for more tips.. (I've been posting some fun Instagram and Facebook Stories lately)
You can get my free Layer Blending modes ebook along with dozens of exclusive Photoshop Goodies here

One thought on “How to use the Puppet Warp Tool in photoshop Tutorial”
Leave a Reply

The Face Aware Liquify in Photoshop C enables you to easily change someones face to look like someone else. See...

Here we have an image of some people playing on the beach in the afternoon. We can easily change this...

Its that time of the year when Adobe drops their big updates to their apps and Photoshop 2021 doesn’t disappoint....


Thats great i need more notification from you guys