
Cropping to an exact size in Photoshop, ultimate Photoshop crop tutorial
Recently while I was conducting a Photoshop seminar tour, I realized that a lot of people were tripping up with the simple crop tool. It’s not that people don’t know how to crop an image, it’s that they don’t know how to do it an get the results they are looking for. The difficulty it seemed was cropping an image to the exact size needed for print or multimedia output.
In this tutorial, I’m going to show you a some tricks with the crop tool, show you how to automatically crop to the exact size you need without math and then provide a few practical cropping tips in Photoshop. It’s pretty much a Photoshop crop tool primer.
7 Cropping Tips in Photoshop
Cropping can be done for 2 reasons:
1. To change the physical size or aspect ratio of the canvas for print, multimedia use etc.
2. To change the composition of the image: To focus on a portion of the photo, while removing distractions. Digital zoom; This is exactly what digital zoom on your camera does, and why I recommend turning it off. You can do a better job in Photoshop.
Crop to exact dimensions and size with the Photoshop Crop Tool
In Photoshop CC, the crop tool was changed to offer more options (Don’t worry CS6- users, this tutorial is still for you). When this first happened, it caused some confusion. Let’s fix that right now. (You can also go back to the old way of using the crop tool by choosing the Legacy option in the option bar).
Step 1.
Choose the crop tool from the toolbar, or press the C key.
You will see the crop boundaries, which can be selected and dragged. (Holding down Shift will constrain the shape)

Step 2.
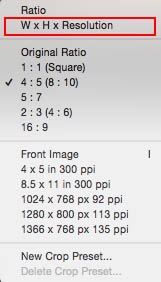
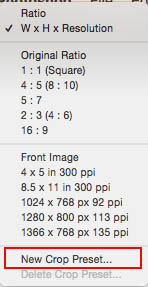
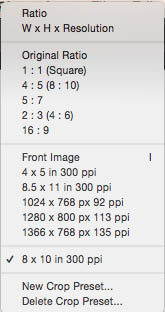
In the tool options bar at the top, change the option to W x H x Resolution. (Width, Height Resolution).
Step 3.
You can now type in your desired aspect ratio, or size. I have typed in 8 in x 10 in. I added the “in” to force the scale to inches. You could also use the ” inches symbol.
If you don’t enter anything in the resolution field, it will just set an aspect ratio without any resolution (final size). This is where people get messed up. Shape, but not size.
For resolution, enter the desired final resolution. For print, it’s usually 300ppi (DPI printed). For online, 72 is common. Also 180 or 360 works well for Epson printers.
![]()
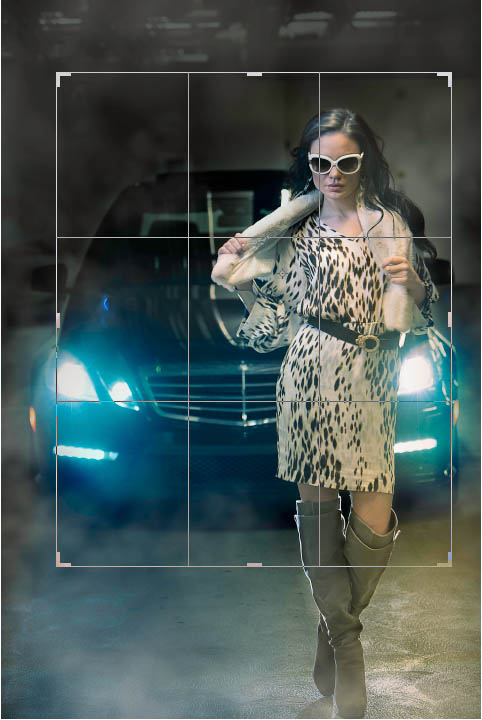
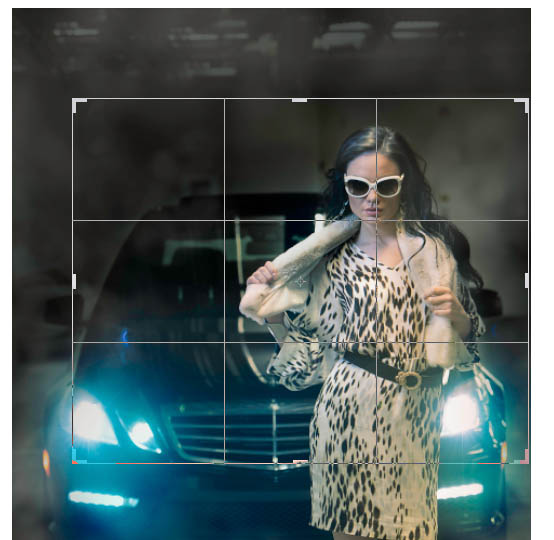
Now, when you change the crop area, it stays locked at the 8×10 aspect ratio: 8 (in) x 10 (in). It doesn’t matter what size you make the cropped area, it will always be 8 x10 (or whatever you entered into the boxes).
Step 4
Press the Enter Key (or the checkmark in the toolbar) to apply the crop.
Notice that it is exactly 8×10 inches. That’s because of the resolution setting.
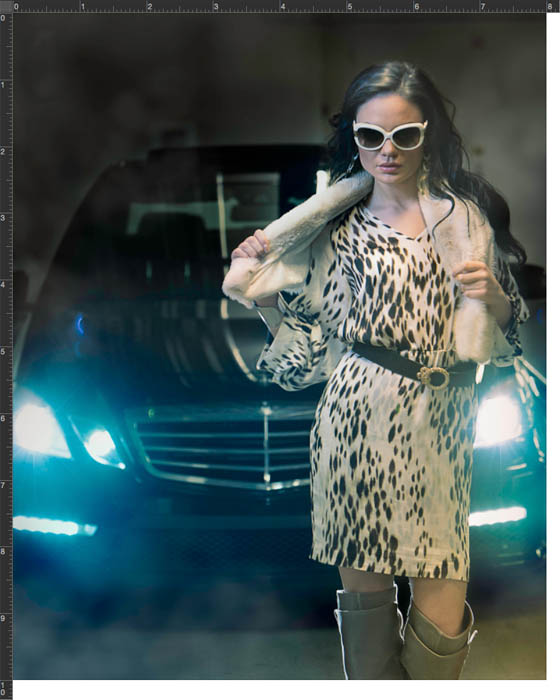
If you change the crop area and apply it, it will still end up at 8in by 10in at 300ppi
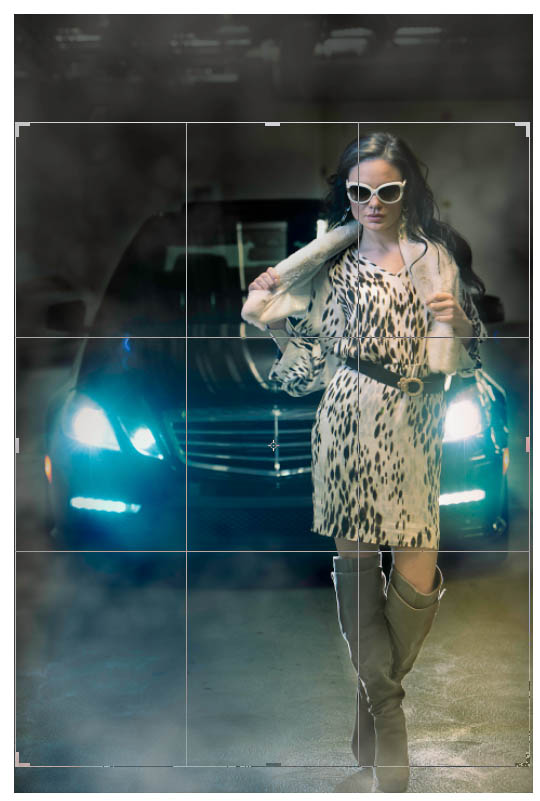
Even when you crop in really tight, it will still be the same final size.
As you can see, this is really useful for preparing files without having to think too much or do math.
Xtra Credit
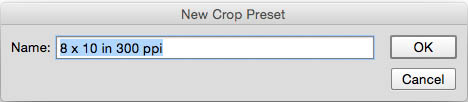
Making a Crop Preset
Let’s save these settings as a preset, so that we don’t have to enter it every time.
In the drop down, choose, New Crop Preset
Photoshop will name it for you, or you can add your own name if you prefer.
When you open the drop down menu from the options bar, the preset will always be available at the bottom of the menu for 1-click application.
Changing the Orientation of the crop tool
Notice that our cropping has all been in portrait orientation so far. If you want to change it to landscape, just press the double arrow tool which will flip the settings.
They can also be entered in the boxes differently, remembering that the first number will always be the width and the second the height.
![]()
![]()
Clearing the Crop tool
If you want to go back to freeform cropping (Unconstrained) click the clear button and it will remove all the settings for you.
![]()
Non Destructive Cropping
When you apply the crop tool, by default it deletes the areas that have been cropped. However, if you turn off the option that says “Delete Cropped Pixels” Photoshop will create a new layer and change the size of the canvas to hide the pixels without removing them, so you can readjust the image afterwards.
![]()
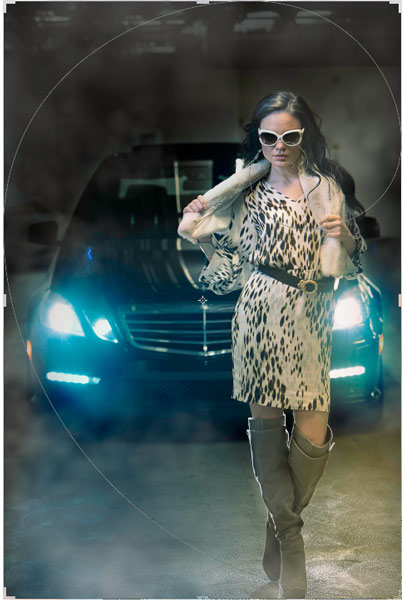
Rule of Thirds and compositional guides (Overlays)
When you are cropping for composition, there are some tools to help you visualize your crops in Photoshop. You will see 6 different options that will show different overlays when the crop tool is in use. You can tap the “o” key to cycle through these.
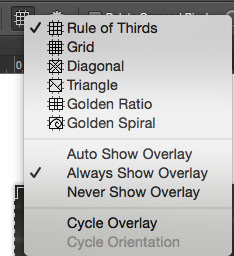
Golden Spiral shown here
Here is the rule of thirds, this is the most common type of composition aid.
When shooting and processing it’s pleasing to the eye to have important portions of the image fall on these 3rd lines rather than just slap everything in the middle.
Important details can even fall on the intersection point of the horizontal and vertical lines.
Even more things you can do.
Another thing about the crop tool, it isn’t just for cropping into an image. You can actually drag the crop tool outside the image area into the canvas to enlarge the canvas area.
Believe it or not, there are even more things that the crop tool can do. If you want to learn more and go this (and more) in depth with all the tools in Photoshop, you should checkout out flagship training, Photoshop For Digital Photographers (We have versions from Photoshop CS all the way to the latest version of CC).
PS Don’t forget to follow us on Social Media for more tips.. (I've been posting some fun Instagram and Facebook Stories lately)
You can get my free Layer Blending modes ebook along with dozens of exclusive Photoshop Goodies here


38 thoughts on “Cropping to an exact size in Photoshop, ultimate Photoshop crop tutorial”
Leave a Reply
More collaging techniques for Photoshop, using channels and layers.This is a bit more in depth than some of the other...
This tutorial will show you how to hold your images together with realistic looking screws.
How to use new Motion Graphics templates in Premiere Pro for your video titles and graphics. Change text, edit color,...


Love the cropping to size tip … shame I found it the week after I had to put in my college assignements – would have saved me loads of time …lol
Awesome work.I like this tutorial.
i was faced many problem on cropping of photos after seeing your tutorial i am not facing that problem anymore.
good info thank you ^_^
Great article, exactly what I needed with different sized images for website thumbnails
I don’t understand. I’m trying to crop to 10″x10″, but every time I input 10in x 10in 300 it just doesn’t do it. I don’t know what I’m doing wrong. It just crops at a 1:1 ratio.
Make sure Size and resolution is on. 10×10 is 1×1 9as you know) once you crop, it will resize to your chosen size.
Hi, thank you so much for this! I would like to know how I could crop an image without going outside the original boundaries. Say you want to square your 10×8 by selecting the 1:1 present aspect ration, but you only want to retain the lower left portion of the image. There has to be an easier way than having to do it manually with grids. I do not want to enlarge my canvas, but I want to crop it to perfection.
is it possible to crop at a fixed size area and memorize the “template” to crop others images with this dimensions ?
Yes, you can save it as a preset
But – I really want to crop from a larger image using a specific pixel size (i.e. I may have a very large pic, and I want to find a natural crop area say LinkedIn’s banner size of 1584×396. How can I create a selection area of 1584×396 and slide it around the larger image until I like what’s in it and grab that area? When I use my crop tool manually is is also showing in cm, how do I get it to show pixels as the measurement?
just type in the number followed by px
Would of been great if you would of showed crop for facebook, not everybody uses instagram.
Facebook isn’t as fussy as it shows both vertical and horizontal images fine.
Facebook
I use Facebook. I find it’s annoying to post things to Instagram from my iMac and I rarely post a photo that hasn’t been edited. Unlike the masses, I hate using social media from my iPhone.
“Golden Ratio” and the “Golden Rule”–you misspoke the last time but, actually, they go together! Thanks.
Facebook
Alex (comment 6) Tap the space bar between “10” and “in” i.e. 10 in and not 10in
What if I don’t want to crop my image at all but I want to print an 11×14 photo? How do I do that?
Just resize it if it already the correct aspect ratio
I accidently cropped an image with a transparent background, right up to the image. Now that I want to do that, I can’t figure out how I did it. I just remember double clicking on something (and then panicking)
How can I get exact measurement of face on photoshop. Facial measurements should be equal on photo as well. Kindly help me.
This tutorial shows what everybody else is showing; how to make a crop box to a given aspect ration, and then how to resize the resulting crop to a desired final size. What I want is to make a floating crop frame that is the exact pixel size I dictate. I then want to freely re-position this now rigidly sized crop box, NOT re-size and re-position to fit whatever.
choose classic mode
As RobertK is saying, I don’t think there’s any way to crop to a given size in Photoshop; you can only crop to aspect ratios. Selecting “classic mode” doesn’t do anything.
You can type in sizes in the boxes eg px, in, cm etc
Typing in sizes in the boxes doesn’t do what RobertK is asking, it just resizes the resulting crop to those dimensions.
To create a floating crop frame to exact dimensions like RobertK asks, you need to use the ‘Rectangular Marquee Tool’ and ‘Crop’ command in the ‘Image’ menu. Type in the ‘Fixed Size’ dimensions you require for your marquee, then click on your image. Move the resulting selection to the place on your image you wan’t to crop and select the ‘Crop’ command in the ‘Image’ menu.
I’m not sure I understand some of the questions and answers and perhaps someone has already given the answer.
I understand that Photoshop can crop with “given” aspect ratios of 1:1, 4:5, 5:7, 2:3 or 16:9. My main question is can I create “my own” aspect sizes, for example, 7:9?
Often I am working on a canvas that has different aspect ratios to what is normally given. Hence, I want to be able to create my own unique aspect ratio sizes.
Is this possible with Photoshop?
This is important for me because when I am doing oil painting and working on canvas that is 70cm x 90cm I would like to crop the image to 7:9 so that it is easier for me to sketch out in paint where the image would be located on my canvas.
Many thanks.
yes, you can crop to any aspect ratio you like
Great tutorial! I’ve been using PS for years, and I learned a lot about cropping that I didn’t know.
My problem is that I want to crop an image to a specific size, but I want to crop in from the right and up from the bottom. If I just crop to a specified size, I assume the tool would crop evenly from all four sides.
Thanks AT, you are correct. The user interface in PS is un-intuitive. All they needed to do was to make a crop option that doesn’t resample the image, and instead take the settings as is. But for whatever reason, they chose to have ‘crop’ always resample.
Great information and help hugely. Is there a way to crop from the middle please so when I have different size images I can set an action up? Thank you
Yes, Hold down the alt/option key.
Hi There
I am dealing with a large number of images from suppliers for a ecommerce site that us being currently built. With that in mind batch processing images is definitely preferred. In order for the website to deal with product images that aren’t square, the developer has requested that there be a 10% clipping space around the product within the overall image, to allow for them to code a cover for the area not used in the space . Is there any way when resizing image through the Image Processor that I can ensure that products don’t appear too close to the edge of the 800×800 pixel area. Would i need to set up an action and somehow ask for the image to be 720×720 and a canvas to be 800×800 for example. Your advise would be greatly appreciated.
My problem with cropping is to take a series of astrophotographs and crop to a standard number of pixels (V and H) to make a new picture file having only the astronomical image of interest. I need a consistent (and non changing) picture dimensions so photo stacking software functions correctly.
I do have developed a 12 point procedure to do this operation by making a white rectangle of the desired dimensions and saving it. It remains on the screen. I open the pictures to be cropped, drag the white rectangle into the picture, open magic marker and place its cursor outside the white rectangle area, select the white rectangle blending options and select ‘multiply’ to make a white rectangular frame, then select inverse (ctrl-shift-I), drag the white rectanglar outline to frame the part of the astro image desired, select crop, flatten image, and save.
Is there a simpler method?
You can use artboards
Suddenly I found a wonderful informative and helpful tutorial. Thanks.