Select and Mask in Photoshop free masterclass Pt 2 fix Smooth edges
Free Photoshop Tutorial. Ultimate Guide to Select and Mask in Photoshop. PART 2: Smooth edges
Adobe Photoshop mini masterclass on Select and Mask. The video and written steps explain how every tool in Select and Mask work, so you can fix all the common problems we get with cutouts. Eliminate Jaggies, blockies, smudgies and halos.
Part 1/2 Hair and Fur is here.
When you make selections to cut out images, often you will have problems with the edges. You’ll see halos, jaggies, blockies, smudgies and other problems. (I just coined the phrases Smudgies and blockies, you’ll know them when you see them.) Photoshop contains a number of tools to address these edge problems. Many people aren’t using all these tools because they often don’t know what each tool does. That’s my goal here, to explain these tools and demonstrate when to use them. I wanted to make a comprehensive walk-through of every feature in Select and Mask and how it works. Here is Part 2 of this tutorial, dealing with Smooth Edges. Part 1 is here
This tutorial is made in Photoshop 2024. It will work with Photoshop CC and newer.
We will use a car because it has nice smooth hard edges. We will focus on these types of edges in this tutorial. Often I will use the Pen tool to get a very accurate selection on this kind of task if I’m going high resolution or print. See how to use Photoshop Pen Tool here
For a faster and easier way to cut out these objects, please watch the first 3 steps of this tutorial.
Select and Mask can be used on all selections, no matter what tool you use to make the selection.

Lets make a selection
Choose the Object Selection or Quick Selection tool

Look for Select Subject at the top toolbar
Choose Cloud for a better quality selection

Tip: Cloud gives the best quality, but you have to be connected to the internet for it to work. Otherwise use device.
You can change the preferences to choose Cloud all the time
Photoshop Settings>Image Processing>Select Subject Processing, choose Cloud.

You will now see a selection
Notice an extra bit got selected at the back

Use Object selection
Hold down Alt/Option for the subtract option and draw around the selection boundaries you want to remove

Photoshop will remove that portion and snap to the object.
Finish making the selection off you need to. I have many tutorials on making selections, there are many ways to do it using the magic tools, quick mask, pen tool, color range, marquee tools and more. I have tutorials on those here as well as a course on Photoshop Selection Secrets.
If you used the steps above or a different selection tool, let’s refine the edges now.
Choose Select and Mask (If it doesn’t show, choose a selection tool for the toolbox on the left of Photoshop).

Select and Mask Workspace Tools.
Let’s look at the tools on the left.
Refine Tool is for soft and semi transparent areas. We covered this in part 1 of this tutorial

Then we have the brush tool.
The brush tool lets us paint wherever we like without any algorithm working. It’s fully manual

If we paint with the brush tool we can add areas to the selection.

Hold down Alt/Option to remove areas. This tool allows us the freedom to manually choose edges and areas that got missed.

In this case, we are painting away the extra bit on the back. We are in Black and White viewing mode which lets us view the mask. (This was covered in part 1).

The object selection tool is the same Object Selection in Photoshop and uses ai to detect edges and objects

We can add the car in the garage with a single click when using the object selection in Select and Mask.

The Lasso tool uses a lasso to add or remove from the selection, Like the brush, but it’s selection based.

Make a selection and that areas shows

Hold Alt/Option and make a selection to remove from that area.
We don’t have to fill when using the lasso tool, it does it automatically.

If we use the polygon Lasso tool, we can edit with straight lines. This is a very useful option.

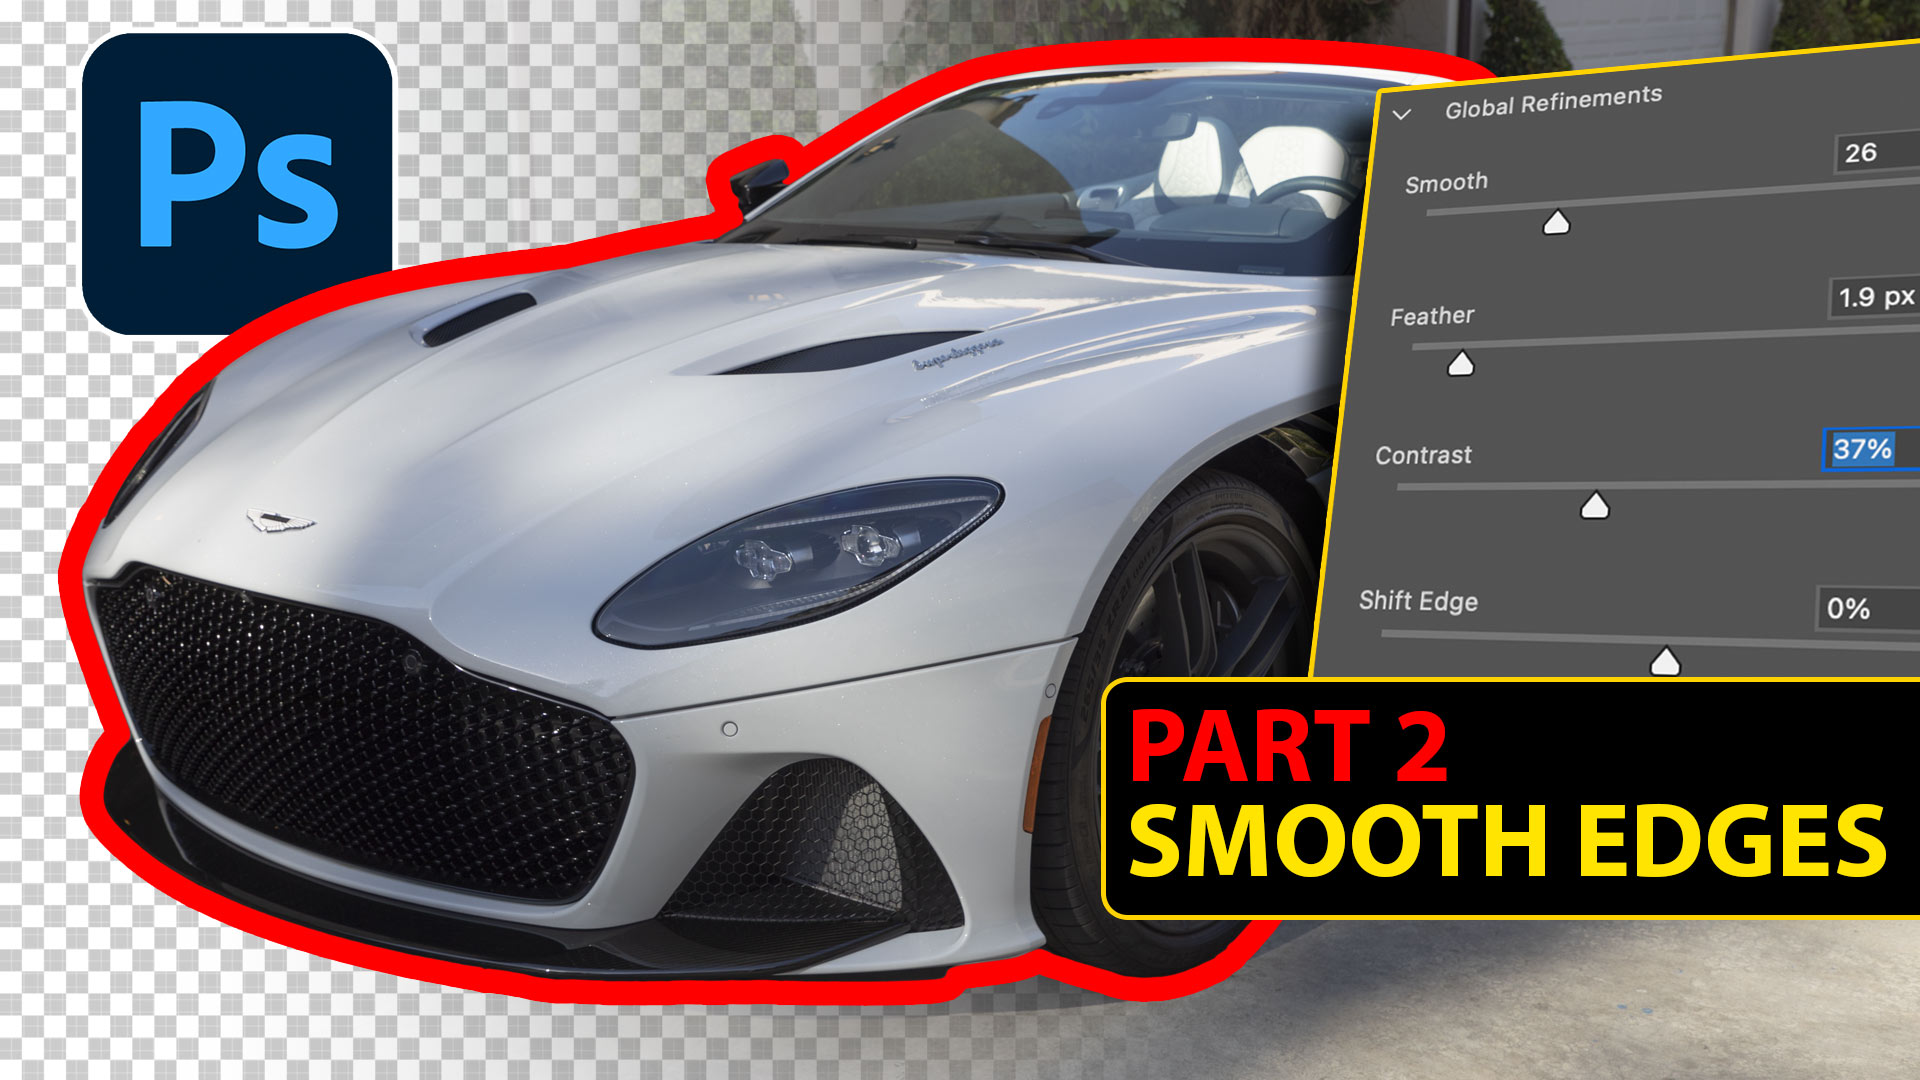
Using Global Refinements in Select and Mask
Let’s explore the global refinements. These tools are designed to help with smooth edges such as skin or hard surface objects.

Look at the Jaggie edge

Adjust smooth to smoothen out the bumpy edge

How Global Refinements Work
Let’s look at Photoshop for a second, so I can show you what’s happening with the Global Refinement tools. Don’t follow these steps, but just observe for a second. (You can watch it on the video at the top).
Here is a rough edge, we are looking direct at the mask. (Photoshop layer Masks for beginners here)

If we choose Filter>Blur, we can soften the edge of the mask,
This is exactly what the feather slider does.

The edge is soft and removed the bumps and unevenness, but we need to make it a sharp edge.
Choose Ctrl/Cmd+L for Levels. (we are adjusting the mask, but viewing the image, so you can see the result, don’t worry, you don’t have to do this).

As we pull the triangles together it sharpens the edge, This is the same as using the contrast slider in Select and Mask.
Before Select and Mask, we used to use blur and Levels all the time, because that way the only way to do it.

Back to Select and Mask
Add some feather to soften the edge and even it out

Add contrast to make the edge sharper.

Shift Edge
There is another setting that allows you to expand or shrink the edge. This lets use show more of the edge, or choke out the edge fringes.
Move it to the right to expand and widen the edge.

Move it to the left to contract the edge.

How Shift Edge works (demonstration, you don’t have to do this).
If we go back to that mask in Photoshop
Remember when we added a feather and then pulled the triangle together in Levels to sharpen that edge?
If we move all the triangles in levels to the right it contracts the edge

Move all the triangles to the left to expand the edge of the selection.

Shifting Edges in Select and Mask
Back to select and Mask
Be careful when shifting the edges in Select and Mask, because this affects the entire image.
Often its useful to Turn on decontaminate colors because this can remove the edge halos by itself.

Only after you apply decontaminate colors. move the Shift edge a very minimum amount.

This is the fastest and easiest way to fix the edges.
There are a number of ways to fix edges and I have made several tutorials here at PhotoshopCAFE. Here is another way to clean up the edges of selections in Photoshop
Choose New Layer with Layer Mask on “output”
Click OK to apply the changes.
The layer open with a layer mask in Photoshop.
If you paint on the Layer mask with a black brush, you can remove areas of the cutout.

If you paint on the Layer mask with a white brush, you can add areas of the cutout.
This way you can use brushes to finish the cutout and get it absolutely prefect.

There are other tools and many other techniques to working with cut outs and edges in Photoshop. My course covers many of them, and there are lots of free tutorials here at the CAFE
I hope this 2-part tutorial has helped you understand the Select and Mask tool in Photoshop better.
Thanks
Colin
If you found this useful, please tell your friends about photoshopCAFE and follow me on social media for Photoshop tips and inspiration.
PS Don’t forget to follow us on Social Media for more tips.. (I've been posting some fun Instagram and Facebook Stories lately)
You can get my free Layer Blending modes ebook along with dozens of exclusive Photoshop Goodies here


in this free Lightroom tutorial learn how to stitch a panoramic photograph in Lightroom 6 / Lightroom CC. Merge photos...

How to wrap text around images in Photoshop, Photoshop text wrap tutorial
Learn how to create reusable layered templates, discover non-destructive layers and masks. Make time lapse sequences, do sky replacements and...