
How to fix edges in Photoshop for perfect cutouts
Removing edge fringes and halos from Photoshop Cutouts.
In this Photoshop tutorial, I’ll show you how to fix edges to make them perfect. Often when cutting out images you are left with dark or light edges. These are called halos or fringes. They are easily removed and I’ll show you exactly how I like to do it. These are other options such as using the matting tools in Photoshop to fix the edges, but I prefer this method for photos of people, because I don’t want to treat the hair the same as the skin areas. If you do that, you will risk creating “helmet hair”. To fix the hair, I like to use the refine brush in Select and mask and can be found in my extracting tutorials. More tutorials listed at the bottom.
Speaking of other tutorials, feel free to use the search bar at the top of PhotoshopCAFE (It works really well) and you will discover tons of other useful tutorials, just like this one.
Check out the video to see the steps and then read the written instruction for clarity and reference. (bookmark and share this page)
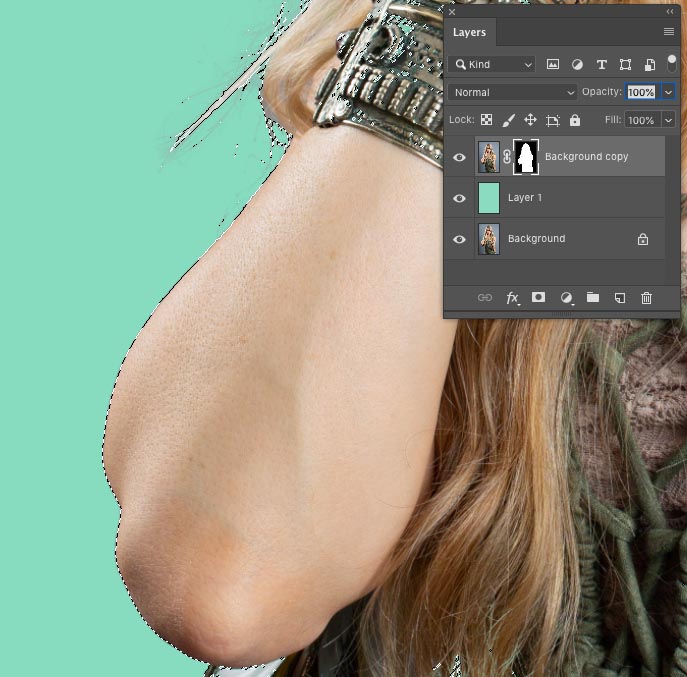
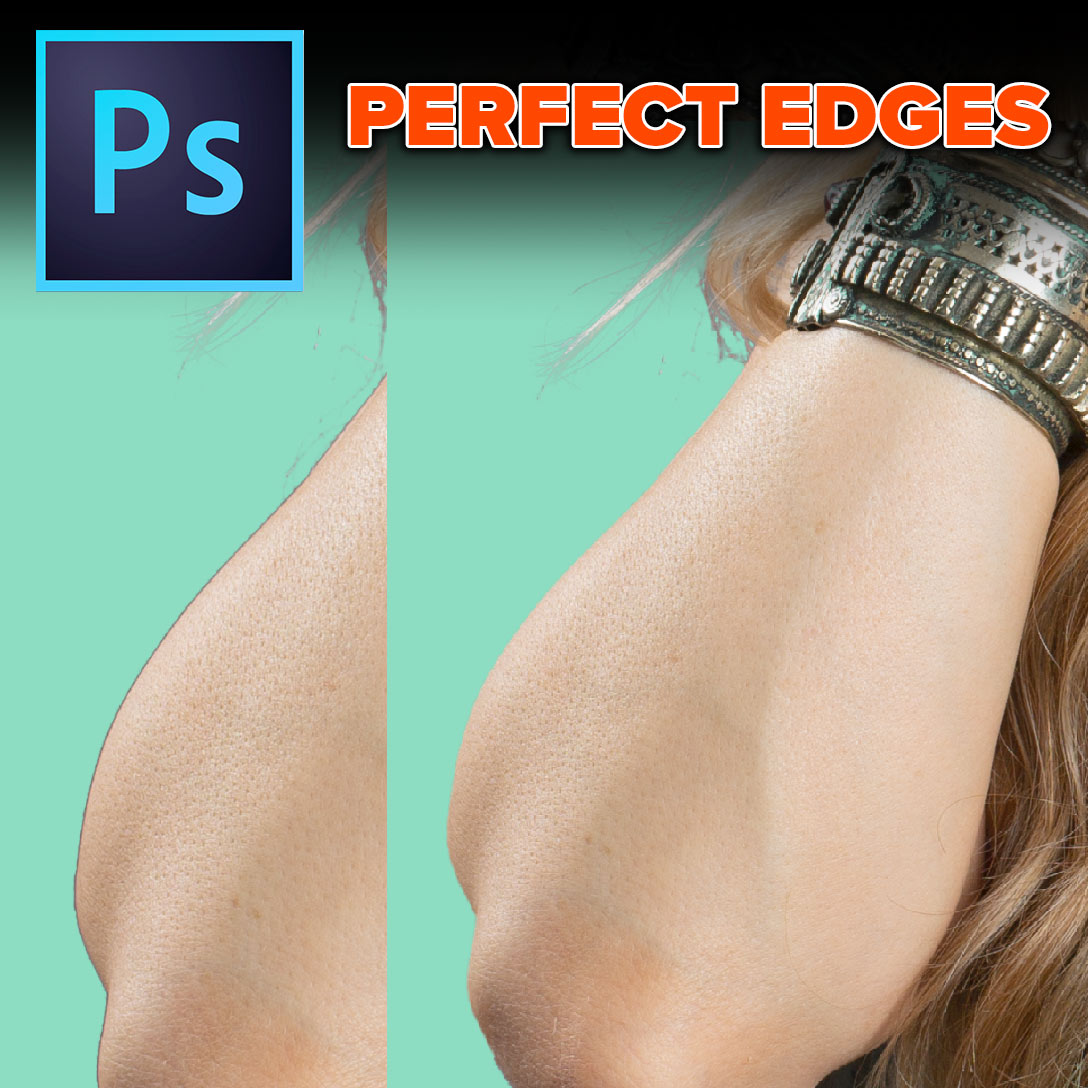
Let’s begin with a photo I recently shot, while preparing images for my Lightroom Classic training course here at the CAFE. (Thanks Callan, for modeling for me). Here is a photograph I have cut out and you will notice the dark edges around the skin. (I placed it on this bright background to make it easy for you to see the edges).

Zooming in for a close look, You can see the edges are very obvious and need some work. (Don’t worry about the hair, the focus on this tutorial is the hard edges).

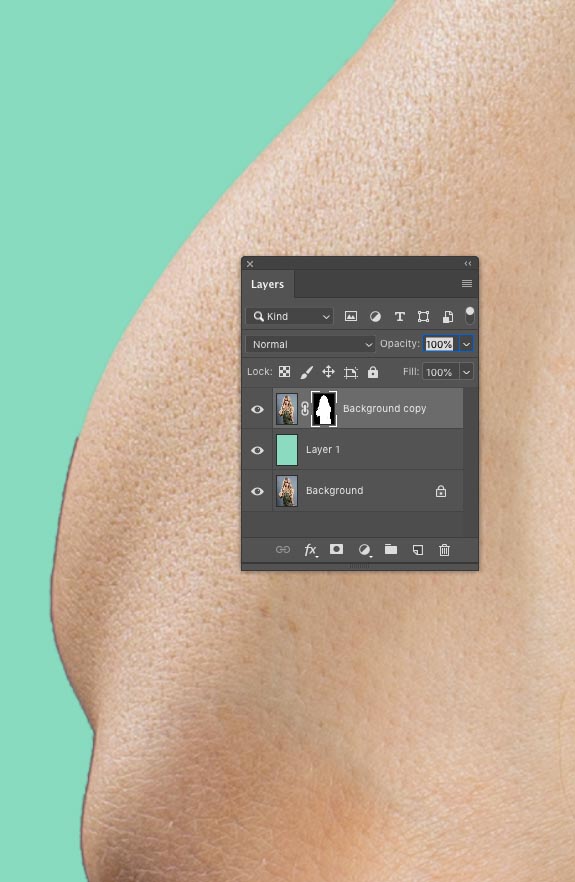
Step 1 // Load the selection.
Hold down Ctrl/Cmd and click on the layer was thumbnail (Ctrl+click the layer instead if you didn’t use a mask)
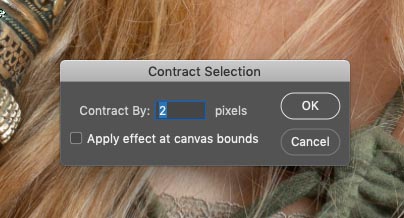
Step 2 // Contract the selection.
Choose Select>Modify>Contract and enter a setting of 2 pixels
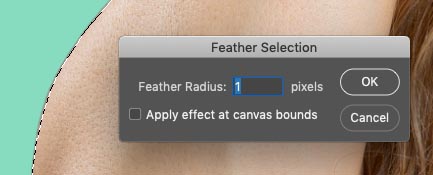
Step 3 //
Choose Select>Modify>Feather. Set it to one pixel.
Step 4 //
Right now we need to swap the selection, so that the outside is selected and just the 2 pixels of the outside edge.
Press Ctrl/Cmd+Shift+I or select>inverse from the menu

Step 5 // brush away the edge halo
Choose a brush and set the color to black and the opacity to 100
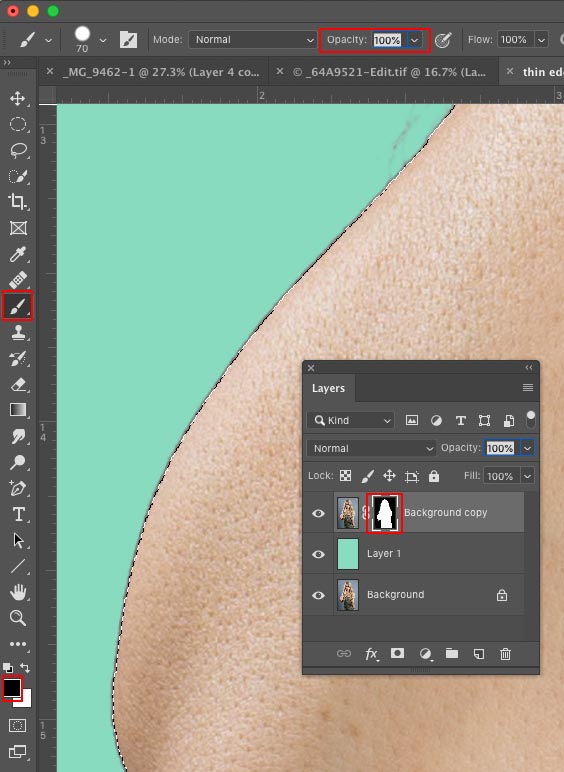
Step 6. //Paint the edges
With the layer Mask selected Paint on the edges and you will see the fringe disappear and a nice smooth edge as you paint. Sometimes, you may need to paint over the edge 2x if you aren’t getting the desired result in the first pass. The feather allows for 2 passes.
I pressed Ctrl/Cmd+H to hide the selection so I can see better while repairing the edge.
(If you extracted on the layer instead of using a mask, use the eraser tool instead).
Conclusion
To finish up the piece, I painted around all the indicated edges.

Here are some of my other tutorials on extracting things from backgrounds in Photoshop
List of some of the Photoshop cutout tutorials here at PhotoshopCAFE. Most contain both video and detailed written steps.
- Cutting out hair and select and mask
- Cutting out impossible images
- Cut out anything in Photoshop
- Cut out Glass, smoke and liquid in Photoshop
- Cut out trees in Photoshop
- Using refine edge
Thanks for checking out this tutorial. Come back for now tutorials every week.
Great to see you here at the CAFE.
Colin
PS Don’t forget to follow us on Social Media for more tips.. (I've been posting some fun Instagram and Facebook Stories lately)
You can get my free Layer Blending modes ebook along with dozens of exclusive Photoshop Goodies here

117 thoughts on “How to fix edges in Photoshop for perfect cutouts”
Leave a Reply

When Photoshop changes your colors, Color Spaces explained

How to automatically colorize black and white photo in Photoshop 2022 including manual finishing

New features and announcements in Adobe Stock. Visual search using AI (sensei technology) new services and integration with Microsoft Powerpoint.


Colin, I am a PC user. I run off 2 towers ,5 monitors and 1 laptop for my graphics design studio.
Both Mac & PC! Mac at home studio, PC at day job.
Mac User
PC User. Thanks for the tutorial!
dumb question but how did you get the cut out of the model on the layer
I used the quick select brush, I have listed that tutorial on the page
PC. Thanks for all of the tips
Mac User. Thanks for all your tutorials
All MAC all the TIME
PC user. Thank you for the tutorial.
Amazing tutorials thanks.I am a laptop user!!!
MAC
great tip!
I use Mac. Also love the videos accompanied by the written explanations. That’s so helpful!
Thanks, most of my tuts have both, but I am a little behind the written on a few! But I will catch up
I am a PC User! I enjoy your tutorials, keep up the great work..
Both Mac & PC depending on what comes in the door–more PC Win 7+ these days. Haven’t done anything complicated in Photoshop for a while, but this tute is one a video editor can use.
Mac User. I like the videos showing difficult masking situations and ways to make good selections. Keep them coming. Thanks.
I will! Thanks for the feedback
MAC
Thanks for the tip Colin – also the link to other selection tutorials! I find selections to be one of the most difficult things I do in Photoshop. I’m a PC user
Should be plenty of tutorials to keep you busy for a while 🙂
Love my Mac
MAC user
Hi Colin
I’m an Apple Pro 2010 user. I have a samsung 4k monitor, Not colour correct but calibrated. Used to use a PC but had so much trouble with hanging, Wacom intuos pro medium, unresponsive etc. With the Apple I have continous use not issues at all save for being slow. 2.4 which i will upgrade to 3.6 in the near future. But still at this slow speed still ants pants 🙂
PC user and thanks so much for the tutorials. They are very useful
Thank you for this info. It will be very helpful for editing some images that require extractions.
Im glad it came at a good time
Great tutorial as always you are amazing. I’m a mac user
Thanks!
windows user. I find your tutorials very helpful. Thank you.
Thanks!
PC user. thanks for the Tip’s
PC with SSD and lots of RAM. Thank you so much for all your tutorials. I spend most of my time turning photos into paintings. I wish I had more artistic talent. Also work on composites.
Thanks! Best of luck on your art, post it in our Facebook group https://www.facebook.com/groups/53878338135/
Don’t forget to share your images with the community on our facebook group https://www.facebook.com/groups/53878338135/
pc user thanks
Windows PC user
Thanks for that hint. I’m armature PC user
I am a mac user and appreciate your tutorials.
I am a PC user.
2, Windows 7 & 3Windows 10 desktops, 3 Surface tablets, 2 Surface laptops, 1 Wacom Intuos tablet.
Grateful for your tips & teaching moments.
Thanks
Great Tutorials Thank you Window Uses
Thanks for this tutorial Colin – a bit more knowledge in my armoury! I’m a PC user.
Thanks Colin….PC user.
iMac. Thanks Colin I always enjoy your tutorials
Mac user
I am a PCs user and really enjoy your tutorials
PC
Well explained. Thank you. I’ve been a Mac user since 1987.
Hi there, great tutorial. PC whit Photoshop CS6, with SSD and lots of RAM.
Hi Colin! As always, another master technique. Thank you.
Yes: can’t have enough hair tutorials, the pariah of Selections.
I’m on a Windows PC.
Love all your tutorials. I am a PC user.
Mac user from UK – I always enjoy your tutorials, albeit I do not understand every one. Keep up the good work
I use both a Mac AND a PC (with PC most often) Your tutorials are wonderful Colin. Thank you for this great tip on working extractions with the masked selection. Easy and wonderful results.
Hi Colin. Great tip and tutorial. I have used both PC’s and Mac. I use a PC which I have built. Much faster than Mac.
Thanks Colin – I really enjoy your tutorials. I just converted to a MacBook Pro this month.
Thanks for the tuts Colin. I’m on a Mac.
Regards,
Dave (in the U.K.)
Thanks for all the tutorials Colin, PC user.
Hi Colin,
I’m using a PC with Windows 10 and Photoshop CS6. Many thanks for the tutorials they are easy to follow and contain lots of helpful tips for the amateur.
Regards
Keith
Great tutorial—-making a good selection is always what I find most difficult. I liked this. I am a MAC user
Thanks for the tutorial. I am a PC user.
Mac use! Great hints 😀
I’ve used a PC since the DOS 1.x days and complained about it every day.
LOL!!
PC user – loved this tutorial – so much easier than the way I have been doing it –
Thanks a lot for all your tutos. Macuser
Hi Colin, I am PC user.
Mac user
Mac User
PC user. Thanks for sharing your knowledge via these tutorials, they’re very helpful!
Always PC.
I use a PC. I am a novice in PS,and have learned a lot from your videos.
Thank you!
MAC user. Love you tutorials. I’ve followed you for years. I am wondering if you would do a tutorial on cutting out a non-portrait. My current project is macro/micro butterfly images and I have a hard. The edges of the butterfly can be brown, white and black and aren’t smooth. I’ve shot on a black background and white but they’re both difficult. Any suggestions? Thanks!
good tutorial I am pc user ant tips or tutorials on setting up Wacom tablet I have a intuos pro small thanks for everything have happy christmas
PC user
You save me so much time…THANKS! I’m a MAC user.
Nice info Colin. I’m a Mac user.
Excellent tutorial. Mac user through and through
I’m a P C user. Love your tutorials I have learned so much since subscribing. Keep ’em coming.
Mac User. Tutorials are great!
Thanks Colin. This is very helpful for this PC user.
Very helpful. Thanks Colin. Enjoy your photoshop cafe. I use a Mac.
Love your tutorials. However, when I wish to recall a forgotten suggestion that you made (e.g. selections other than made in this tutorial), I find it difficult to find on your website. Would it be possible to include a search tool on the site?
Again, many thanks and much appreciation.
Hi there
There IS a search tool on the site 🙂
Look at the top to the right of account, click that magnifying glass 🙂
I love this tutorial you have shared.
Thank you Colin, from a PC user!
Great tutorial – very helpful! PC User
I’m a PC user
PC
Mac user. Your tutorials have made such a difference in the quality of my photo manipulations, thanks for keeping them simple.
Very useful tip, thanks
I am a PC user who recently retired after 30 years in federal and state crime labs. I started with Photoshop 4. Now that I am volunteering at a local history museum, I have found that I have had to learn the artistic and retouching side of Photoshop. Your tutorials and training DVDs have been a big help. We get a lot of old and damaged blueprints, maps, negatives and photographs that need to be enhanced and/or restored. Thank you for all you do for the profession.
Hallo Colin,
cut out hair is a problem any time I troggle about it.
I am an pc youser. Your tutorials are yous full to me.
Thanks a lot
Louis
I have a couple of tuts on cutting out hair, hit the search icon at the top of the screen to search PSC
Thanks for the tutorial. I am a PC user.
PC user…was MAC and changed over. I missed my PC. Tuts are very helpful!
I am loving your tutorials. Always have problems with cut outs, so this is a very very useful tip.
I am a Mac user – wouldn’t go back to PC, ever.
PC user… Love your tutorials… Please keep them coming 🙂
PC user… excellent video! thanks
Hy Colin. I´m a PC user.
Mac user, thanks for the great tutorials..appreciate.
PC user, great tutorial much appreciated.
This was the perfect tip – oh those dreaded black edges and struggling to remove them! No more!
I am a PC user
Great tip – thanks. MacBookPro and iMac (4K).
PC User. Great Tip
Great tutorial. I’m a PC user.
brilliant tips. Mac user
PC user. OMG You just saved me so much time and tedious work! Thank you!
PC. Thank you for this fantastic tip.