
Remove color reflections in Lightroom Classic ACR with new Point Color
Fix Color in a photo with Point Color in Lightroom and Camera RAW
A new tool in Lightroom and camera Raw is Point Color. This tool enables you to select and change colors in photos based on Hue, Saturation and Lightness, as opposed to old tools which only let you select by hue. Point Color can also be used on Masks.
We will remove this color reflection from the photo of cameras.

How Point Color Works
First lets take a quick look at how Point Color does its magic.
Go to the Develop Module in Lightroom (Or Adobe Camera Raw in Photoshop)
Go to Color Mixer and you’ll see Point Color.
Click the eyedropper tool

Click on the color you want to work with in the photograph

You will se the color is selected.
You can drag to the left or right to change the Hue (the color itself)
Drag up or down to change the Saturation. (Amount of Color)
Drag on the gradient to the right to change the Luminance (Light or Dark)
Of course you can always use the sliders which are named as such.

Try moving the sliders or the point in the color swatch, you can alter the corresponding colors on the image.
Here you can see the green changing.

Click the visualize Range box, or hold down Alt/Option as you move a slider to see the area that’s being changed. On the effected area will appear in color.

As we move the slider, notice the bar under the swatch shows the original color to the left and the new color on the right half of the bar.

We can refine which areas will be included by opening the arrow at Range to see the options.
Moving the range slider to the left decuces the reach of colors to be included, while sliding to the right increases the spread.
Use the Hue, Saturation and Luminance range sliders to further refine the selection. This is demonstrated on the video above

Notice, we can refine the selection so just the greens in the hedge are selected.

Change the Hue Shift to add a nice green to the hedge and no affect anything else. As I noted at the start, this will also work on masks if you need to refine it more.

Fixing the Color Contamination in reflections
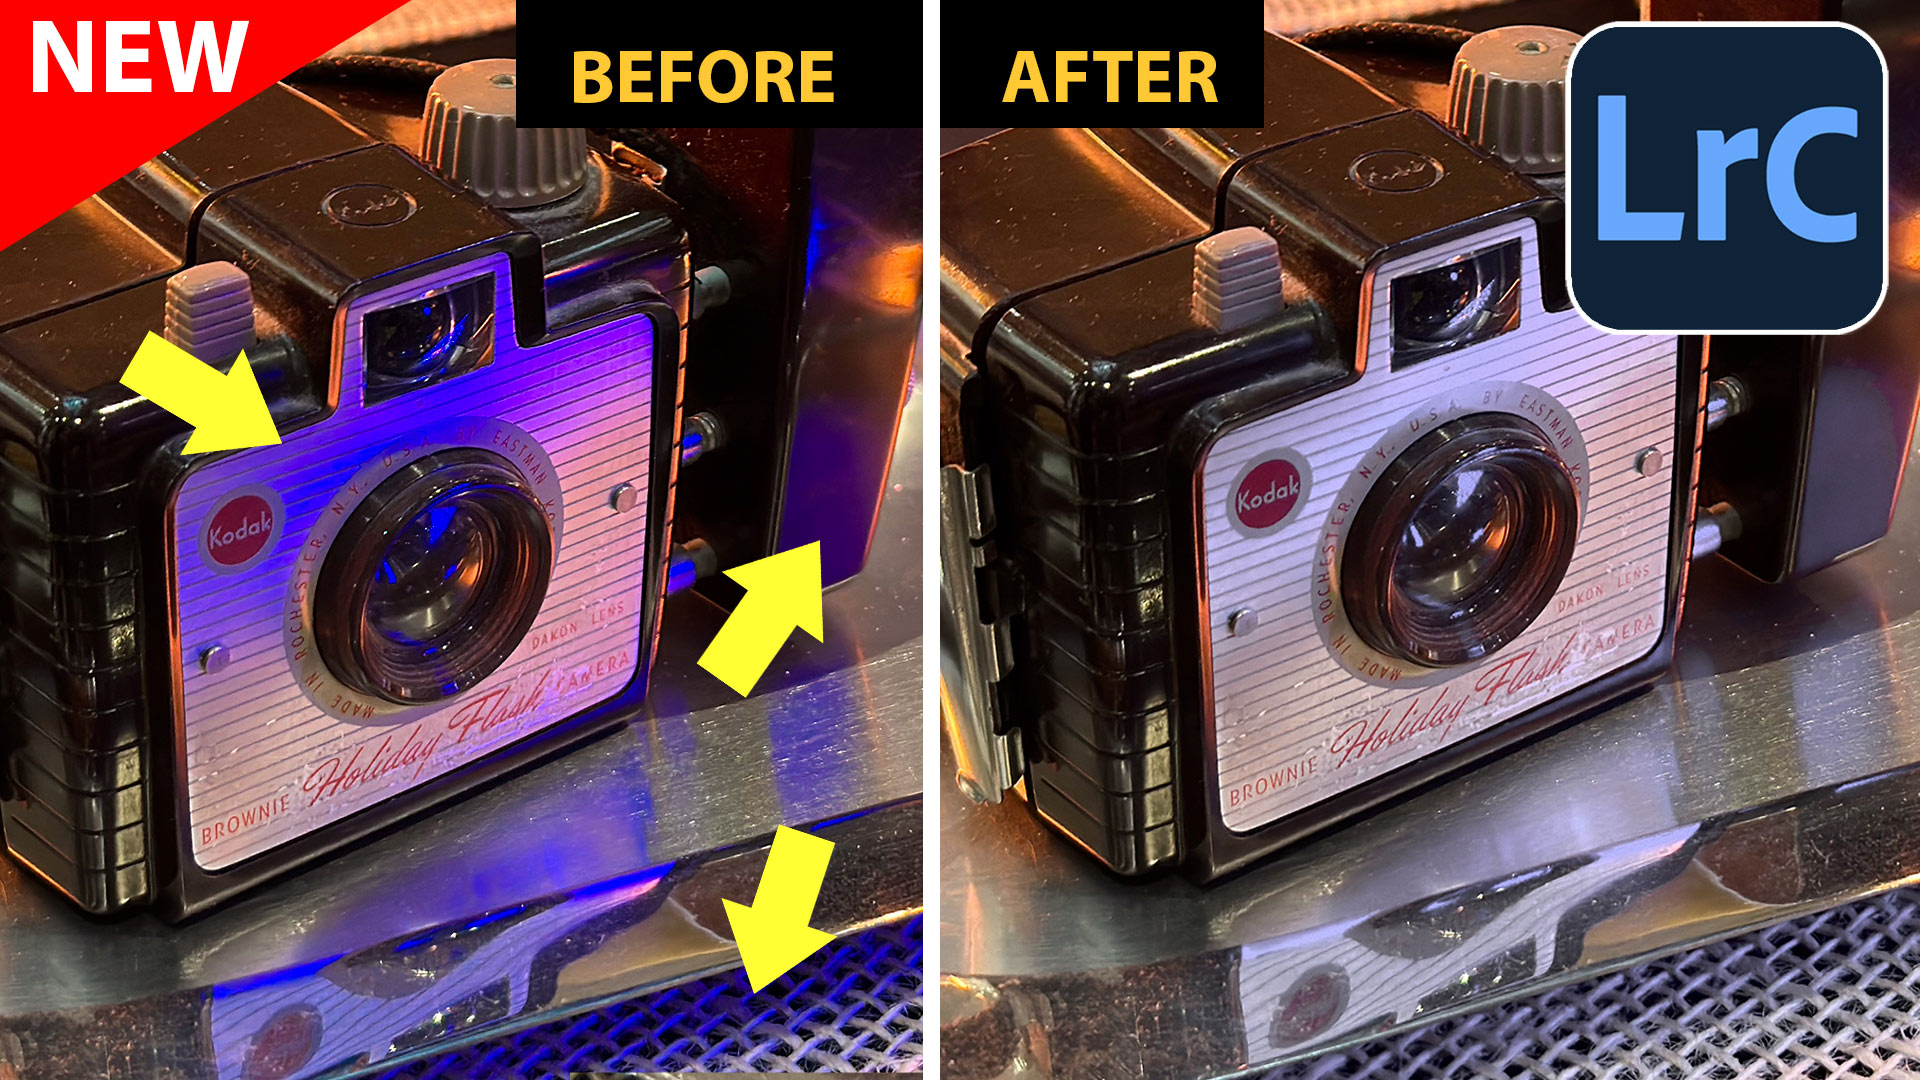
OK, let’s look at this picture I snapped at an exhibit. You can see all kinds of colored reflections on the metal from surrounding colored lights. Let’s fix this.

Choose the eyedropper to select the purple color.
Refine the selection under range

Drag the saturation all the way to the left to remove the color.

There are still some salmon colored reflections.

Click with the eyedropper to add a second color.
Reduce the saturation to remove that color too.

Notice the red letters are still there on the camera.

Watch the video to see this more in depth.
I hope this was useful!
If you want to learn Lightroom Classic check out my course on Lightroom 2023 here, or the brand new course on Lightroom Masks
Thanks
Colin
PS Don’t forget to follow us on Social Media for more tips.. (I've been posting some fun Instagram and Facebook Stories lately)
You can get my free Layer Blending modes ebook along with dozens of exclusive Photoshop Goodies here

3 thoughts on “Remove color reflections in Lightroom Classic ACR with new Point Color”
Leave a Reply

New Lightroom CC, project Nimbus is now CC 2018. New feature tour and tutorial on synching and using Lightroom CC...

Auto remove anything in Photoshop with General Distractions tool.

Use this trick to Fix color in any photo in 1 click in Photoshop, Lightroom or Camera Raw


Great tip Colin!
That was great! Thank u🙋🏻♀️
It was very helpful to learn this valuable technique. It will be a very essential skill in a graphic designer’s arsenal.