
How to Perfect AI Mask Edges in Camera Raw in Photoshop
Adobe Camera Raw’s New Edge Cleanup Feature: How to Get Perfect Mask Edges
Adobe has introduced a new edge refinement control for AI-powered masks in Camera Raw. At first glance, it looks like a simple slider, but there’s more going on under the hood than most people realize.
The new feature does an excellent job cleaning up hard edges on automatic masks, but it doesn’t always solve every masking problem. In this tutorial, you’ll learn how the new Edge Cleanup control works, where it excels, and a powerful technique for refining difficult edges such as trees and foliage when the automatic cleanup isn’t enough.
Creating an AI Mask
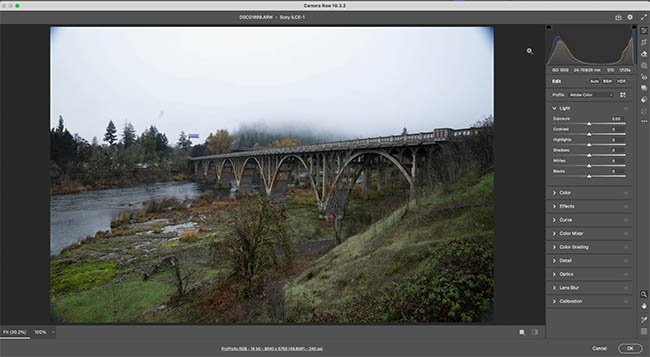
Start by opening your image in Camera Raw: If you’re working with a RAW file, simply choose file>open to open it directly in Camera Raw. If you’re working from Photoshop, choose Filter > Camera Raw Filter.
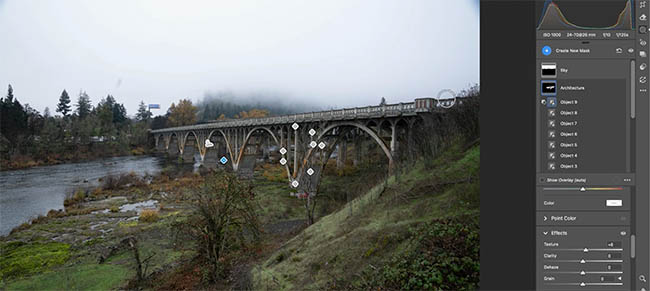
To create a mask, click the Masking icon to open the mask panel
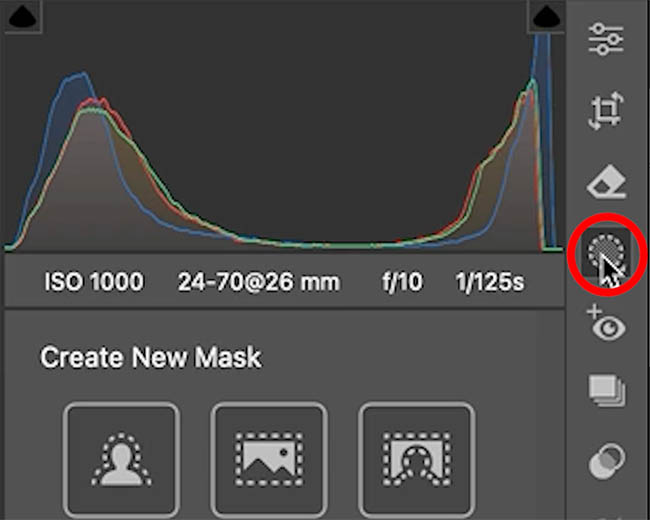
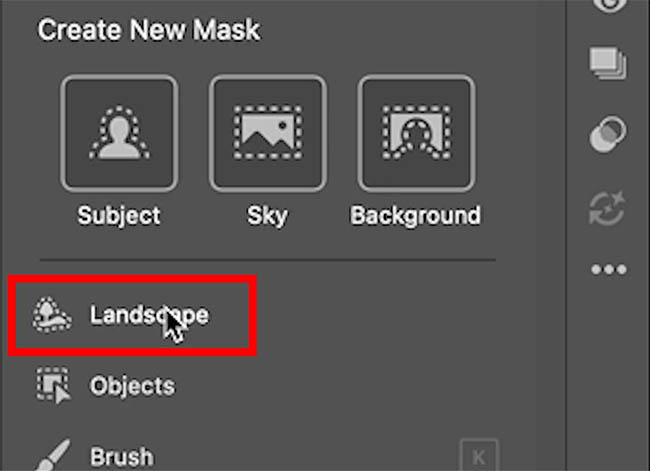
Choose Landscape Mask. To apply a landscape mask, by isolating different parts of the photo.
Camera Raw analyzes the image and automatically separates different elements of the scene into categories.
For this example, select all available landscape elements so Camera Raw creates separate masks for each area of the image.
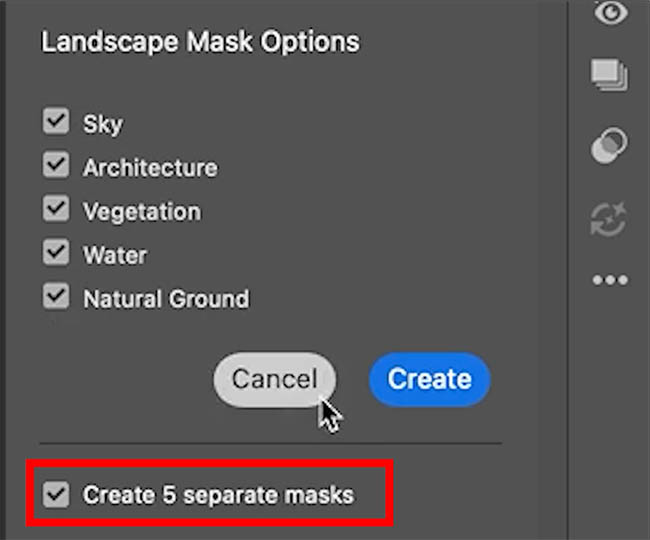
You’ll now have individual masks for items such as:
- Sky
- Architecture
- Vegetation
- Water
- Ground
This allows you to target specific parts of the image independently.
Understanding the Edge Problem
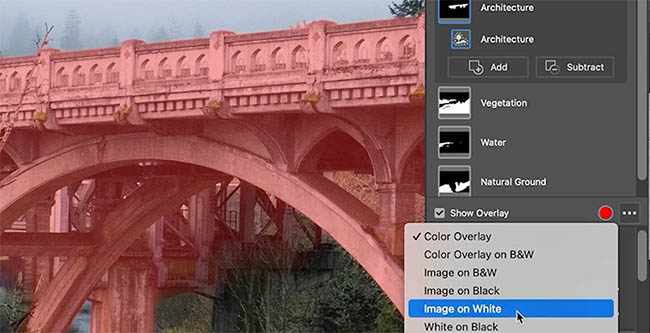
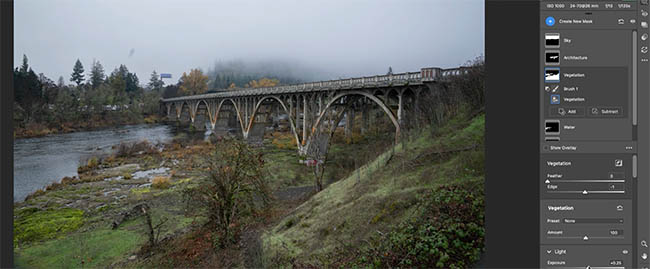
Let’s start by looking at the Architecture mask, which has found the bridge. (Watch the video to see how to optimize the selection to include the entire bridge).
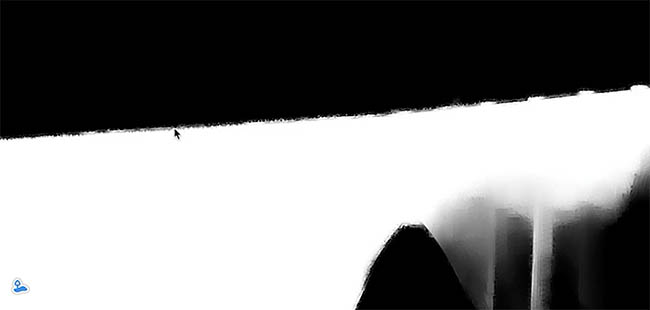
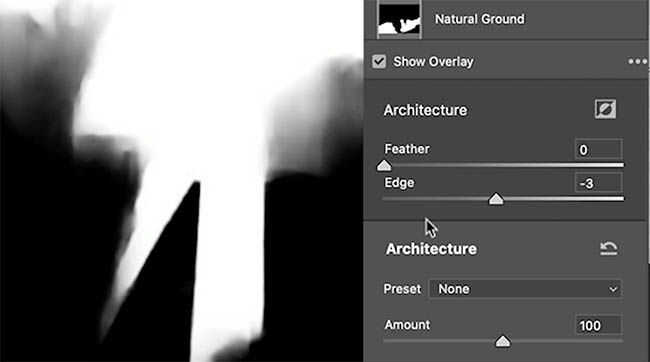
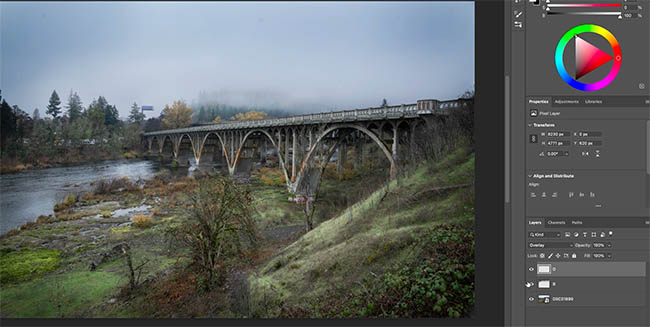
At first glance, the mask may appear accurate. However, zooming to 100% reveals a common issue that’s existed with AI masks for quite some time.
To expose the problem clearly, temporarily increase the Exposure far beyond what you would normally use. This exaggerated adjustment makes masking errors much easier to see.
When viewing hard edges such as bridges, buildings, or railings, you’ll often notice rough, jagged transitions along the mask boundary. These edges can create unnatural adjustments and become especially visible when making strong tonal changes.
To inspect the mask more clearly, enable the overlay and switch it to a black-and-white display.
The roughness becomes immediately obvious.
Using the New Edge Cleanup Control
Adobe’s new Edge Cleanup control is designed specifically to solve this problem.
You’ll see a feather and edge slider in many of the auto masks.
This feature currently appears only in Camera Raw and not Lightroom. Adobe often introduces new tools in Camera Raw first before rolling them into Lightroom later, since both applications share the same processing engine.
The Edge Cleanup control works similarly to a classic Photoshop masking technique known as choking a mask.
As you move the slider one direction, the mask contracts.
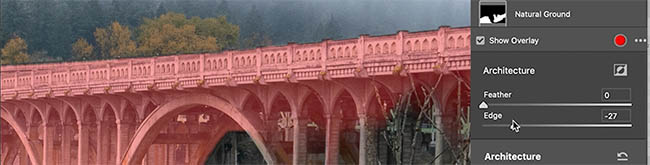
Move it the other direction and the mask expands.
If you’ve worked with alpha channels in Photoshop, the behavior will feel familiar.
What’s surprising is how little adjustment is usually needed. Simply nudging the Edge slider by 1 often produces a dramatic improvement in edge quality.
The jagged mask instantly becomes smoother and more natural. If it doesn’t, add a tiny bit of feather.
Fine-Tuning Hard Edges
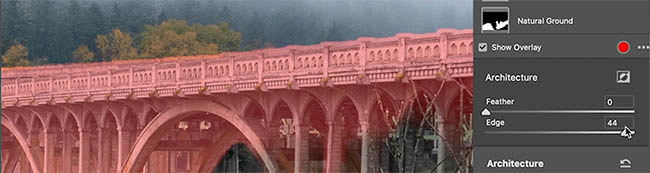
After cleaning the edge, turn off the overlay and evaluate the mask against the image itself. (With the exposure still turned up very high)
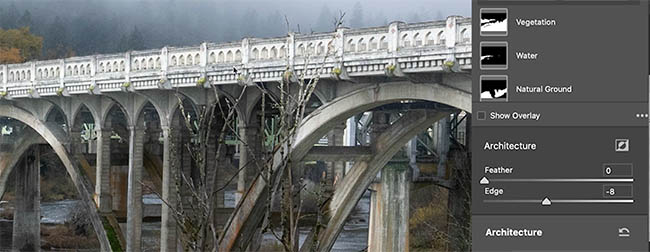
You may notice that the mask extends slightly beyond the object boundary.
If so, reduce the edge just enough to bring it back into alignment.
Remember, the goal isn’t simply to clean the edge. The goal is to create an accurate edge.
At this stage, the bridge edge should look significantly better.
The exaggerated exposure adjustment was only used to reveal problems. Once you’ve refined the mask, return the exposure to a realistic value.
Now your adjustments can be applied with much greater confidence.
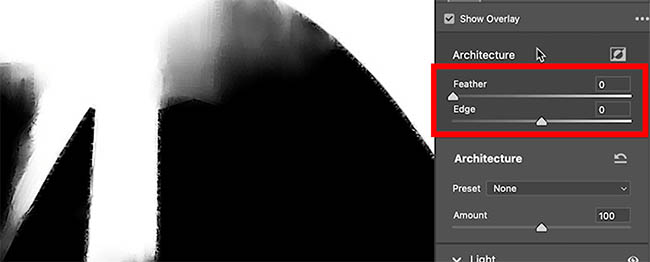
Where Edge Cleanup Falls Short
Hard edges are relatively easy.
Trees and foliage are much more challenging.
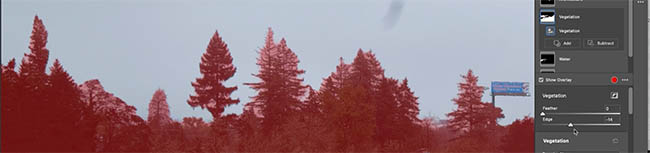
Let’s switch to the Vegetation mask.
Zoom to 100% and examine the edges around the leaves.
This is where the limitations of the Edge Cleanup slider become apparent.
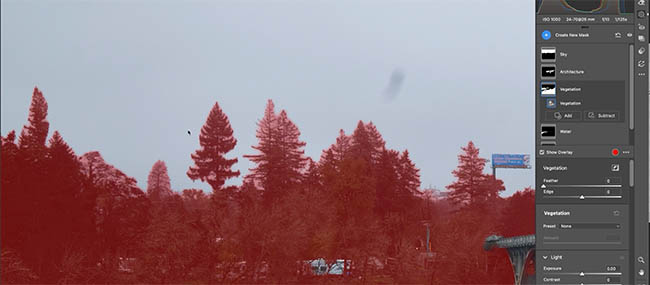
The problem isn’t simply the outer edge.
The real issue is that many of the tiny openings between leaves were never selected correctly in the first place. (TIP: Sometimes, using a Sky mask and inverting it can produce a better result than vegetation).
No amount of edge expansion or contraction can restore information that isn’t part of the mask.
That’s where a different technique becomes necessary.
The Professional Foliage Refinement Trick
Instead of trying to force the edge slider to solve the problem, use the mask subtraction tools.
Select the Vegetation mask.
Choose Subtract and select the Brush.

Turn on Auto Mask in the brush settings and turn Feather all the way up.
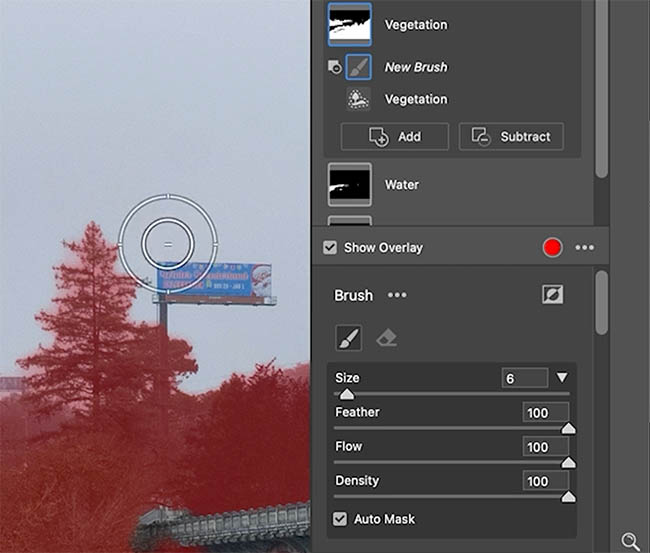
Now comes the important part.
Position the brush so the center minus symbol remains entirely inside the sky.
Do not let the center touch the tree.
If it touches the tree, Camera Raw will begin removing parts of the foliage.
As you carefully paint around the edges, Camera Raw uses edge detection to remove the sky from the mask while preserving the leaves.
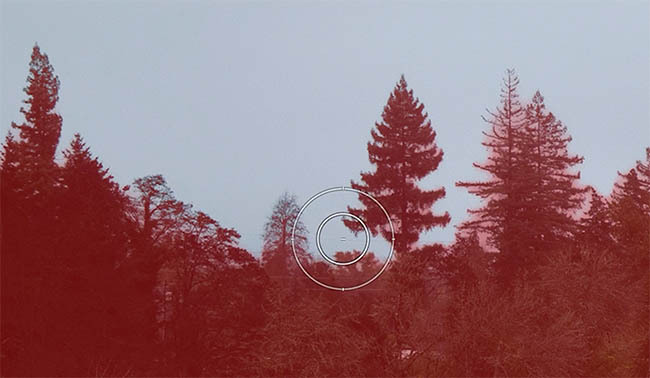
In effect, you’re using the eraser’s edge detection to create a more accurate selection.
Work around the perimeter of the tree, cleaning up areas where the mask failed to isolate the foliage properly.
You can even target tiny gaps between branches and leaves.

The results are often dramatically better than relying solely on the Edge Cleanup slider.
Combining Both Techniques
After refining the foliage manually, switch back to the Edge Cleanup control.
Now that the mask contains more accurate information, the slider becomes much more effective.
Apply a very small negative adjustment.
This cleans up the remaining roughness without damaging the delicate leaf structure.
Turn off the overlay and evaluate the image.
You should see much cleaner transitions between the vegetation and the sky.
The combination of manual cleanup and edge refinement produces results that neither technique can achieve on its own.
Finishing the Image
Once the masks are refined, continue making your creative adjustments.
Increase brightness where needed, enhance texture, recover shadows, or apply any other corrections that support the image.
If unwanted areas were accidentally included in the mask, simply use the subtract brush to remove them.
When you’re finished, click OK to return to Photoshop.
At this point, you can continue with additional finishing work such as dodging and burning, local contrast adjustments, or cropping.
In many cases, a simple crop can solve edge issues near the borders of the image more efficiently than spending time refining masks in areas that don’t contribute to the composition.
Final Thoughts
Adobe’s new Edge Cleanup feature is a welcome addition to Camera Raw.
For hard-edged subjects such as buildings, bridges, and architecture, it can dramatically improve mask quality with almost no effort.
However, understanding its limitations is just as important as understanding its strengths.
When working with complex subjects such as trees, foliage, and intricate natural details, combining Edge Cleanup with manual Auto Mask refinement delivers far superior results.
Used together, these techniques allow you to create clean, professional-quality masks directly inside Camera Raw without needing to move into Photoshop for additional masking work.
Have you tried the new Edge Cleanup control yet? Have you found it works better on architecture or natural subjects like trees and foliage?
It’s great to see you here at the CAFE
Colin
PS Don’t forget to follow us on Social Media for more tips..
(I've been posting some fun Instagram and Facebook Stories lately)
You can get my free Layer Blending modes ebook along with dozens of exclusive Photoshop Goodies here


9 thoughts on “How to Perfect AI Mask Edges in Camera Raw in Photoshop”
Leave a Reply


Why Photoshop Generative Fill doesn't always remove objects and how to fix it. BIG Photoshop generative fill + Remove Tool...
New Point Color for fixing colored shadows on faces.


Thank to you. We’re learning so much about Photoshop.
I’m so glad this is helping you!
Colin, you are a gifted teacher. I know I’m repetitive, but thanks again for a nuts-and-bolts lesson. Lou
thanks! Glad you liked it
I do hope Adobe will follow through and put these tools in LRc. But I have one question, Colin. Why didn’t you subtract the sky to get a better edge on the trees.
You always explain everything so well, but I just wondered about this.
Thank you showed me from your photoshop making a clarifying better than original picture. I learn more and more improved myself. Good Job teaching us!
Thanks for the comment. I’m glad it helped you!
Thank You for these tutorials and thank you again for the written directions. Very helpful when I am attempting to do this on my own. I cannot always keep up with the tutorial(s) and was replaying it multiple times trying to figure out what just happened. Now I can go to the written instructions and it helps clear up my confusion.
I’m so glad the written steps are helping you.