
Photoshop CC Jan 2014 update

Photoshop 14.2 (Jan 15. 2014)
To start the year off on a good footing, Adobe has released a CC update to Photoshop CC. This includes some useful new features as well as bug fixes and JDI’s. I know one bug fix that helps me was a weird display artifact on the HDR Pro screen on the Macbook Pro Retina. It’s now resolved and everything looks normal. Let’s have a look at what’s new in this drop.
Major features
Let’s look at the big features first, right, let’s get to the good stuff first.
Perspective Warp
The Perspective Warp (Just like the Camera Shake Reduction) was something that was demonstrated at the Adobe MAX conference on the crazy, fun-filled night they call “sneaks”. This is when engineers get to show-off and demo a feature that may or may not even be possible to put in the final product. It’s where they get to dream, be crazy and play with an experiment. Perspective Warp is one of those experiments that has made it’s way into Photoshop.
It’s a great compositing tool. One of the big challenges with compositing different photos, is that the camera height, angle, focal length and other things may not match. Size is easy to fix with scaling, but when the angle and perspective is off, it just looks wrong.
Perspective warp enables you to change the angle and perspective of a photograph, allowing for some really decent compositing.

It’s a 2-step process. The first step is to create a bounding mesh (like in Vanishing Point). You choose Edit>Perspective Warp. You will now have the option to create a box. Drag the corners to make it match the perspective of the object. Create a second Box and move the edge over the first, it will turn blue and then combine into one mesh. Drag the corners of the box to match the perspective. You are basically putting a cage over your object.
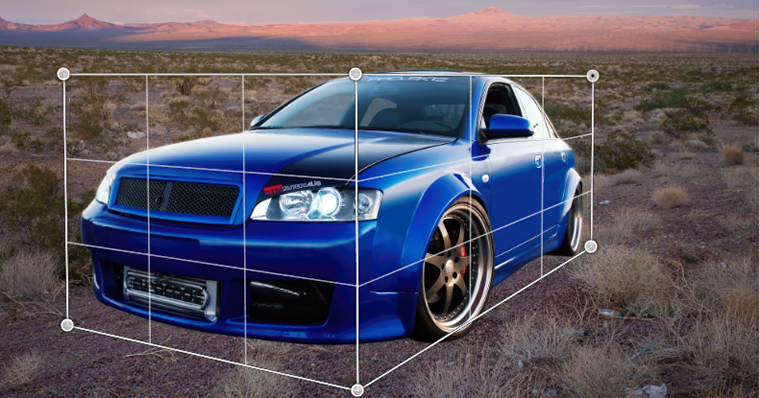
![]()
Either press the Enter Key or click the Warp option at the top in the Options bar. You are changing from Layout to Warp Mode.
When you drag the points, you will now notice that you are warping the layer and changing it’s shape to match the photo. Keep moving until you like the result, then press the Enter key to apply the warp. I added a shadow for effect.
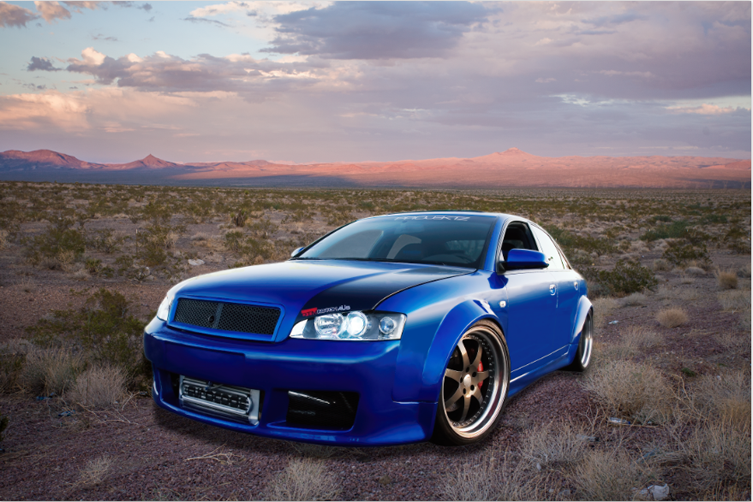
© Photos (Colin Smith)
Tips: Drag the edges to change the width or height of the grid.
Press Shift and click a line, you will lock and snap to vertical or horizontal, depending on the type of line that is clicked. Shift-click to unlock.
Linked Smart Objects
Since Photoshop has possesed Smart Objects, they have always been one type, and that’s embedded. What that means is when you create a Smart Object, it’s contents are included inside the PSD. A linked Smart Object, is more like what you do with InDesign, where you link to an external file rather than embed it in the document. The advantage of a linked object, is that you only need one copy of the file. It could be a logo from Illustrator, or and image file. When you link to is, you can have multiple Photoshop documents, Illustrator and InDesign documents all pointing to it. The advantage, is when you update the file, it will update in all the documents that are pointing to it. If you have ever worked in a busy Design Studio, agency, or corporate environment, you can see the advantage right away. It can be a lot of work having to go through a bunch of different documents, updating files whenever a change is made on important piece of collateral.
When you place into Photoshop, the option is now split into 2 options, Place embedded (like before) or Place Linked.
 Scripted Patterns and Fills
Scripted Patterns and fills are very useful, because they can do a lot of the legwork for you.
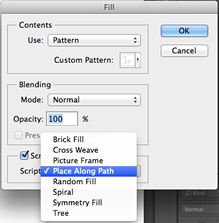
When you open the Fill Dialog box (Shift Delete / Shift+Backspace on Windows) you will see the scripted Fills at the bottom.
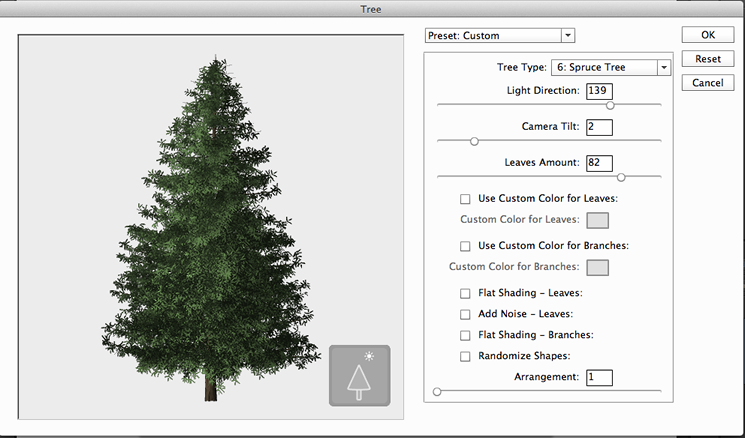
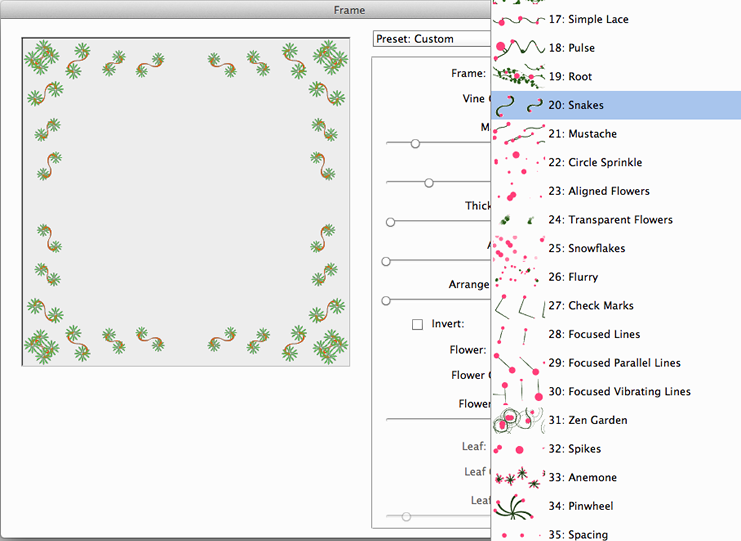
This includes the option to generate lots of different things including trees and borders. What’s great about these, is that you can change the settings and no two are alike. Have a look and see how many different types of trees there are and how you can customize each one. Or look at the picture frames, there are options for all the different parts.
If you want, you can easily create your own. Just choose a shape, or create a custom pattern (Select Edit>Define Pattern). When you create a path with the pen tool, or one of the shape tools turned to Path mode, you can actually;;y attach a scripted pattern along the path. If you play around with this, you’ll be amazed at all the things you can do. I think that Scrap-bookers will get the most use out of this last feature.
3D printing
I’m quite excited about 3D printing. It’s definitely in its infancy at the moment, but the future looks great. I think of it as a Star Trek replicator, except that it takes hours for each print. Give it time. Basically you load a 3D model into Photoshop and then send it out to print. Instead of printing on a sheet pf paper, a 3D print will print out a 3 dimensional model. The options include different types of plastic, ceramics and even different types of metal including stainless steel, bronze and even Stirling silver (for jewelry). To me, 3D printing is the beginning of the desktop product revolution. Just as Adobe was at the forefront of the Desktop Publishing Revolution, it’s making sure to be involved with 3D Product revolution. I say revolution loosely, because it this point it’s not even a strong movement yet, but watch that change quickly.
I have been looking at 3D printers at Siggraph each year. I saw my first one many years ago, it was loaded with a block of plastic material, which was cut into with a laser. This thing was huge, slow and very expensive, Since then, I have seen the size and price drop. There are printers that pour very thin materials in each pass. Over time (hours in many cases), they build up the shape, layer by layer. The technology is so impressive that I have seen objects within objects, such as spheres contained within boxes. At this last Siggraph, I saw a printer that used common office paper. each pass would cut a stencil out of a sheet of paper, then glue and press with immense pressure, then repay, hundreds of times. The final result didn’t feel like paper at all, more like a lightweight porous plastic. The detail can be impressive.
So why Photoshop? 3D printing isn’t as easy as many people think, You don’t just grab a model, press print and walk away. There is prep work to be done. Walls have to be wide enough, holes need to be filled, lattices need to be constructed, so that the model doesn’t collapse when being printed. Photoshop automatically prepares the model for printing by fixing all the aforementioned. Let’s look at how it works.
The first step is getting a 3D model. You can create one yourself in another 3D application, or build a simple model in Photoshop. (Photoshop’s 3D modeling tools are very limited, but with some thought and tweaking, you can create models from scratch).
Here is an example of some objects that I created entirely with Photoshop’s 3D tools. My choice though is to create my 3D models in Maya or Cinema 4D, as they have real modeling tools such as subdivided polygons, and the ability to push and pull vertices’s, faces and edges. Being limited to extruding and revolving paths, leaves me wanting.
The alternative to creating 3D models, is to download them. There are many places you can download 3D models, from buying them at very high-end pro sites, to the free Google 3D warehouse. I think in the future, manufacturer’s will allow you to download replacement parts (for a fee, I see cottage industry booming here) for your things, and print them yourself.
There are 2 options. The first is to send to a 3D printer that is attached to your computer. The second option, is to send them to an online 3D printing service called shapeways. This is probably what most people will do. as not everyone has their own 3D printer at their disposal.
Let’s go through the process right now. We will end by sending a model to shapeways and monitor it’s progress and (hopefully) end up with an actual 3D model that I can photograph in my hand.
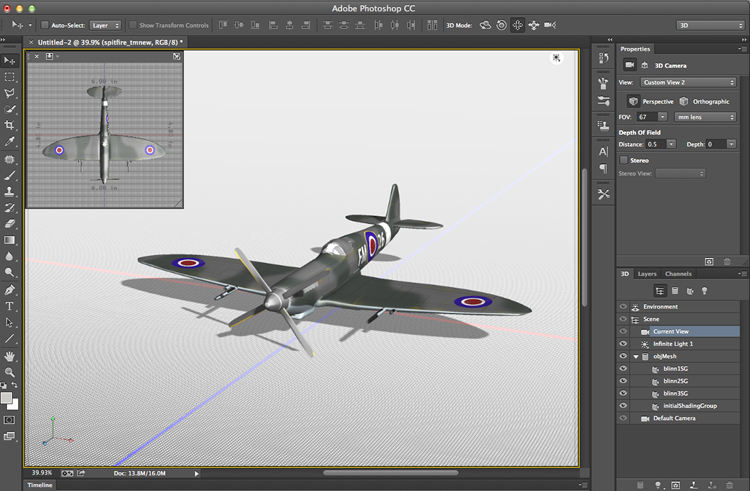
For a case study, I’m going to take a model of a Spitfire airplane that I built from scratch in Maya. I created it as a polygon model over the course of a few weeks, working on it, on and off. I them exported it as an .obj. Ok, onto the steps to print.
Open the model into Photoshop by choosing 3D>New 3D Layer from File. Choose your model (an .obj in my case)
In the 3D panel, click on scene. A new option will now be available in the Properties panel, it’s the middle one called 3D print properties. You could also cut to the chase and press the 3D Print button. That’s the new icon 4th from the left in the 3D panel (this takes longer as it starts the process).
In the properties, you’ll see options.
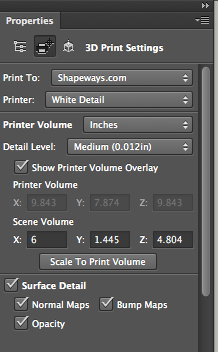 Print to: Choose Local to print to a connected printer, or choose shapeways. You can also get printer updates from this menu.
Printer, this is where you will choose the type of materials from Shapeways, you will see the long list of options. At the very bottom of the list is an option that says Estimate Price.. This is where you will get a quote of the approx cost to print your model. The 3 things that will influence this are: Type of material you are printing to, the size of the final model and the detail level. It takes a while for this to resolve because, it has to actually process the model to get a quote. The good news is that all the materials are quoted at once. The biggest element is the size of the model. When you change the size, the processing has to happen all over again, so patience is important.
Printer Volume: Choose the unit of measurement.
Detail Level. Higher quality means that it takes longer to print. Bear in mind the type of material you are printing to. as some materials are limited in the amount of detail that the can hold. In my early tests, I founds that quality doesn’t impact the prices that much from shapeways.
The printer volume displays are a bounding box over the model and can be toggled on or off.
The scene Volume. This is where you can change the size of your 3D model. Change any of the x,y or z sizes, the others will change automatically. Don’t worry about pixelization because the 3D models work as vectors and can be scaled up or down. Resolution is actually added in 3D by increasing the polygon count (or tessellation if you are using nurbs), more about that in a different article.
Click the Scale to Print Volume to automatically make the model fit the print size.
You can also turn on or off surface properties Normal maps, Bump maps (kind of engraving effect) and opacity.
When you are happy with all the settings, press the “Start Print Button” at the bottom of the properties panel
Photoshop will simplify the model, thicken thin edges, and create UV’s (for the textures), it will also create any supports and lattices if they are needed.
Eventually, the 3D print settings dialog box will open. Here you can inspect the model to see what it will look like. You can move it around and view it in 3D space, so that you can see every angle. When you are satisfied, press the export button.
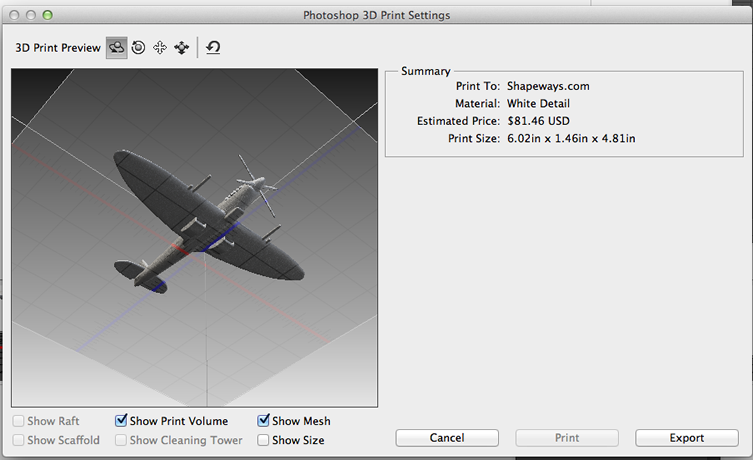
A new document will be saved in stl format. This is your print file. It can be taken to a 3D printing service bureau. Or it can be uploaded to Shapeways (or any other online printing site).
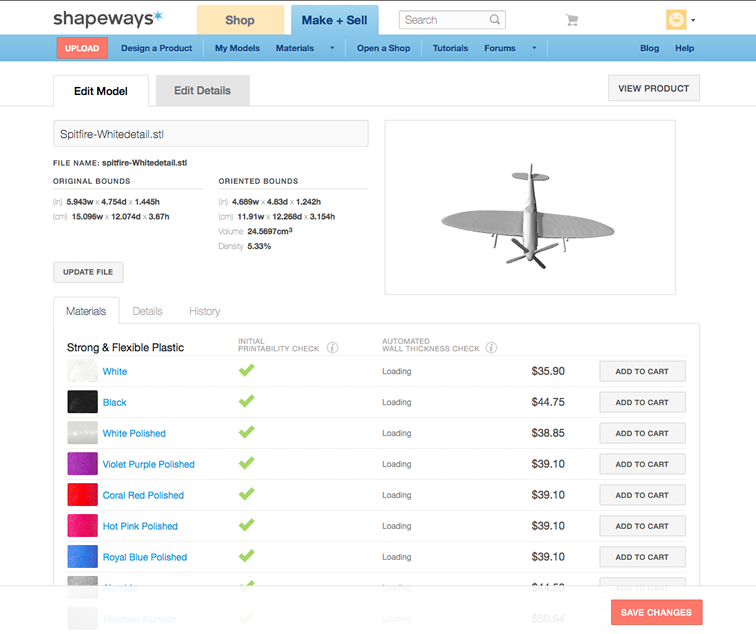
Let’s look at Shapeways.com and the process. Adobe gives you the option to launch Shapeways directly if you choose it.
The first thing you need to do is create an account.
Them you upload the model. This takes a while, as shapeways will error check the file and build a preview.
Then you pay with credit card or Paypal.
You will get a confirmation that includes an estimated shipping date.
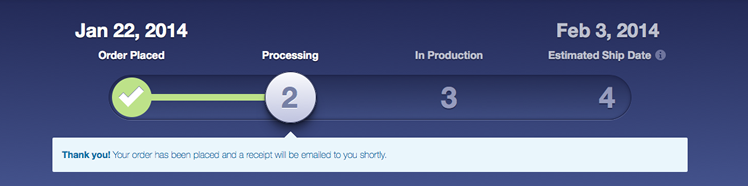
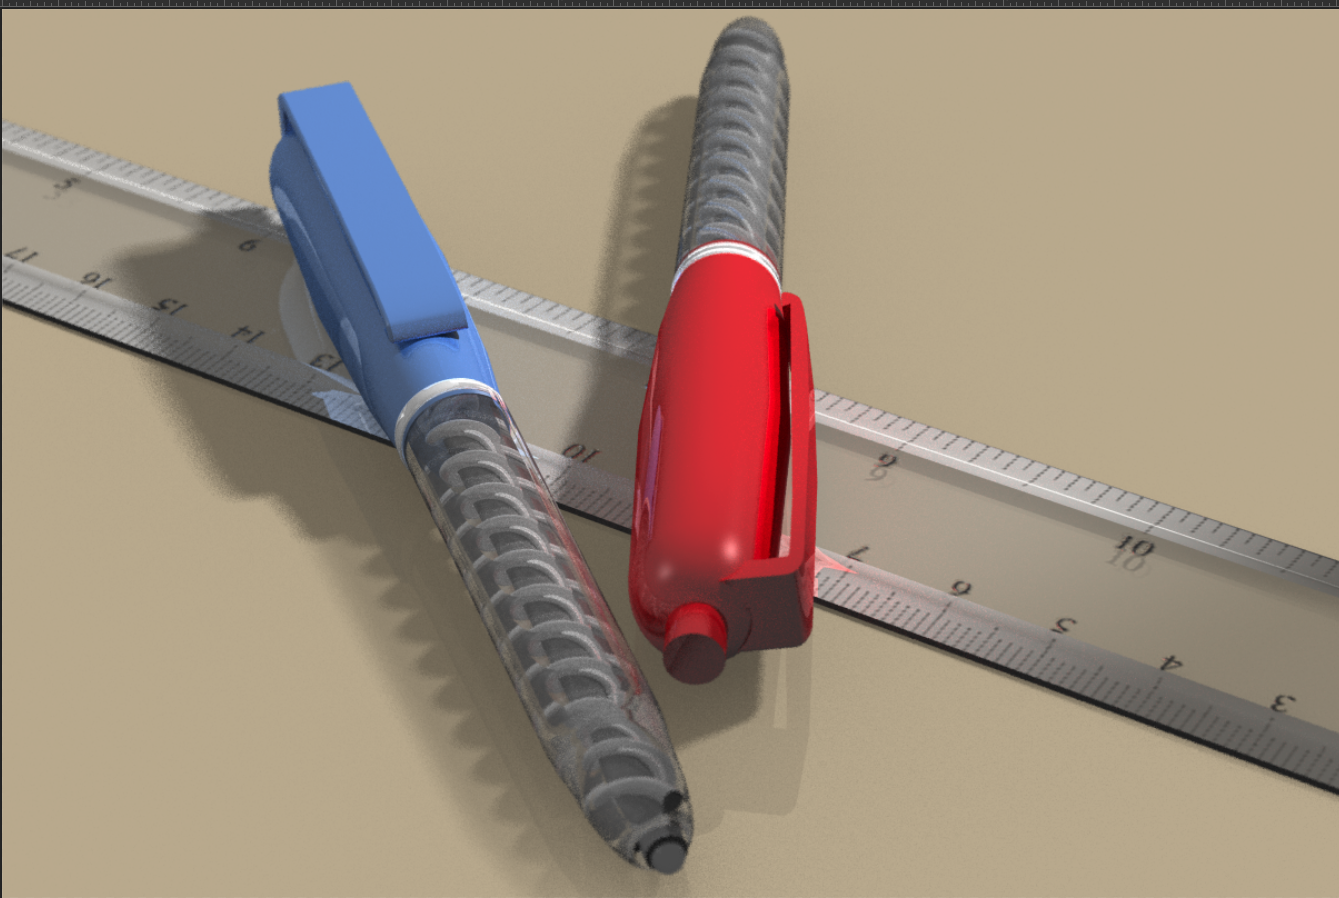
So, I have send off my Spitfire to be printed on white detail acrylic. (A lot more expensive, than the bendy plastic, but I want to see how good a quality we can get.) Stay tuned and I’ll post progress and the final model once it arrives!
Other improvements in Photoshop CC 14.2
The Smart Sharpen filter got a speed boost, thanks to tapping into the GPU (Now called Mercury Graphics Engine)
Have you tried using a Windows 8 tablet? I have a Surface Pro and I noticed that Photoshop didn’t have pressure sensitivity with the Microsoft stylus. That has changed and these is now support. Don’t expect it to be as good as a Wacom Cintiq though.
Photoshop World JDI’s
If you attended Photoshop World, last year Adobe had a “Code-a-thon”. There were several Photoshop Engineers present at the conference and they took requests from the attendees. The best suggestions were coded on the spot and have now been added to Photoshop. These weren’t big features, just little fixes and annoyances. These kinds of fixes are called “JDI’s” Short for Just Do it. Photoshop should Just do Something without fuss. The included JDI’s are. (Taken from Adobe’s site)
On a background layer, one click on the lock icon unlocks the layer
Set custom background color in New Document dialog
Better negative number support in curves adjustments
See recent colors in the Swatches panel
Change “Clear” to “Clear All” for the Color Sampler tool
Increase number of color samplers from 4 to 10
Change all color samplers in Info palette at the same time
Other feature improvements and JDI’s
Added a “do not show again” checkbox to the missing fonts dialog
Enabled Share on Behance for more languages
Improved history states for editing text, editing and applying Character and Paragraph styles
Generator can export padding in image assets by using layer masks
Layer names can now be up to 255 characters long
Generator now properly rescales Illustrator Smart Objects when exported at 200%
New option for Narrow Options Bar, for small displays

This is where the collision happens between Lightroom and Photoshop. When do you use each? If you know one application...

Lightroom 2023 Major new features, how to use new features in Lightroom
New Features in Lightroom Classic 13.3 2024 explained Content Aware Remove AI, Sony tether and more


