
New way to Light photos in Photoshop with Texture boost
Colin Smith’s Lighting Photos 2.0 in Photoshop Tutorial.
Previously I made a very popular tutorial on how to use Lighting effects to relight photos in Photoshop. I had many people tell me they weren’t aware this tool ever existed and were really happy with the results. It’s a tool I have loved and used for many years, but sadly, due to Adobe moving away from certain technology. mainly Open GL, they are retiring the 3D tools in Photoshop, and this includes our beloved Lighting Effects (even though it was a precursor to 3D in Photoshop). (see this tut on how to keep using these features as long as possible)
I used Lighting effects are far back as the 90’s to create a series of photo realistic illustrations entirely in Photoshop (it made PhotoshopCAFE very famous in the 2000s) , such as the guitar here. See more of my illustrations here

At one point, Adobe updated the Lighting effects to use 16-bit channels, but it never worked right, and they went back to 8-bit, but with the newer interface. I wish someone would patch the original lighting effects (8-bit application which no longer works) which didn’t use GPU and get it working. Anyway, it’s an end of an era. So I have taken the new tools and adapted them to use for lighting photos. (It won’t Create the bump on a channel for me to make illustrations though).

2.0 version of Colin’s Lighting photos in Photoshop Tutorial.
Ok, here goes.. it doesn’t give you as much control as we used to have, but I have figured out how to make the new tools produce a similar result.
Pay special attention to the 2nd part of the tutorial. which is adding edge texture. I don’t know of anyone else who does this in Photoshop, but it sure makes a difference.
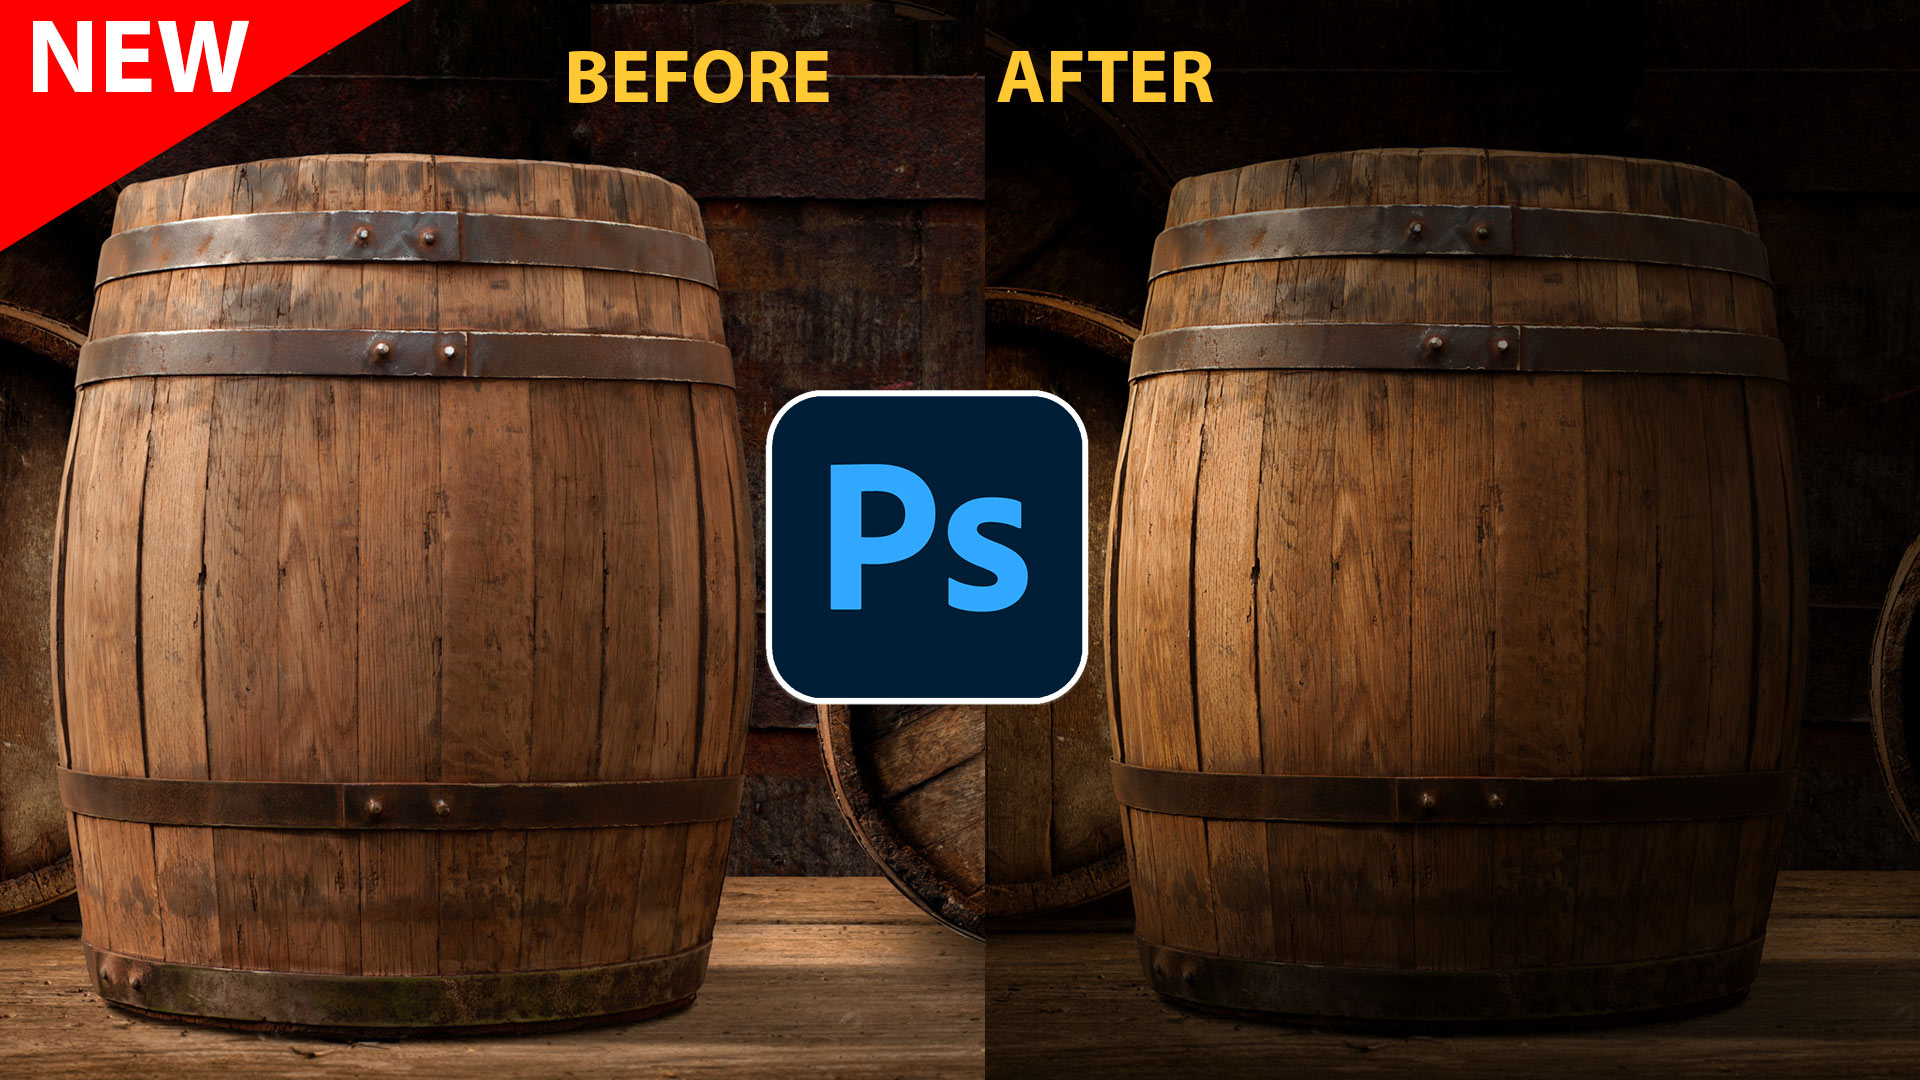
This is the starting image. The same one I used in the original tutorial on this, a few years back.

Let’s set the ambient light, making everything darker.
Click the new Adjustment Layer icon

Choose exposure (Curves or LUTs work too, but this is easiest for tutorial purposes).

Move exposure down the darken the image

Every adjustment layer comes with a mask. Click on the mask.
If we add black to the mask, it will hide the adjustment and allow the original to show through, giving the impression of light.

Press the D key to reset foreground and background colors. *(Black as foreground)
Choose Gradient, grab foreground to background.
Choose radial as the gradient type.

Drag on the image to create a spot light. (If it doesn’t work, try turning on reverse for the gradient options).
You will see a new addition in the form of a point on the outer circle. Depending on when you read this, it’s currently only in the Beta version of Photoshop. How to get the beta.

Drag the point to change the circle to an oval

See the diamond on the line? Drag it to the outside to reduce the fall off.

Move it closer to the center to increase the light fall off, for a more natural feather of the lights edge.

As you se, it produces a nice light effect.
Texture Boost
These is something missing though. When you light an object from the side it increases the appearance of the textures.
If you front light, it’s usually flat and conceals details, which is why a lot of glamour and beauty photography utilizes flat, front lighting. We want the texture boost.

Choose the Channels panel
Click on the Red channel. (Because red is the dominant color. in this image).
Hold Cmd/Ctrl and click on the thumbnail.

This will load the luminance (brightness) from the red channel as a selection.

Click on the words RGB to restore the channels. (Not the thumbnail)

Make sure your panel looks like this before proceeding.
All the channels are active and all are selected in light gray. (This is the default value).

Choose the background layer.

Press Cmd/Ctrl+J to copy the selection to a new layer.

Change the blending mode to Overlay
Don’t worry if the colors look over saturated suddenly, that will be fixed in the next step.

Lets make the texture pop
Choose Filter>Other>High Pass

As you increase the Radius, you should see the texture become more pronounced.
Choose an ampunt that you like, usually between 1-4 depending on the resolution of your image.

Here is our final result. I hope you like it!

Thanks for checking out this tutorial. See you next week with a new one!
Colin
Drop a comment and let me know if this was helpful.
Browse the other free photoshop tutorials here at the cafe
Download 100s of dollars worth of Photoshop adds on for free here at the Vault.

Also follow me on Instagram, Tik Tik, Threads and Twitter. for shorts and reels.
See you next time!
Colin
PS Don’t forget to follow us on Social Media for more tips.. (I've been posting some fun Instagram and Facebook Stories lately)
You can get my free Layer Blending modes ebook along with dozens of exclusive Photoshop Goodies here
24 thoughts on “New way to Light photos in Photoshop with Texture boost”
Leave a Reply

New features in Lightroom Classic 8.2 and Lightroom CC 2.2 2019 Feb update. Here is a walkthrough and demo of...

How to turn a photo into a comic book effect. Learn how to make a Cartoon from a photo in...

How to use ai masks in Photoshop and Lightroom for 1 click retouching of faces


Great tip! But on my beta version of Ps (25.0.0) on a Mac, I don’t see any gradient controls, and no white outline to identify the location of the gradient. The gradient is produced. I can see it on the mask, but without the control handles, I cannot replicate your results.
Great tip! But FYI, on my beta version of Ps (25.0.0) on a Mac, I don’t see any gradient controls, and no white outline to identify the location of the gradient. The gradient is produced. I can see it on the mask, but without the control handles, I cannot replicate your results.
Thank you, Master !! 😍
Thanks Colin. In PS beta, this works only if the exposure layer is in Softlight mode (Overlay works, but less subtle)
Nice tip, thanks
Love Photoshop Cafe & have learned a lot. But:Took several tries at this due to small steps left out. Not the first time for that. I never got the white shape, just the control dots. Is there a setting? When I went back to the project I couldn’t change the previous gradient. I’m using the latest PS Beta.
When on photoshopcafe.com after a time the window promoting free downloads pops up and stays on the screen.
Watch the video carefully if you are missing steps. There is an x at the top right of the box to close it. I tried to make it more obvious, but can’t seem to get that to work
Great video guide. Love it. However, I can’t figure out how to put in two lights. Thoughts?
Thanks
Ed
You will need to use white to transparent for the 2nd gradient
Nice
Great tutorial. You explained everything really well. I love all of your tutorials. (except I had trouble with the last one,
Mask in Lightroom)
Love the video, thank you. I assume the application of the gradient is destructive to the mask or can I get back to tool to adjust slightly? Or perhaps there is a way to work non-destructively? Thank you for your help.
Sometimes you can re-adjust the gradient in the mask, Once you have closed and reopened the document, the gradients won’t be able to be changed on the masks, but the gradient layers will
Why do you select the red channel to enhance the texture? Is that only for this photo, or would it work on every photo. It seems to me that you would want to increase the text in the areas that are facing the light, but I don’t understand why selecting the red channel would do that.
Because the subject is mostly red in this image
Thanks so much for this. I loved that old tutorial and was sad that the feature was gone. This is great. I can’t wait to ue it.
Thanks so much for this. This is great. I can’t wait to use it.
That is totally amazing! Thank you.
Woow….. Colin! That’s amazing! The Photoshop-guitar. Guess what… I own that guitar. Or it is very, very simular of the Ibanez SA08 LTD2-RAR model. Perhaps an idea for an online tutorial?
Great job. With compliments.
Andre, The Netherlands
Hi there, Mine is a 540s. I did tutorials and stuff on that in the book New Masters Of Photoshop, years ago 🙂
As others have mentioned the control points to the gradient are not visible in either the Beta version of Photoshop (PS) or the non-Beta version. Working in Lightroom, a similar effect can be achieved with some effort. How does one get the control points of the gradient tool to appear in the gradient version of PS?
can you go back an edit the mask?
Yes
I’m unable to get the circle on PS classic version 25.0 nor on PS Beta version 25.1
Would you know why?
It should be in the newest version, make sure you don’t have classic selected under the gradient options