Automating Photoshop to crop and reposition multiple photographs
How to use Photoshop scripts to save time!
Reframe and resize bulk images in Photoshop – resizing for Instagram etc
This Photoshop tutorial shows you how to work with multiple photographs, the easy way. Use Photoshop scripts to automate putting images into a layer stack. Then non-destructively crop and then make individual images from each layer.
Have you been doing it the the hard way?
Step 01. Loading the images into Photoshop
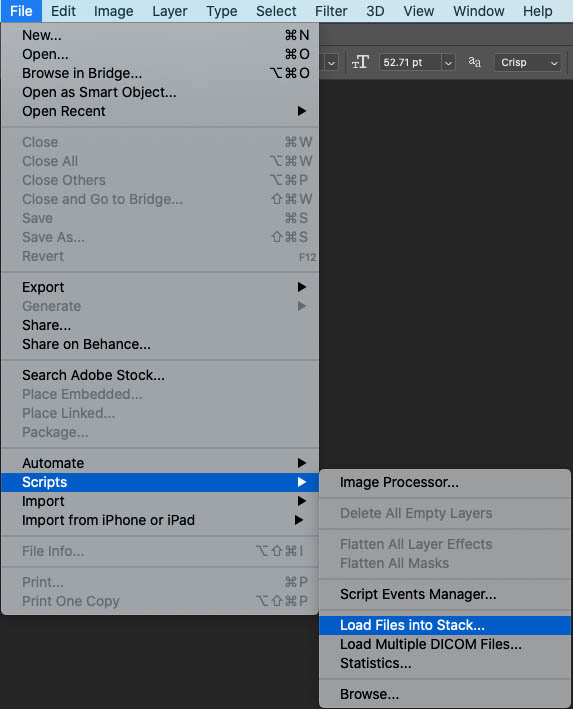
Don’t load them in 1 at a time please. Choose File>Scripts>Load Files into stack.

Step 02.
Click on Browse. (If they are already open in Photoshop, choose Add Open Files).

Step 03
Browse to the folder of images and select the images you want to import. I click dragged around them all. Ctrl/Cmd+A will also select all.
Click ok

Step 04
You will see the files about to be added
Click OK

Step 05
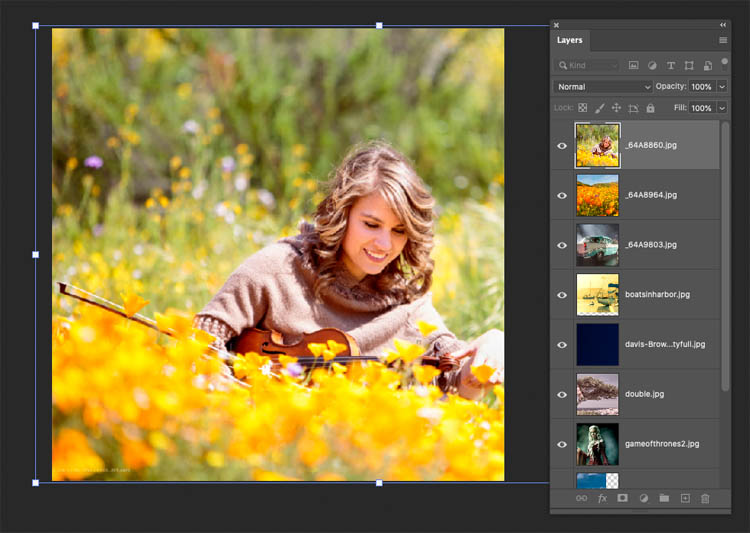
You will now see all the images loaded into layers. The document size will be the size of the largest images. They aren’t resized from their original sizes. (If you want them the same size, you can use File>Scripts>image processor)

Step 06. Resizing all the images
Choose the crop tool.
In this case we will resize for Instagram at 1080 x 1080 square.
Choose W+H+Resolution
Type in 1080px (px will make them pixels) and 72 for px/in
IMPORTANT! Turn off Delete Cropped Pixels, so it just makes a window around the layers and doesn’t actually crop them permanently.
![]()
Step 07
Drag the corner of the crop window until it fits one of the smaller images.
Click the checkmark / press Enter to apply the crop

Step 08
Choose the top layer
Press Cmd/Ctrl+T for free transform.
Scale and position the layer to fit within the crop window. Press Enter to apply. Notice that you can position the layer and it isn’t cut off because you are using non-destructive cropping. (Because you turned off Delete Cropped Pixels)

Step 09
Hide the top layer.
Choose the next layer and repeat step 8 to scale and position.
Go through each layer, positioning and scaling the layers until each one looks good.

Step 10. Turning each Layer into its own image.
Don’t export each layer separately.
Choose File Export>Layers to Files

Step 11
Click Browse next to destination to choose the folder to save the images in.
You can also add a name if you like, this will be appended before the original file name.
Choose jpg and 7 quality for web/social media.
Click Run

Step 12
All the layers will be saved as individual images.

Step 13 – Batch rename in Bridge.
If you want to rename multiple photos at once, bridge is the fastest way.
Click the arrow next to the document looking icon at the top of bridge and choose Batch Rename.

Step 14
You can add or remove fields by clicking the – or + signs at the right of the fields.
Under New Filename Use Text and enter your desired name.
If you want to add incremental numbers, choose Sequence Number. Type the number you want to begin with. 1 in this case and choose the number of digits. (This will effect leading zeros).
Click Rename.

Step 15
All done

I hope this little tutorial saves you lots of time.
If it does, please take a few of those valuable seconds I just saved you to share this with a friend or 2 on Social Media or email.
Great to see you here at the CAFE
Colin
PS Don’t forget to follow us on Social Media for more tips.. (I've been posting some fun Instagram and Facebook Stories lately)
You can get my free Layer Blending modes ebook along with dozens of exclusive Photoshop Goodies here

21 thoughts on “Automating Photoshop to crop and reposition multiple photographs”
Leave a Reply
Amazing Adobe AI Photoshop 1-click Season change on your photos, how to use Landscape mixer
How to turn any photo into a watercolor painting with Photoshop. This Photoshop tutorial goes beyond a typical watercolor effect...
In this easy Photoshop tutorial, you learn how to make a cinemagraph from a video. You learn how to export...


Not seen this procedure before. I found it absolutely brilliant. Thank you Colin.
Looking forward to the written tutorial for this. Thx for sharing
Not sure if just a resize is useful… aren’t you concerned about losing most of your image if you are not scaling? How can I actually resize, the entire images please?
Sometimes you have to fit an image within a certain size, no matter what. You can automate any sized image, this is just a spring board for you to begin your own experiments and build workflows that you will use.
Script is a Great tool
I wish I could SCRIPT a bunch of files that differ Landscape & Portrait & sizes – put a Fixed Signature (a brush) and save it.
Sure one cant add more functions like any filter, action, Sharpen etc. on the fly.
You can do that with batch actions
Hi Colin, I have been watching your videos for many years now ,and they have given me Photoshop experience that I good never have achieved by reading a book., so thank you.
I live in Western Australia and I look forward to receiving your video’s every week.
Thank you again.
Thanks . New to me. Much Appreciated 🙂
Well Done. Again!
Thanks
We can always learn something – thank you
Wow! Thanks! I will be using this today!
WOW! In the past 20 years there’s no telling how many hours I wasted doing it the old way. Many thanks!
Thanks that’s going to help a lot.
Great tip! Real time saver. I always learn something new from your tutorials
Very happy to be a new member! I am sure I will learn Photoshop very fast with your tips.
HI Colin, I am fairly new to Photoshop and new to Photoshop CAFE. Your tutorials are easy to follow, and very helpful!
Thanks a million for making these available for Photographers both novice and expert. You are amazing!
Hi Colin, and thank you!
Just a small detail I haven’t been able to figure out… as a begin to work on the layers the one before gets moved by the modifications I performed on the current one.
Can you help me to fix this?
Thanks again!
Colin!
This has saved me countless hours! Thank you so much for these really genius tips. I’m working with hundreds of product images for a website, all similar in size as they are all varients, and working one by one, trying to batch crop and products misaligned – this was a time saver of ginormous magnitude. This will also speed up my social media posts and many other workflows! I would love to see you in Skillshare. Thank you again!
Do you know if it’s possible to use script to create layered images, from stacks in Bridge (or some other way to tell PS which images you want layered) and then save them as TIFF’s automatically? It doesn’t seem like you can create a batch process using Photomerge and PS will also name all the same thing (which script doesn’t seem to do).
I want to layer up several images into one TIFF so that mask out portions of each layered image, but I have about 30 layered images to make and want to do it all automatically and have them saved as differently named TIFF’s
You could create an action and run it as a batch
Hi Colin, this is really a useful script to resize and fit images for e-com. I only like to know if there’s a way to keep the original name when saving the layers. Now it adds to each file “_0000_” before the filename and the extension “.jpg” at the end (I chose JPG when saving the files). So the result is something like this _0000_original-filename.jpg.jpg. I know how to solve it using bridge but it would be nice if I can skip the second pass on bridge. Thanks for any input you can share.