
Get started, how to edit video in Photoshop CC CS6 Tutorial
Edit video in photoshop
Photoshop has the ability to edit video. In fact.. it’s been there for quite some time. Photoshop CS6 saw a big change in the way that Photoshop works with video and this continues with Photoshop CC. This is a great option for photographers who have shot video on their DSLR camera and need to edit a video without having to learn a dedicated video editing program. You can very quickly and easily cut short films and promo videos right within the program you already know and love.
Many of the features you’re familiar with such as layer styles and adjustment layers work perfectly with video. Even may of Photoshop’s filters work for video, just make sure that you convert them to Smart Objects first.
This video tutorial shows you how to get started with video and give you the basic building blocks to edit your own videos.
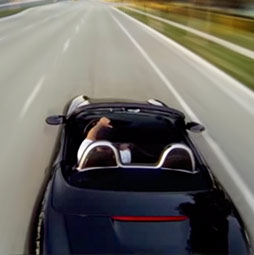
This video was shot on a GoPro Hero 3 on a DJI Phantom Quadcopter Drone.
How to Edit Video in Photoshop CC and CS6 – The Basics
Hi there, this is Colin Smith from PhotoshopCAFE and in this video, I’m going to show you how to do some basic video editing inside of Photoshop. So right now, we’ve got Photoshop sitting here and you can see I’ve got the Timeline open and no document.
So what I’m going to do is I’m not going to create a document and then bring the video in. I’m just going to simply open the video. I’m going to choose File, Open, then I’m going to go to the video, and then, click here, and then, what it’s going to do is it’s going to open the video in Photoshop as a document. Now the reason I did that is because I didn’t want to have to figure out all the settings and have to put in the proper size, the proper codec, aspect ratio, all that stuff. By bringing the video into Photoshop, it creates a new document with exactly those settings for you. So you can see right now we got a timeline here and this is called a Play head and I can drag the play head to script through the video and we can see different parts of the video.
Now I’ve turned the audio off here. If I have it on, you’ll get sound; if I turn it off, you won’t, so I’ve turned it off right now so as you can hear me speaking over the footage. I’m going to hit the Spacebar right now to play it. And what we have right now is I’ve actually done a little follow cam kind of a thing here with the car driving by and I’m using a DJI Phantom Quad copter with a GoPro Hero 3 Black edition on the bottom. In other videos, I’ll show you how to remove the distortion and get rid of some of the camera shake. In this video, we’re actually going to put some of the footage together and create a small sequence. So, with the first clip added, if we want to add more, we simply go down here and we can click on the video and we can choose Add Media. I’m going to add two more, so I’m going to simply click on the first one, then I’m going to hold down the Command key and click on the second clip. That would be Ctrl on Windows and click Open. Now when I do this, it adds all three to the timeline. You can’t see them right now because there’s too much going on to show you the timeline at once. So we can go down here. We can use this little slider here which enables us to zoom in and out of the timeline. Now, it’s not changing the speed or the duration of the video clips. All it’s doing is shrinking down the timeline so we can see it.
So what I’m going to do is I’m just going to go to the next clip and hit the space bar and we can see what we’ve got. Here we go; we got another shot where I’m flying over the top of the car and I’m going to let it continue, see it’s just like dead air at the end of that. And then, we’ve got another one here where I’m hovering and along come a car and now I start to follow the car with the copter. So you can see we got these three different clips. So what we want to do, we don’t want it here where they start to get in the shot here. [00:03:01] there’s some stuff getting in the shot. So what we’re going to do is take the three clips and we want to trim them to length.
So we’re going to start with this one since it’s running right now. I’m going to click and drag. Notice as soon as I click, you see a window which shows the duration of this particular clip, which is 10 seconds and 21 frames right now, and the entire project that we have right now which is 31 seconds and 22 frames. So, I’m just going to drag back and you’ll notice as I do that, we can stop right there where everything gets into the shot. Let’s go to the beginning of the shot and we’re going to drag it until the car starts to appear. You’ll see the shadow first and then the car. So I’m going to release it right there. So what we’ve done now is we trimmed this clip to only that where the action is. Now this hasn’t thrown anything away. It’s still there and you can recover it at any time by clicking and dragging to bring it back. So these hidden areas are known as the head and the tail of the video. So it’s still there but we’re just working non-destructively.
So let’s click on the next clip. I don’t even have to have the play head over the clip I’m working on. I can simply click and drag backwards until we get to the end and let’s go right there where I’ve just gone to the end of the car and let’s go to the beginning, click and drag to where the car appears, and there we go. And now, we’ve trimmed that one down. Let’s go the first clip and we’re just going to click and drag. Notice its right in there, so let’s go to the end of that shot and actually that’s pretty good. We don’t need any trimming on that shot. Notice, though, that we’ve already trimmed this project down to 21 seconds and 18 frames. You can see that here, which is quite good; we’ve lost almost 10 seconds. Now remember, people have a short attention span. Less is more, so trim your videos just down to the very, very important parts of action. All right, let’s go back and we’re going to take the play here to the beginning. I’m going to hit the Spacebar and I’m going to let it play.
As it’s playing, notice that it’s becoming green behind the play head and it’s showing green at the bottom, saying it’s playing in real time at 29:97, which is 30 frames per second, for argument’s sake. If Photoshop was not able to keep up, it would show red and it would start to render this out. So what I’ve actually done is these clips I’m working on right now, that should reduce the size down to 720 and if we actually go and look at the image and we go to Image Size, I’ll show you what we’ve done. You can see I’ve got it down. If you don’t see the pixels, if it’s in inches, you want to change it or percentage change to pixels, and right now, you’ll see we’re at 1280 by 720. This is the 720 HD size. So right now I’m working in 720 HD even though the footage was shot bigger, I could work on it bigger. I could work on it 1080 or the 2.7K, which it was originally shot. But I’m working at it 720 because I’ve got much better performance just to demonstrate how this works. So if you find that your play back is a little bit sluggish, then let it play, and then, once it’s green, like it is now, then we hit the Spacebar to play again. This time it will play through smooth because now that it’s green, that little bar there, see that? They’re green. It means that we’re on RAM preview, meaning every single frame now is loaded into memory so we can play it back at the actual speed that the action is happening. So I just want you to be aware of that. So we’ve got these different clips. What if we want to change the order of the clips?
Well, the first thing we want to do is we’ll want to see where they live and they live in the Layers panel. So if we click on the Layers panel here, you’ll notice that we’ve got our three clips. And I just hit the top one and notice that the other two show. So what it’s doing is rather than how layers work where it stacks from the bottom to the top, and loads images on top of each other. When we’re working inside a video group, which is what you’re going to get when you create a timeline like this, the video group is going to change it from stacking on top of each other to playing one after the other in [00:07:24]. So, chronologically speaking, the beginning is at the bottom and the end is at the top. So, in time, it goes from early to late, so time flies is a way to think about it. As it goes up, it goes across. So if we want to change the order of these clips, say for example, we’re starting with this shot, what if we want to put that one in the middle? Well, we can click it and drag it and release it, and now it’s reordered. And notice everything snaps in position here. That’s because we’re in a video group and then what it does is it will snap everything into position and avoid those little gaps in there. This is also known as ripple editing, which is done automatically inside of Photoshop.
So, now we’ve got this first clip here that goes like this as close up shot where we fly away, then we’ve got this one here, and then, finally this one. I feel like I’d like to change the order of the first and the last one. Well rather than having to click and drag these like that, we can actually do it from the Layers panel. Take that one to the top. Take that one to the bottom. And as I change it in there, notice it also changes it right here inside of the timeline. So, sometimes, it’s easier to change your timeline by moving them around in layers than it is to move them ion the timeline panel. So let’s have a look at smoothing out these transitions.
What we’re going to do is create some nice dissolves because if we look at it right now, we’ll see where it goes from one to the nextóvery sudden. Although in a lot of movie making, these sudden cuts are very common and work very well. In this case, we’re doing something that looks like a car commercial, so we want something a little bit smoother that gives us a nice feeling of just a very nice soft, fuzzy feeling. So what we’re going to do is we’re going to click on the Transition button. We can change the duration of these transitions. I’m going to make it 2 seconds and I’m going to choose the Cross Fade. So I’m going to click and drag that Cross Fade between the clips that I want to change and I’m going to do the same thing here. So now if we go back and we play it, we’ll see we’ve got this nice smooth transition in-between the clips. And then, we’ll let it play to the next clip and let it transition again. And there we go; we get these nice transitions.
Now if you want to change these transitions after the fact, you can by either right clicking, we can change the type of transition or we can change the duration of the transition, or we can delete it by hitting the little trash can. The other option is we can actually just click and drag here and you’ll see the duration is showing us we can make it shorter or we can make it longer. In this case, I’m going to shorten it ever so slightly. And now if we want to play back again, you’ll notice the transition is quicker. It goes into that and then the car goes off now, and it’s going to go to the other transition. Now something that always looks good to finish these things off is a Fade to Black and Fade from Black.
So what I’m going to do right now is I’m going to choose here and I’m going to choose Fade With Black, but this time we’re going to change the duration to 1.5 seconds. And, now, whenever I change the duration here, notice it’s going to affect every single transition. That’s how it works. If I set it there, it will affect every transition before I apply it. Now once I applied it as you saw before, I can always change it, so we’re going to do one and a half and we’re going to drag it at the beginning, and I’m going to do one and a half and I’m going to drag it at the end. I’m going to go back here and I’m going to hit the Spacebar and notice it fades in. And you’ll see a little jerk every now and then while things are loading up, and right now it’s loading up into RAM. It’s loaded up pretty well right now. It’s playing as that transition. It’s going to go back and I was going to Fade from Black out, and there we go. Right now I just got it looping so it’s just going backwards and forwards and you can see that we’ve got our video clip is playing.
Now there are a lot of other things we can do. We can add sound. We can add different adjustment layers. There are a lot of different things. And, in fact, what I’ll do just for fun is I’ll convert this to black and white and I’ll show you how to add that. We click on the top video group and then, I’m going to go under here and I’m going to add a black and white adjustment. And this black and white adjustment, let me make sure that it’s turned on to show all layers. If this clipart is turned on, it’s only going to affect the layer directly underneath it, which, in this case, you’ll notice will be the last clip. So what I’m going to do is turn that off so it affects all of them, and now we have this black and white video of this car going. Well, we could change all kinds of things of adjustment layers. If we wanted to add a Curves Adjustment, we could. And with this curveólet me just pop out the curve here a little bitóyou could tend to plug up this shadow a little bit more, which is done a lot in movies. And if you wanted, you could open up the highlights.
So what we’ve done is we’ve actually increased the contrast quite a bit and this might not work so well in color, but in black and white, it’s quite effective. So, let’s have a look. Once again, make sure that that clip is turned off. If it’s clipping like that, hold down the Option key and then just click on the layer. And now it’s going to affect all the layers underneath. So let’s play it now. We’ve got our adjustment layers. We’ve got black and white now and we’ve got the Curves Adjustment. And you can see that we’ve got this nice black and white effect. Now if you wanted to take it even further and add a sepia tone, you could do that. In fact, you could apply any adjustment layer that we have here. One of the ways I like to apply color, a cinematic color here. But before I do, notice one of the things that we’ve been having here when we’ve been applying these adjustments, as you’ve noticed, here’s our adjustments here that if we go into our Properties here, you will see that we’ve got a lot of different things.
When we click on our adjustments here, they now appear in the Properties panel. So, the other thing is the mask. If we wanted to add a mask, we could do that, but we’re not going to do that right now. What we’re going to do is I’m just going to go back down again and I’m going to apply a solid color. Now with the color, I’m going to choose this. We want to do a sepia tone, so I’m going to grab an orange color, click OK. And now I’m going to change the Blend Mode of this color because I want this Blend Mode. Notice, though, before I do that, now that I’ve created this, notice that it’s at the very end. I want you to be aware of that. What we need to do is drag it out and we put it on top, and then, what we’re going to do is we’re going to grab this and drag it here all the way out, so now this lasts the same amount of time as our footage underneath. So, if that what happens, if you’ve got them appearing in here, do that.
Now, any of these, I could drag these out as well, but there’s no need. But with the Color 1, I do need to do that. So what I’m going to do is I’m going to change the Blend Mode to Color. And now you can see the color come through. And to choose the amount of color that I want in here, all I simply do is adjust the Opacity. So I’m going to take the Opacity down and give it just a little smidge about there and now we’ve got this cool sepia tone video clip. Let me hit the Play button here and you can see how that’s going. And one of the other nice things about doing this when we do this kind of effect, it really ties the footage together because now the footage has this uniform color effect.
Now while I’m doing that, I’m going to show you one more thing. If I turn off the black and white, by applying this color adjustment, it gives a feel or a look to our entire footage. So, now, you can see here this footage has got this really warm kind of a color tone because it’s not black and white anymore. And so, sometimes, if you want a cinematic look, all you need are two things: One, increase the contrast here with your curves like we did and add a little bit of the color cast. You can change the color cast. Double click and we could go, say, greenish hue, so we get something that looks like it’s out of the Matrix. And now we can play it back and notice that all the footage now has this green tint to it. So you can see how easy it is to apply these different adjustment layers to the video to get different feels to your video and just really change the mood of it entirely.
So when you’re done, you can simply save this document. And the wonderful thing about saving the document is that everything we’ve done is going to stay within the document. Now the footage is linked, so you need to keep the original footage on your hard drive. It’s pretty robust actually because if you move your footage around within the drive, Photoshop is still going to keep it connected. But if you move it off the drive to another drive, it’s not going to work. It’s going to be looking for that footage. However, all that edits and transitions, our adjustments, all the things that we do here, are all going to be contained within this one document when we save it as a psd.
When you’re ready to share it with the world, go down here, click the Render button and then we can choose options. In a nutshell, we’re going to give it a name, we’re going to choose where we want it to go. Then the options you have is right now we’re just going to work with Adobe Media Encoder. Right now it’s going to H.264, which is a standard sharing format that works on YouTube, iPhones, iPads, Apple TVs, Android, even Blu-ray players use H.264. It’s pretty much the standard right now so you could choose that or you could go down to QuickTime. But under the H.264, let’s look at some of the presets. You can do High, Medium or Low, and that will take the size and the frame rate we have, or we can even change it to work on all these different devices, even YouTube, Vimeo, Android phones, Apple TV, and it will actually size the video for you and you’ll be good to go. You don’t even need to know what the settings mean, so when you’re done, you can simply click Render and then it’s going to create a movie in the location that you’ve chosen, and then, you can share it with other people.
So I hope this has helped you and you’ll find that as you start to play with video on Photoshop, there’s a lot of options here that are available. And don’t forget to come back to PhotoshopCAFE because I’m going to have a lot more tutorials on video on Photoshop. I actually have a book on it as well which is called Video in Photoshop. And there’s a lot more I can teach you about this topic. But for now, this is enough to get you started. I hope you enjoyed it.
If you want to learn in more depth and also learn how to make animated slideshows, see this 3 hours of training on Photoshop and Video
PS Don’t forget to follow us on Social Media for more tips.. (I've been posting some fun Instagram and Facebook Stories lately)
You can get my free Layer Blending modes ebook along with dozens of exclusive Photoshop Goodies here

2 thoughts on “Get started, how to edit video in Photoshop CC CS6 Tutorial”
Leave a Reply
File formats for Photoshop explained simply, including PSD, PSB, Tiff, Jpg, gif and png. What file type should I use,...
How to change the color of an object in Photoshop and get good strong colors, change white to any color...

in this Photoshop tutorial, learn how to add a nostalgic Black and White Film Noir look to a portrait. This...


Being using Photoshop for many years, Know the use and what the miracles can be done with Photoshop. But after watching this tutorial, i suggest your video as a virtuoso info. Thanks for sharing.
thanks