Creating a knockout Online Portfolio with Photoshop – Photoshop Tutorial

Times really have changed! Only a few years ago it was par for the course to travel across town (or the country) lugging a heavy portfolio case full of treasured works, or mailing them to a faceless stranger. There was the fear of damage, or worse still, hearing the words, “Can you just leave it here with us for a few days,” not knowing what will happen to them as soon as we turn our backs.

I have a hunch that the printed portfolio will be with us well into the future. However there is a growing trend to put a portfolio on the web. This has obvious advantages; Your site is up 24/7, Its cheap, can be viewed by anyone around the world and the potential audience is huge. Since launching photoshopcafe.com almost 5 years ago, over 3 million people from around the world have viewed my portfolio, this would be impossible without the web.
Photoshop makes it very easy to build an online portfolio. I will show you how in just a few steps and we can do it all from the File Browser in PhotoshopCS or Bridge in CS2 For more detailed information on Photoshop for Digital Photographers please see my videos.
Step 1
Launch the File Browser (bridge in CS2) and navigate to the folder of images that you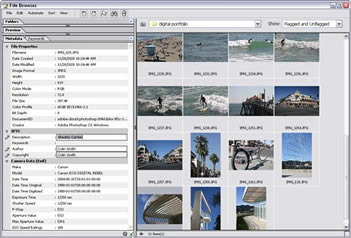 desire to include in your online Portfolio. (Tip: To hide all the palettes press the tab key)
Click on an image and view the metadata tab. A lot of information can be stored here such as Image information, camera settings at time of capture and even your location if your camera is equipped with GPS. Under “IPTC” You will notice some fields that have a pencil in the left Column. This means that these fields are editable. Enter in a description (This will become our caption on the Web Page). Also enter in the credits for the image. Note: For more fields, right click a thumbnail and choose “File Info.”
Click the checkmark at the bottom of the window to apply the custom fields to the image. This information will now be attached to the image and travel wherever the image goes.
Step 2
Lets move on to the gallery, choose Automate>Web Photo Gallery from the file browser’s  menu. (Tools>Photoshop>Web Photo Gallery in Bridge CS2) Select a style for the gallery. You can see a preview to the right. (Note that some options will not be available with certain styles)Enter your email address so that visitors can contact you. Cast your attention to the Source Images section. This is where we will choose the images and decide where we will save the gallery.
Use either Folder: Select an entire folder of images to be processed Selected Images From File Browser (Or Bridge): Use this option to use only selected images. You will have to select the images before opening the Web Photo Gallery dialog box. Hold down Ctrl (Cmd on Mac) and click on each desired thumbnail to select it.Click on Destination and either create or select folder to save the gallery into.
Step 3
 Under options, you will see a drop down menu. Space is limited to run through each of the options, so we will look at the important ones and the others can be left as defaults.
Choose Banner, This is where you will enter the title of the gallery and personal information.
Step 4
 Choose large images: This is the actual size that your images will be displayed. You can choose the default or increase the size if you wish. Notice there is a slider that says “File size”. This will set the jpg compression. The further left the slider. the faster the images will load but they will be lower quality and suffer from jpeg artifacts (little blocks and smudged details). Move the slider to the right and the quality will be much better, but it will take longer for the image to download. The setting you use depends on your intended audience. If your audience are using fast connections such as cable or DSL, then use a higher setting. If they are using Dial-up modems or overseas, then use lower settings. If you are unsure, a setting of 5 will produce a healthy compromise.
Step 5
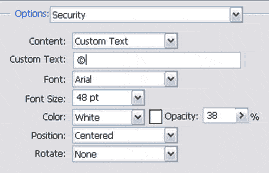 Security Perhaps the most important setting is the security setting. This will allow you to watermark your images. This will make it difficult for people to steal them and use them without paying you the proper fee or credit. (One of the biggest fears of Photographers desiring to post images online.)
Under custom text you can type in any message you like for a watermark. In this case I have used the copyright symbol. Tip: A great idea is to take your logo and have it converted to a font, and then select it as the watermark.
Choose the size and placement of the watermark.
Finally select a color and opacity, this will determine the strength of the watermark. I prefer to use White and lower the opacity to 38% This allows the watermark to protect the image without distracting too much.
Step 6
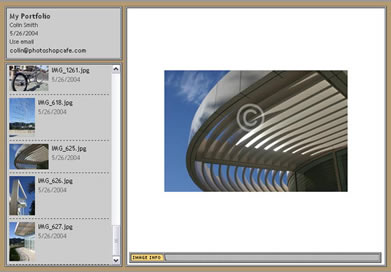 When you are happy with all the settings, hit OK. Photoshop will now do all the work for you. Sit back and relax while you are being saved hours of work. You don’t even have to resize any of your images first, Photoshop does it all for you. All the thumbnails, HTML and Javascript will be built for you.
When Photoshop has finished, it will launch your new gallery in your web browser.
You can scroll through the thumbnails and click on any of them to display the full size image. This is a quick way for viewers to locate the desired images quickly. Notice that the watermark can be clearly seen.
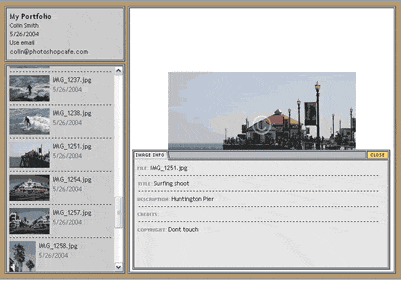
Portfolio.6.tifClick in the Image Info tab to display the File information.
Step 7
 The final step is to upload the images to the web. You will need to locate a web hosting company if you don’t already have an account. A hosting account can be obtained for a very reasonable price. You will then upload all the files in your chosen folder (The one we exported to) to the internet via FTP. There are easy to use ftp programs available such as cuteFTP for windows or Fetch for Mac. This really is easy and any good hosting company will provide full instructions and assistance.
Good luck with your portfolio, your images are waiting to be displayed in the World’s largest gallery for everyone to see.
Download the original article in PDF
PS Don’t forget to follow us on Social Media for more tips.. (I've been posting some fun Instagram and Facebook Stories lately)
You can get my free Layer Blending modes ebook along with dozens of exclusive Photoshop Goodies here

2 thoughts on “Creating a knockout Online Portfolio with Photoshop – Photoshop Tutorial”
Leave a Reply
How to remove colored reflections in a photo with Point Color in Lightroom Classic and Adobe Camera RAW
It's simpler than you think to reset the home screen in Photoshop, but it isn't at all obvious.




Hi, all the time i used to check blog posts here in the early hours in the morning, since
i enjoy to gain knowledge of more and more.
Good way of explaining, and nice paragraph to take facts concerning my presentation focus, which i am going to present in school.