
Photoshop CC 2015.5 June 2016 release, New Features tutorials

It’s always exciting when Adobe releases a new version of Photoshop, with exciting new features.
The June 2016 update, dubbed as Photoshop CC 2015.5 is full of great new features. From performance to really useful new features, this release won’t disappoint. Here is a rundown to keep you up to speed with all that’s new.
First of all, you might notice some minor tweaks with the dark interface to make it a bit clearer. You will also notice performance increases, especially with downloading and opening files. Let’s get to the sexy stuff. Check out this quick video on my 5 favorite features in Photoshop CC 2015.5.
The Top 5 New Features in Photoshop CC 2015.5
As you might have gathered, there are some really useful and exciting features in this release. I have also prepared some more in-depth videos on some of these features.
Content Aware Crop
The “Adobe Magic” continues with Content aware Crop. You know when you rotate or straighten a photo, the corners get snipped off, or you crop them out to get rid of the transparency. This causes you to lose part of the photo.

Enabling Content Aware Crop at the top of the screen, will make the crop expand. You can drag it all the way to the corners if you like. Once you apply the crop, Photoshop will use content-aware fill to fill in the transparent areas. In the past, we had to select the empty areas and apply Content Aware Fill, or crop it manually.
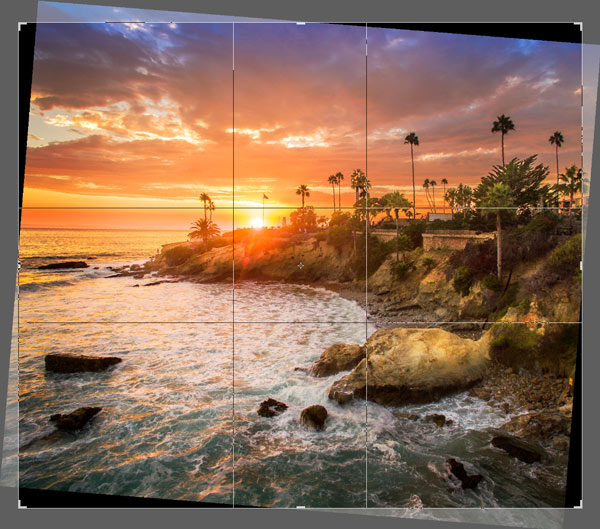
This isn’t just the regular CAF either. The algorithm has been tweaked to make it work better and faster for this kind of work. Speaking of, the entire Content Aware Fill has been worked-over to make it faster and to produce less blurring in the final result.
The Content Aware Crop is also very useful for working with panoramas. As you know (If you have merged panoramas before), the end result isn’t straight around the edges, it looks a bit like pools of liquid.

Content aware crop can also be used to fix these areas when working with Panoramas.
Watch this video and see Content aware crop in action for both straightening and also for working with panoramas.
Download the source images to make your own panorama here.
Select and Mask Space
New Select and Mask Space for cutting things out. This replaces the refine edge, which was good, but weak on fine edges such as hair. See Select Mask in action (In-depth video tutorial) and more info here.

Face Aware Liquify
Another crazy new feature is the Face Aware Liquify. This enables Photoshop to detect faces in Photographs and then isolate them. It will recognize the eyes, nose, mouth, chin, face and forehead, and enable you to change them by moving a slider. It even works on video (You get a little taste of that on my intro to the Face Aware Liquify video tutorial here).
Check out the in-depth tutorial on Face aware Liquify and more detailed info here

Match Font
Match font is one of those dream features for designers, or anyone using type. Have you ever looked at something and wondered what font they were using? Match Font does just that. Make a selection around a piece of text and choose Type>Match font. Photoshop will attempt to recognize the font and match it to known fonts. At the top of the list, you will see currently installed fonts that could be possible matches. You will also see a list of fonts available on typekit in the lower portion of the dialog. Creative Cloud subscribers can download and install those fonts in a single click.
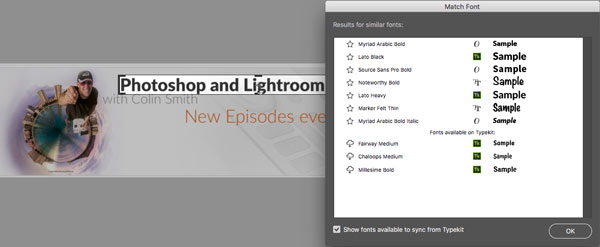
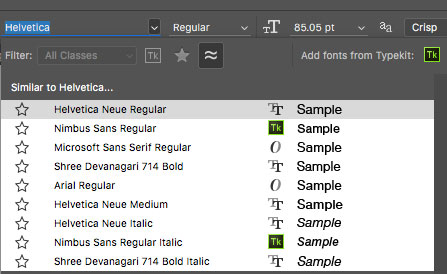
Here it has identified the font correctly as Lato Bold. If you have problems identifying it, try using another new feature, Similar Font, the little wavy icon will show all similar fonts installed or on typekit.
In type, you can also display Glyph alternatives directly on canvas, right click and see “show alternatives for selection” and you can choose alternative characters (glyphs) right on screen.
Creative Cloud Libraries
You could already set up a shared library and have other people access it and use items or add their own to the collection. You can now set permissions for shared libraries on Creative Cloud. This means you can set a folder as read only, the collaborator, can access the assets and use them, but you can set it where they can’t upload or remove any items for the library. (Side Note: If you license a photo from Adobe stock, the collaborator doesn’t get the licensed version. Open the image, save with a new filename and then put it into a Library to share the version without a watermark).
Other New Features
Artboards can now have colored backgrounds, or transparent backgrounds,
Legacy mode is introduced for the healing bush, under preferences>Tools
Brush performance is improved.
Don’t forget to check out the pages on Face Aware Liquify and Selections and Masks!
PS Don’t forget to follow us on Social Media for more tips.. (I've been posting some fun Instagram and Facebook Stories lately)
You can get my free Layer Blending modes ebook along with dozens of exclusive Photoshop Goodies here

3 thoughts on “Photoshop CC 2015.5 June 2016 release, New Features tutorials”
Leave a Reply

How to resize bulk images in Photoshop. Using scripts to automate photoshop, resize multiple images for instagram and social media.

How to find and search photos easily in Adobe stock. How to use Adobe Stock in Adobe Photoshop with CC...

Have you ever made adjustments to a photo in Camera Raw and then wanted to blend the edited version with...


Thanks for the information. I had not been able to update to this version because of some issues with my windows update not working properly, but that is resolved now, so I am very excited to try this out!
Thank you for the tutorial. It was driving me nuts that the refine selection was gone after I did the update. My problem is that the panel on the right to refine things once into the mask screen is missing. Any ideas why that might be? I tried going into essentials and photography workspaces and had the same issue.
Thanks for the information