
Warp an image in Photoshop with advanced warping

How to warp an object in a photo in Photoshop 2020 and add a realistic shadow.
In this Photoshop 2020 tutorial, we are going to look at a big new feature to help us make really cool composites and collages. Photoshop 2020 has introduced a new warp feature, that lets us split the grid on a warp. We will use it to make this dinosaur look fiercer and also to warp our shadow for more realism. Don’t forget to check out my other Photoshop 2020 new features tutorials here on PhotoshopCAFE.
How to Warp an image in Photoshop using Split warp
We are beginning with this dinosaur. We have a flat background plate and a cut-out object on it’s own layer. How to cut things out.

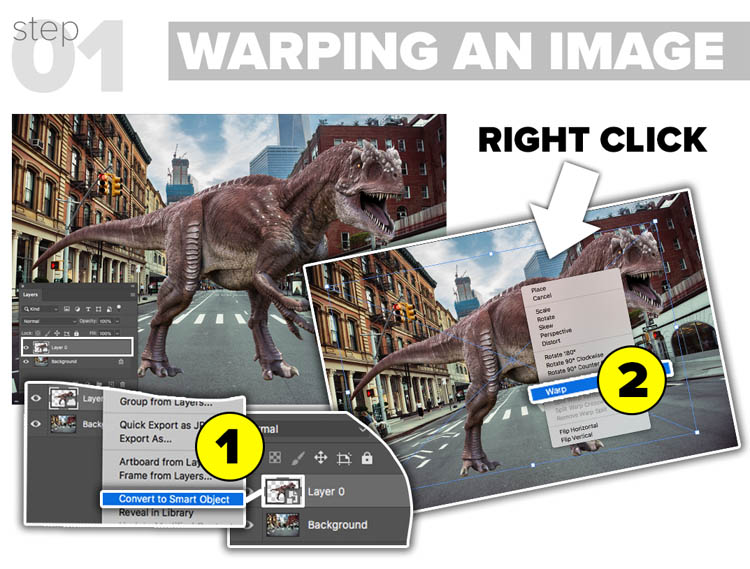
Step 1.
To get the most out of this effect, we need to convert to a Smart Object.
1. Right-click on the top layer in the layers panel and choose “Convert to Smart Object”
2. Right-click on canvas and choose Warp. A mesh will appear.
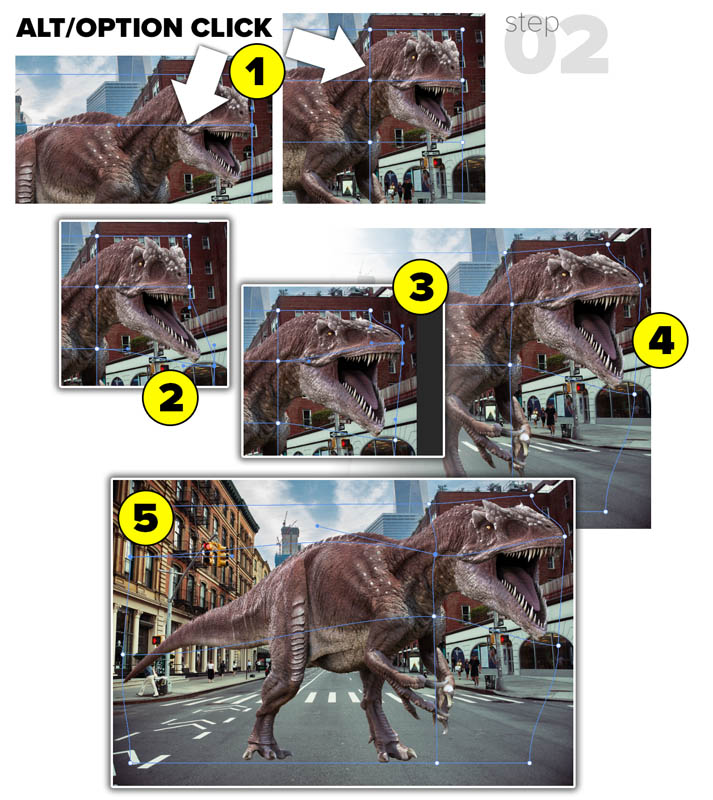
Step 2// WARPING THE HEAD
Let’s warp the dinosaur (called Dino from now on) and make it fiercer.
To split the mesh Alt/Option+ click and drag on the mesh.
1. Click near the vertical line to create a new horizontal guide.
Alt/Option + Click on the top of the grid to create a new vertical guide to frame Dino’s head.
2. Drag down and out to elongate the bottom jaw.
3. Elongate the top jaw. Try dragging both on the lines and using the bezier curves as well as inside the surfaces.
4. Pull up to make the head taller
5. Expand the body and just have fun.
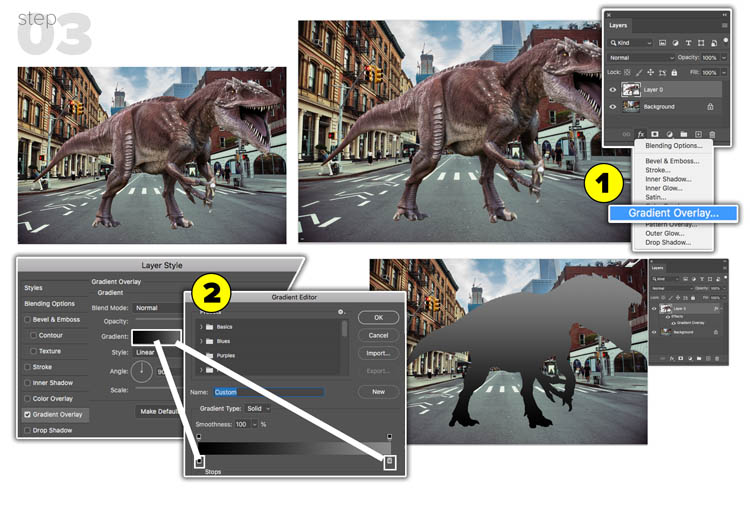
Step 3// MAKING A SHADOW
Right now Dino looks like he’s floating in space and needs a shadow to anchor him to the ground and give a sense of scale and position.
1. Choose a Layer style and select Gradient Overlay. Nope, not a typo, this will be different, but more realistic than a drop shadow.
2. Click the gradient to enter the gradient editor. Click the stops on the bottom of the gradient to see a black to dark gray gradient. You see, a cast shadow loses strength as it gets further away from the subject.
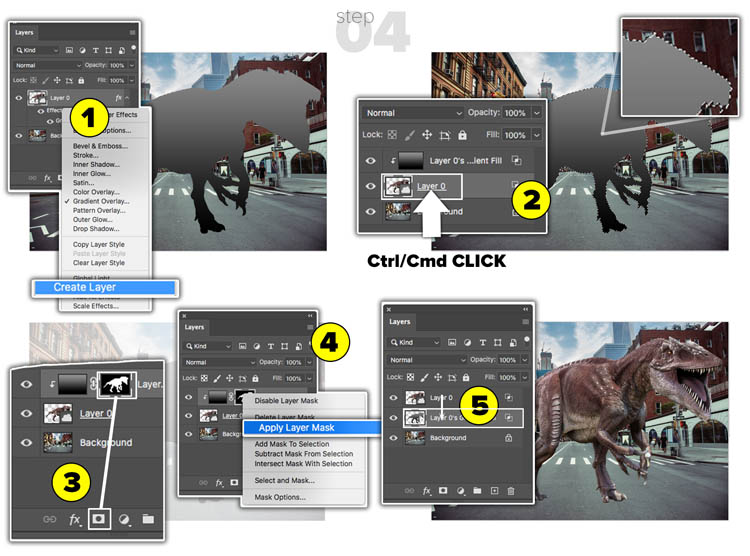
Step 4// MAKE A CAST SHADOW
1. Right click on the Layers panel and choose Create Layers.
2. Cmd/Ctrl+Click on the Dino layer to load the transparency.
3. With the gradient layer selected, click on new layer mask. A mask should now be on the gradient in the shape of Dino.
4. Lets Merge the mask to the layer: Right click on the mask and choose Apply Layer Mask.
5. Drag the gradient under the Dino layer. You should now see Dino with the gradient hidden.
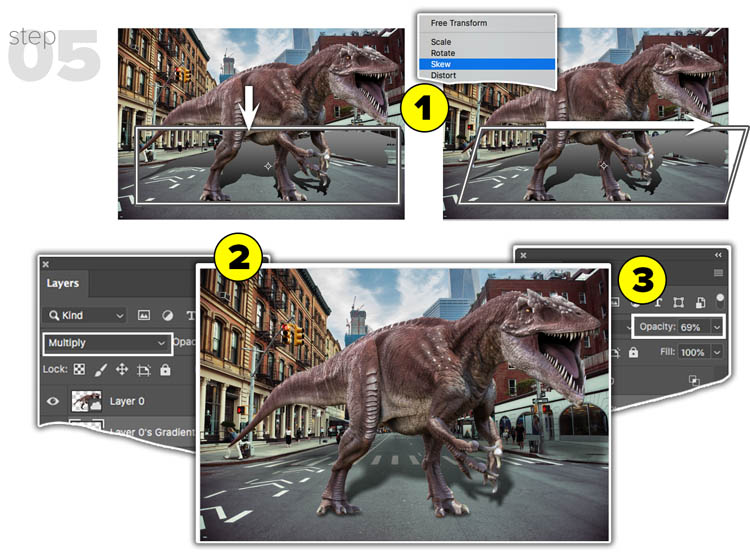
Step 05//
1. With the gradient layer selected, press Cmd/Ctrl+T for free transform.
(a) Drag down from the top to shorten the shadow.
(b) Right click and choose Skew. Drag the top middle handle to the right to skew the shadow.
2. Change to Multiply Blending mode in the Layers Panel.
3. Lower the opacity. I used 69% here. See why I used a gradient now? The fall-off looks good.
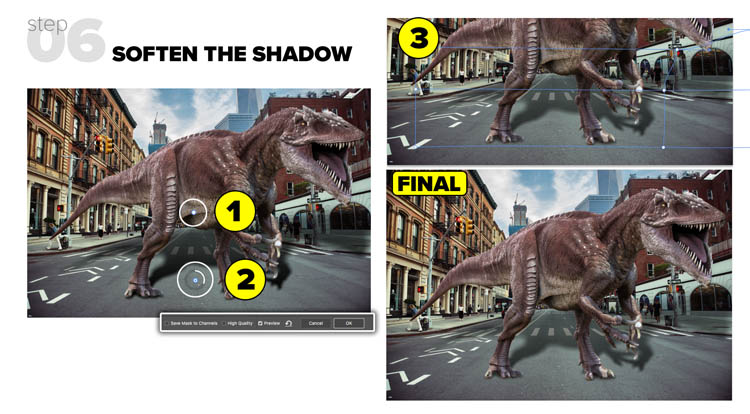
Step 6// SOFTEN THE SHADOW
In real life a shadow will get softer the further it gets away from the object casting it.
1. Choose Filter > Blur Gallery > Field Blur. Adjust the amount of blur on the pin to make it soft.
2. Click underneath the pin to add a send one. Make less of a blur on the second pin. Try moving the pins around to see how it changes the blur. Click OK to Apply.
3. (Optional) You can right click on the shadow and choose Warp. Use what you learned in this tutorial to warp the shadow onto background elements for added realism.
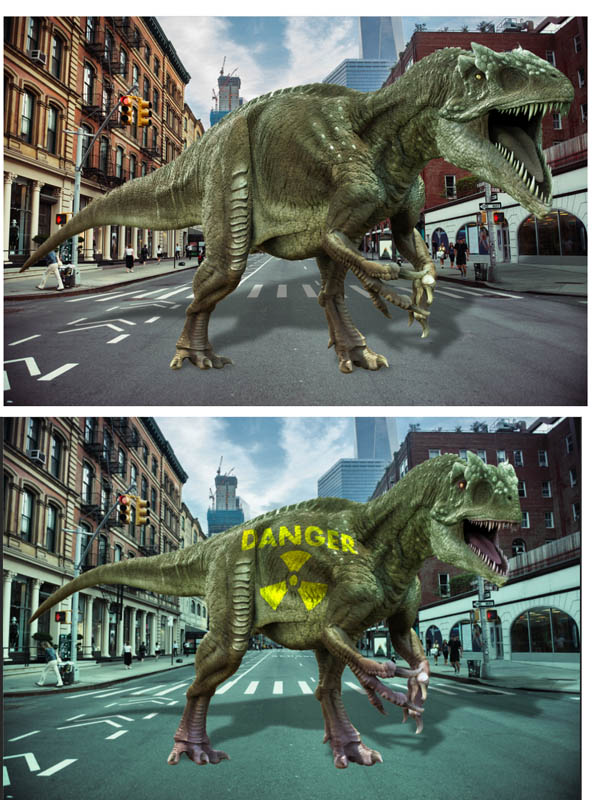
Here are some variations, I used a basic color fill layer set to color mode for the color. In the second example, I used advanced warp to fit the logo to the Dino.
I hope you enjoyed this tutorial. Don’t forget to check out my other Photoshop tutorials here on PhotoshopCAFE
- New Feature overview (All the new features in Photoshop 2020)
- New Presets panels, (Using gradients to colorize an image)
- Advanced Warp (Warping a dinosaur and shadow)
- Photoshop on iPad
Great to see you here at the CAFE.
Colin
PS Don’t forget to follow us on Social Media for more tips.. (I've been posting some fun Instagram and Facebook Stories lately)
You can get my free Layer Blending modes ebook along with dozens of exclusive Photoshop Goodies here


8 thoughts on “Warp an image in Photoshop with advanced warping”
Leave a Reply

New features and announcements in Adobe Stock. Visual search using AI (sensei technology) new services and integration with Microsoft Powerpoint.

The DJI Mavic 2 Pro and Mavic 2 Zoom have been announced this morning. A big feature is hyper lapse,...
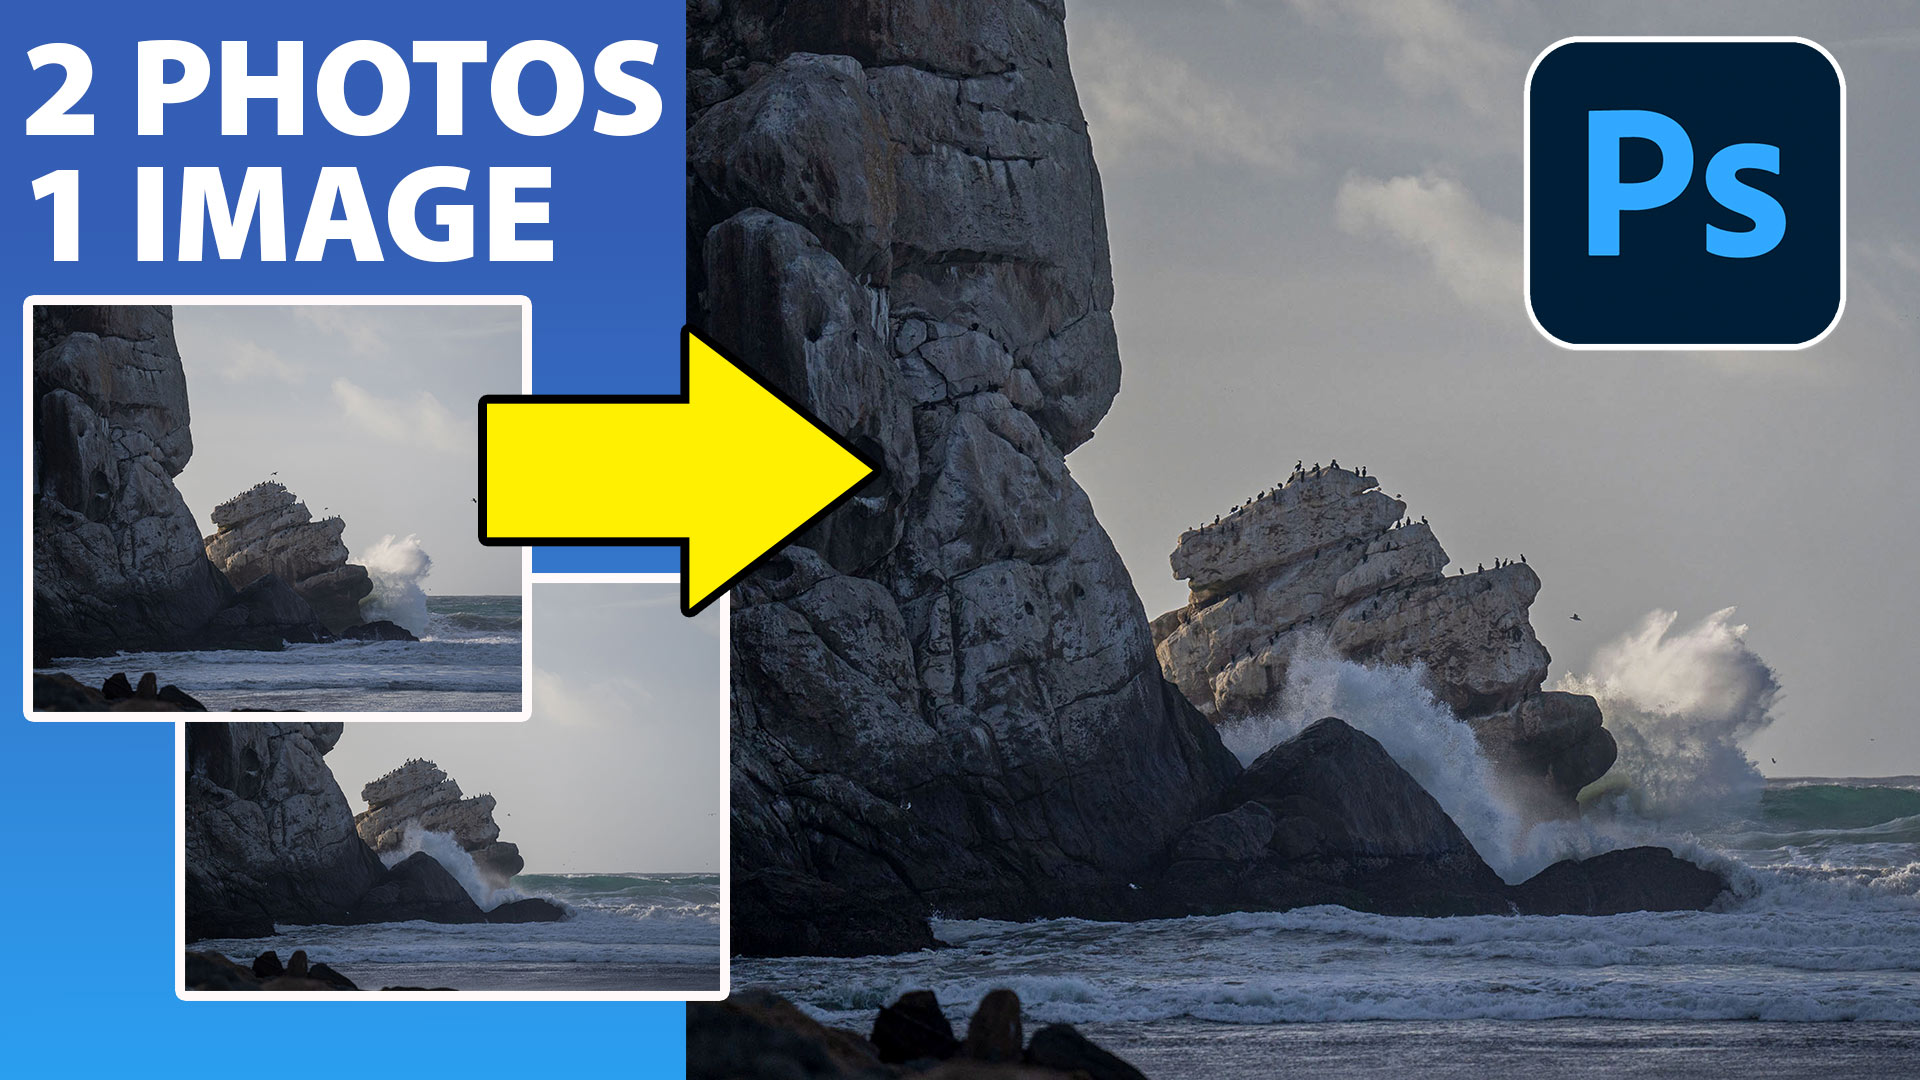
Combine 2 photos together in Photoshop to make a better image in this simple but very effective Photoshop tutorial


Thanks for yet another very concise and clear tutorial
Brilliant. I learn so much, thanks.
This is a great addition,explained concisely by Colin
Ehm… Sorry… But the result of this tutorial was not very good. Again, sorry.
Clear and useful tutorial. Thanks
Excellent, as always very clearly explained and so becomes a very versatile tutorial
Thank you for all that new information!
Question though – When you use the transform tool in the warp mode, there use to be guide lines automatically so you could judge if you were warping evenly. Is that totally gone? I know you can add points & then see some lines, but I didn’t want to add any points.
Thanks for any answers!
I could not even find the warp tool. Where the heck is it. I’m using PS 2020 and a beginner, but t’s not there.