How to Retouch a face in Photoshop, workflow tutorial
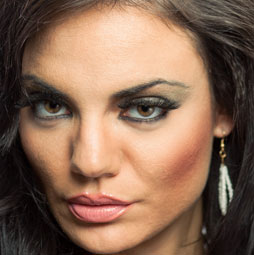
In this tutorial, you will learn how to retouch a portrait in Photoshop.
The purpose of this tutorial is to give you a high level overview of the different steps and how to do them. Some of the ideas I present here are option that you can choose to do or not do, depending on the result you are looking for. Some of the ideas are very refined and sometimes stylistic for my high end, fashion and editorial clients. Some prefer a subtle “tuneup” that enhances the natural face and this is usually the best style of retouching, where the retouching is invisible unless you compare the before and after results. The techniques presented here will allow you to do either style.
The philosophy followed here, is start big and go small. To deal with the largest areas first, such as overall toning and coloring. Then you move to large blemishes and wrinkles, then onto smaller pores and flyway hair. Finally you can apply dodging and burning and coloring to add shape and style.
Another philosophy I like to follow is only retouch out things that are temporary, such as acne, bags under the eyes, those kinds of things. I don’t change the proportions of facial features etc. I have seen too many retouched photos, that don’t resemble the original person. Most of the time, we are not trying to turn them into another person, but bring out the best of that person.
(Written steps, editing and images coming soon)
How to Retouch a Face in Photoshop in 4 Steps
Hey everybody, it’s Colin Smith here from PhotoshopCAFE and today I’m going to show you how to retouch a portrait.
So when we go to retouch a portrait photograph, what we want to do is just remember, start big and then go small. So what does that mean? Well, that means essentially we fix the biggest problems first and then, move on to the smallest ones. So, I’m just going to hit Ctrl J to copy this so we can look at a before and after later. And we’re not going to spend hours retouching this. I’m just going to show you the basic work flows and the techniques, so you can pick this up for yourself.
So the first thing we’re going to do is we’re going to go under Filter here and we’re going to go to Camera Raw Filter. Now, if you’re working on an earlier version of Photoshop, what you want to do is launch it in Camera Raw from Bridge or start in Lightroom. So what we’re going to do is just add basic corrections first, then we’re going to come in and do our close up retouching. So I can see here, we need to open things up a little bit, so let’s move our exposure a little bit. It’s gone a little far, notice that we can pull our Highlights down just enough to kind of keep some highlights there in the skin, and same thing, I want to open up the Shadows a little bit, see a little bit more detail there in her hair, so let’s open it up a little bit and we’re going to play around. Let’s bring those whites back down. In fact, that exposure’s too hot, let’s bring it back down.
Okay, so we can put the blacks in there and put a little body in there, play around with those whites, and I feel like I want to open up the shadows a little bit more. There we go. You don’t want to open it all the way up here because it’s not very flattering at all and it makes the hair look like it’s made out of straw, so you really want to avoid that. But I want to get it just enough so we can start to see some color in here and a little bit of definition. Now, we can flavor this with the Contrast slider. So if we give this more contrast, notice it gives it more punch and more feel. If we go the other way, it kind of shows a more dynamic grain, so I’m just going to double click to reset it, just give it a little push. And the other thing that you want to do too is the white balance. Make sure you’ve got your white balance set correctly. And we can do that by choosing the white balance settings up here if you shot in raw or grab this little tool here and then click in an area that would be white, so we can look for an area in here, maybe there, an area of detail, click on that; that will neutralize it. Now what I would like to do a lot with portraits is, maybe, push the temperature up, just a little touch, so I’m just going to barely breath on it, and I’m giving it the +3 and it just kind of warms up the skin a little bit.
So, that’s looking pretty good. So if we look here, this is where we started and this is where we’ve ended. So, we’re going to open this now inside of Photoshop, so we’re just going to click OK and now we open it. Once, again, we can see the before and the after, so what we’ve done is to just open up some detail. Now what we want to do is actually move it a little bit and start to clean things up. Now there are different types of tools. We could go in here and we could clean up the hair if we wanted. Now, we can use the Healing Brush or some people like to use the Clone Stamp tool and this is good to get rid of. I’m using the left and right bracket keys to make things a little bigger. You could go in here and start to clean out the hair by hitting the Alt or the Option key here, selecting that edge, and then, just kind of move over there, and you could just kind of clone it out of the stray hairs. That’s one way of doing it. Of course, there’s different ways of working, now let me make sure I get this right. Let me zoom in a little bit just so you could see it better. And, again, hit the Alt or the Option key, go up to the area there, and just kind of clone that in. And you could go there just to get rid of the stray hairs. Now, we can do it that way; in this case, you could almost just grab a paint brush too and paint it out. But let’s look at some of the other things we want to work on; the skinóvery important.
All right, so what we’re going to do now is we’re going to go down and we’re going to grab our Healing Brush Tool. So we’re going to go down there and we’re going to grab our Healing Brush. Now you could use a Spot Healing Brush and you could see these little areas and you can just click on those and notice as you do that, that kind of cleans those little areas out. See that? And we’re just getting those little pores there up on that part of her head. Now, the difference between the Spot Healing is that it just grabs a Healing point from random. Now, if we grab the Healing Brush itself, what we do is we’re going to hit the right bracket key, make it a little bigger, and then, we hit the Alt or the Option key to sample an area and then, we just stamp it back in, so we’re hitting Alt or Option a lot and what it’s doing is it gives us a little bit more control of where we’re sampling from and where we’re sampling to.
Even though I’ve been doing this, let me show you a better practice is to create a new layer right now, then you choose current layer and below, and, now, let’s continue with our Healing. And I’ll zoom in a little bit and just move over. So if I hit Alt or the Option key now, what I’m doing is I’m painting with my healing brush there and I’m painting on to a new layer. So, as you can see, I’m just kind of dropping this in, but I’m not really dragging. I’m just kind of popping it in, and as you can see, it’s a very laborious job. I’m not trying to rush. I’m just taking my time and notice one of the things I’m not doing is I’m not liquefying her face, I’m not changing the shape of her face or anything. All right, so that gives you kind of an idea what you can do with that, in this case, we want it to look natural. I’m not trying to make it look fake or remove the pores of her skin. So, we’ve got a little bit here because of the lighting was a little bit high here and we’re catching a little shadow under her eyes here, so we want to kind of work on that, so let me show you a way to do that.
What we can do is we can actually just create another layer on top and I’m just going to call this one “under eye.” And then, with the under eye area, what I can do is I can sample here. I’m just going to hit the Alt key or the Option key to sample from this area, and now I’m just going to paint onto here. So what am I doing? I’m literally getting rid of all of these. Now don’t worry about the fact that we’re overdoing it here because we are. Let us just go in here because right now it’s going to make her look a little bit like a mannequin, but that’s okay because I could say we’ll fix that, so let’s just go in here. And at this point, you could look for any, like small little wrinkles like maybe they’re on the nose or whatever and we could go in and start to remove this. But you can see, we’re getting a little bit more heavy-handed with this stuff now and what we’re going to do is there it is before and after, so we’re just going to roll it back, so we’re going to take the Opacity and just pull it back a little bit. So this is how it was before. We can just bring it up a little bit and it just kind of reduces that a little bit.
All right, so there’s kind of, you know, what we’d do with the skin so you could continue to work on it like that particularly if you want a natural result. The thing we can do with it is a little bit of dodging and burning, so what I’m going to do is hit the Alt or the Option key, create a new layer. So I held down Alt or Option, click the New Layer icon. This gives me this option. So we’re going to change the Blend Mode to Overlay and we’re going to click fill with 50% gray. And then, what that does is it just gives us a dodging and burning layer so we can non-destructively dodge and burn. So I’m going to hit the little B for the Brush, so we go into the Brush Tool. We want a soft edged brush to make sure the hardness is all the way down and set the Opacity toóI don’t knowó20 or 30. So if I hit the 2 key, that will set it to 20; I hit it to 3, it will set it to 30. So I’m going to hit it to 20% right now and hit the D key to reset the foreground and the background. Now I’m just going to hit the X key.
So what I’m doing is I’ve just set the foreground color to white. And then, what we can do is we can actually go in here and just kind of start to paint over this area a little bit under the eye edges, lightening it up a little bit. See that? So we’re just kind of lightening up underneath the eyes. That’s one of the things that we want to do and maybe open up here around the cheeks, so we’re just kind of creating this nice area in here. Same here on the bridge of the nose, there’s another spot, so just kind of lighten up a little bit and just kind of paint that in. Now, if it starts to get weird like that with color, we can change the Blend Mode. There’s other Blend Modes we can use, such as a Soft Light, so if we look at this before and after, see that? And that reduces the effects of that a little bit more. So we could actually go in here and just go under there and I’m just going to kind of hit the chin and we’re just kind of flattening it out. So what we’re going to do now is just kind of contour the face. This is still working with white right now and we’re kind of just going up over that area and that part under the eyes and up to the cheeks.
And then, what you could do at this point, we’re going to switch around the X key and now we’re going to go to Dark. And with the Dark, we can just kind of highlight the cheek bones and kind of chisel a little bit the shape of the face. See that? So we’re just kind of blending that in and we could do the same on the other side there. Now just remember, I’m doing this quickly. You would spend a lot more time doing this for real, like if you want to work on a lot of images to get the exact look. I’m going to go under the eye there, just kind of add a little bit more shadow and it kind of shows a little bit more shape to her face. So we’re not changing her at all. We’re just enhancing, you know, her natural body or her natural face, should I say. So if we look at this before and after, you can see, you know, it’s not that overdone. It’s a little bit more subtle, but let’s just zoom out a little bit and let’s look at what we’ve done so far.
So if we start there, we can see we have lightened it up a little bit. We’ve done just a little bit of healing there. And then, what we’re doing here is just kind of fixing under the eyes and stuff, and then, a little bit of dodging and burning. You can see how the dodging and burning is really having an effect. Now you can take the Opacity down if you want to be more subtle. So let’s zoom in on the other thing that’s nice to do is I’m just going to make sure I got white again and grab a little brush here. This is one of the things I love to do with dodging and burning is just go in here and just grab the eye there. See that? We’re just kind of really just opening up the eye, lightening it up a little bit, and that shows more of the eye color. If we look at this before and after, see that really makes a big difference. Once again, if you feel like you’re going too far, hit the X key, go to black and then, maybe bring the Opacity down to like 10% and you could do that. Now, what I like to do sometimes is go around the edges here and darken it around the edges of the eye and in the pupil there, and that kind of makes the eyes a lot more prominent.
There’s more than one way of doing things in Photoshop, so what we could do is we could create a Hue/Saturation Adjustment Layer, so we go here, we’re going to choose Hue/Saturation, and then, what we’re going to do is take the Saturation all the way down to black and white. Now, in order to apply this, we select here. This is our mask and we’re going to hit Ctrl I or Command I to invert that mask and, now, we’re going to paint with a Brush and as we paint with this brush, we’re going to turn it back to 100%. We’re just going to be painting away the color. See that? So that’s another way of doing it. So notice I’m not just painting in there with white because this would make you look ghoulish and the best way is to keep that there and just paint, you know, of the desaturation. So, if we do that now, you can see that we’ve managed to desaturate that in the eye.
Now some areas like that, maybe if it’s a little much, we can go in and we can clone this. You know, we could use the Healing Brush. We could come in very, very close and let me do that right now. Let me grab our Healing Brush here and we’re going to drop it way down super tiny, and hit the Option key to sample, and, you know, you can clean out some of these veins if they’re a little bit much. See that? All the time, you know, we’re not painting white because that will just make it look unnatural. So you can get rid of veins that way. It’s another way of doing it. And then there are other things that people will do during this retouch. One of the things that people will do quite a lot is maybe work on the make-up. You could kind of darken it. We could work on the hair. We could clean up the hair a little bit, but I think you get the general idea. So if we look at what we started with, there’s before and there’s after.
So the next thing we want to do is maybe just top this up by giving a nice little coloring effect. So I’m going to go here and I’m going to go into Curves. So under Curves, what I want to do is I want to set my tones. I’m going to give a little contrast. Let’s pull down a little on the blacks and pull up a little bit in the highlights, but not too much. Now, we’re going to work on the color, so we can go into the individual colors here. So if we go to, maybe, the reds here, we can actually increase the reds a little, see that, in certain parts of the face, and the highlights, let’s do that a little bit, just a touch. And now we’re going to go to the blues. We’re going to increase our blues a little bit and the shadows, to kind of just give it an interesting, you know, maybe a little bit more cinematic type effect. And then, we can balance off the green, so we grab the greens. Notice if we go this way, it looks like that. If we go the other way, it looks more red. So we can kind of just play around in there and just get a nice toning, you know, like looks a little bit more high end. So if we look at this before and after, you know, it might be too much, so let’s take the opacity down and just bring it up a little bit. And so we’re giving this a little bit of a dramatic kind of a look to it right now. So there we go. So if we look at this, this is our before image and then, that’s our after image.
So, anyway, I hope you enjoyed that.
Thanks for checking out this tutorial,
I post new tutorials each week here at PhotoshopCAFE and as such, we have quite an extensive library, feel free to check them out!
Don’t forget to subscribe to our newsletter and also subscribe to our youtube channel.
Thanks
Colin
PS Don’t forget to follow us on Social Media for more tips.. (I've been posting some fun Instagram and Facebook Stories lately)
You can get my free Layer Blending modes ebook along with dozens of exclusive Photoshop Goodies here

In this Photoshop Tutorial, learn how to design a magazine layout. Convert a layout into a reusable template in Photoshop...
Photoshop CC 2019 new feature review and tutorial. Watch video and read about all the new features released in Adobe...
How to use the NEW features in Photoshop 2025 July 29 update, free written tutorial and short video tutorial by...


