Photoshop has some hidden tools called Quick Actions (Not to be confused for actions). You can perform a number of effects or tasks in Photoshop in a single click. These are really great for beginners, but more advanced users may find them useful too. Is this the first you have heard of Quick Actions? Don’t be surprised. It seems that Adobe has hidden them so well, that most people have never seen them. Let’s remedy that, shall we?
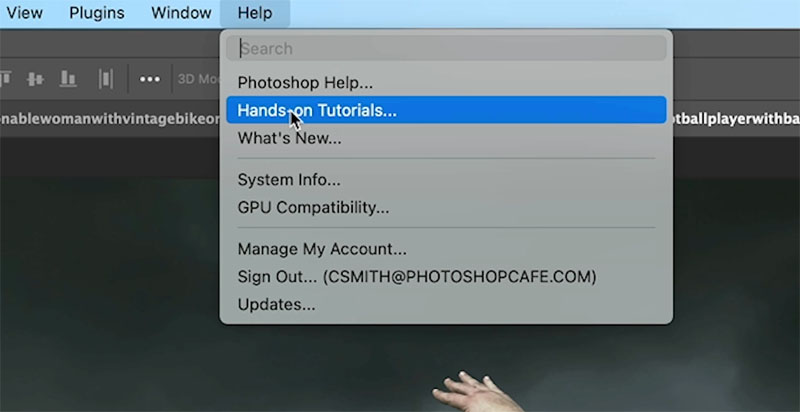
To launch Quick Actions, click on the Help Menu.
Choose Hands-on Tutorials (Adobe got me to create 1/2 dozen of these tutorials – humble brag).

You will now see the Discover panel.
Click on the back arrow (I told you they were hidden) and this will take us to the quick actions panel.

Now you will see a list of quick actions.
We are going to use a couple of them here. We will also look at a better way to use the background blur as this one doesn’t work very well, but another quick action does it better.

Starting with this picture of a group getting off a train, we will make the background black and white.
Click on the Make BW Background button.

And just like that, the background is black and white, but you can easily make adjustments after.

Click on Black and white and the Black and White adjustments will appear for you to make changes. Here you can make any changes that you want, and there are options for most of the actions.

All the layers, masks and adjustment layers are also created like normal, so you can change whatever you like.
Choose another photo and click, Add duotone effect (This isn’t really a duotone, but a duotone EFFECT, an actual duotone is different)

You will see a duotone has been added to the photo.

If you want to use different colors, click the gradient Map button.

Choose any gradient from the gradients that pop up. You can access additional gradients that are already in Photoshop here.

How to blur the background in a photo, is a popular request for Photoshop. Good news, there is a blur background option in Quick Actions.

Bad news, it looks terrible, See the fuzzy edges? Good news, I have another way you can do this with quick actions and it looks much better.

Choose the select Background quick action.

Press Ctrl/Cmd+J to copy the background to a new layer.
Hold Down Ctrl/Cmd and click on the layer thumbnail to turn the selection back on.

You should have the top layer selected and see a selection around the background like this.

Choose Filter>Blur>Gaussian Blur
Choose the amount of blur you want.

And see how nice the edges are with this one.

Don’t forget to check out my very short video above that shows these steps and drops a few extra tips in.
Great to see you here at the CAFE
Colin
If you haven’t, subscribe to our youtube channel by clicking the subscribe button under the video.
See you next week with another fun tutorial.
I’ve got a whole bag of goodies you can have for free at the Vault. Grab free goodies here, including Photoshop brushes, actions, presets, sky images, ebooks and a whole bunch more.
Consider Consider joining our mailing list so you don’t miss any of my tutorials.
For more, follow us on Social Media

This site uses Akismet to reduce spam. Learn how your comment data is processed.
How to get better selections when cutting out hair and fur in Photoshop...
That trendy color tinted effect explained here. In 3 easy steps!...
5 mistakes to avoid in Photoshop. Never do these things in Photoshop. ...

Never new the quick actions were there in Photoshop. Thanks for the lesson, especially like the way you did the background blur. Great tip!!!
Wow Colin! Learning from you about these quick action tips feels like opening a surprise filled Christmas Advent calendar (hmm a Lightroom/Photoshop Advent calendar…) Anyway, thanks so much and best of the season to you and those you love.
Hi Colin,
Thanks for the permanent infos and tricks. Personally this time I’m not too convinced by the performances of the Adobe’s quick actions: very heavy downloads for some neural filters and rather poor results for others, saying nothing about the 8 bits limitation(?) of others. Even if it takes a few minutes longer, I prefer the “hand made” solution. Keep safe and have a nice day !
I had no idea these quick actions were there. Seems very similar to the neural filters, but easier to get to. Thanks again, Colin, for your great tips!!
Thank you Colin, your tips and tricks are very helpful. Kind regards, Gerda
Fantastic Colin. Thank you.
Exactly where Adobe needs to go: faster, simpler, with great results…which is exactly what we want.
Now, if they could add this simple tool to Lightroom !
Thanks Colin, completely unknown by me. Now I need to find uses for them!
Very informative!
Had no idea about these quick action tools. Thanks, as always, to keep me informed about the possibilities.
Sneaky 😜
No, I didn’t know about them.
Yep! I knew about them and mentioned in the chat during the LFL in the past couple wks (before Thanksgiving). But the Blur Background workaround tips are great to know! Thx for sharing them, Colin!!!
love your videos. Thanks!!!
I didn’t know about these actions. The background blur tips are great but you missed the background between his legs but that’s just an addition to the selection. Thanks for the tips! Really useful to know these actions are even there!
thankyou for your informative knowledge
thankyou for your informative knowledge