
Creating dynamic motion blurs on backgrounds in Photoshop tutorial
You have the photo of the action. However, your shutter speed was pretty fast and it looks like its frozen in time. You wished that you had dragged the shutter a little and panned with the action. Or, you found the exact stock photo shot, but wished it was a little more dynamic. Here is a Photoshop CC tutorial that will show you how to add that motion and make the photo really come alive! (If you don’t have Photoshop CC, just add a Filter>Blur>Motion blur instead of the Blur Gallery).
Alright… lets go!
Written steps are coming soon! (I always add them within a few days of launching the video. Hey, I’m excited to share the video with you).
Thanks for checking it out!
Don’t forget to check out our extensive library of full-length premium tutorials from myself and a team of hand-picked world-class authors! See them all here
Motion and Dynamic Backgrounds in Photoshop
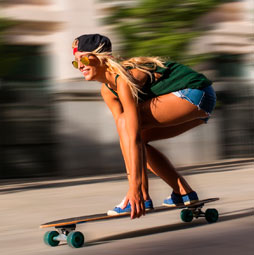
Hey Cafe Crew, it’s Colin Smith here from PhotoshopCAFE and this week I’ve got a great tutorial for you. I’m going to show you how to take a photograph like this and add a much more interesting background to it.
What we’re going to be able to do is add some motion to the background, which is going to make a lot of life into the photograph and it’s also going to bring attention to our subject. So there’s a couple of little things that you’re going to learn in here. One of them is I’m going to show you how to create that blur around her without getting a weird glow or a weird halo and you’ll see what I mean in a minute.
By the way, if you’re looking for images to work with, you know, for practice or you know, to apply to your project, grab them from Adobe Stock. I actually just got this one here from Adobe Stock and I just– Here it is right there and I’ll actually provide a link to that in the description below. But what I did is I just did a little search here directly inside of Photoshop, did “Skater girl” and found this photograph. I’ve got this girl skating down the road, but there’s no motion; there’s no movement or anything. So, right now, we just got the background. What we want to do is we want to make a selection around our girl here.
Now the way to do this is to grab our Quick Select Tool and just start kind of dragging around there, making our selection. Now when you go over the selection, which eventually is going to happen here, I just set a couple of places there, what you do is you hold down the Alt key or the Option key and you can just go around and take it away from the areas where you went over.
So it’s a very quick and easy tool to use here–the Quick Select. So I’m just going to add more of a selection here and when you feel like you’re getting closer and you want to check your selections, just tap the Q key and that will bring on the Quick Mask, and you can see, hey that’s not bad. There’s a couple of little areas that maybe need some work around here, but let’s just tap the Q key and we go back to our selection.
So this, actually, doesnít have to be perfect for this technique. This is actually going to be good enough for what we want to do. We’re just going to go into Select a Mask now and we just want to make sure that we can make it a little bit better. So let’s turn the Opacity up a little bit, turn on Show Edge and then just bring up the Radius until you see the edge. See that? Do you see a little bit of an edge? Now turn it off and that would have cleaned up a lot of it. But there might be a little bit, say, around the back there. We just want to make sure you’ve got that mask selected. You got a small brush and you could just paint around here just to get a slightly better selection around those areas there, so especially around the hair and things like that, so let’s just quickly do that.
And just a little bit there, you know, we could go over this and make it perfect if we wanted, but you know what? This is going to be more or less good enough to show you the technique here. So what we want to do now is we want to put this out. We’re going to choose Decontaminate Colors, just to kind of clean up the edges, and then we want the new layer with a Layer Mask, and we’re going to click OK. And there we go. We’ve got it nicely cut out. So what we’re going to do is we’re going to show our background and now I want to duplicate that background, so I’m going to hit Ctrl J, and you’ll see why in a second why I want to do that. So what I want to do now is I want to blur this background that we just copied and this is going to provide a Motion Blur Effect.
Now you’re going to notice a little problem and we’ll come back and we’ll fix that in a second, so I’m going to choose the filter and I’m going to go down to the Blur. Now, if you’re using earlier than CS 6, you just want to down a Motion Blur. If you’re using CC, come on back to the Blur gallery and we’re going to go down to the Path Blur where we have more control. And notice what’s happening right now is we’re applying this Motion Blur. We can change the direction of it, which we’re going to do here, and I’m just going to drag that out a little bit. Now if you want to increase this blur to make it a little bit more dynamic, turn the speed up. See that? And you can even do the taper and we can play around to create this cool kind of a Blur Effect.
So this is looking quite realistic as far as the blur, but one of the things you’ll notice here is around the edges here. Around the edges, it’s looking a little bit weird, right? So what we can do is we can apply– Okay, we’re just going to apply it here and I’ll show you how to fix that. All right, so that’s what we’ve done, we’ve applied it there. We’re just going to turn it off and I’m going to go here to the background. I’m just going to hit Ctrl J, so we can just copy it one more time. And now, what we want to do is we want to apply that Blur, but we don’t want to blur the edges of our person.
Here’s how we do it. We go up to the mask, hit the Ctrl key or the Command, and you’ll notice, you see that little Mask icon. Click to grab the selection from there. Now make sure that we’re still selected on our layer here and what we want to do is we get a Content Aware Fill, but before we do, we want to expand it so we can get rid of those edges.
So now what we’re going to do is we’re going to choose to select, we’re going to expand this selection by choosing Modify Expand. 10 pixels will be good enough, click OK. And notice what we’ve done is we’ve gone outside those bounds a little bit. Now we’re going to use Content Aware Fill. So hit Shift Delete, Content Aware Fill will come up under here, under the Fill, and that will be Shift Delete on Mac, that will be Shift Backspace on Windows, and then click OK. And it’s going to fill in those areas. You can’t see it because I’ve got that turned on, but if I turn off that top layer, you can see that it’s just kind of filled it in. There was a couple of artifacts, but it’s pretty good. So what we want to do now is we want to apply the same blur that we applied early on to this one here. And you can do that by hitting Ctrl F or Command F or go up under Filter and then choose Blur Gallery, and you’ll notice at the very top, it will apply the previous filter, which was that Blur and you’re going to see it there; it’s going to apply it. Boom!
And now if we turn our top layer with that girl, we can see that we don’t have the halo around here. We just have her skating off with the blur and compare that with the one there. See that halo in the middle? So, we can do that. Now, if you want to go one step further and add a little bit of a motion blur behind her, which technically wouldn’t really be happening because we’re panning with her, but maybe you might get a little bit.
What we could do is we could turn on this layer in the middle and that’s the one with the edge, and then just click and drag it behind her. So it’s just kind of trailing her a little bit and you could kind of see that we can do that. That’s one way of doing it. And the other thing I’d like to do if I do that is take the Opacity and just kind of blend those areas, those layers together, and you can get a result that looks something like that.
So those are the different types of things that you can do there. I hope you enjoyed this tutorial. If you did and you want to get a new one every single week, hit that Subscribe button right now, become part of the Cafe Crew. And if you like this tutorial, show your love by smashing that Like button, add a comment, let’s get a discussion going and, guys, I’ll see you next week. Until next time, I’ll see you at the Cafe.
Great to see you at the CAFE!
Colin
PS Don’t forget to follow us on Social Media for more tips.. (I've been posting some fun Instagram and Facebook Stories lately)
You can get my free Layer Blending modes ebook along with dozens of exclusive Photoshop Goodies here


How to use the new features in Photoshop 21.2, June Photoshop 2020 release. See all the new features and the...
How to use displacement Maps in Photoshop to wrap graphics and text around any surface and follow every wrinkle realistically

How to put a photo onto a new background in Photoshop. Simple steps, best and fastest result in this easy...


