
Add colored highlights in Photoshop with color curves
How to use Color Curves in Photoshop to add colored highlights
How to control color with Curves in Photoshop, easier and more powerful than you imagine
When you change curves into color mode, they don’t change the tones, but rather the color. There are 6 primary colors in Photoshop and this is the best way to access them. One of the most powerful ways to control color in photoshop is with curves, you will learn how to unlock these powerful color controls in Photoshop.
Lets start with a little bit of theory, trust me this is WELL worth the read, as this will open up a new world of color to you in Photoshop, The color theory is only 2 steps then we will jump into using this to create some stunning colored highlights that can be used for reflections, rim lights, cast lights and more.
Using Photoshop Curves in Color Mode
Press Ctl/Cmd+M for curves (we will use adjustment layers in a second)

You are probably used to using curves to adjust brightness. Pull down to darken, up to brighten. (How to use Photoshop curves here)

We are going to do something totally different. We are going to use curves to adjust color.
When you are in color mode, the curves change the color NOT the brightness. (You can see a little tonal shift if you are aggressive with color curves, especially on multiple channels).
Where it says RGB, choose a color channel. Now you are in color mode

There are 3 primary colors in Photoshop in RGB mode. Red Green and Blue. (Additive primaries)
The opposite of the RGB primary colors are the subtractive primaries (CMYK) Cyan, Magenta and Yellow. (B is black, but its not a color, but a tone). Subtractive are used for print, to an offset printing press, CMYK mode. (I have written extensively about this in my books and in my premium corses, we won’t go deeper here).
What you need to know if if you push the red curve up above the baseline, you are adding red. If you pull it below the baseline, it doesn’t darken the image, it adds the opposite of red> Cyan. (See my full courses on Curves and also on layers to understand more of this.) So the colors are as follows:
Red Channel: +Red – Cyan
Green Channel: +Green -Magenta
Blue Channel: +Blue -Yellow

Here you can see how the colors interact with each other, The colored circles are in screen mode.
Additive RGB are light. All colored added equal white.
Subtractive CMYK are pigments. All colors subtracted equals white. (Let me know in comments if you want me to go more in depth in another tutorial, please ONLY if you REALLY want me to to, as in you will read it lol). Ok, on to the practical steps..

Using Color Curves to add colored highlights to a picture
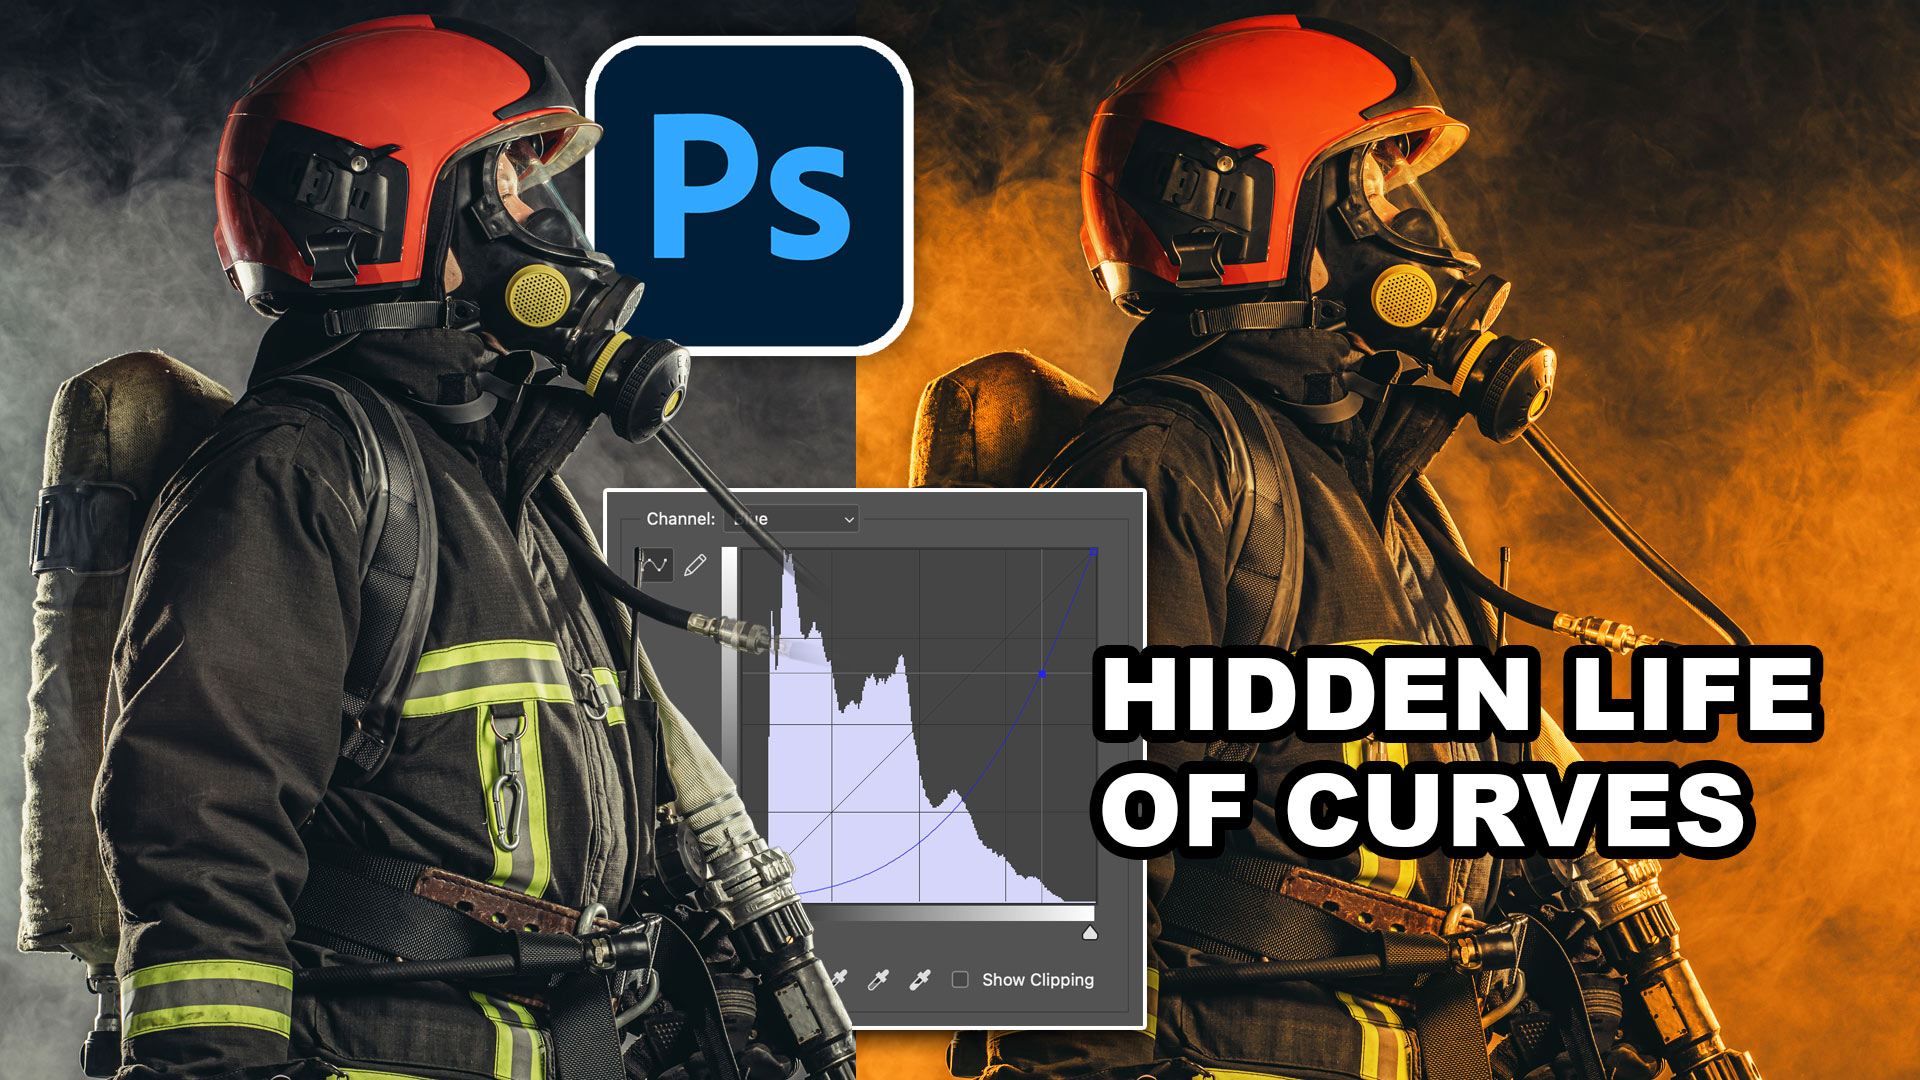
Let add some drama to this image, but in a realistic way. We want to set the background on fire by changing it to a bright orange, and only hit the highlight areas of the fire fighter with the color.
Add a curves adjustment layer in the Layers panel.
Choose new adjustment layer and choose curves.
Change to the Red color channel in curves.

Drag the pointer up the right side of the red curves (Highlight region)

We have red, but we want orange. Red and yellow make orange. How do we add yellow?
We just learned that the opposite of Blue is yellow. So choose the Blue channel
Drag down to add yellow. This yellow added to the Red makes orange.

To change the hue of the orange, go back to the red channel.
Make adjustments and you can really set the orange ablaze.

To color is good, but in the real world, the backlight color wouldn’t be on the centerline of the object, let’s remove it.
Click on the layer mask in the curves adjustment layer,
Choose a black brush

As you paint with the black brush, notice the color is removed from that part of the image.

Targeting the highlights only.
Let’s remove the color from the shadows and only hit mid-tones and highlights.
Choose the adjustment layer again, rather than the mask. (you can see all this on the video above)
Click on FX and choose Blending Options.

See the Blend if?
Drag the black slider on “this layer” to the right.
Notice the color is gone from the shadows, but the edges are rough.

Hold alt/Option and drag on the left side of the arrow. This splits the triangle and makes for a smoother transition.

Adjust the black slider to suit your taste.

And here you have it, just one of the many things you can do with curves.

If you are ready to really step up your Photoshop game, you need to understand how to use curves, they are one of the most powerful tools in Photoshop.
If you enjoyed this tutorial, maybe you would like to dive deeper into the amazing world of curves. With curves you can:
- Adjust specific regions of images
- Change any color, to any other color PRECICELY
- Add high end color grading with ease
- Super Dodge and Burn
- So much more.
Colin’s course on Mastering curves in Photoshop is one of our most popular and for good reason, it opens up a level of control you can’t get any other way in Photoshop. It may seem daunting, but Colin makes it so easy. You will never edit images the same again after this. Color and tone confidence, will be yours!
Check out Mastering Curves in Photoshop

I hope you enjoyed this weeks tutorial.
See you next week
Colin
PS Don’t forget to follow us on Social Media for more tips.. (I've been posting some fun Instagram and Facebook Stories lately)
You can get my free Layer Blending modes ebook along with dozens of exclusive Photoshop Goodies here

30 thoughts on “Add colored highlights in Photoshop with color curves”
Leave a Reply
How to remove People in Camera RAW, ai people removal in ACR

How to use 3D in Photoshop. The ultimate guide, to all the 3D features in PS CC. learn Photoshop 3D...

How to make the “out of bounds” or 3D pop-out effect in Photoshop. 4 easy steps (download included)


When I first started using Photoshop, using curves intimidated me. That changed when I watched a video tutorial by Ben Willmore specifically dealing with curves. It was an excellent course by an excellent teacher. But as great as it was, it was very in depth and (if I remember correctly) at least an hour long. And I don’t think it went into the color modes (and if it did I had enough on my plate at the time just dealing with luminosity).
So anyway, just now you taught me something completely new. And in just a few minutes you made using the color modes look easy. Quick but thorough, it was an excellent lesson. I hope you continue to include theory in your weekly videos.
[I look forward every week to your tutorials. I should comment more often because they all deserve praise. But because of time constraints and my laziness, I rarely leave comments. FYI ]
This was very helpful. I really like a little more in depth as you did here. Helped me to learn much more about the Curves tool.
Very helpful video, and yes, please continue with details, don’t rush through. It’s very much appreciated.
Dear Colin, I have been following your lessons from Belgium for years. No instructor gives such clear explanations, speed and clarity are very important for a non-native speaker. For that I would like to thank you very much,
Edmund
I like the in-depth approach. This video explained the color curves succinctly, yet understandably. Great job!
As always, great tutorial!
I, too, learned something. I’m at the point where I am intimidated by Curves and am not really sure when to use it. So the in-depth discussion on using the color modes and how it works was helpful. In general, I’m willing to spend a little extra time to understand how these tools work.
Excellent short tutorial on color using curves. The theory lesson opened my eyes to the use of color. I look forward to everyone of your tutorials.
I came across your name and WONDERFUL tutorials when I was working with members of my photo club. Sadly, none of us were that experienced with Photoshop. I had attempted several times but quit out of frustration. Your videos are exactly what I needed; and that is what our members were looking for. You don’t ramble thru the instructions. We call you our “GURU”; Thank you for everything you do!
This was excellent. I’ve never seen such a good explanation of color in curves. Thanks you!! I thought your pace was right on!!
Excellent simple explanation of a really useful feature
Loved it!!! Thank you so much. I really like the expanded explanation because if really helps me to understand the principals behind the steps, which I means I will retain more of the information,. I have learned so much from.
Many thanks again.
Merry Christmas
Excellent tutorial. A good explanation of color in curves. Enjoyed the longer Tutorial .
Great tutorial, Colin!! I Love the trick, never occurred to me this kind of simplistic way to achieve such effect.
THANK YOU!! 🙂
More in depth. Very helpful to get some of the theory. Without the theory, curves would be extremely difficult to use
Colin, Great Tutorial!! I really like that you went into the color theory on Curves first. It made a lot of sense to me after that. Also, I keep forgetting to use Blend if … !! I was just working on a project where I needed to do that, but completely forgot. :-(. Thanks for your Tutorials.
Colin, thanks for the excellent tutorial! I didn’t know it could be so simple to transform an image with color!
Excellent tutorial – thanks!
Yes, please go into depth on these tutorials.
The deeper the better from my perspective.
For even more control try using two curves adjustment layers. One for adding reds and another for adding yellows. Then use blending modes with split controls, plus layer masks, to increase deep reds in the shadow areas and bright yellows in the highlights. Makes it really pop!
Excellent tutorial! Question-will this work on a selection or is it global. Can you isolate the sky and just use this curves method on that? Thanks for your weekly tuts, they are very helpful.
Thank you for such an excellent tutorial…concise and easy to understand. The in depth discussion helps a lot.
You have opened up a new approach to working for me with color in Photoshop.
Very useful, thank you.
That’s great!!!!! Very, very helpful, thanks.
Wow, I loved it! More in depth is fantastic. Thank you Colin, I love your tutorials.
Really appreciate the expert and concise explanations you give. that along with the pictorials of the tutorial. Great undoing of the mysteries of curves and a new tool to make my photos look the way I imagined them. Love your tutorials!
Excellent! New and useful information for me. Most definitely keep some background explanation in your presentation. Otherwise, it becomes something I have to memorize and not really understand.
CMYK YES PLEASE!
Well done Colin, I found that mist interesting but for some reason, I couldn’t see the ‘like’ button to hit.
Outstanding. For me, I like the in depth explanations, like using curves colour channels to access the colour wheel. Then applying that only to where you want. Short, direct, and golden info. Impressed, thanks Colin.
This review of color adjustments in Curves is excellent and I would always prefer detail. Thansks