Transparent Glass Text Photoshop Tutorial
How to make Transparent glass text in Photoshop
Shiny, see through, glassy, transparent text definitely has its place. If you are designing a poster, product packaging, social media card or just for fun, glass text is sure to impress. I’m going to show you exactly how to create it in Photoshop CC and it also works on Photoshop 6, 7, CS etc. I have the easy written guide that I wrote a number of years ago, (like 10 or so). I have updated the simple steps to be current and have recorded a brand new video. The written steps will get you up and running, while the video goes more in depth and shows you a number of additional options and variations.
Creating Glass text in Photoshop, an easy step by step guide
In this Photoshop tutorial, we are going to create a transparent glassy effect that allows the background to show thorough.
Step 1
Start with a background. 72dpi and RGB mode.
Step 2
Add some text, here I used galant (www.1001freefonts.com)
Step 3
Add a layer style by clicking the little “f” at the bottom of the layers pallette.
Add a dropshadow and a bevel, copy the settings shown here.
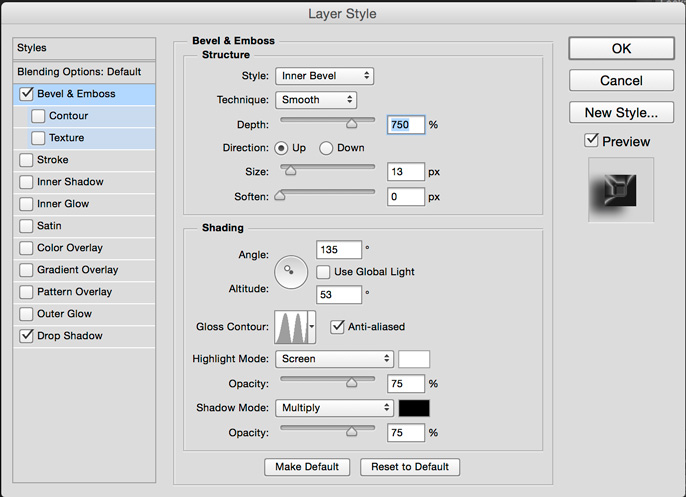
Note 2 things here that really make the glass “pop”
1. Change the contour, this gives the reflected look.
2. uncheck the global light and change the altitude to 53.
A listing of the Layer Style Contours in Photoshop
The layer Style Contour options are in many places in the Layer Styles panel in Photoshop. Here I am going to show you what they are all named and what they look like. Go to the end of this tutorial where I will show you how to create your own custom contours!
This is the sample text we will be using, so you can see the effect of only changing the contour, everything else is the same.

To let you see what each of the contours look like, I have created this chart.
Photoshop Layer Style Contour Chart

Ok, back to the tutorial.
Step 4
Here is the result, pretty uninspiring huh?

Step 5
This step is where the magic happens!
In the styles palette, click on the Custom blending options. (you can also do this from the layers panel)
Now pull the fill opacity all the way to 0 and the rabbit comes out of the hat!

Step 6
Here is our glass type.
How to make your own Contour in Adobe Photoshop | Custom Layer Style Contour
As cool as all these presets are, you can really step it up a notch by creating your own custom contour so match the effect you want exactly.
You can find the contours in several places in Photoshop. This is the Layer Styles dialog box.

To edit a contour, click on its thumbnail.
The contour editor will open. To change the settings, drag the points on the curve and imagine the curve is the cross section shape you are making, because it is. The corner box will make a hard edge, if you uncheck the box, it will be a rounded edge.

Your contour will be called custom
Click on new to add it to your list in the editor.

When you are happy with your curve, you can save it, by clicking save

Here I have named it glass and thats it!


Loading Custom Contours into Photoshop
When you are in the Contour Editor, you can choose the presets from a list under preset, choose custom when you are making your own
To load in custom ones you have created or downloaded, choose Load

Navigate to the contour

And its added to your list

I hope you enjoyed this tutorial and the extra lesson on creating custom contours. If you haven’t watched the companion video at the top, please do because it has a lot of stuff not covered here, the 2 supplement each other. (One of the awesome things about PhotoshopCAFE, we are one of the only Photoshop free tutorial sits that give you BOTH written instruction AND video for most of our tutorials, double the learning).
Thanks for checking this out, don’t forget to check out our other tutorials here at PhotoshopCAFE, there is a LOT of good stuff in our pages 🙂
Don’t forget to comment, bookmark this page, share it and sign up for ou weekly mailing list where I’ll give you new tutorials!
Colin Smith (PhotoshopCAFE Founder
PS Don’t forget to follow us on Social Media for more tips.. (I've been posting some fun Instagram and Facebook Stories lately)
You can get my free Layer Blending modes ebook along with dozens of exclusive Photoshop Goodies here

9 thoughts on “Transparent Glass Text Photoshop Tutorial”
Leave a Reply
Testing the auto remove power lines in Photoshop. Testing with difficult images
Complete guide to using Reference Image in Photoshop to generate images. Colin Smith shows how to use a reference image...
How to remove People in Camera RAW, ai people removal in ACR









I just completely updated this tutorial and added a whole section on creating Custom Layer Style contours as well as a new video. I hope you like it!
Hi Colin,
It is warm in Western Australia, but only 30 degrees forecast today.
I enjoy all your tutorials and learn something new each time.
You should try to visit WA as the photographic opportunities are great along with the weather.
I love that you always show hidden customization opportunities wherever available, and what they can do! Thanks for this, it’s amazingly helpful!
Love your tutorials. You cover a lot of technique, but in a straightforward, understandable way. It is 51 degrees F in the Puget Sound area. Having lived in India and in Minnesota, I know there are much worse things than rain.
Colin, you are amazing. As a rank amateur hobbyist and dabbler in Photoshop and Lightroom,my interest is high but my productivity lacking. However, I have been a subscriber to the Cafe for many years and always wonder what drives a talented guy like yourself to give so much to the photography community . I have enjoyed each and every tutorial and save as many as I can – or scribble notes to refer to later on in my projects. So many thanks for your excellent teaching. You make tough stuff look so easy.
PS I live in Ottawa Canada and it is COLD (4C)
Norm
Hi Norman,
I started PhotoshopCAFE back in the year 2000, as a way to give back to the creative community and I’ve been doing that every since 🙂
THANKS FOR YOUR AWESOME TUTORIAL 🙂 I appreciate you making it …