
Stylish background blur in Photograph in Photoshop, field blur tricks
Adding a creative blur to the background of a photo in Photoshop – the proper way
Blurring the background of a photo is a great trick to reduce the clutter in a photo and also simulate a lens with a large aperture opening. This adds a shallow depth of field and blurs the background. This is also commonly called bokeh. I have previously created simple tutorials on how to blur the background of a photo in Photoshop as well as how to add bokeh blur to a photo. We won’t repeat those here, rather we will look a a creative background blur using 2 different kinds of blurs, but a single tool. Let’s get started.
BTW, Ctrl/Cmd means Ctrl on Windows, Cmd on Mac. Alt/Option is Alt on Windows or Option on mac.
Some people may ask (people always ask), why not just take the photo with the right lens in the first place?
Non-exhaustive list of reasons, Why you need to blur the background in Photoshop (Can you tell I deal with trolls on youtube much?)
- Don’t have an expensive lens.
- Used gopro, point and shoot camera, 360 camera etc.
- I’m a designer, this is the photo I was given (99% of the time for designers).
- I needed to close the aperture down, because it was too bright and I didn’t have an ND filter (even the expensive lens doesn’t help here).
- Add your own reason, if you like.
Creating a realistic background blur in Photoshop
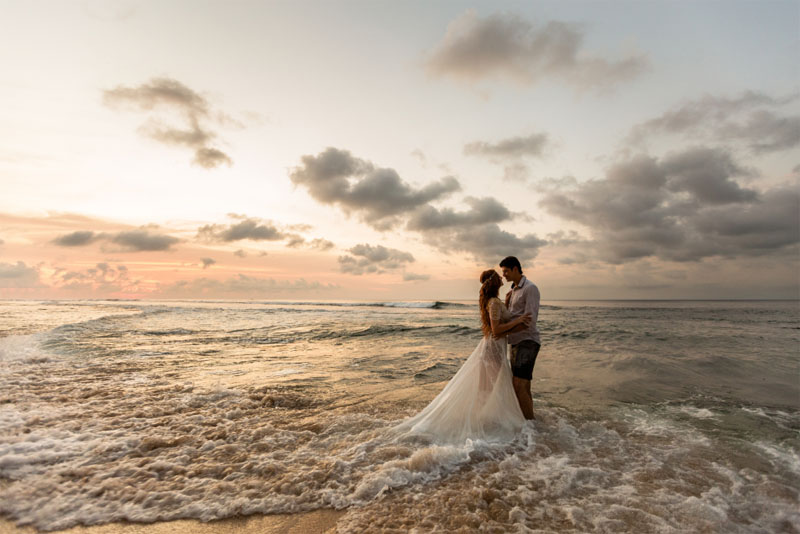
I began with this photo from Adobe Stock
Step .1
Press Ctrl/Cmd+J to duplicate the background

2. Choose the Object Selection or Quick selection tool

3. If you are on Photoshop 2019 or newer, click the Select Subject button at the top of the menu bar.
If you are on Photoshop CS6-2018 make a selection with the Quick Selection tool.
![]()
You should see marching ants around the couple.

4. Use the object selection tool to clean up the selection. Hold the alt/option key to get the minus selection, for removing areas from the selection.

Once your selection is ready, its time to move on. Note, the selection doesn’t have to be remotely good near the ground, as this area won’t be blurred.
5, Press the Layer Mask button in the layers panel to put the selection into a mask.

Now, we are going to prep the image, so we don’t get halos around the blur, as that looks bad.
Here is an example of what we want to avoid.
If you have done this in the past, it’s ok. Now you know and will have a better way to do it moving forward. (YAY PhotoshopCAFE for real techniques that work in the real world)

6, Choose the Background layer
If the selection isn’t still active, hold Ctrl/Cmd and click the layer mask to load its selection.
Click the eye to the left of the top layer to hide the cutout for now.

7. Choose Select>Modify>Expand
A small amount like 3 is enough. We just want to make the selection a little larger than the edges of the people.
Click ok

8. Press Shift+Delete on Mac / Shift+Backspace on Windows
This opens the fill dialog box
Choose Content Aware in the Contents drop down
Press OK

The selected area is a filled, it doesn’t have to be anywhere near perfect, as long as the edges look good. This will prevent the edges expanding and adding that halo when we blur the background.
(If you don’t see the result, hide the top layer)
9. Press Cmd/Ctrl+D to turn off selection.

10, Make the top layer visible again, so you see the people. Make sure you are still working on the bottom layer.
Choose Filter>Blur Gallery>Tilt Shift

11. Move the pin down to the area that you want to keep sharp and in focus, where the feet are.
Set the top and bottom lines by dragging on them. All this is explained in the video.
Now we have a blur going up and another going down. Spin the ring in the middle to increase or decrease the blur amount.
Don’t press ok yet.

12. Now, let’s add an additional blur to the left.
Still in the blur gallery, check the box for Field Blur. Yes, you can have more than one blur happening at once in this tool.
Click on the words; Field Blur, this activates the controls for field blur.

13. You will see a pin, adjust this to change the amount of overall blur.

We want to blend the blur into a nice sharp photo.
Click on the photo, to add a second pin. Hold Ctrl/Cmd+Double–click on the pin to set the blur to zero.
Everything to the right of the pin will be sharp, everything between the 2 pins will gradually become blurry
Click ok to apply.

Just as a finishing touch, I wanted to fix the tones in the image. (you can see how on the video)
Select all the layers. Right-Click and choose Convert to Smart Object. This enables us to apply and adjustment to everything at once.
Filter>Camera Raw
These are the adjustments I made in ACR. (How to use Adobe Camera Raw)

And, ka-boom Here is the final image. Nice effect huh?

I hope you enjoyed this weeks tutorial.
See you at the CAFE
Colin
PS, If you really want to up your skills, check out my courses here.
PS Don’t forget to follow us on Social Media for more tips.. (I've been posting some fun Instagram and Facebook Stories lately)
You can get my free Layer Blending modes ebook along with dozens of exclusive Photoshop Goodies here


12 thoughts on “Stylish background blur in Photograph in Photoshop, field blur tricks”
Leave a Reply
How to use the new Neural Filters in Photoshop 2021. Change the age or expression on a face and more.

What's new in Photoshop CC 2015.5, new features revealed in these free tutorial videos and review.
Tutorial on how to turn a video into a panoramic photograph in Photoshop and Lightroom. works with any camera, shot...


As usual, great video and presentation. I have always had trouble mastering the blur filters. This will help. I would like to learn more about all the others.
Fantastic! I love the way you explain by Video and also in writing. So easy to follow and to come back to the written part when practicing. You are doing a superb job and Thank you very much for sharing your Passion with us ♫♥♥♥
Really enjoying this video on blurring! I have learned so much from your videos! Thank you for making them available.
As always a great tutorial and presentation, you are so easy to follow. Thank You for making all your tutorials available. Appreciate all you share.
Thanks for your great and valuable tutorials and for being so generous with yourself
What a knockout exercise. Gave me new impetus
Love it, love it, love it. Thanks for the tutorial
Nicely done, Colin! It’s nice to know you can use more than one Blur from the Blur Gallery. Now I just need to practice these more.
Thanks,
Dennis
This tutorial is exemplary and should be given 5 stars.
Thank you Colin. Very helpful workflow. Thank you for the clear tutorial.
A method I will certainly use! Thanks for an excellent tutorial.
Love it. Thanks For this tutorial.