
New HDR Features in Photoshop 2023
New HDR Features in Camera Raw in Photoshop
Adobe has added some unreleased new features in Photoshop. These new features enable you to output a true HDR image for viewing on HDR enabled screens like monitors, iPads, phones and laptops including Apple XDR screens.. At this time, Chrome browser supports the HDR image format jpg XL (jxl). (skip to Enabling the new features section if you want to skip my HDR explanation and HDR vs fake HDR rant)
Just for clarity, I’m talking about true HDR, not the HDR effect. (I’ve been talking about this distinction for YEARS). A common example these days are HDR TVs. There is color and details in areas that used to only appear white on SDR (Standard Dynamic Range) screens. Keep an eye on this space, because HDR is the future and it’s coming at you fast.
I’m super excited and I have a ton of content and tutorials I have created on actual HDR. I say “actual” because there has been a lot of noise (confusion) about HDR over the past few years where it has been relegated to a look or an effect used in Photography to give a grungy or otherwise overprocessed look.
Quickly, HDR stands for High Dynamic Range. Which means more than the usual dynamic range you see in an 8 or even 16 bit file. HDR means details in the shadows and in the highlights. Without getting too technical, The dynamic range is how many stops of light can be capture and displayed. That’s why camera are measured in stops of light for Dynamic range. For example 8 stops of dynamic range is bad, 15 stop is amazing. The more stops of light, the more details that can be displayed in the highlight and the shadow regions at the same time.
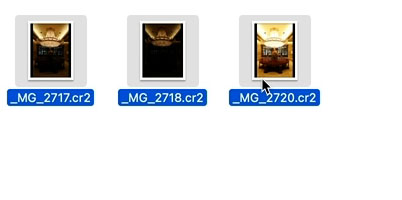
In order to capture HDR images, you need to bracket the photos (or use a true HDR camera). The image below shows the center image is the correct exposure for the scene. Notice the windows show white and the shadows are black. This is because the sensor on the camera can’t capture all the light in the scene because it lacks the dynamic range. To fix that, you bracket, The left photo is underexposed to see the detail outside the door. The right image is over exposed to show the details in the dark areas. You can use AEB (Auto Exposure Bracketing, the camera automatically take more than one photo, some are darker and others are brighter) on your camera to capture this. The most common way I bracket is to add +2 and minus 2 and shoot 3 images. (not always, but I want to keep this simple). Here is a more in depth lesson on the basics of HDR
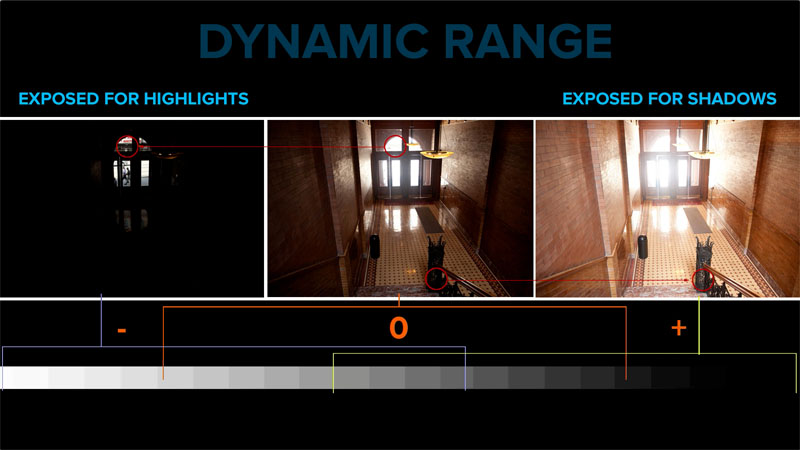
The final processed image. This contains the highlight and shadow detail from the 3 bracketed shots above. This is a tone-mapped jpg to compress all the details into a SDR image. It’s technically not a true HDR, it’s a jpg print, from and HDR. Most images people have seen and called HDR, are just prints like this one. more about that in this tutorial

Up until very recently, you couldn’t share an actual real HDR image for viewing. Now with HDR displays becoming more common, we are seeing the beginning on HDR images on the web. These new features in Photoshop are enabling you to do this for the first time.
See the uploaded HDR image on Facebook, view in Chrome with HDR display
Enabling the new HDR features in Camera RAW, Photoshop and your System
In order to use these new HDR features, you need to enable them. They are currently in Camera RAW and hidden under Technology Preview. (They are coming to Lightroom, but not there at the time of this writing)
Enabling in your system preferences
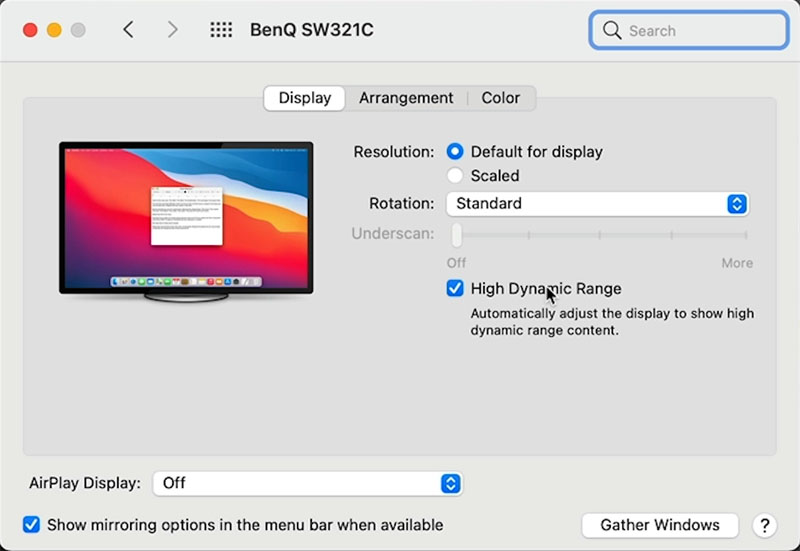
First enable HDR in your system preferences. Mac System Preferences>Display turn on High Dynamic Range. If your screen isn’t HDR supported, it will look too bright and a bit weird.
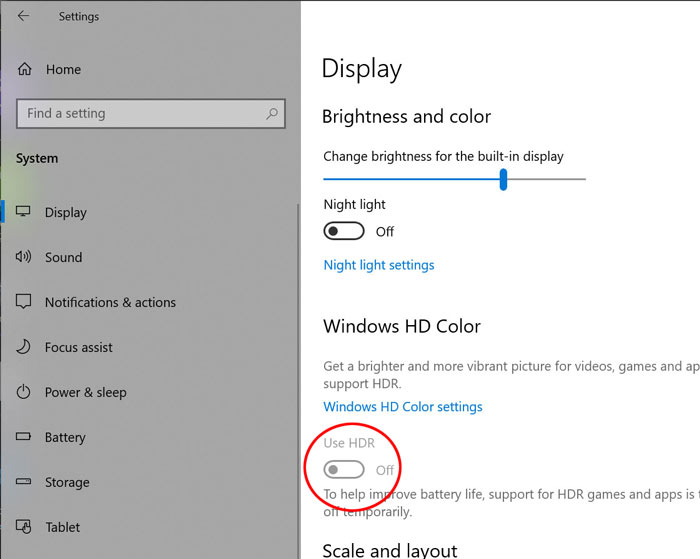
On Windows, Right-Click on your desktop and choose Display. If you don’t have an HDR capable screen attached, it might be grayed out.
Enabling in Photoshop
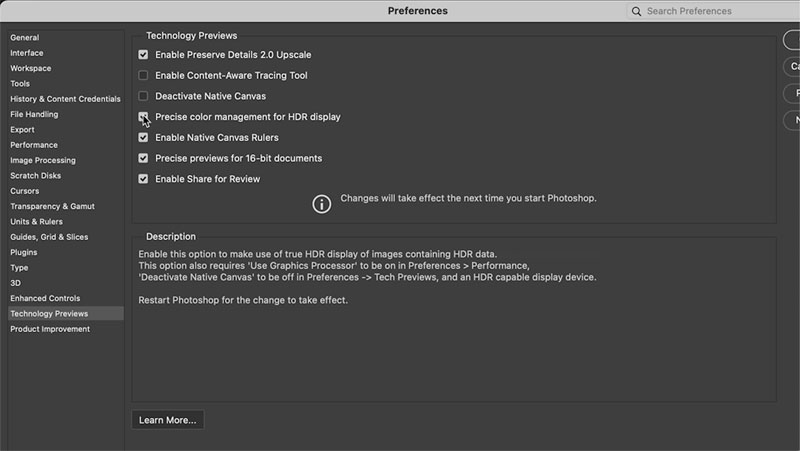
In Photoshop Preferences, choose Tecnology Preview> Precise Color Management from HDR display. (In the future you won’t need to turn this on here.
In Camera Raw preferences (click the gear in the top right in Camera Raw). Choose Technology Previews and turn on HDR Output.

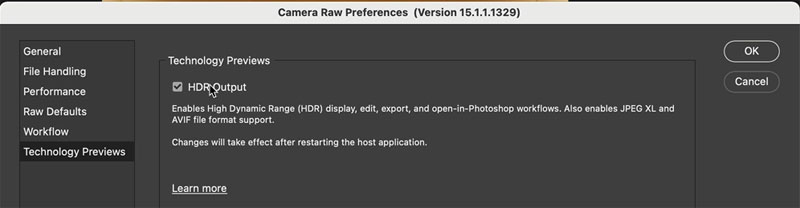
You will need to restart Photoshop for this to work.
Making an HDR image
Lets quickly make an HDR to image to use (and so you get a full walk through on this tut. Search this website (photoshopCAFE) for many more HDR tutorials. it very possibly has the best collection of Photoshop HDR tutorials anywhere. I was one of the first to teach on the topic.
In Photoshop, choose file>Open Choose your bracketed images in a raw format and click ok.
If you don’t have the bracketed images in a Raw format, open them in Adobe Bridge. Right-Clik and choose Open in Camera Raw.
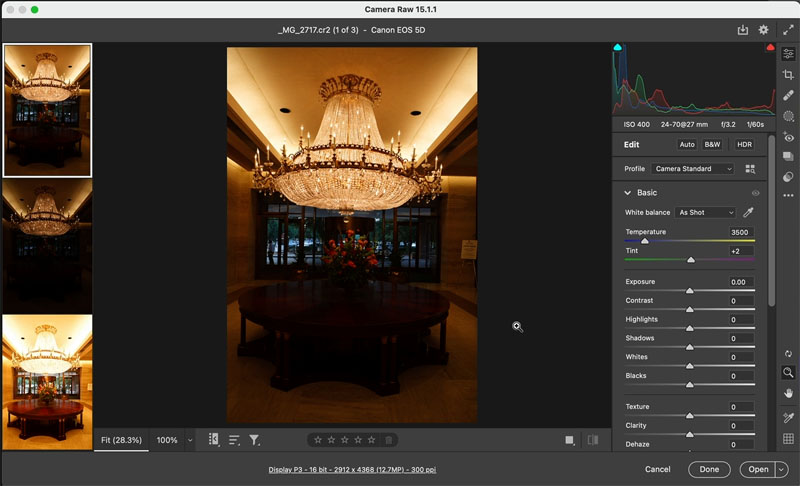
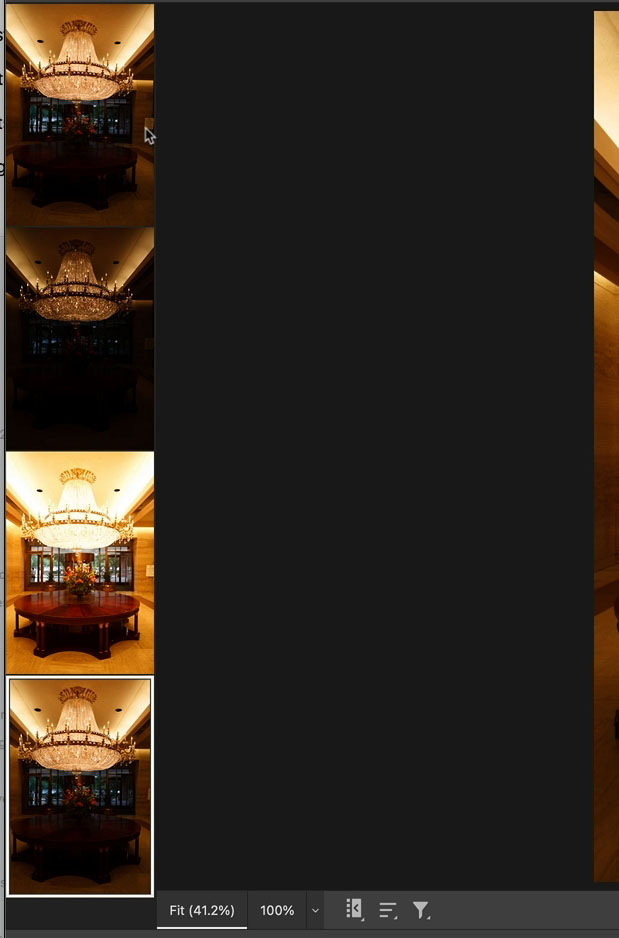
You will see the bracketed images in Camera Raw.
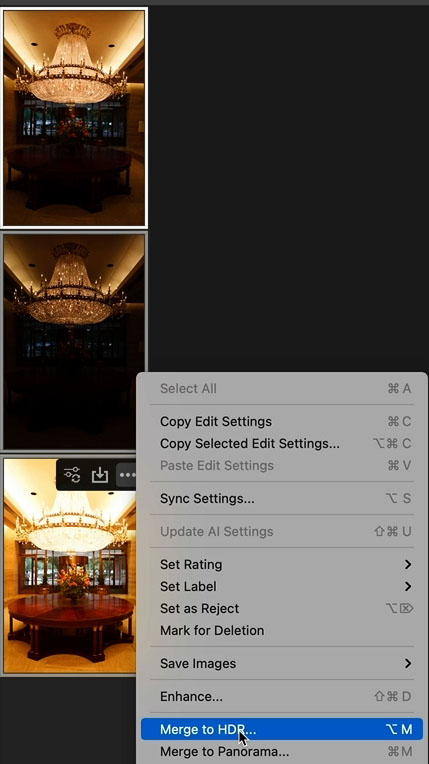
Select all the images and click the 3 ellipses.
Choose Merge to HDR
You will see a single merged image. Skip the settings for this tutorial. Choose Merge
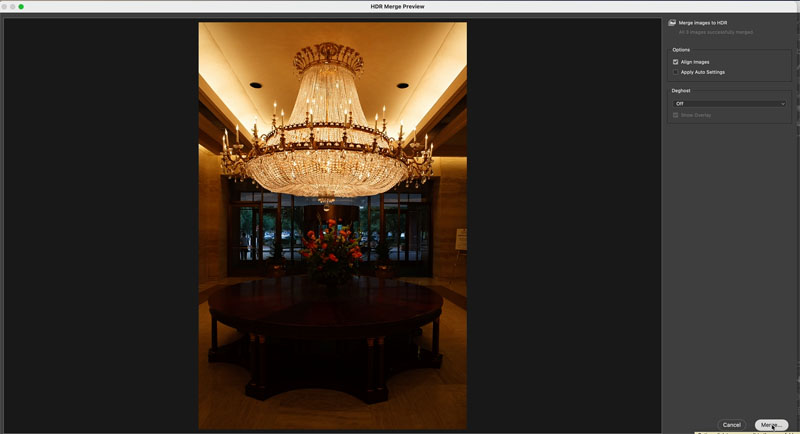
An additional DNG will be created next to you other images.
This contains all the information from the 3 images merged together into a new photo with a wider dynamic range than any of the single images can contain.
Note, the incorrect “hack” of using the same image processed 3 different ways, cannot increase the dynamic range (I have always warned people against this fake hack). If you do this, stop. Moving the shadow and highlight sliders to the extreme in Lightroom or Camera Raw will do the same thing and produce a cleaner result. The brightest and darkest pixels with detail are still the same in any single image, you need to bracket and capture more dynamic range to make a true HDR image.
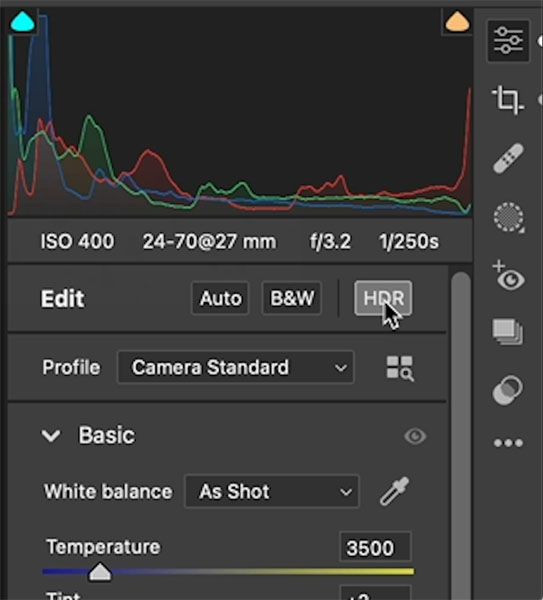
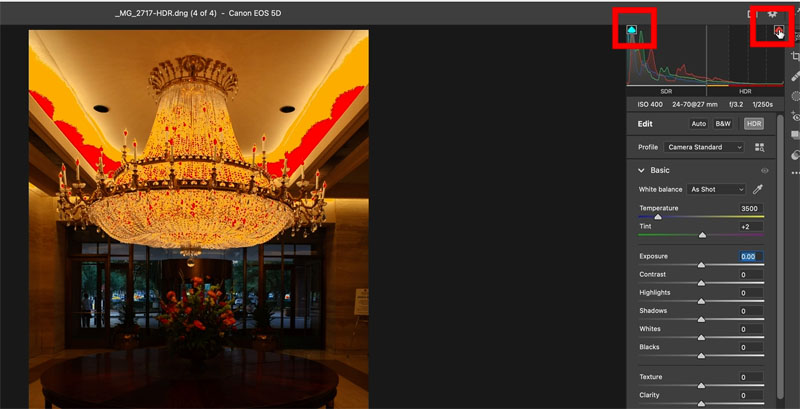
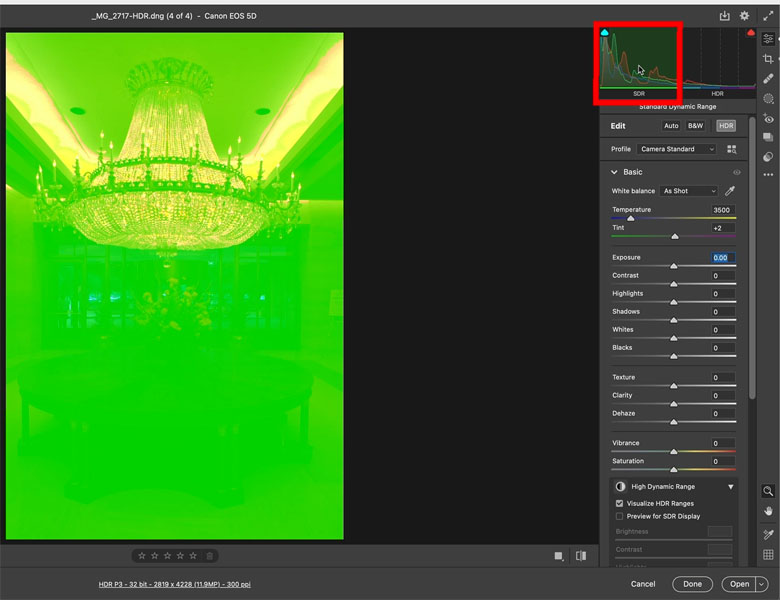
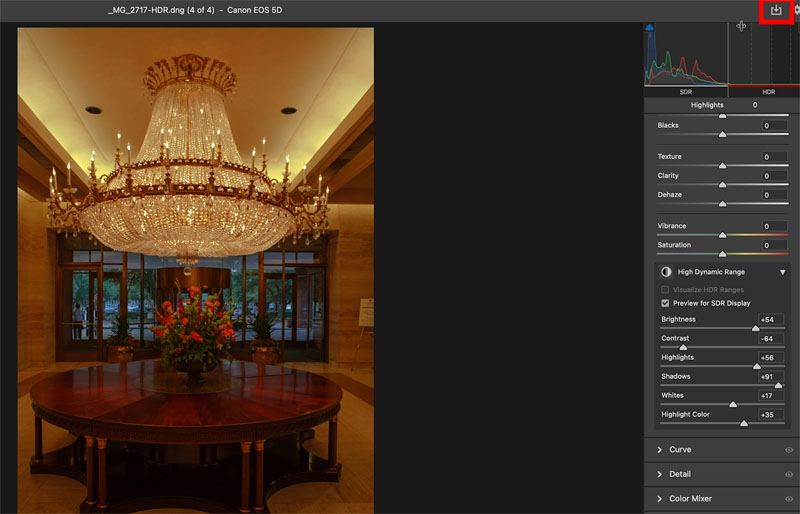
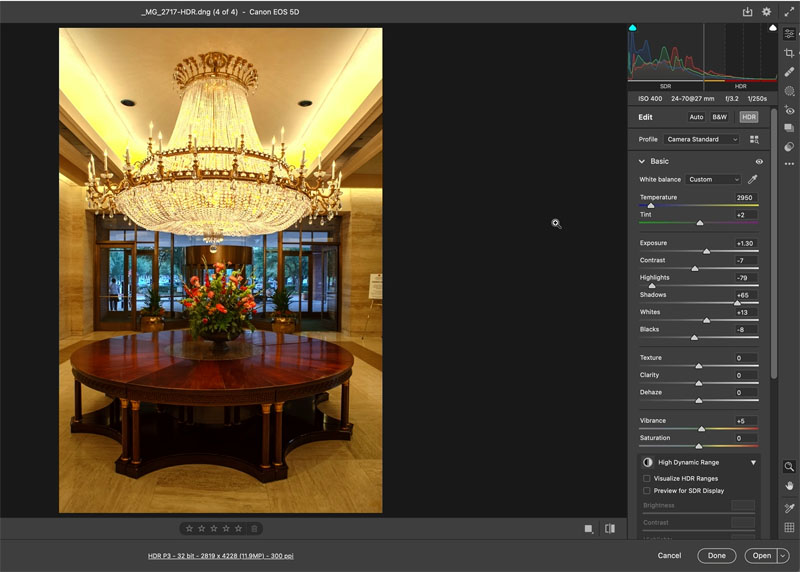
Just below the histogram on the right, you will see a new button. HDR. If you don’t see this, make sure you set up the preferences as I have outlined above.
Click the HDR button
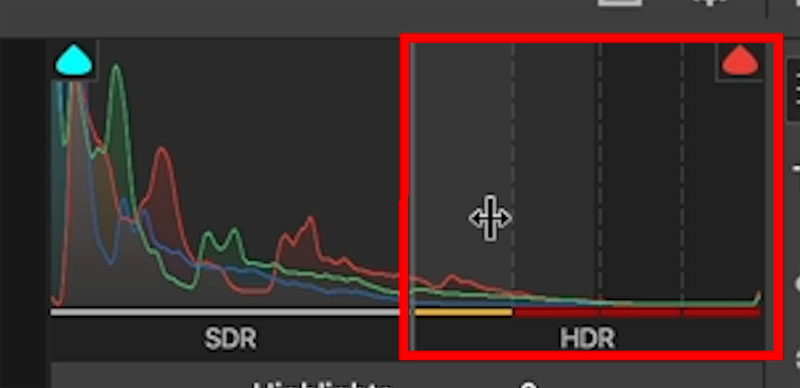
The histogram will now change.
On the left under SDR is the histogram on an SDR display. This is what everyone who doesn’t have an HDR display will see.
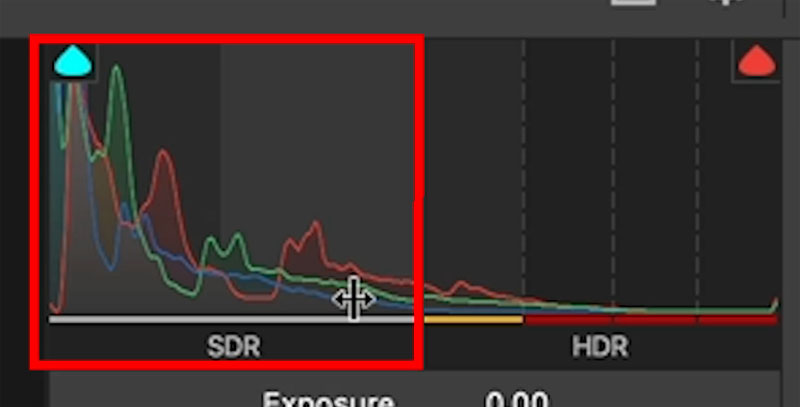
On the right, you will see HDR. See there are pixels that can’t be seen on a regular display.
Because I am using an HDR display (BenQ SW321C) it supports extended dynamic range. The area above the orange bar is visible on my display. The area in red has detail, but outside of what my screen can show.
If you are viewing on an SDR display you won’t see the orange bar, it will show as red.
Preview the pixels that are in the HDR range.
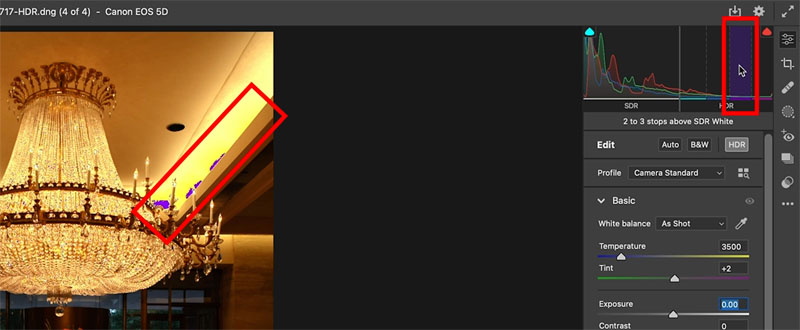
Each of the segments to the right of the SDR histogram represent a single stop of light.
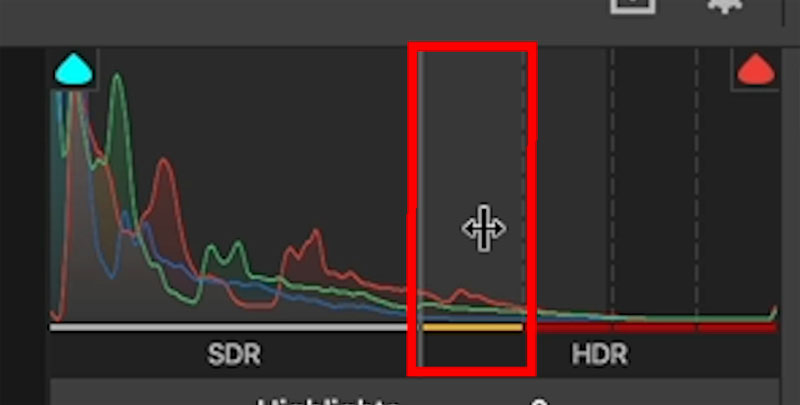
If you turn on clipping in the histogram, you can see the areas of detail (in orange) that will only display on an HDR screen.
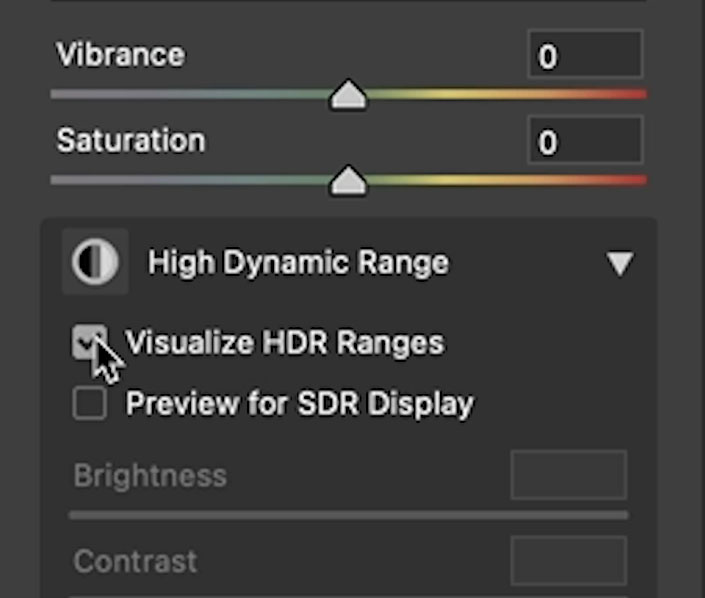
If you want to see the areas of HDR detail, turn on Visualize HDR Ranges from the bottom of the basic panel. (or right-click in the histogram and turn it on).
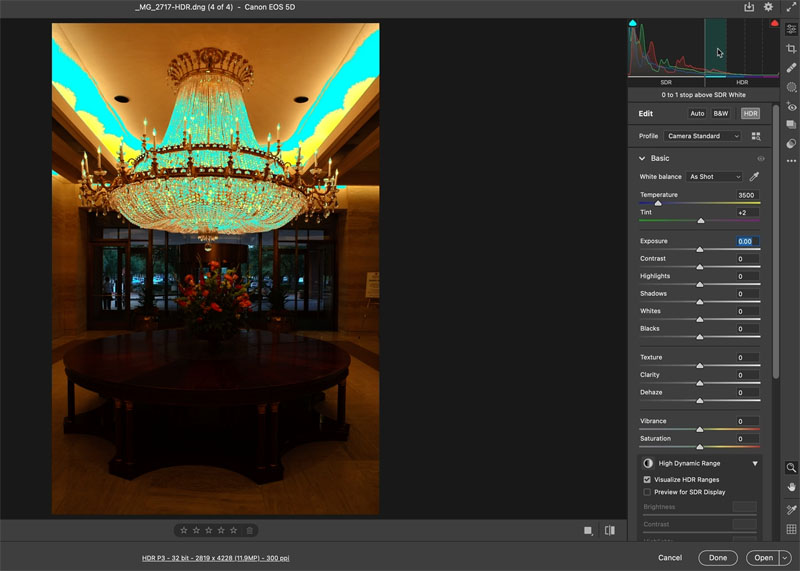
As you roll over the different parts of the histogram, you will be able to see the pixels in those ranges.
All the image except the highlights are visible in SDR
Highlight details are shown as I roll over the +1. I can see the detail on my HDR monitor, but it won’t show on SDR monitors.
Even brighter details are present (this is +3), but I can’t see them because they are outside the range of my display.
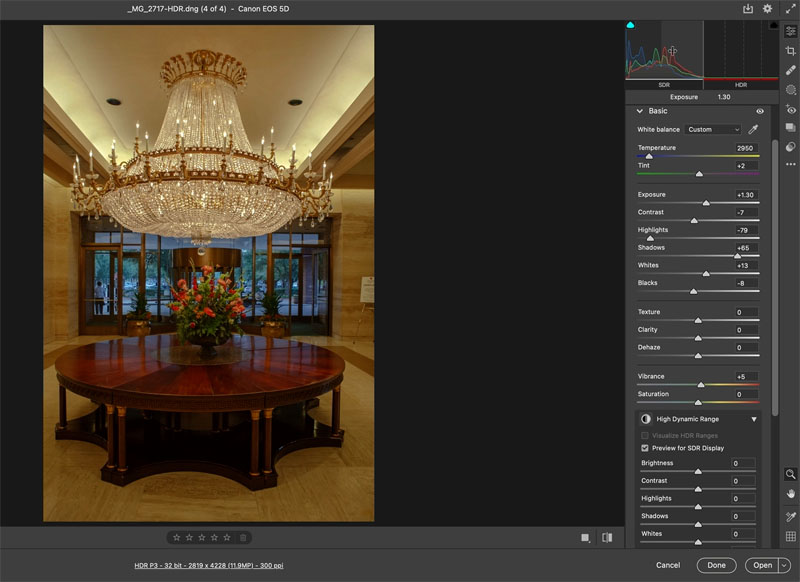
If you turn on the Preview from SDR Display, you can visualize what the image will look like on an SDR display. All the details are compressed into the SDR space.
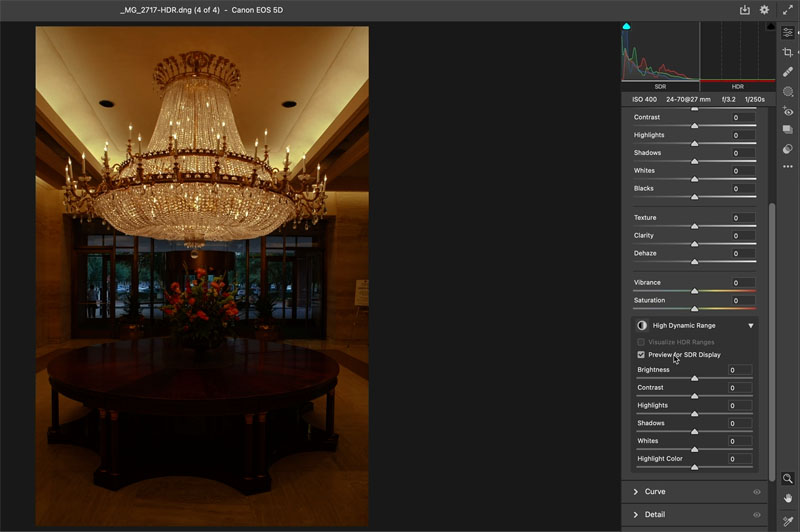
You can make adjustments for SDR in the new HDR box.
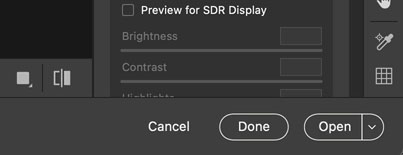
If you want to output this result you can. Choose the export button
(If you don’t see this button, it’s because you opened the image from Photoshop using Filter>Camera Raw. Quit Camera Raw and go to Bridge. Right-Click and open in Camera Raw. Now you will see the options.
You will see save options
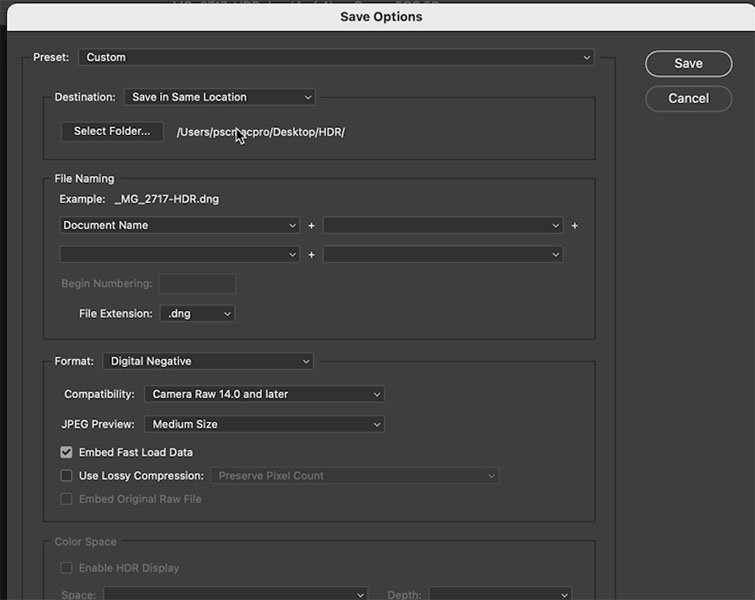
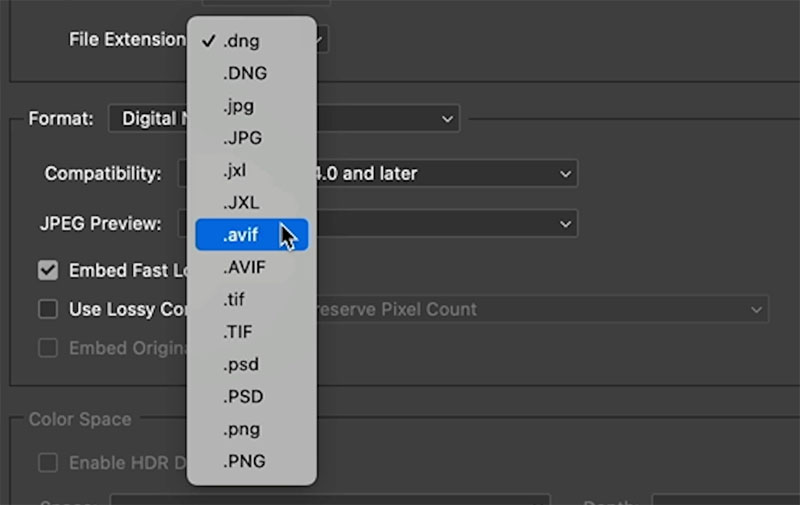
Choose format. you’ll see 2 new formats. .jxl and .avif these support HDR.
Right now, .jxl is supported by the Chrome Browser and sometimes in Facebook (but you must be in chrome). WordPress doesn’t yet support .jxl
You could save the image as a jpg of course if you aren’t looking for HDR output.
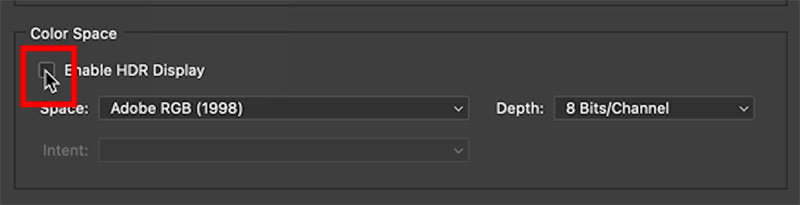
If you don’t turn on Enable HDR Display from the Save Options, the settings that you used from Preview for SDR display will be retained.
Back in Camera Raw, another option is to make the adjustments in the regular Basic Panel, but keeping SDR preview on will let you see what the image will look like for people using non HDR screens.
If I turn off the SDR preview, notice more color in the highlights. This will only be seen on an HDR display.
Let’s output as an actual HDR image.
Saving HDR images as a jxl (Jpg XL)
Choose the export button
Select .jxl from the dropdown.
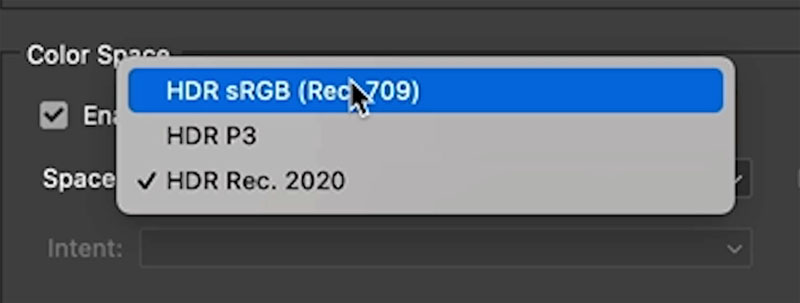
This time, Turn on HDR under the Color Space. You will see 3 options for color
HDR sRGB is the lowest color gamut (supports the least colors)
HDR P3 is the format used by Apple and others and will work on XDR displays
HDR Rec 2020 has the widest color gamut and is also the video space used for HDR video.
You can upload those files and people with HDR displays will see the extra colors and details in the highlights.
You can also open these HDR images into Photoshop.
Choose open
Once In Photoshop, you will see that that these are 32 bit images,
You can use all the 32 bit tools in Photoshop and even do compositing. These images will remain in HDR because they are in a 32 bit space.
You can save as an Open EXR if you want to use the HDR images in 3D and video applications. (For lighting, environment and reflection maps etc)
If you take them back into Camera Raw they will remain in HDR too. Watch the video above for more options and ways to tone map and more.

I hope you found this useful
Great to have you here at the CAFE
Colin
PS Don’t forget to follow us on Social Media for more tips.. (I've been posting some fun Instagram and Facebook Stories lately)
You can get my free Layer Blending modes ebook along with dozens of exclusive Photoshop Goodies here


7 thoughts on “New HDR Features in Photoshop 2023”
Leave a Reply
5 of the most useful Photoshop Tips you will know! Here is a roundup of some very useful tips that...
Learn how to make a VR 360 Panorama on Facebook. This tutorial shows you how to prepare your image to...

Complete guide to using Reference Image in Photoshop to generate images. Colin Smith shows how to use a reference image...


Thank you so much for this tutorial. Just on time!!! I just faced this problem when I was editing my .psd picture in Photoshop, using the Camera RAW filter – after Photoshop’s new …23 -update. It ended up as all over a disaster, I almost lost my picture.
Great tutorial on the new HDR features in Photoshop. Keep these amazing tutorials coming.
Great information on the NEW features of HDR thanks so much
Hi,
what Monitor do you prefer for this new feature.
Colin, I am using version 24.1 of Photoshop but when I go into preferences to enable HDR, the option to do so is not there. What am I doing wrong?
This is beta, you need to download it. Your GPU may not be capable either.
Great !!!! So easy to understand…and the notes are great!!!