
Massive Lightroom Classic 13.3 update, May 2024. Generative remove, Sony tether and more
New Lightroom Classic Features
This tutorial in an overview of the newest Lightroom Classic features released this morning by Adobe. This tutorial shows you how to use the main new features in classic. Remember these are also in ACR, with the exception of Sony Tethered shooting. I’ll make more tutorials in the future and go more in depth on the relevant features.
Generative Remove (All Lightroom versions /Adobe Camera RAW)
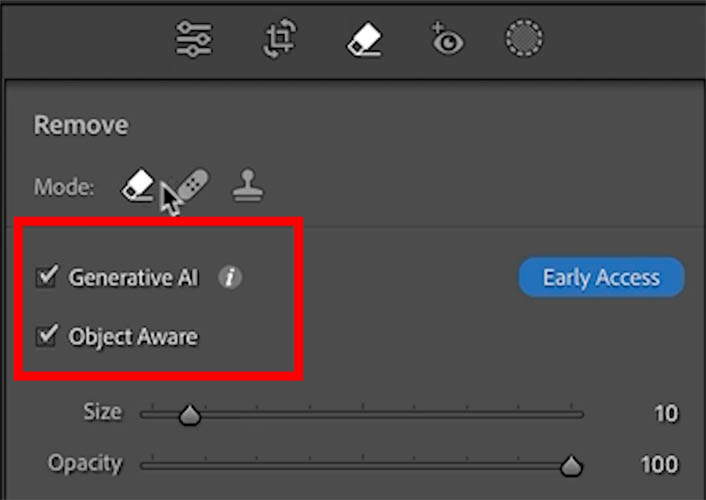
If you go to the remove panel and choose the eraser option, you’ll see a box that says generative ai. The remove tool with use Generative fill when you have this option on. With it off, you can still use the tool in the old way. In the old way, it works well for smaller areas and doesn’t need cloud access.
Let’s test out Generative AI remove.
Paint over an area to remove. I’m removing the light stand.

The red shows the selected area. We have Object aware on, so it also detects the object we want to select, so your selections can be rough.

Once you paint, you will get the refinement, where you can add or remove brush strokes. (Hold Ctrl/Cmd key while applying to skip this option).

I added a little bit to the bottom left of the light stand.
Click the apply button in the remove panel to apply the Generative ai

As you can see, it did a superb job.
Click on Variations to cycle through 3 variations, just like Gen fill in Photoshop.

Just to test how well this works, let’s select our model. No, in real-life, we wouldn’t generally be removing the model, but this is a test, just to see if it can.
Click apply

Look at that. Pretty amazing!

Tethered Capture with Sony Cameras

I feel like hell froze over. Yes, we now have Sony cameras joining Canon and Nikon! Very unexpected (Sony are very tight on their APIs). And yet, very cool. See the Adobe sire for the supported cameras, just the newest ones right now.
| A1 | |
| A9 II | |
| A7S III | |
| A7R IV | |
| A7R V | |
| A7 IV | |
| A7C | |
| A6700 |
I am using a Sony Alpha 1 (A1) to test this feature.
How to set up Sony Alpha cameras for Lightroom Tethered shooting
There are some settings you need to change on the camera for this to work.
Network>Smartphone Connect>Smartphone Connection>OFF
Network>Transfer/Remote>PC Remote Function>Connect Method>USB
Network>Transfer/Remote>PC Remote Function>PC Remote>ON


Once the camera is setup, plug in the USB-C cable from the camera to your computer.
Choose File>Tethered Capture>Start Tethered Capture

Start the tethered shoot
Choose the Session name and the location where the images will be saved.
Click ok

When your camera is detected, you’ll see a tether bar where you can change the settings and remote shoot by clicking the shutter button. You can, of course change the settings and shoot directly from the camera too.

If you click Live, a window will open where you get a live view from the camera.

From what I experienced, the shooting speed was faster than I expected, and very snappy transfer of the 50mp images, with very little lag. I did notice a but more lag when using the onscreen shutter button vs the physical shutter button on the camera. Another nice surprise, if I turned the camera off, I was able to reconnect without restarting the tether session. something I was not able to do with a Canon camera while tethered to Lightroom. I hope these newly updated settings in tethered shooting make it to Canon and Nikon too.
Updated Lens Blur
I’m not going to go too in-depth with Lens blur here because I already have a detailed tutorial on it here.
We will touch on its functionality and then focus on the new features. Lens Blur is no longer an Early Access, it’s a finished feature now.
When you click on apply, Lightroom detects the subject and builds a depth map. It uses this to blur the background, or the foreground if you prefer. If there is already a depth map (smartphone shot in portrait mode), Lightroom will use this.

Turn on Visualize depth to see the depth map.
Darker colors are further away from the viewer, whereas lighter colors are closer.
The focal range now has Near and Far labels on the slider, as well as numbers. The bar on the left was added by me as a way to show the depth map..

Use the sliders (shown on the video, and the linked tutorial) to refine your depth map and adjust your bokeh and blur.

Syncing Lens Blur
The Lens blur can now be included in presets. These are called adaptive presets, because they will automatically adapt for the image and choose a unique subject for each and apply the preset settings.
When you copy the settings (Copy settings or Sync) you will see Lens Blur is now included.

Let’s choose a different photo of the cab in NYC.

Let’s paste the settings

Notice how the background is now blurred
The area in the window is missed.

You can easily modify the Lens blur settings after a preset has been used, or you copy or sync settings.
Simply go to lens blur, choose the blur refinement brush and paint in the wood to include it.

Alright!
Other features include a “Exported” label. This works in the attributes filter, in Smart Collections and collection that allow you to filter images by those that have been previously exported. There is also an alt tag and description filed added to the meta data.
Let me know in the Comments, which features you would like to see me go deeper into.
I hope this was useful!
Colin

Recommended for this tutorial
Learn Masks in Lightroom and Camera RAW
Make precise local adjustments in Lightroom and Camera Raw with every type of mask.
$59.99 · one-time purchase · instant download

Free for you
The Photoshop Vault
Get my free Layer Blending Modes ebook along with dozens of exclusive Photoshop goodies: actions, brushes, presets and cheat sheets.
You're on the list, so your free goodies are waiting for you in the Vault.
Get Free Photoshop Goodies Open the Vault

New Features Lightroom Classic 2025. LRC 14
New Features in Lightroom Classic 2025 aka Lightroom Classic 14 Read tutorial
Adobe Camera App Project Indigo, tutorial and review
Adobe's new camera app, Project Indigo in depth. How it works and simple user guide tutorial on using it. Read tutorial
5 big new features in Photoshop 2026 August update
5 New Photoshop 2026 Features You Need to Know Adobe has added a number of new features to Photoshop 2026, and some... Read tutorial
How to Use the Light Adjustment in Photoshop: In-Depth Guide
Colin Smith shows how to use Photoshop’s Light adjustment layer to recover highlights and shadows, control tone, use masks and stack adjustments. Read tutorial
Big ambitious NEW features in Photoshop 2025 July 29 update
How to use the NEW features in Photoshop 2025 July 29 update, free written tutorial and short video tutorial by Colin Read tutorial











One thing I’ve notice both in LR and OS with Background/depth blur is that it’s leaving a dark fringe around the subject in the foreground that’s in focus. How can I stop this from happening?
you can adjust the mask with the paint tool
The lens blur part of this was fascinating and really constructive, thank you