
How to make very realistic shadows in Photoshop
Making cast shadows in photoshop
This photoshop tutorial will show you how to make very realistic shadows in Photoshop.
You will learn how to make the shadow, how to position the angle and length. A realistic shadow fades and softens as it gets further away from the point of contact. I will show you how to do all of this very easily in Photoshop. You will be very happy you watched this tutorial next time you create a composite in photoshop
Note, this is my original method of creating Shadows that I have used for a long time. I say that because a lot of people plagiarize on the web and don’t give proper credit. Notice, I’m not monetizing, I actually want to help.
(BTW My newsletter is unique in that I do the same thing, I share completely free tutorials and don’t try to constantly sell things, join from the form on the right and also get the goodies in the vault).
Part 1 making the Shadow
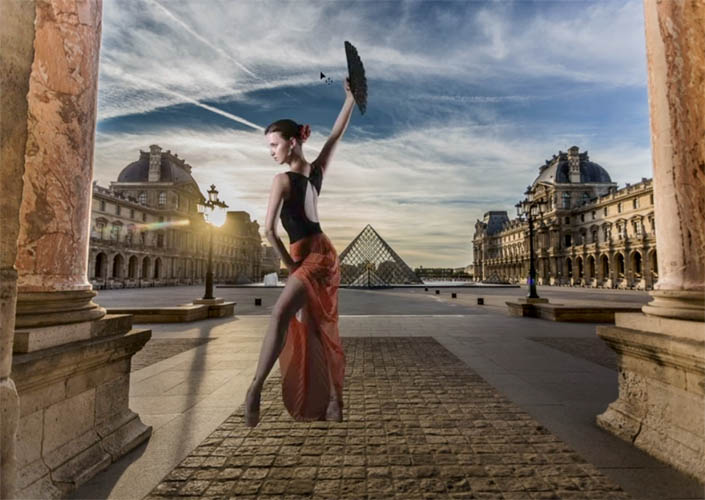
Lets start with a photo of the Louve, Paris.
Notice there is a cut out person on a layer at the top, that’s currently hidden. I have other tutorials on how to cut out a person and how to combine images.
We will make the shadow in 3 steps.

I have turned the top layer on.
Now we have a person on a layer above the background. It needs a shadow to look realistic and believable.
Choose the layer with the person from the layers panel. Click fx to open the layer styles, choose drop shadow.

We are going to use the shadow in a different way than you might be used to. (We want a cast shadow, not merely a drop shadow).
Copy these settings;
Black Shadow, Opacity =0, Distance, Spread and Size all to 0.
Click ok

You will see a Drop Shadow added to the layer.

You won’t see much of a difference on the image, maybe a small black outline.

We want to convert the Effect into a layer.
Right Click on the drop Shadow in the Layers panel
Choose Create Layers

Now the FX will be converted to a pixel layer of a black silhouette
Part 2: Positioning the Shadow
Choose the Layer

Press Ctrl/Cmd+T for free transform (Ctrl = Windows /Cmd = Mac)

Right-Click and choose Flip Vertical

Now the shows is flipped upside down, just how we want it.

With the move tool (V) drag the shadow down until its touching the lowest point on the person

Take notice of the direction of the shadow coming off the light source. (The sun setting behind the building and lamppost).
Rotate the shadow to match

Right-Click and choose skew
Skew the shadow so the bottom of the person is touching the shadow
also stretch it to make it longer
I dragged the bottom a bit more to the left to match the existing shadow angles

Part 3: Soften the shadow
Look at the existing Shadow. Notice its softer, But not in proportion.
As the shadow gets further away from the subject it gets softer. Notice it also becomes more transparent. We will match that now.

Choose Filter>Blur Gallery>Field Blur

You will now get the Blur Gallery workspace.
Click to add a pin and adjust the amount of blur by dragging the wheel on the pin

Click closer to our person and add a second pin.

Make this one less blurry. This is how we blend the blur

Click ok and we now have a blended blur. Notice is sharper as we get closer to the person.

We will fade the transparency in a moment, but first, lets touch up the shadow, because its not touching the dress even though the dress is touching the ground. This step is optional.
Press Ctrl/Cmd+T for free transform.
Right-Click and choose Warp

Drag on the top of the shadow and warp it into shape if you need to.

Fading transparency on the shadow
Choose the shadow layer and add a Layer Mask by clicking the Layer Mask icon at the bottom of the Layers Panel.

Choose the Gradient Tool

Set it to black to white and Linerar

Drag the gradient along the height of the shadow
Adjust the gradient so the shadow fades away towards the bottom

If you need to, adjust the opacity in the lyaers panel and there you have it, our shadow is done.

Thanks for checking it out, I hope you found this Photoshop tutorial useful.
Colin
PS Don’t forget to follow us on Social Media for more tips..
(I've been posting some fun Instagram and Facebook Stories lately)
You can get my free Layer Blending modes ebook along with dozens of exclusive Photoshop Goodies here


18 thoughts on “How to make very realistic shadows in Photoshop”
Leave a Reply
How to make your colors really pop in photoshop. Makes skies instantly bluer and more. This 1 minute tip shows...
New Adaptive Profiles in ACR Adobe Camera Raw make photos better

How to install LUTs in Photoshop, how to use LUTS to color grade your Photos in Photoshop. Download Free Photoshop...


Thanks for sharing your knowledge with us. I learned a whole lot of useful information from this video.
Love it! Have not used all the options in Free Transform. Much appreciate the introduction.
Great !!!!
Clear and simple to follow
Congratulations
I never noticed the density option on the mask, very helpful.
Great tutorial as usual and very helpful.
Brilliant…Thank you
I learned something new Colin – thank you!
Thank you for the great tips! This is definitely a help!
Wonderful tutorial. You make it so easy, relatively speaking. Very well explained, step by step. THANKS !!
Super, Thanks
Love the 2 point blur tip for the shadow.
Are the written steps ready yet?
Not yet
Just checking, are the written steps ready yet? I do not use this skill all that often and the written notes of your lessons are a great refresher.
For some reason, I thought I had made them, but I don’t see them. Hmmm
Accessed your written steps elsewhere. They`re superb.
My question has to do with starting point where you have the subject cut out against a transparent background. This I can do, but it seems impossible to save as such. In saving it, the background goes from transparent to white. Have I missed a tutorial where you cover this? Thanks so much for your postings.
you have to save as a PSD or Tiff for it to keep the layers
Sorry for the delay, the written steps to this Photoshop Shadow tutorial are now live