
How to edit amazing looking photos in Lightroom Classic
How to edit amazing looking photos in Lightroom Classic
Hi Cafe Crew!
In this tutorial, I’m going to show you the steps I take to edit a photo in Lightroom Classic.
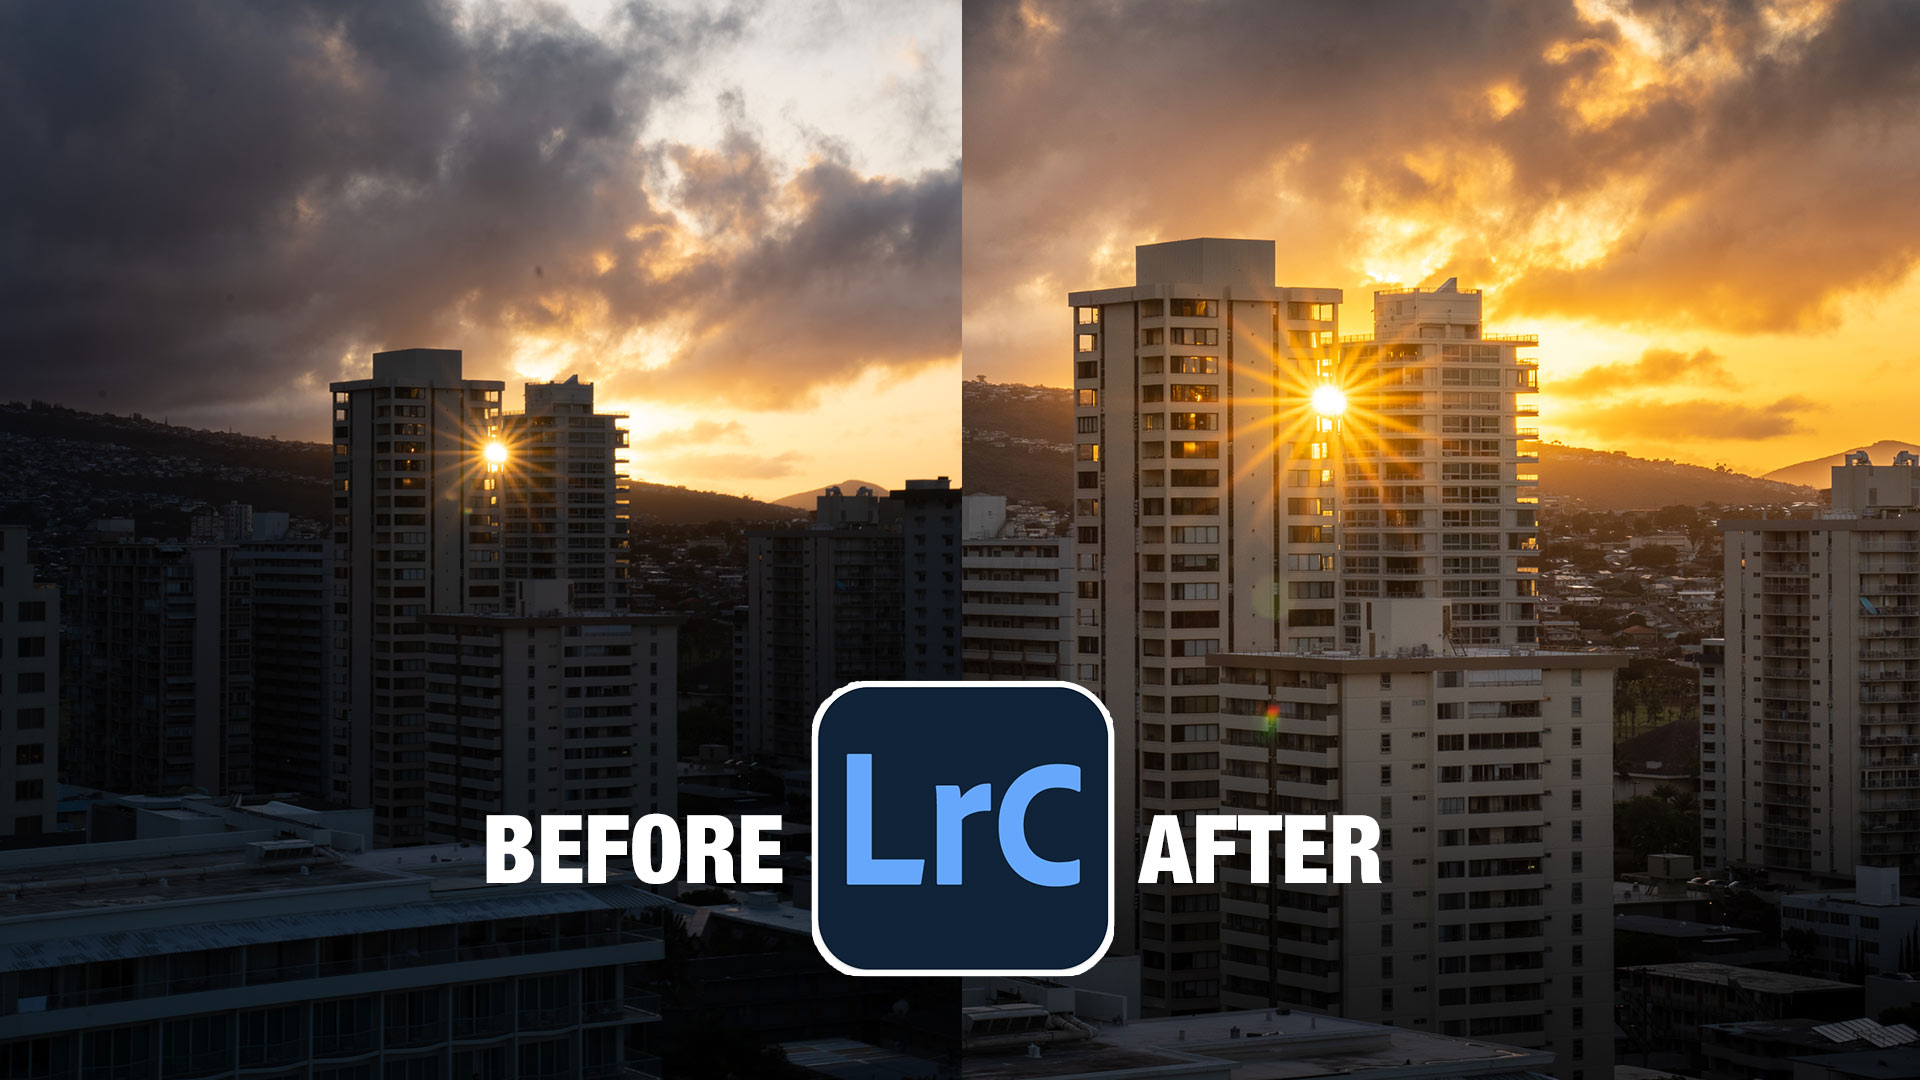
Before and after image


I was lucky to catch this amazing sunrise recently. Here you see the before and after images, Let me show you how to get there.
This is done on Lightroom Classic, most of the settings are the same in Lightroom and in Photoshop’s Camera Raw.

Open the Develop module.

Adjust the highlights and shadows to recover highlight and shadow information. Be careful not to go too far with the shadows, or it doesn’t look real.
Adjust the exposure to get a nice exposure.
Slightly move the Temp to the right to warm the photo up (make it more yellow).
See how the details look better now.

Next we need to crop this photo.
Choose the crop tool

Choose 4×5 for instagram (It’s changing to 9×16 soon).

Drag over the area of the image we want to focus on.
We will crop out a lot of the distractions including the top of the building underneath. This makes the composition tighter.
Tip: keep pressing the O key to change the crop overlay
Rotate the crop to straighten the image (explained in the video)
Press enter to apply.

Let’s add a gradient to the bottom of the image to reduce distractions more.
Choose the mask tool

Grab Linear Gradient

Start at the bottom and drag up about 1/3 way

Reduce the exposure to darken the bottom and slightly cool the temp by moving to the left.

Let’s add a gradient to the sky
Click on Create New Mask (in the masking panel) choose Linear Gradient again.
This time drag down from the top.

Add a little Dehaze. Dehaze makes clouds look awesome. Reduce the blacks a little because dehaze makes shadows too black.
Slightly cool the Temp by dragging to the left a touch. See the nice drama?

Make the sun rays pop
Create another new mask and choose Radial Gradient

Drag the gradient over the sun rays.

Slightly increase the Exposure and Temp. All of these moves should be subtle.

Try a smidge of Clarity and sharpening to finish it off.

And we are done. Check out the video at the top to see this process.
Thanks for checking it out!
Follow me on Instagram to see more of my photos
Colin
PS Don’t forget to follow us on Social Media for more tips.. (I've been posting some fun Instagram and Facebook Stories lately)
You can get my free Layer Blending modes ebook along with dozens of exclusive Photoshop Goodies here

10 thoughts on “How to edit amazing looking photos in Lightroom Classic”
Leave a Reply

Generative upscale in Photoshop and how it compares to Photoshops other ai resizing tools.

How to edit and retouch a photo in Lightroom. The ultimate freeLightroom photo editing tutorial, full workflow, adjustments, lens correction,...

This Photoshop tutorial shows you all the steps to make a watermark from a signature. How to make the signature...


Nicely done, Colin! Did not know about using the “O” key to cycle through the crop overlays. Good tip! Could you also have used the transform tools to level and resolve any perspective issues on the building? (Sometimes it works, sometimes it doesn’t, depending on the image).
As always, great tips. I never would have thought of using a filter over the sun. Nice job 👍🏻!
Great Colin, thank you. I just took a sunrise this am and then your email pops up. I got a much better image following your instructions thank you. Always forget the radial filter so the smallest things make a big difference, wish I could share the final.
Great tuition it sometimes is good to go to basics and rediscover forgotten elements. Thank you
Thanks for another great tutorial, I really appreciate the written instructions!
Fantastic tips. I have printed them to assist me to copy your configuration.
Love this demonstration! Your application of the radius filter mask for the sun prompts a question regarding the use of the “invert” function for LR’s masks.
Prior to the introduction of masks (which are terrific, by the way), I was able to set invert either on or off, and it would remember that selection from one radial filter application to the next. So, if I wanted to apply a vignette with the radial gradient, I could invert BEFORE applying the gradient, and affect the area OUTSIDE of the selection. And it would remain that way until I changed it.
Now, with the new(-ish) masking tools, each new mask default to invert OFF. So, if I want to do a vignette, I have to drag out the radius and then add another step to invert it (apostrophe key or tick the invert checkbox). But that’s an extra step.
Do you know of a way to keep the invert function from defaulting to OFF — i.e., to have it remember what it was set to the last time it was used?
Sorry…long winded, but I hope that makes sense.
Thanks!
I haven’t tested to see if there is a sticky option. It’s usual for Adobe to introduce a feature and then work on the small things later in updates.
Hey Colin Smith,
You just shared an amazing information with us. There are enough resource in your article to get in detailed idea to edit amazing looking photos in Lightroom classic. But i want to add some knowledge with your article which will add value to your traffic and user.
Assuming you would like a step-by-step guide on how to edit amazing looking photos in Lightroom Classic:
1. Find a good photo to start with. It will make the editing process much easier and the end result will be better.
2. Take your time. Experiment with the different settings and don’t be afraid to try something new.
3. Pay attention to the details. Small adjustments can make a big difference.
4.When in doubt, less is more. It’s easy to go overboard with the editing and end up with a photo that looks artificial.
5. Import the photo you want to edit into Lightroom Classic.
6. In the Develop module, start by adjusting the white balance to achieve the desired look.
7. Next, add contrast by playing with the blacks and whites.
8. To add drama to the photo, increase the clarity and vibrance.
9. To really make the colors pop, increase the saturation.
10. To finish, add a vignette effect.
11. Export the photo as a JPEG.
Great tutorial. Your teaching is very deliberate and easy to follow. And you provide great practical tips.