
SpeedGrade CS6 New Features
Colin Smith – Adobe Systems (The “Other” Colin Smith from Canada)
In 2011 Adobe Systems Inc. acquired a German company called “IRIDAS”, that had developed some very innovative technology and a fantastic color grading application called, “SpeedGrade”. We, at Adobe, were looking to round out Adobe Production Premium as a full end to end solution and SpeedGrade was a perfect fit. High-end colorists around the world were already using SpeedGrade and it made great use of GPU acceleration; which was already a key element to our production tools like Premiere Pro. SpeedGrade gets its name from the fact that it’s fast! With just a single GPU and an off the shelf PC, SpeedGrade is comparable in speed to other solutions using 4 GPUs and multiple workstations. SpeedGrade also works with many native RAW formats including RED R3D, Phantom RAW, ARRIRAW and SI-2K RAW and that means it’s easy to take advantage to all the deep color information in theses formats.
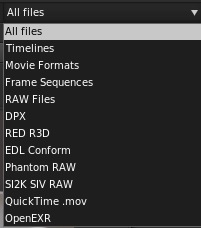
The first thing you’ll see when you launch SpeedGrade is the Desktop, which is the main interface for loading your assets including image sequences, EDLs, QuickTime movies, OpenEXR files etc.
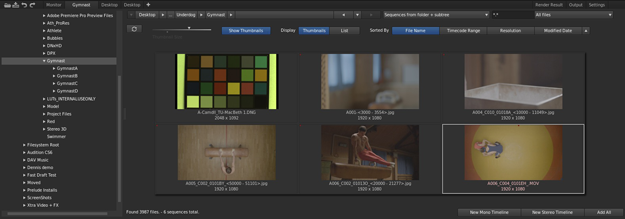
When working with hundreds of thousands of image sequences, the Desktop gives you easy ways to filter out what you don’t need and load just what you want.
It can also delve into child folders (Sequences + subtree) so you can just point to a parent folder and see all the individual image sequences nested within. You can also load audio files and stills shot for calibration like a MacBeth chart and put them on a new timeline or load an EDL and conform all the reels with one click! The large, scalable thumbnails make your assets easy to spot and each one includes a small scrubbable timeline at the top so you can zip through to find what you need. You can close and open the Desktop anytime by pressing the D-key.
Once you load your assets, you’re ready to work in the Timeline. The Timeline is where the action occurs; it’s where you can add grading layers, pan & scan layers and more. Most times you’ll be loading a linear timeline of clips from your NLE and Premiere Pro CS6 now has the ability to send a timeline of 10-bit DPX files directly to SpeedGrade. Once you close the Desktop you’ll be able to see the Monitor, which displays your clips from the Timeline.
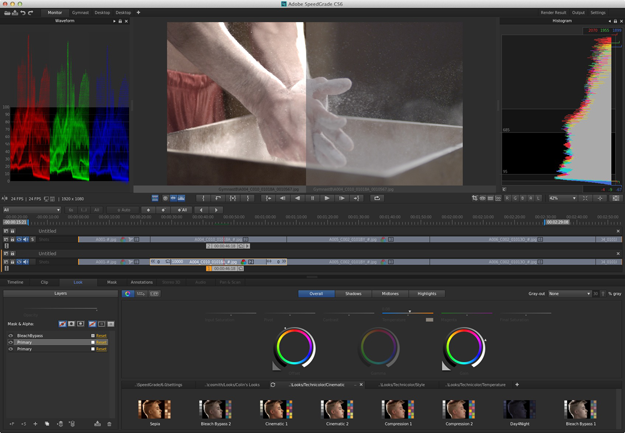
There are controls on the right side to scale the image to fit your monitor but most people will be using SpeedGrade with a second calibrated display such as an SDI output from an NVIDIA Quadro card. SpeedGrade will work on any Mac or Windows computer with a GPU but having a dedicated workstation with a more powerful GPU will dramatically increase your productivity. There are also controls to hide or show each RGB channel, luminosity, cropping, overlays and aspect ratio correction.
Making Selections
The Timeline uses 4 modes of operation (All, In/Out, Master and Playheads). Each is suited to a specific need like automatically centering a clip or being able to zoom out and in to a traditional timeline view.
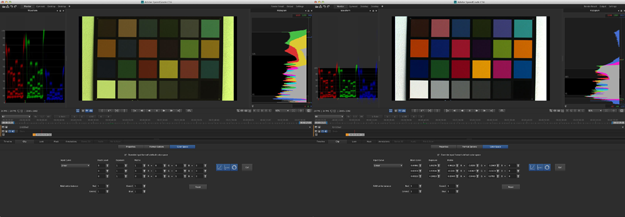
Below the Timeline are various tabs for working with the whole timeline or individual clips. The Timeline tab has controls for setting the FPS, stereoscopic 3D, calibration, saving timelines (as IRCP files) and EDLs and also the ability to drag a grading layer onto the Timeline. What I find very liberating is that everything is open, there are no fixed order of operations and SpeedGrade doesn’t “beep” at you and tell you can’t do something, you have complete freedom to add grading to a clip or on a series of separate layers and it will even extract the grading from a clip to a new layer. The scene change detection allows you to intelligently analyze a single clip and break it apart to individual clips and have each clip automatically get assigned its own grading layer. The Clip tab allows you to set several parameters for mirror and aspect ratio, but what’s truly magical is the Color Space tab and its ability to recognize a MacBeth chart and apply cubical auto-correction to neutralize any casts which is perfect for calibrating the input from more than one camera.
The Look tab is where I completely fell in love though; it’s a perfect blend of unfettered creativity and simplicity.
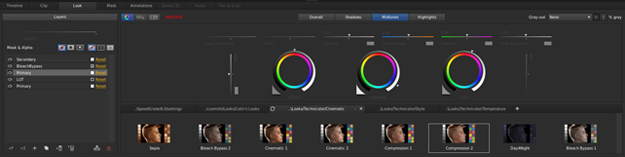
The engineers of SpeedGrade did not stand still since the acquisition from Adobe, in fact they completely redesigned how grades are applied and they’ve chosen a layer-based metaphor which is not only dead simple, it’s an interface that every Adobe user already understands and uses every day. So to adjust any color, just add a new Primary layer and tweak away! You have unlimited control of applying more changes to that Primary or add another if you’re big into housekeeping. At any time you can save the changes as a .Look file that has the added benefit of being compatible with both Photoshop CS6 and After Effects CS6 (Note: Photoshop and After Effects don’t read masks or any geometry settings saved in the .Look file).
Beside the layers panel is the grading panel and it’s pure genius. One bugaboo that needs to be taken down is the idea that color grading must be complex or it’s not valuable. I completely disagree with this and I challenge that grading is being democratized and put into the hands of uses who’ve never been on the “dial turning” part of the business. It’s common to have a DP create a look on set and have a colorist match that later but SpeedGrade is fast becoming a tool that is used on set during production to not only create a look but have that look applied to a preview monitor so by the time the colorist is loading the files, they already have the look the DP designed. There are a great many users that want the control that has been previously hidden away in high-priced studios for their projects. Some of these same users have tried prepackaged software solutions for standard movie looks but you run the risk of looking like everyone else. SpeedGrade gives you the best of both worlds with simple to apply non-destructive looks but also the ability to edit those looks and create a completely unique final project.
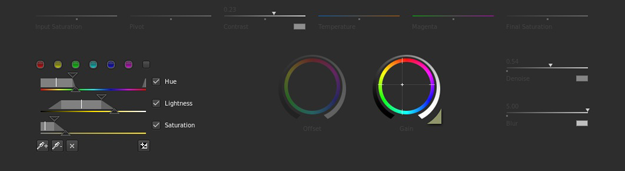
SpeedGrade supports hardware devices like the Tangent CP 200 panels and the Tangent Wave or even a simple trackball or scrollwheel mouse. All you have to do is right-click on any wheel with a standard mouse and SpeedGrade emulates a virtual trackball; moving the mouse changes the inside part of the color wheel (for changes in chrominance) and the scrollwheel, which emulates the outside ring on dedicated hardware, controls the outside of the colorwheel (for changes in luminosity). There are three wheels, one for Offset (also called Power or Slope) for controlling the blacks, one for Gamma (also called Knee) for adding or reducing light, and one for Gain which is white control. Above that are sliders for Saturation, Pivot, Contrast, Temperature and Magenta. Because some solutions change saturation before the grade and some after, SpeedGrade offers both for compatibility. Pivot shapes the curve for contrast so lowering the pivot produces a rather flat increase on contrast whereas a higher value produces a lower mid point for contrast, resulting in a crisper image. Contrast is just what it says and it may seem sacrilegious to colorists to have such a simple control to produce a change normally done using several controls but why have complexity when we don’t need it? Temperature can be used to quickly and easily warm or cool a part of an image but it can also be used to balance the red against the blue channel and the Magenta slider can be used to balance the green against the red and blue.
Now that may seem like quite a bit of controls but that’s only the beginning; every one of the controls I just mentioned can also be applied just to shadows, midtones and highlights! So instead of learning numerous controls you just learn one set and apply them to the part of the image you need to work on. Now if you’re paying attention, your first question would be, “What designates a shadow from a midtone, and a midtone from a highlight?” and you’d be perfectly correct in asking that question and SpeedGrade would answer you back by giving you individual sliders for each shadow, midtone, highlight.
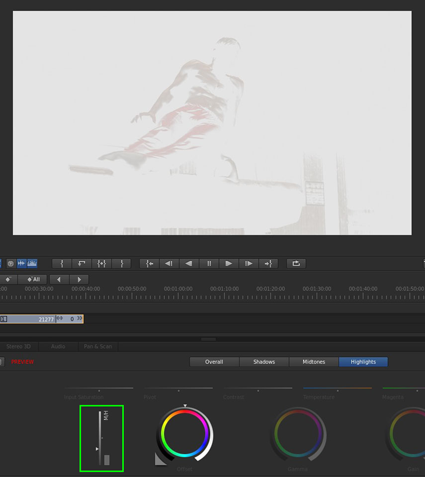
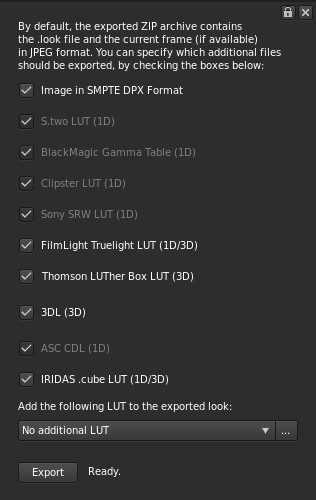
So as you add a coolness to the shadows, you can also limit how far that coolness seeps into the mids. A convenient popup menu gives you an overlay in Color/Gray, Color/Black or White/Black so you can see exactly where each designation ends and begins. SpeedGrade makes is so simple to create a tri-tone look with different tints on each of the shadow, midtones and highlights. All the while you could be saving each stage of your creation to .Look files and call them up later for comparison. Looks can also be exported in many industry standard formats like Clipster LUT, 3DL, FilmLight Truelight LUT, etc.
LUTs can be designated as 8X8X8 up to 64X64X64
SpeedGrade gives you lots of control over secondaries including the ability to add as many secondary layers as you need. There are built-in primary colors for creating a key or + and – eyedroppers to sample colors in an image. You can fine-tune your selection using dedicated Hue, Lightness and Saturation slides; each with it’s own range and falloff.
Add to that the ability control Denoise and Blur and you can easily create a key for skintone or any other colors you want to isolate. Secondaries are also saved in .Look files used within SpeedGrade.
Add to that the ability control Denoise and Blur and you can easily create a key for skintone or any other colors you want to isolate. Secondaries are also saved in .Look files used within SpeedGrade.
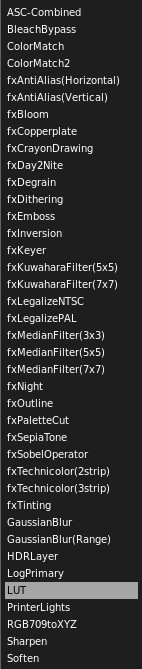
The next layer that can be added is a custom layer that includes styles and effects like Bleach Bypass, fxBloom, fxDay2Nite and GaussianBlur, etc..
What makes SpeedGrade unique in this department is that each of these custom layers comes with an independent opacity slider, just like Photoshop! This is perfect when you want a Bleach Bypass look but it’s too intense, just adjust the slider and reduce the effect. The colorists who we’ve shown this to in Beta versions of SpeedGrade really flipped out and loved it. It’s a real game changer in terms of control with zero compromises. Imagine using a LUT on its own layer with opacity as a creative tool – it’s incredible!
SpeedGrade also has the ability to add preset or custom drawn masks with individual node control and keyframing and the built-in planar tracker means you can have your mask follow a specific face in a scene for example. That alone would be great but again, German engineers have a way of looking at something old and making it new. I’m talking about the Mask Widget; a brilliant little on-screen controller to resize, reshape, feather and position any mask or node intuitively.
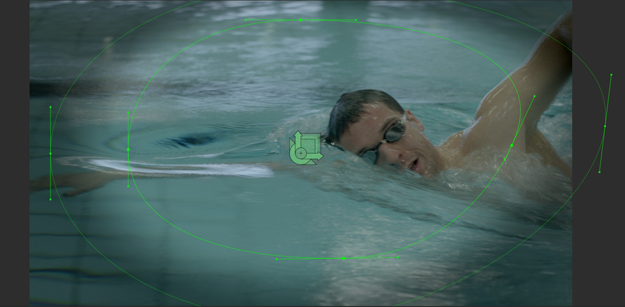
The design of the Widget allows a user to get instant predictable results with zero training – it’s just a brilliant piece of innovation that I wish I had in other Adobe applications. This same Widget is also used for positioning and scaling frames on a Pan & Scan layer.
Stereoscopic 3D workflows are also something SpeedGrade can handle including intelligent matching on left eye, right eye for parallax, rotation, vertical offset, relative positioning and color. You can preview your results to an external 3D display or use anaglyph on a computer display. Controlling the color in a stereo 3D image is just as easy as working on a 2D image in that SpeedGrade applies all changes to both eyes at the same time.
Output from SpeedGrade is set in the Output tab with the ability to render to any installed codec in compressed or uncompressed formats. Output can have burn-in and calibration applied if needed too. Some notable image sequence formats are 16-bit and 32-bit TIFF and OpenEXR, which are important for high end work. SpeedGrade is the perfect compliment to Adobe Production Premium.
About the Author Colin Smith (2), not to be confused with Colin Smith from PSC.
Colin Smith has been swimming in the deep end of the video and imaging industries for over 20+ years. 15 of those years have been spent at Adobe Systems where he continues to evangelize leading edge solutions to customers all over North America including Hollywood filmmakers, New York media giants and broadcast and animation houses in Canada.
Colin’s passionate and accessible speaking style makes him a major draw at a multitude of Adobe events and seminars as well as making regular appearances on his hit show “No Stupid Questions” on Adobe TV.
When not on the road, Colin spends his time fighting crime by teaching law enforcement agencies to leverage Photoshop and other Adobe technologies and writing and recording music for his band “Raven House Poets.” You can check them out on iTunes.
Other Content
Lightroom 4 Learning site
PS Don’t forget to follow us on Social Media for more tips.. (I've been posting some fun Instagram and Facebook Stories lately)
You can get my free Layer Blending modes ebook along with dozens of exclusive Photoshop Goodies here


How to use the Selection Brush tool and Quick Mask in Photoshop, detailed guide.

Photoshop CC 2017 has a search tool, templates, updated face aware liquify, refined select and mask, a new, new workspace...


