
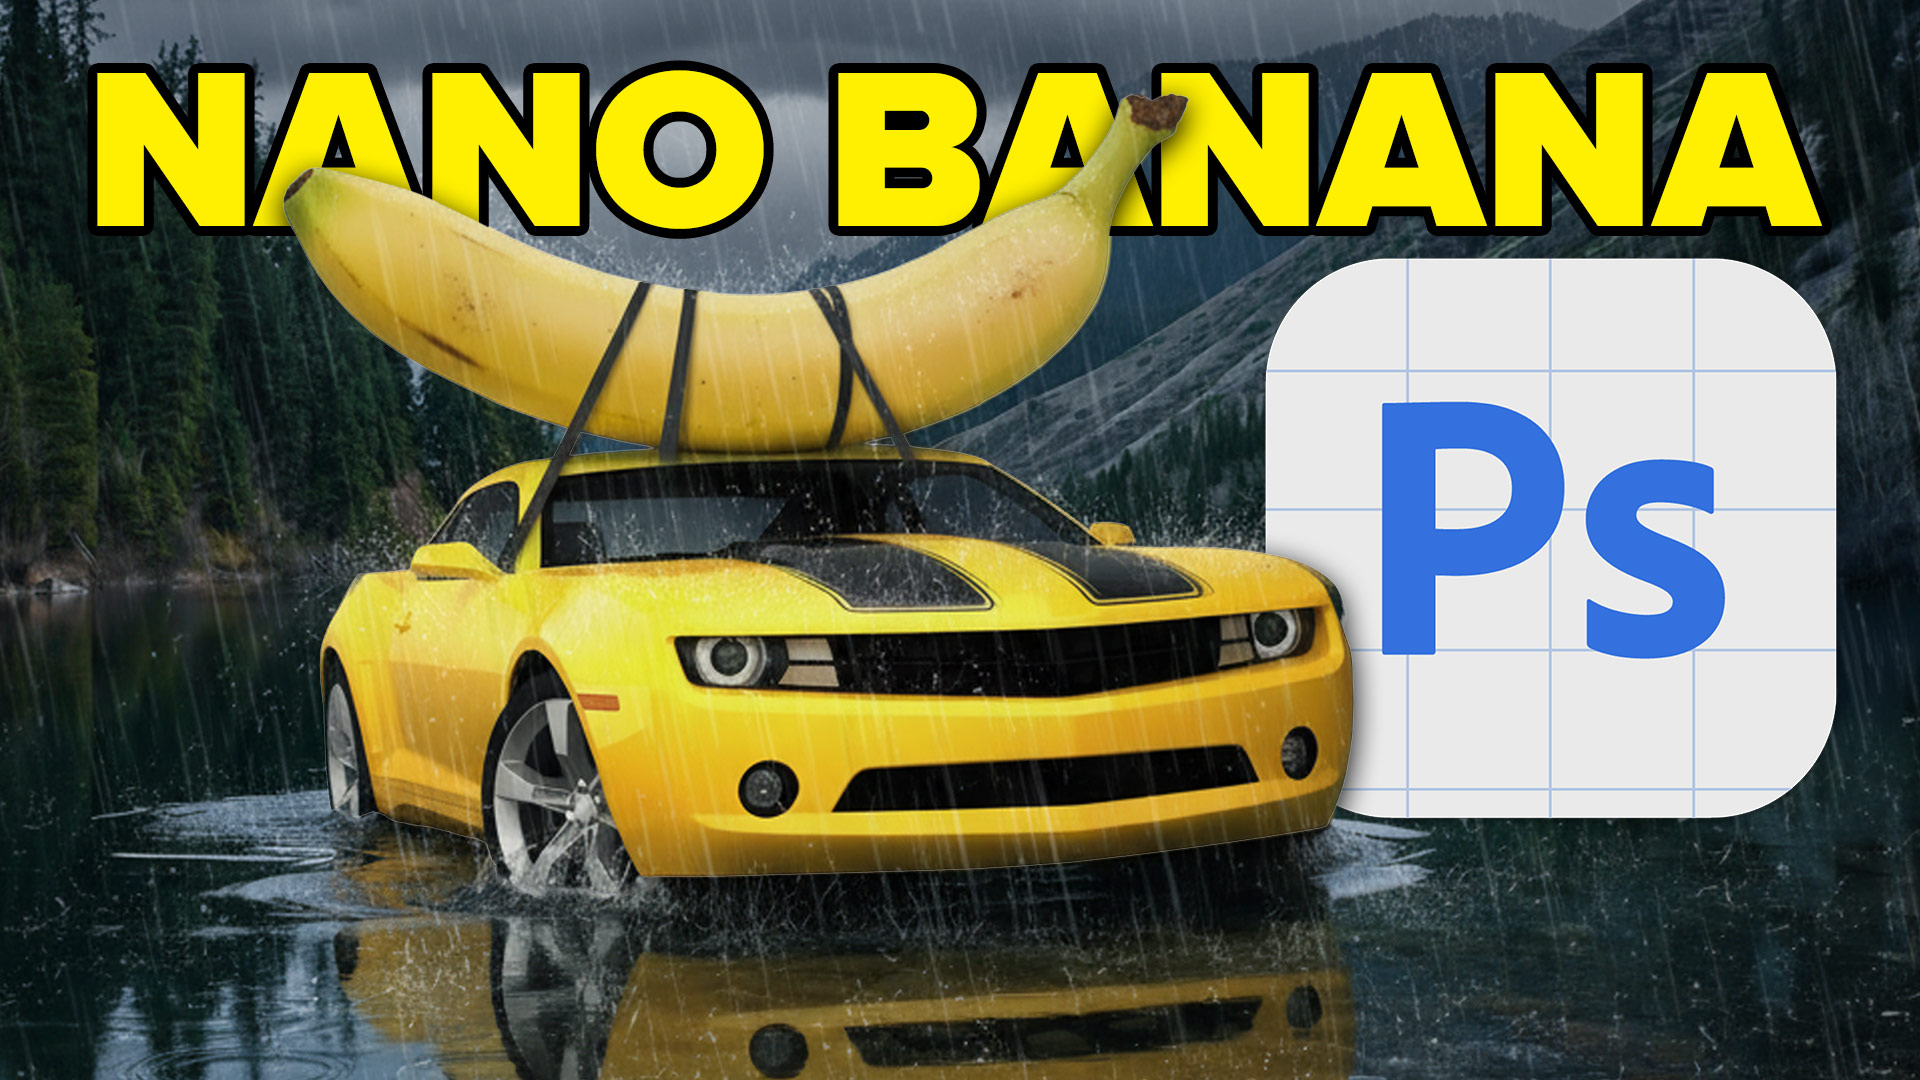
Adobe Photoshop has Nano Banana AI Generator inside
You’ve NEVER Seen Photoshop Do This Before. Nano Banana (Gemini 2.5) in Photoshop Beta.
Adobe just dropped something HUGE into Photoshop Beta. It’s called Nano Banana, and it’s powered by Google’s Gemini 2.5.
I’m going to show you how it works, how to activate it, and even some tips to get the most out of it. We’re going to turn a simple photo into something mind-blowing.
Check out my tutorial on using Nano Banana in Google Gemini and using Nano Banana in Adobe Firefly
See the comparison between Nano Banana and Flux Kontext Pro in Photoshop (after this tutorial).
First things First: Getting Access
Before we get started, you need to know this is only available inside Photoshop Beta right now. So, pop open your Creative Cloud app, head to the “Apps” section, find the Beta apps, and download the Photoshop Beta.
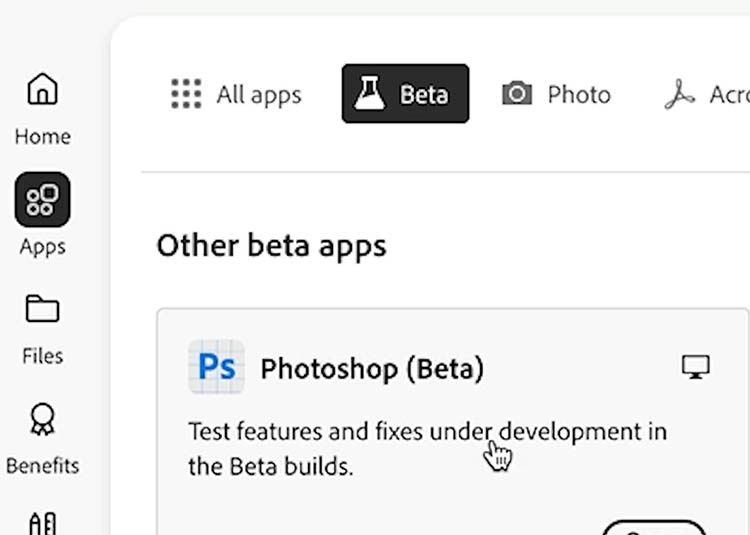
Or choose update, if you already have it. It was updated this morning.

Tip: Make sure you check Creative Cloud for updates first, because the latest update may not be loaded in yet.
Activating Nano Banana: Let’s Do This!
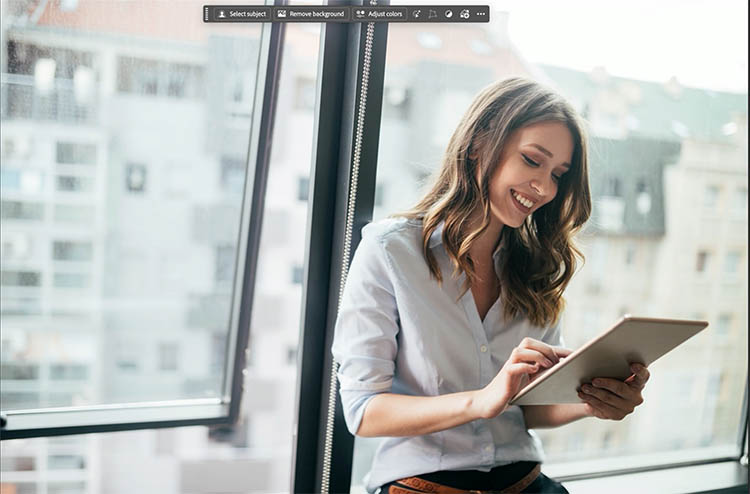
To get it started, you need to make a selection. Choose Select Subject from the task bar.

Once she’s selected, we’ll inverse that selection (Command/Ctrl + Shift + I), or click Invert selection from the task bar. We want to change only the background.

Now, hit Generative Fill.

Here’s where it gets interesting. You’ll see a little dropdown to change the AI model.

Click that, and you’ll see Nano Banana (Gemini 2.5). Select it, and now we’re ready to go!

Changing the image
Let’s try a prompt. How about a “futuristic city from the year 3000”?

And boom, there it is. Right away, you can see the generative quality is a big step up ( But not the resolution) from what we were getting before.

The Real Power: Preserving Your Subject
But what makes Nano Banana so special? It’s the incredible way it can preserve the details of your subject. We can change everything around our person without messing up her likeness.
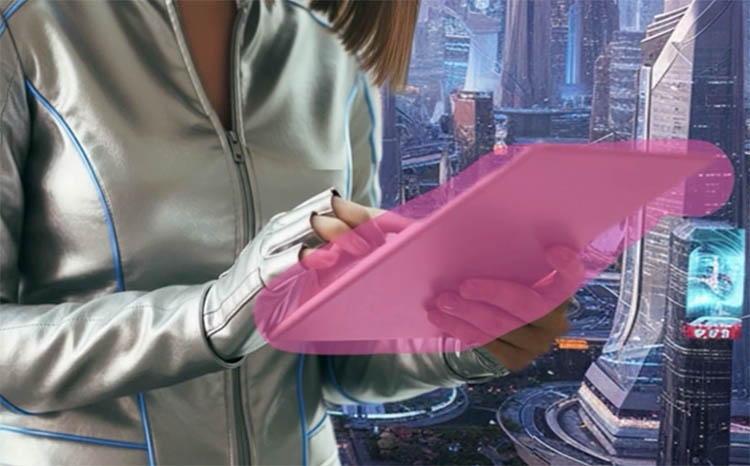
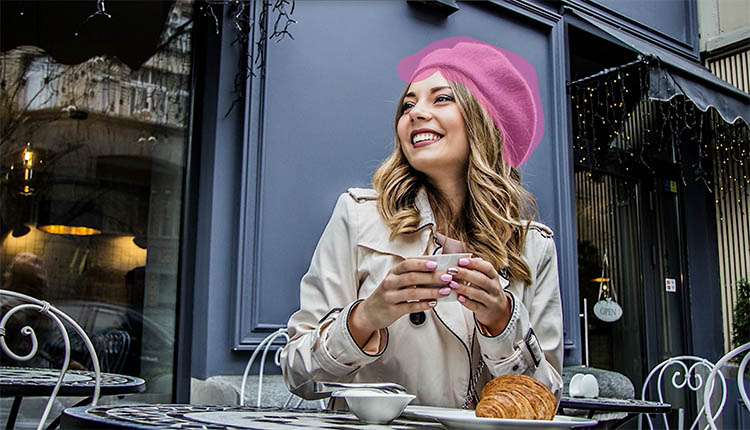
Let’s change her outfit to something more fitting for the year 3000.
Choose the selection Brush tool.
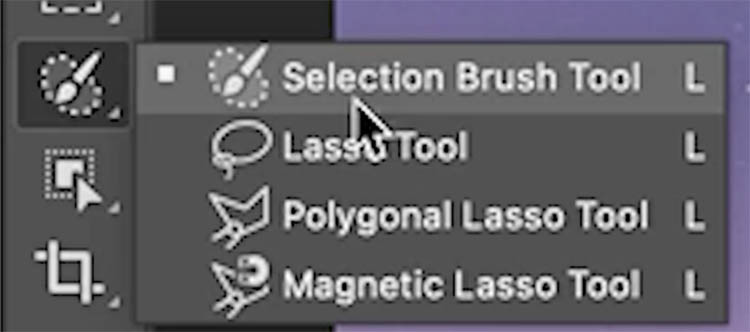
Paint a selection over her clothes with the Selection Brush.
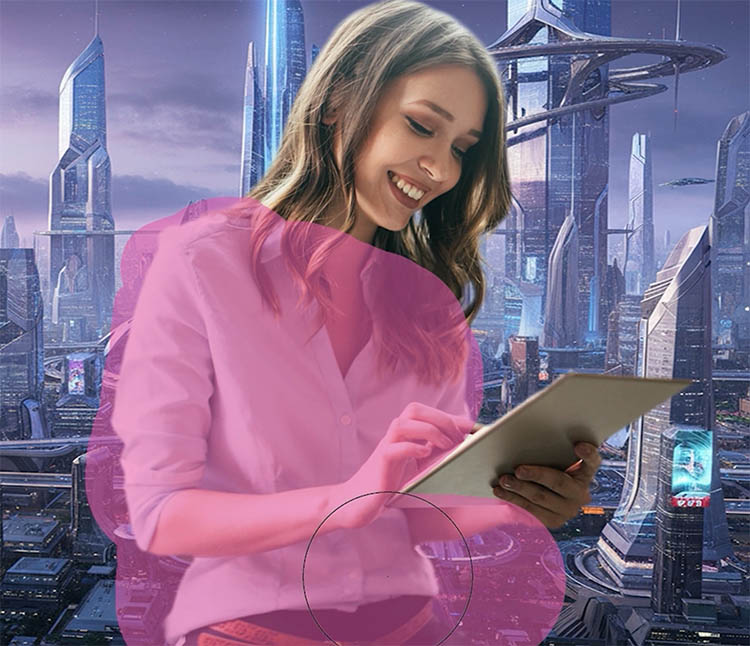
Choose Generate from the task bar
Type in “futuristic space jacket.”
![]()
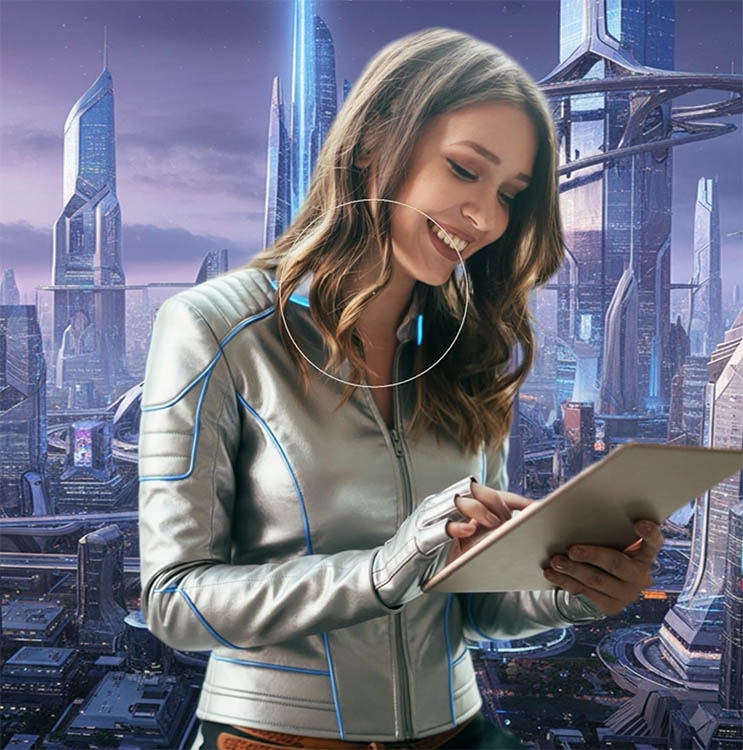
And look at that! It’s a whole new jacket, and it even kept her hair the same.
We can easily change the hair.
Make a selection with the selection brush.
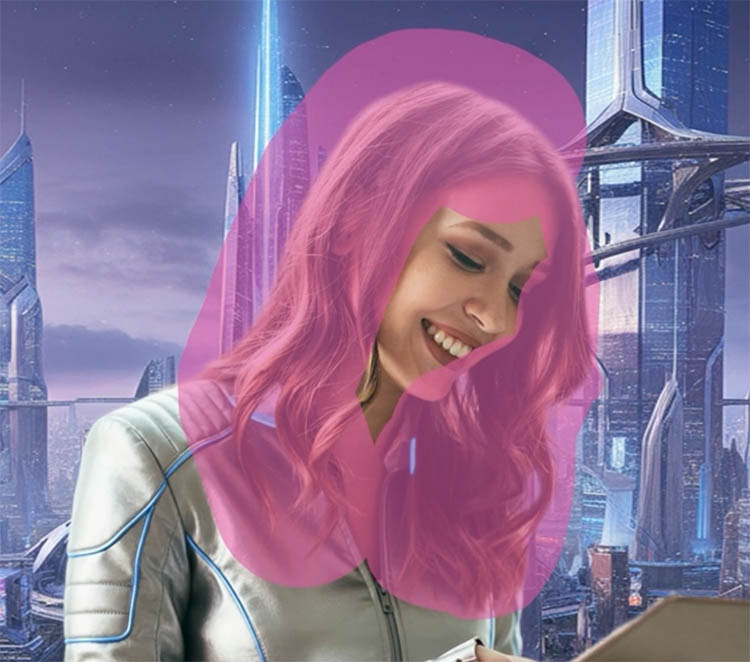
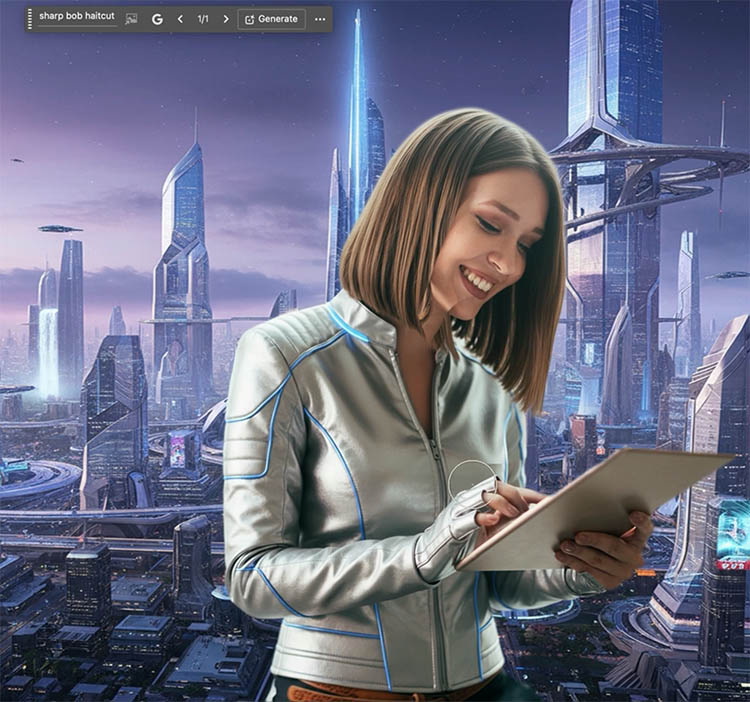
Type in something more futuristic, like “sharp bob haircut”
And you can see the result.
We can keep going.
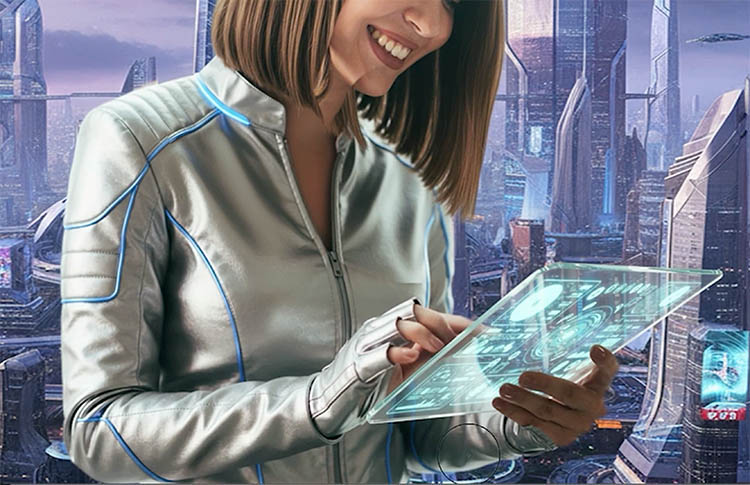
Let’s select her tablet
and change it to “clear glass with glowing UI.”

We get the exact result we want. This is actually much better than a similar things I was able to generate in the Firefly model.
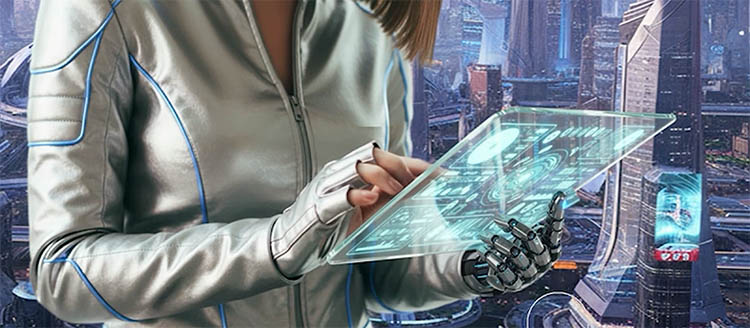
let’s give her a “cyborg hand.”
The downside
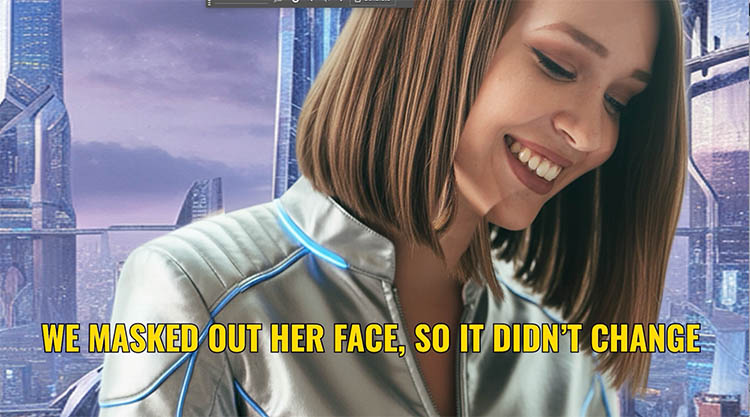
Currently, the resolution is very low, only about 1k. You can see in the example how soft everything is compared to her face. There are also some weird things going on. like the way the hair is on her cheek. When people say, ai will replace Photoshop, it’s not true. It might replace a lot of stock photography, but you still have to retouch and fix it with Photoshop. You will always have to get your “hands dirty” and change things manually, to get exactly what you want. Now, we are retouching ai, as well as photos. Keep your Photoshop skills sharp!
A Pro Tip for Smoother Blends
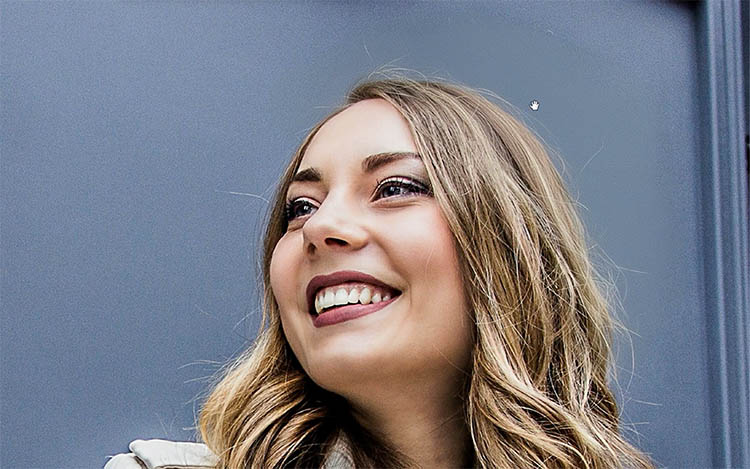
Okay, here’s a tip you’re going to love. When you’re removing something, like a hat, the edges can sometimes look a little harsh.
Select the hat
the prompt is “remove hat” yes, we say “remove” again lol. See the little G in the bar? That means we are using nano Banana and not firefly. (currently, Nano Banana is free to test and use.)
![]()
It removed the hat nicely, but notice the texture above her head no longer matches.
Here’s the trick: use the Selection Brush but turn the Hardness all the way down.
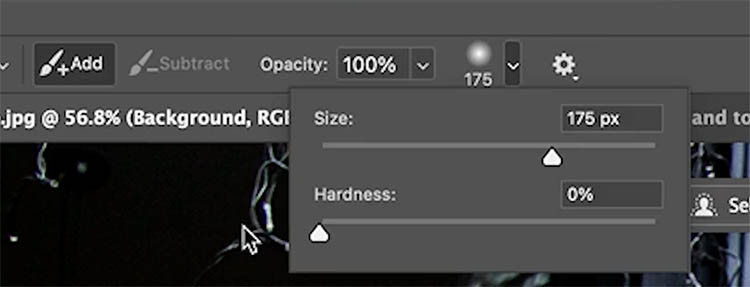
A soft-edged selection allows the generated pixels to blend better, and you get a much smoother, more natural-looking texture.
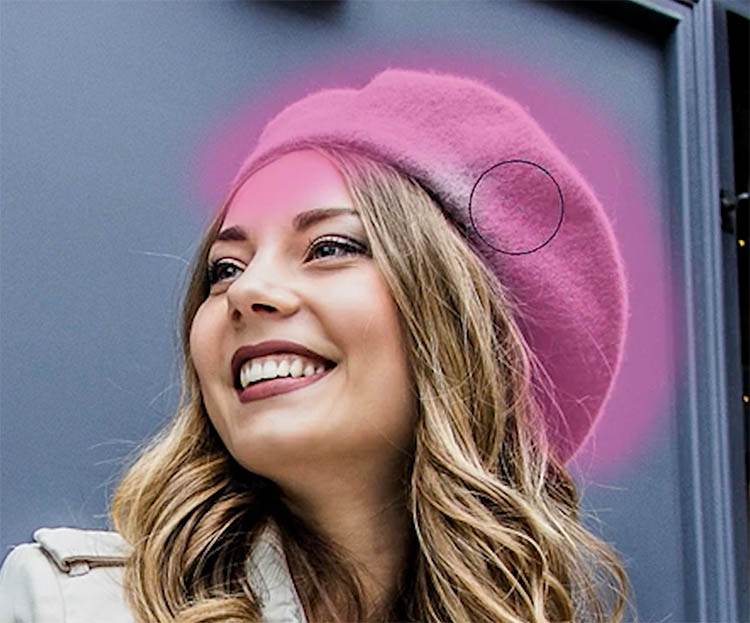
It’s a small change that makes a huge difference.
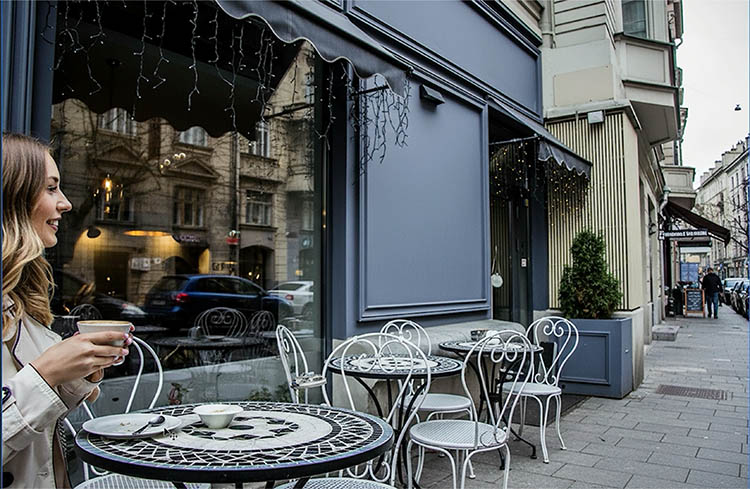
Beyond Simple Edits: Changing Perspectives & Combining Images
This is where it gets wild. Nano Banana can maintain continuity very well.
Select the whole image (Ctrl/Cmd+A)
Prompt: “pan the camera to the right.”
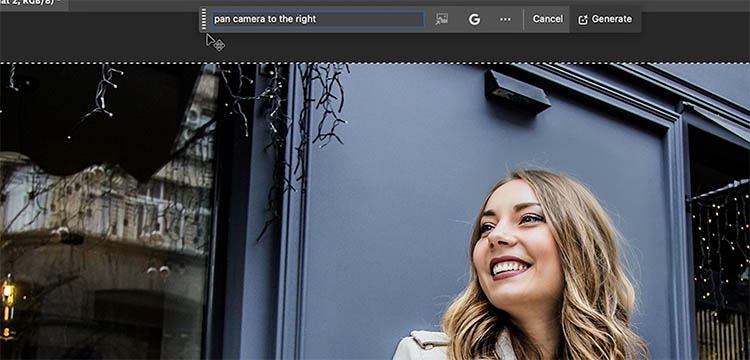
Look at that—it extends the street, keeps the same tables and chairs, and the same woman.
Let’s test nano banana’s ability to keep the continuity more.
Make a selection (I used the rectangular marquee tool)
Type in, Woman looks surprised.
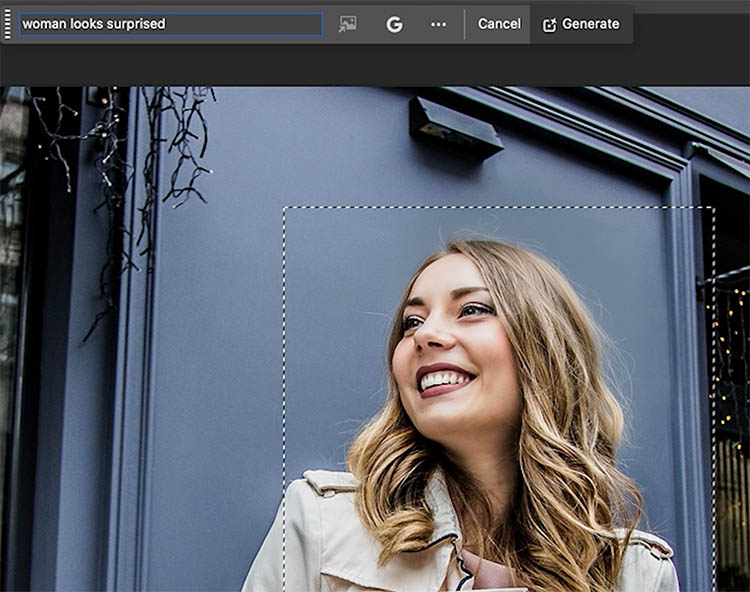
It did a good job of the expression. However, to me, she now looks more like Taylor Swift, than herself.
Also notice the rectangular selection wasn’t a good idea.
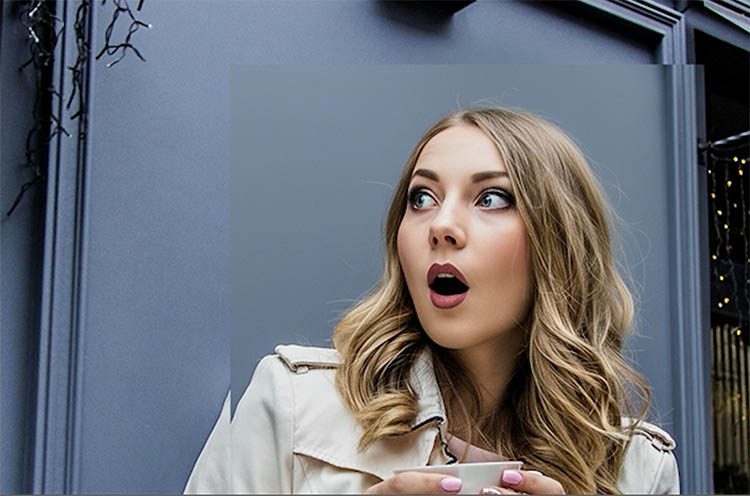
Let’s try something else.
Use the selection brush with soft edges. The selection brush is our friend for this kind of work!
Prompt: Looking other direction
![]()
This is pretty good. I think it looks like the same person here. It definitely needs some retouching though.
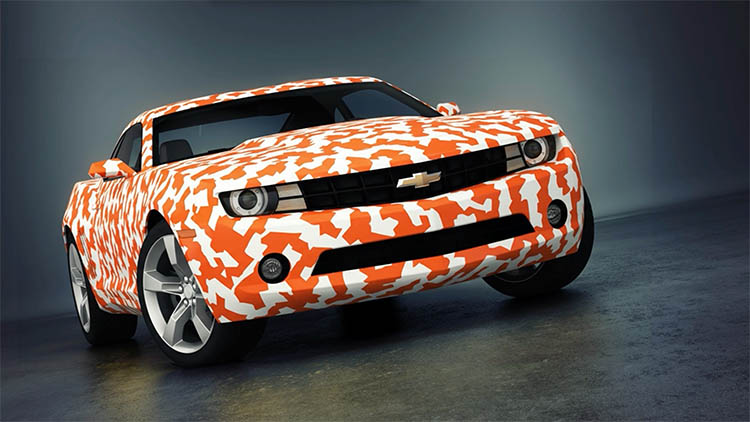
Changing color and texture with Nano Banana
Nano Banana can perform tasks like changing colors and textures.
Prompt: Change car color to orange and white camo.
![]()
You see it can do this pretty easily. If I were just changing the color though, I would use this method because I prefer to choose the exact color and not have to describe it over and over with words. Not to mention the resolution loss.
Combining images and compositing with Nano Banana and Photoshop
We can even combine images.
On a flat image, grab the move tool.
Click Remove Background in the task bar.

For clean backgrounds, select subject and remove background work really well, especially since the recent algorithm update.

Drag the image of the car into another image of a lake. How to combine images in Photoshop in case you don’t know how to do this.
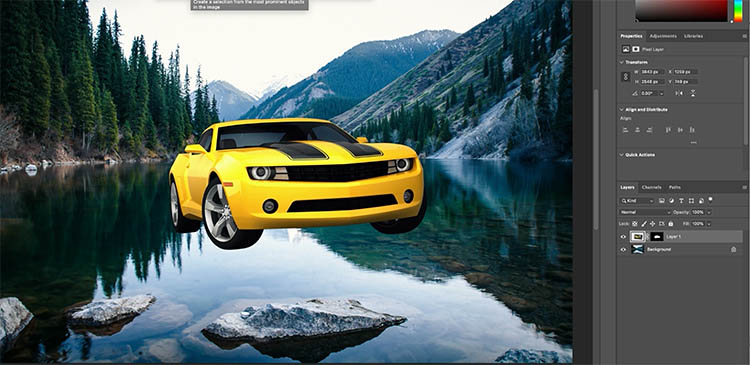
The car is just floating there. Let’s composite it.
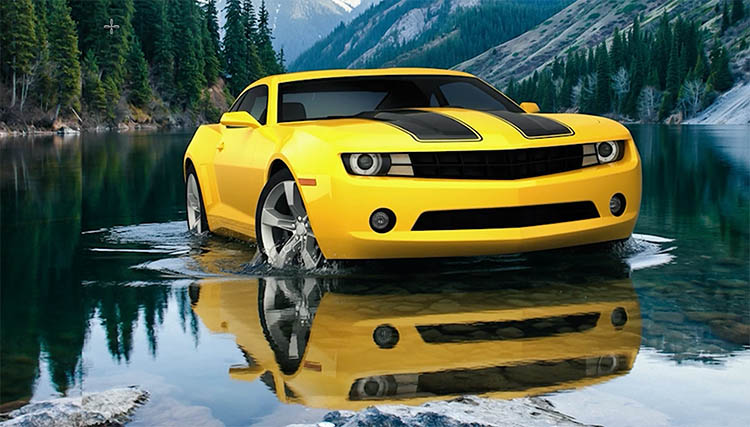
Make a selection around the area to work on. Give it enough space to make a reflection and other details such as splashes.
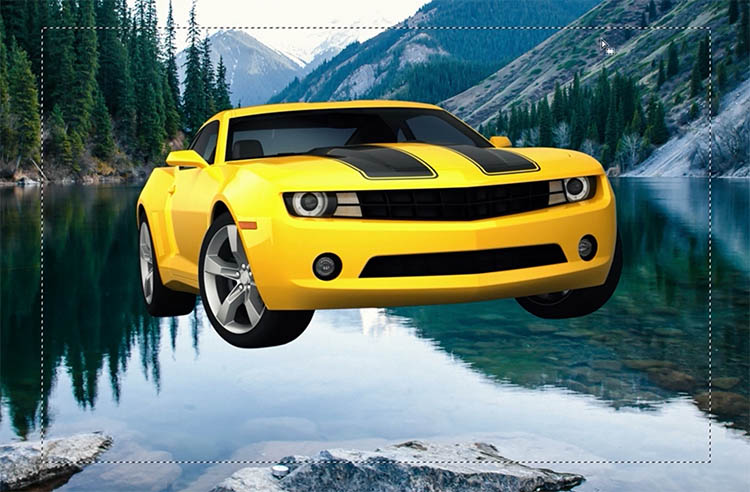
Prompt Nano Banana to “put the car in the water a little bit.”
![]()
And bam! It’s in the water, with splashes on the wheels and everything.
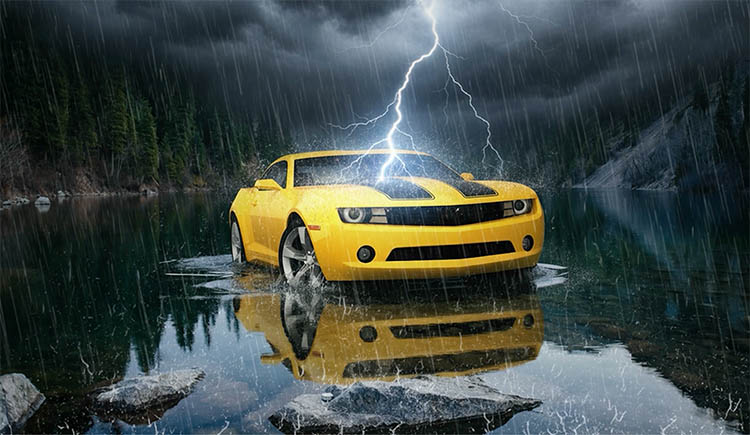
Want to get even crazier? Let’s select the whole image and add “rainy stormy weather with dark clouds and lightning striking the car.”
![]()
That looks pretty cool. The lightning is ok, but the rain and atmosphere is really good.
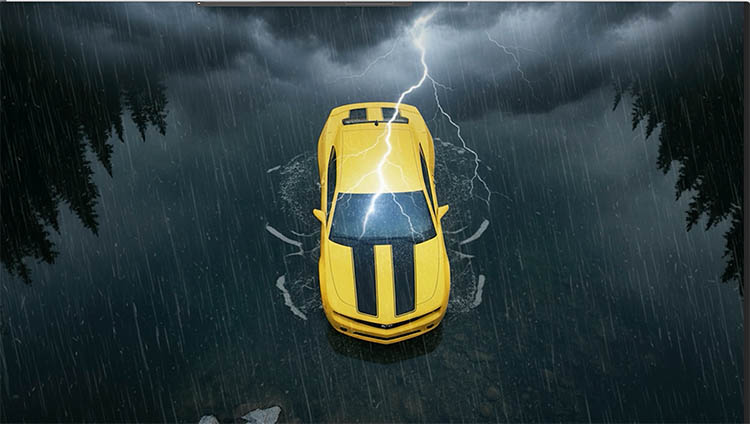
We changed the angle of the woman earlier. Lets try it here, type in “drone shot looking from above.”
![]()
This makes me think how useful this would be for story boarding.
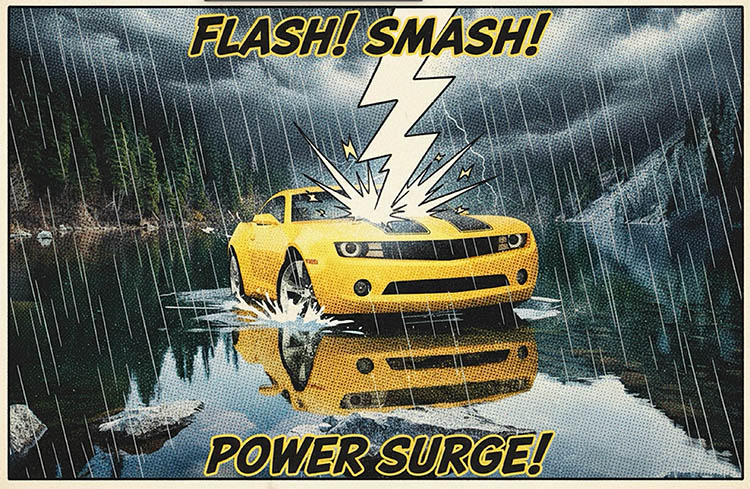
And for the grand finale, let’s turn the whole thing into a “1950s style comic book.”
![]()
FLASH! SMASH! POWER SURGE! How cool is that?
So, Is This the End of Photoshop as We Know It?
While all of this is very amazing and exciting for some people, I expect a mixed response. Some of you will be really excited about what is here and where it’s going. Other’s may be more worried. I know what some of you are thinking. “Is this the end of my career? Are my skills useless now?”
I think absolutely not. Think of this as an amazing new assistant. It’s another tool in your toolbox. It’s not going to do everything for you. You’ll still need your skills to refine, adjust, and get the exact result you want. There are so many tasks in Photoshop that ai doesn’t do.
How will it affect different professions?
For photographers, Some of the tasks you can seen here are very much in the compositing and visual effects realm and not what you would do to most of your photographs. Maybe this looks like a fun gimmick to some serious photographers compared to the actual work you do, day to day. Or maybe you will work some of this into your workflows, once the resolution improves.
Graphic designers, your craft is still essential. This just speeds up some of the heavy lifting. You’re still in the driver’s seat. I treat ai as another tool available to me. Sometimes I use it and other times I don’t, but often it’s a hybrid workflow with ai as the assistant. Even though ai can generate a lot of things, it doesn’t have taste or a sense of style. Only you can decide what looks good.
Advice
My advice is. keep learning Photoshop and master your craft, don’t ignore ai (unless you are doing this just for fun as a hobby). If you are doing this as a career or looking to make a career out of it (Yes, it’s still going to be a valid career). learn how to ai as part of your skillset. Don’t make it your whole skillet, I think you will need to know both manual and ai in the future for best chances of landing a good job.
So, what are your thoughts on this? Drop them in the comments underneath! Also watch the video for step by step as well as a fuller views at the end.
Until next time, I’ll see you at the cafe.
Colin
PS Don’t forget to follow us on Social Media for more tips..
(I've been posting some fun Instagram and Facebook Stories lately)
You can get my free Layer Blending modes ebook along with dozens of exclusive Photoshop Goodies here

15 thoughts on “Adobe Photoshop has Nano Banana AI Generator inside”
Leave a Reply
New Features in Lightroom, Lightroom Classic and Adobe Camera RAW Feb 2025 update.
Hidden button to instantly fix color of photo in photoshop I’m going to show you a button that most people...
Crop marks show the printer where to trim the final piece. Photoshop doesn't have the ability to create crop marks...


Thanks for the tutorial, Colin. This gives me a lot of ideas for making composites, original artwork and enhancing my photos.
Have fun with it
This truly amazing and has provided much food for thought. What ever will they think of next? Think back to Photoshop V6.0…
Does make you wonder if “photographic evidence” will become a thing of the past…
Good point. However ai won’t have photographic metadata, although that can be faked
I find it really messes up with specific spelling. It “admitted” to me it was not programed well enough to type directed words into an image it was creating. Loved the image but had a ton of retouching and editing to do.
In the photo of the girl in the future setting…would Harmony make look more like she is in the scene? I saw this last night for the first time, and had a photo that I was wondering what I was going to do with it. I put the two people in Disneyland and with a few minor adjustments it was surprising to my wife I could do that. Now we are going to blur the lines between real and AI unless it shows up in the sidecar.
When I first started using Photoshop in 1991, I would never have guessed…
Thanks, I was unaware of this being in Photoshop beta. I was using it in native mode and created some interesting Halloween images. In native mode just upload an image and tell it what to do. No need for masking if you can describe your intent.
Thanks, you make it look so easy.
I can see that changing angle of a face would be really useful in group portraits- the new headswapa1
Colin ~. Do you have any concerns regarding Adobe’s dependence on Generative AI for image editing? That’s one of my biggest struggles.
If I understand the question correctly: Adobe are still actively developing non-Ai tools and you can still do anything you like without using ai if you choose.
Is there a way to use this feature and add your own images to it? For example, if I have a photo of the inside of a store and I want to add a logo to the back wall and have it lit like a sign.
yes, absolutely you can