Match Sunset color in less than a minute Photoshop Tutorial

Add a sunset in Photoshop
How to change a photo to look like a sunset in Photoshop.
Step 1
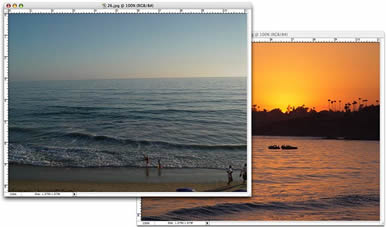
Open the image that you want to work with and also open any image of a sunset.

Step 2
Choose Image>Adjustments>Match Color
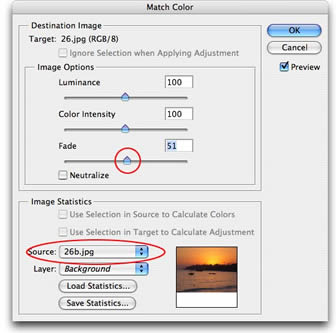
The Match Color dialog box will open. We will only need to use 2 settings for the task at hand.
Under Source, click the drop down menu and select the image of the sunset. There will be a thumbnail for you to check that you have selected the correct image.
Turn on the preview option if it isn’t already. The working image will now take on the color attributes of the sunset image. Most probably the effect will be a bit too much.
Adjust the Fade slider until you are happy with the result. Move it to the left for more of the inherited color and to the right for the original color.
Luminance can also be adjusted if you see differences in the brightness of the images.
This tool can also be used when compositing multiple images in a layered document, where you will select the name of the layer the layer option.
Step 3
When you are satisfied, click the OK button to apply the changes. There are many things that can be done with this new filter including using the match color to remove a color cast in a single click.

PS Don’t forget to follow us on Social Media for more tips.. (I've been posting some fun Instagram and Facebook Stories lately)
You can get my free Layer Blending modes ebook along with dozens of exclusive Photoshop Goodies here

2 thoughts on “Match Sunset color in less than a minute Photoshop Tutorial”
Leave a Reply
5 Photoshop tips to make your photos look better. How to make your photographs better in Photoshop, fast and easy.
How to do Frequency Separation (modern method), silky smooth skin in Photoshop. Easy way to do high end retouching for...
When Photoshop changes your colors, Color Spaces explained


Great and quick tutorial for a super effect – Thanks.
Thank you so much! Most of the landscapes I take are in the golden hour, but not always. This helps to get the lighting at the right level to match the scene or improve it. I might have missed this, so thank you for offering these tips!