
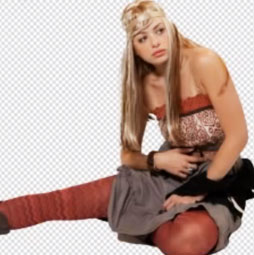
Removing a Picture from it’s Background Photoshop Tutorial
Cutting things out in Photoshop has to be one of the most requested tutorial topics. This tutorial is for older versions of Photoshop (CS4 and earlier), as the extract tool was replaced in Photoshop CS5 for the Refine Edge.
If you are on Photoshop CS5 or newer, please refer to our newer tutorials instead.
See this tutorial on Select and Mask in Photoshop 2024 and newer
How to cut out a photo quickly using quick selection and refine edge. (easy)

Masking impossible images in photoshop using Color rang and quick masks. (advanced)
Step 1
Open your image, and double click on the “background” name in your layers pallette. This will turn it into a layer. 
Step 2
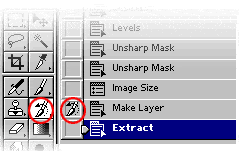
 Open the extract tool: Image>Extract or Option/Alt+Cmd/Ctrl+X
Step 3
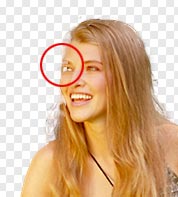
 1. Take the
 ![]() marker tool and trace around the image you want to extract. Keep the marker 1/2 way on the image and 1/2 on the background. For solid areas use a small brush, for softer areas like the loose hair, use a larger brush. Tip: to adjust the brush size use the [ and ] keys.
marker tool and trace around the image you want to extract. Keep the marker 1/2 way on the image and 1/2 on the background. For solid areas use a small brush, for softer areas like the loose hair, use a larger brush. Tip: to adjust the brush size use the [ and ] keys. ![]()
2. Now take the bucket tool and fill the area you want to keep.Click OK.
Step 4
 There will be a few areas that have been accidently deleted. You can clean up the image using the eraser and the history brush.
Step 5
 In the history pallette, click next to the image before the extract state. Select the history brush.
Step 6

 Select a small brush size and “paint” back the image.Now you can place the image onto any background you wish.
PS Don’t forget to follow us on Social Media for more tips.. (I've been posting some fun Instagram and Facebook Stories lately)
You can get my free Layer Blending modes ebook along with dozens of exclusive Photoshop Goodies here

10 thoughts on “Removing a Picture from it’s Background Photoshop Tutorial”
Leave a Reply

How to install LUTs in Photoshop, how to use LUTS to color grade your Photos in Photoshop. Download Free Photoshop...

Create a hollywood style, spotlight effect. This tutorial came about as a result of a request from the forums. This...

How to retouch a portrait photo in Lightroom or Camera RAW. This Lightroom tutorial shows how to smoothen skin, whiten...


Thanks for all the steps, I am sure it will help any one get better in Photoshop!
First of all I would like to thank you for sharing such a beautiful and essential tutorial. I hope that through this tutorial I can do back ground removing very much easily and it will enhance my quality in Photoshop work.
I was working on some images that required the backgrounds removed from the main picture. I kind of got stuck back then but after going through this tutorial i managed to get the job done.
Thanks for this beautiful and easy tutorial,
Hello Smith,
Thank you for sharing your another tutorial about background removing. I hope, it’s for beginners level photoshop editor.
hi is there a way to do this in photoshop elements 15?
thanks in advance
I’m really sorry, I don’t know, I haven’t opened Elements in over 5 years.
Hello. Lovely tutorial. I have a picture with a background, I want to cut out the picture but still have the full background. How do I go about it please. Thanks
Colin – Bless you. In all my years on Photoshop I have never seen this process so clearly explained and easily completed. My version is 7.0 so I had to find ‘Extract’ under ‘Filter’ but it worked perfectly. Thanks, Harry
Owa Its a Great tutorial actually I am very interested to learn more about Photo shop , although I provide basic photoshop service and your instruction is very helpful for me .. Thanks @Colin Smith
Very easily explain that is very helpful for beginners, thanks for the helpful post.