
Realistic background blur in Photoshop with Lens Blur
Create realistic Adjustable Depth of Filed Effects in your Photos
We can create sophisticated depth of field effects in Photoshop by creating a depth map and then using lens blur. It’s not too difficult to create the depth map. We use shades of gray to tell the blur how far things are from the viewer. White is far away and black is very close. Different shades in-between define position in 3D space. This exercise uses masking to isolate different objects.
How this works: We will isolate, foreground, mid-ground and background in the photograph, by making selections and copying to new layers. We will fill foreground elements with darker gray, while the background elements will be filled with lighter shades. Where a plane spans both, such as the arch, we will use a gradient to define its depth. All of these will eventually be blended together into a single layer and used as our depth map. This is similar to how smart-phones create depth with portrait mode. (The depth map can also be uploaded to Facebook to create a 3D photo.)
This tutorial will show you how to do Facebook 3D photos
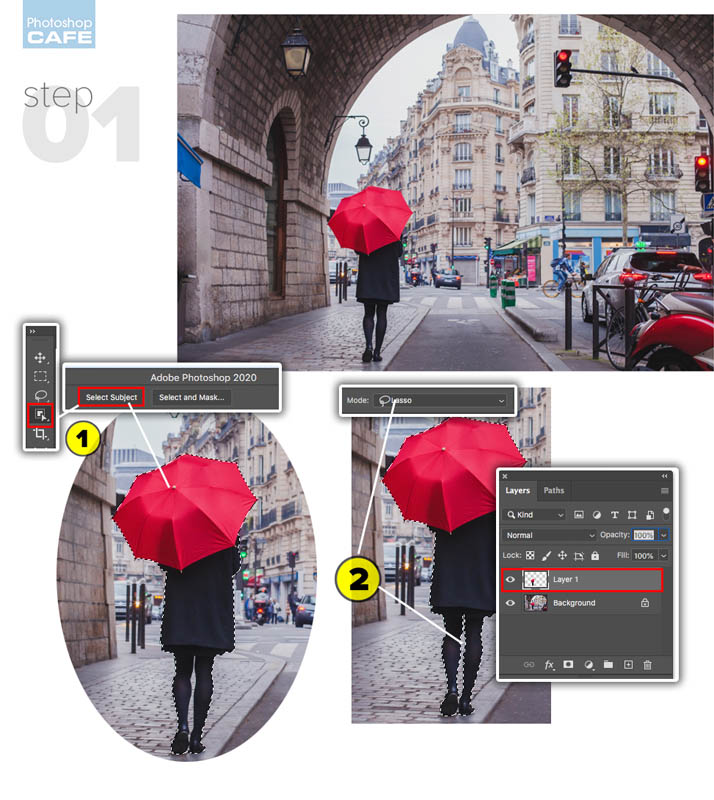
01// CUT OUT PERSON
1. Choose the new Object selection tool. (Or any masking tool) Click Select Subject and Photoshop will make a selection of the person. The AI is updated for Photoshop 2020.
2. Use the Object Selection tool with lasso to refine selection, such as the hole between the legs.
Hold Alt/Option to remove from a selection, Shift to add to a selection.
Press Cmd/Ctrl+J to copy the selected subject to a new layer.
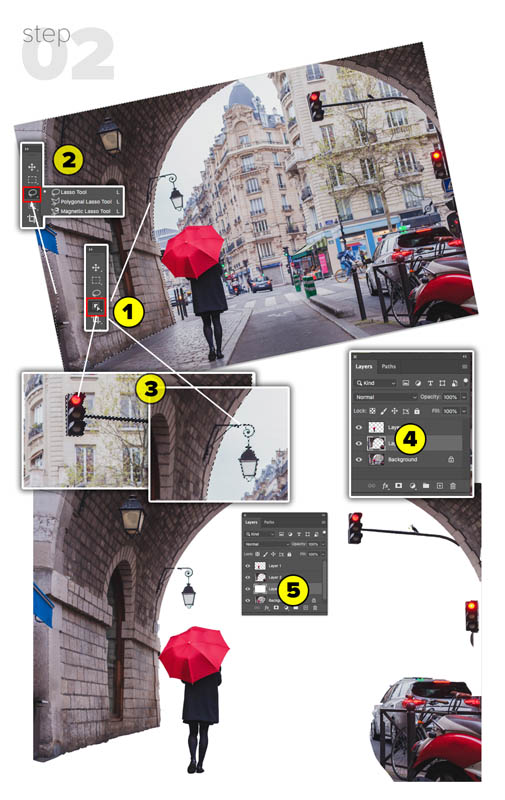
02// ISOLATE MID-GROUND
1. With the background active, choose the Object Selection tool.
Make a selection around the arch.
2. Also use the Lasso tool to clean up large areas that don’t need edge detections, such as the front sides of the arch.
3. Continue refining the selection by including traffic lights and street lamps.
Also include the cluster of cars to the right. The Object selection tool should make this easy. (They don’t have to be absolute perfect selections for this exercise.)
4. Press Cmd/Ctrl+J to copy the selection to a new layer. This is our mid ground.
5. Create a new layer in between the background and mid ground. Fill it with white.
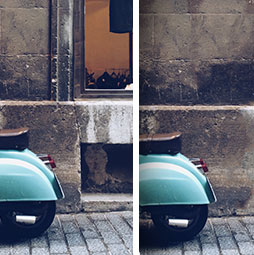
Your image should resemble the image below
03// ADDING DEPTH
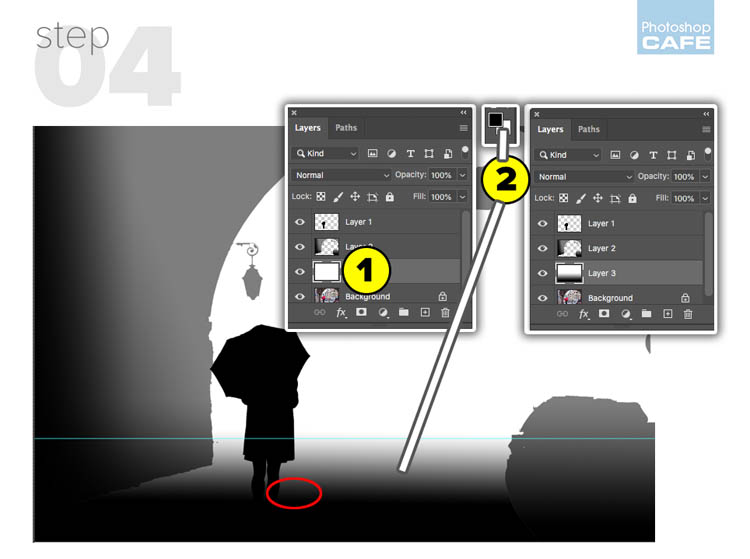
Choose the layer with our person and fill with black:
Filling with Foregound Color
• Press D to reset colors.
• Hold down Cmd+Shift+Del (mac) Ctrl+Shift+Backspace (win) to fill with foreground color while protecting transparency.
1. We want the arch to go from foreground (black) to mid ground (gray). A gradient is perfect for the task.
Choose the mid ground layer that we isolated in the previous step. Create a black to gray linear gradient.
Making a Custom Gradient:
• Choose the Gradient tool.
• Click on the gradient at the top left to open the gradient editor.
• Click on the triangles at the bottom left and right and choose a color from the color picker that pops up.
2. Cmd/Ctrl+Click on the layer thumbnail to load the selection. You will see the marching ants.
Drag the gradient from the left to the opening of the arch as shown in step (2) on the left.
3. We also want to apply a gradient to the cars on the bottom right of the arch. The problem is, if we apply the same gradient, it will replace the gradient we just made on the left.
The solution is to change the gradient to foreground to transparent. (This can be found at the top of the gradients under basics, its the second gradient preset).
Drag the gradient for the right to add a darker gradient to the cars. Your image should look like the one on the left.

Now we are going to blend the ground into the background. There are a couple of things that are essential, so it doesn’t look like our person is floating in the air.
First of all, the shade of gray on the ground must match the same shade at the feet. The second part is deciding where the ground blends off into the background. Add a guide so you can see where the gradient should end.
Press Cmd/Ctrl to turn on Rulers. Drag from the ruler to create a guide.
04// BLENDING THE GROUND PLANE
1. Choose the White background layer
2. Press the D key to reset the colors to Black and White.
Choose the gradient tool if it isn’t still selected.
Start from the feet and drag up to the guide. You should see a gradient like the one shown here.
//Next– Turning all the layers into a depth map //
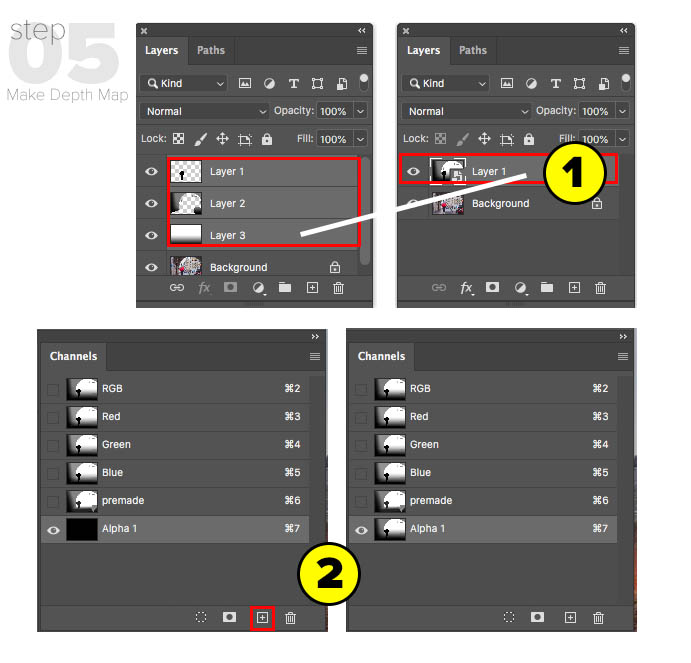
05// MAKING A DEPTH MAP
1. Select the 3 layers. (Click top desired layer, hold Shift and click bottom desired layer to select layers)
Right-Click and choose Convert To Smart Object This is a better option than merging, because we can go back and change the layers if we need to.
Press Cmd/Ctrl+A to select all. Press Cmd/Ctrl+C to copy the contents of the Smart Object layer.
2. Open the Channels Panel.
Click the + to create a new Alpha channel.
Press Cmd/Ctrl+V to paste the depth map into the channel
Return channel view to normal: Click on RGB in the channels panel.
Turn the eye off in the alpha channel if it’s still on.
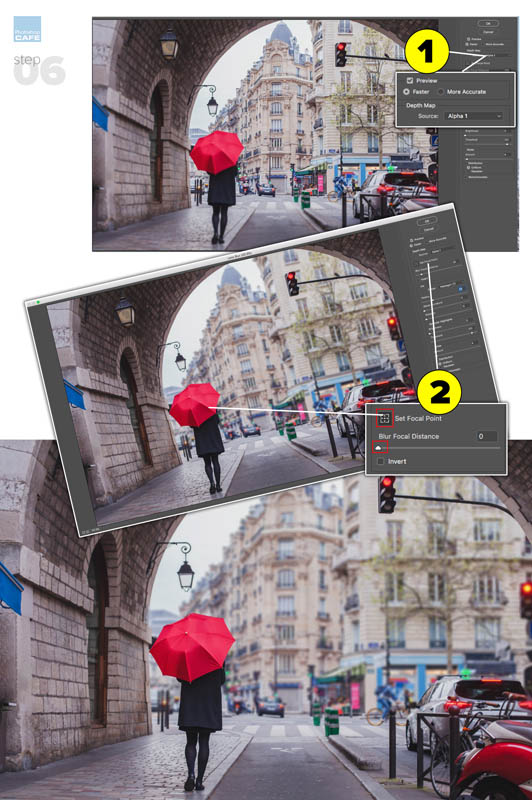
06// USING THE DEPTH MAP
This is where we use the depth map to create our blur.
Go to the layers panel and duplicate the background (for safe keeping) We are working on the new background layer.
1. Choose Filter>Blur>Lens Blur.
Under Depth Map Source; choose your Depth Map (alpha channel) Choose the one you made, (alpha1) or “premade” that I made for you.
2. There are two settings you will use. The first is Radius. Start with a setting of 24. Now you should begin to see a nice background blur.
Click on Set Focus Point and try clicking on the person and then on the background.
Try on different places on the image.
Isn’t it amazing? You can now focus in your photo, just like you would with a camera.
Adjust your focus and blur, now you have a very realistic depth of field effect.
We only made 3 focal planes in this example, imagine whats possible with your composites and a little creativity.
PHOTOSHOP SUPERGUIDE
- New Feature overview (All the new features in Photoshop 2020)
- Trouble Shooting Photoshop 2020
- Advanced Warp (Warping a dinosaur and shadow)
- New Presets panels, (Using gradients to colorize an image)
- Photoshop on iPad
Thanks for checking this out!
Colin
PS Don’t forget to follow us on Social Media for more tips.. (I've been posting some fun Instagram and Facebook Stories lately)
You can get my free Layer Blending modes ebook along with dozens of exclusive Photoshop Goodies here


11 thoughts on “Realistic background blur in Photoshop with Lens Blur”
Leave a Reply
How to remove anything from a photo in Photoshop to get rid of distractions and make a clean background. This...
When you launch Photoshop CS4 for the very first time, something is totally in your face. Yes, it sports a...
Here is a highly requested tutorial. Everyone wants to know how to take a picture and replace the background or...


Hi,
Thanks for this nice tuto !
One question : how to export a HEIC file from iPhone to desktop or photoshop ???
You have to turn it on in iPhone preferences
A Big Thanks!! You Do A super Job!!
A huge thank-you
Very awesome, thank you 😊
A big thank you, it is really enlightening.
Colin, I bow to you once again. Fabulous tute, and so easy once you’ve been shown how. Huge thank you.
It would be great to have the picture/s available for download so we can work on it as you do the tutorial.
All the premium tutorials come with exercise files.
When I go into the lens blur filter… after doing Everything else as you have done it, I have NO preview to work with in the filter and nothing happens when I try to use it anyway… happens with background copy and locked bg. I have tried with several images. I am using photoshop 2020. What can I do to fix or what is the problem? window operating system. left a question on your youtube channel as well.
Go to preferences and choose Legacy Compositing, if that doesn’t work, go to preferences>performance and turn off GPU (advanced)