Photoshop CC 2019 New features tutorial

What’s new in Photoshop CC 2019
In Depth Videos New in Photoshop CC 2019: Frames in depth and 5 tips
Hi everyone, we are at that time of the year when Adobe MAX is on (I’m teaching 7 classes this year, come by and say hi! Mention you are a CAFÉ crew member).
This also means that, this is the time when Adobe releases major updates to all of their creative Cloud applications. This year is no exception. On the surface, it doesn’t seem like a big upgrade to Photoshop CC, but there really are some big changes.
Today Adobe Releases Adobe Photoshop CC 2019. As always, we here at PhotoshopCAFE have you covered (Check out all our superguides, for a running guide of new features added to Photoshop since about CS2 or CS3.)
So, here they are! Watch the videos and read the features and how to access them here.
New Content-Aware Fill
We all love Content Aware fill (CAF). When it first appeared in Photoshop, it revolutionized how we do our retouching. We can make a selection and choose Fill>Content aware (Shift+Backspace) and the area is magically filled seamlessly. At least that’s how it’s supposed to work. Sometimes you get weird artifacts and we reach for the clone stamp tool. That’s because, CAF grabs pixel from another part of the document to heal the area and it either works or not.
Now, we get a Content aware workspace by choosing Edit>Content Aware Fill. You will see a live preview on the right, before committing.
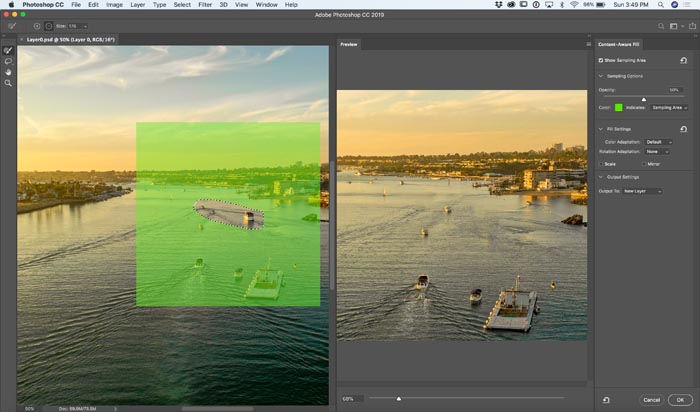
The areas that appear in green are the areas that will be used to sample from. Paint with the brush to exclude areas. Hold down Alt/Option to add areas to sample from. We can now define the sample areas, this really changes things.) Watch the video to see this is action).
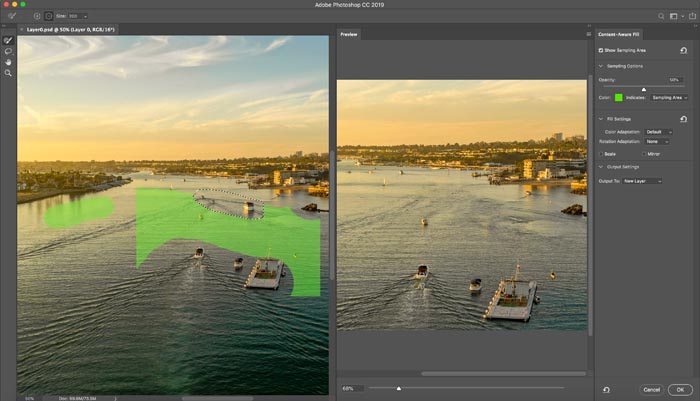
There are check boxes that allow rotation, scaling, or mirroring of pixels to help with perspective, faces and other things.
Choose output to new layer to get a non-destructive healing layer.
Frame Tool
If you have ever had to create things like thumbnails, you will love this feature.
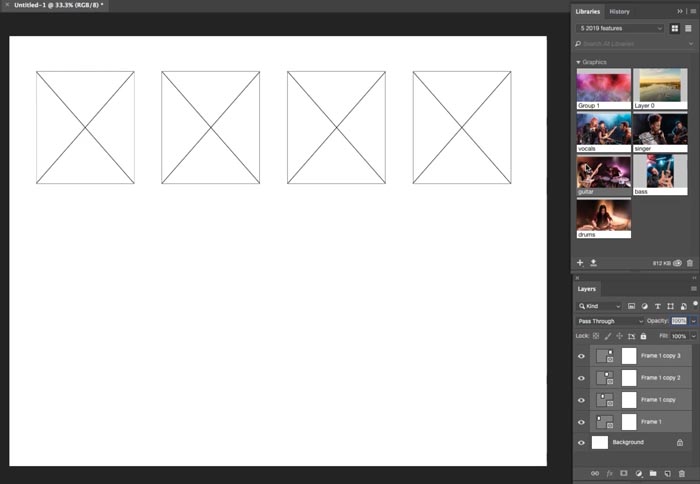
Here is what it replaces: You would create a rectangle. Drop in a photo. Create a clipping group to add the photo to the rectangle and then resize and reposition the photo.
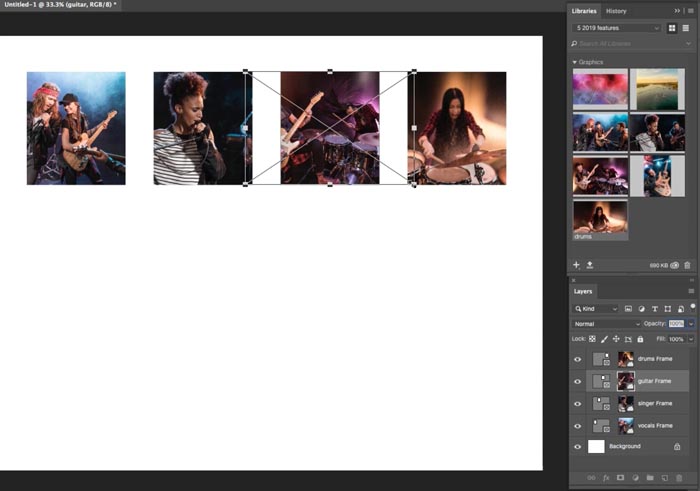
Now you just grab the frame tool (rectangle or oval) and draw on the canvas. Now you can drag a photo from the library, or a different layer and it will go into the shape and resize to fit. Here are a few tips:
- Double click with frame tool to toggle between selecting the photo and selecting the frame.
- To replace with a new photo, drag in a new one and it will replace existing image.
- This is big: Right click in the layers panel to convert and text or shape to a frame, custom shapes!!
HDR Panorama
This is new in ACR (Camera RAW) and Lightroom Classic
To create an HDR Panorama (A panoramic image that is in HDR and has all the dynamic range). We would first merge all the bracketed photos to HDR. Then we stitch all the HDR images into a Panorama. (See the tutorial here on how to do all this).
Now, we can just select all the images in the filmstrip, right click and choose Merge to HDR Panorama. This saves a lot of steps.
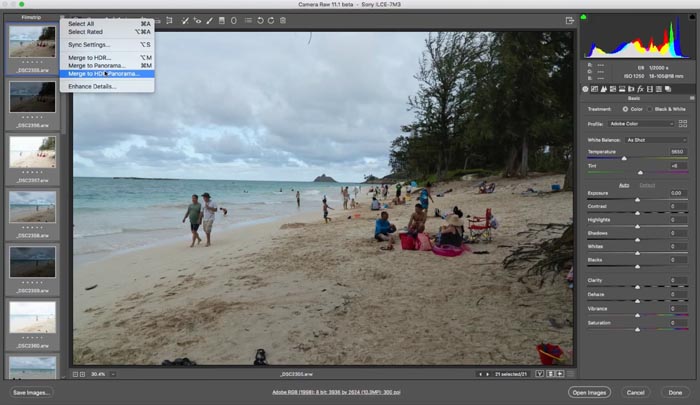
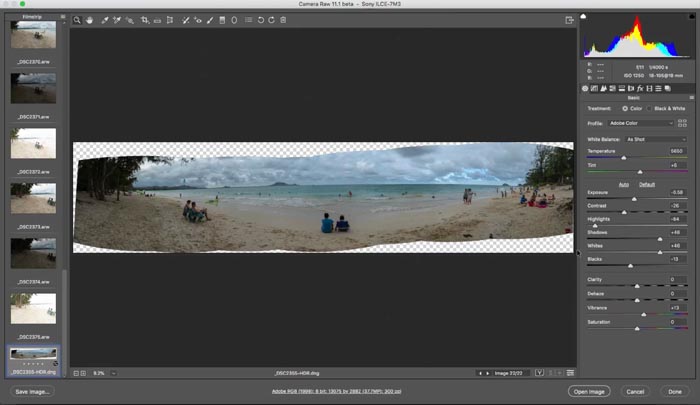
There are some caveats though. At the moment, it doesn’t work with DJI drone images, because they are only .7 of a stop brackets. I’ve heard murmurings that you need 2 stops of bracket for it to work. (You can still do it with the 2 step method as shown here).
Blending mode Preview
Instead of guessing the Layer Blending modes, choose the move tool. Click on Normal in the Layers panel, as you move through the different previews, Photoshop now shows a preview.
Other Changes
- If you have the move tool selected, double click on type and you can edit the text.
- To apply text, transform, place and crop, click away on th canvas (you don’t have to select a different tool anymore.
- Scaling: Don’t don’t need to hold down Shift anymore to constrain proportions while scaling. (If you hold Shift, you now transform disproportionate (the behavior is now swapped around).
- Multiple undo is now Cmd/Ctrl+Z, no longer Alt+Cms/Ctrl+Z
- Lock the position of your panels: Window > Workspaces > Lock.
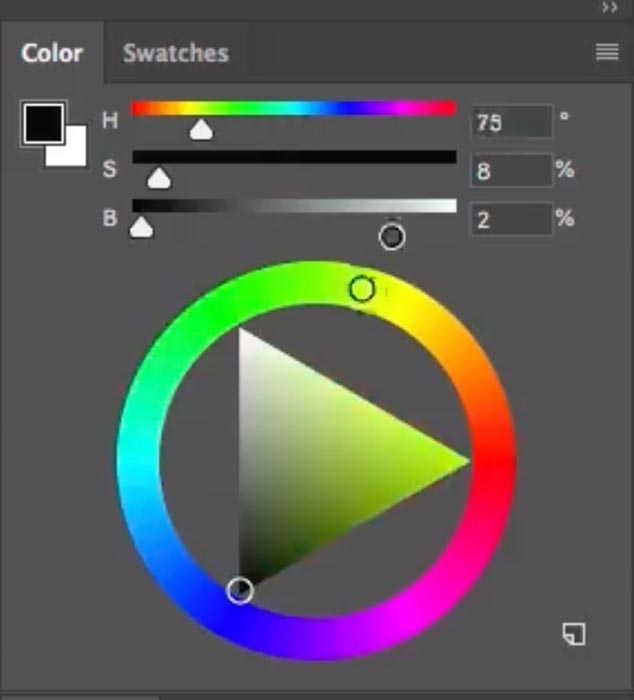
- Right click on the Color Swatch in the Color Panel and choose Color Wheel. You now get a color wheel that makes it easier to see complimentary colors and make color choices. (Looks more like the one in Painter).
- Math in number fields (simple math like “200/2” gets calculated and the result returned)
- Concept artists are always flipping the document horizontally to Help with composition. Choose View>Flip Horizontal to get a preview without actually changing the pixels and losing quality each time.
Thanks for checking this out and bookmark this page, as Ill be adding more videos here soon
PHOTOSHOP CC 2019 NEW FEATURE TUTORIALS
- 5 Big Little hidden things in Photoshop CC2019
- New Photoshop Frames in depth
- Content aware fill in depth
- New Features in Lightroom Classic
- Adjustable Depth Of Field
Great to see you here at the CAFE
Thanks
Colin

More CC 2019 New Feature tuts
► Lightroom New Features tour and tutorial
► Frames in Photoshop CC 2019
PS Don’t forget to follow us on Social Media for more tips.. (I've been posting some fun Instagram and Facebook Stories lately)
You can get my free Layer Blending modes ebook along with dozens of exclusive Photoshop Goodies here

53 thoughts on “Photoshop CC 2019 New features tutorial”
Leave a Reply
Stop ruining your photos in Photoshop because it will make you look like a noob. Here are 3 things to...
By Weston Maggio With each update to Adobe Photoshop, tablet users enjoy a plethora of enhancements that make their workflow...




No video
Try again
In older versions or Photoshop, I had tons of saved brushes that I used for backgrounds. If I install a brush with CC2018, they don’t seem to stay. I was hoping that would be resolved in the update.
I am stoked about the new content aware fill….and the multiple undo is something I’ve been wanting since 5.5….
Thanks for this great article!!! All great features! Can you check that link on the DJI 2 step method? I don’t see any working link? Thanks!
Content Aware Fill..one of my favs now even better!!!!
Wonderful information, as always. I hope you’ll keep doing lots of Photoshop tutorials! Thank you for always giving us good stuff!
ps please
When will PSD & TIFF files handle larger files and When will Lightroom “See” PSB files?
Probably never on all the above. PSB replaces the other 2 for large files and LR will use DNG
Hi my friend extraordinary as always… I have a question I have not up dated since 2016 and my platform is a Mac EOX 10.9.5 is it compatible with CC2019 ???
I like the restraining the portions while scaling and not have to hold the shift key. I also like the content aware fil that gives you a preview, and the blend modes that gives you a preview. These seem to be my favorites, but I do like the other changes.
Thank You for the heads up on the update! Your emails are very informative and appreciated!
Wowzers, that content aware fill is the best new thing, I’m always trying to find ways to do that simply. This is so exciting, thank you, Colin
Thanks for your great article! I don’t seem to see a link where it mentions a method to bracketed exposures on DJI Drones? Can you check that out? Thanks a lot!!! Gio
click on “see the tutorial on how to do this”
Prefer tutorials for Photoshop 2019, rather than Lightroom. Thank you
The content aware fill is definitely my favourite, and Ctl Z for undo. The others feature are also interesting.
Thank you for keeping us up to date.
Thanks indeed.
I would like more Photoshop tutorials (less Lightroom). Thanks — you are one of the best instructors, presenting material very clearly and understandably.
Next iteration PS wish — the adjustment brush range mask in Camera Raw is very useful. I use it often to lighten too-dark areas (using exposure and/or shadow sliders, often adding contrast). The ability to use a luminosity range mask limits the effect (minor complaint: for some reason, it’s not 100% accurate — can sometimes effect adjoining areas that should be beyond the range — but it’s usually pretty accurate). Wish PS had this luminosity/color range mask option (e.g., to limit dodging to a particular luminance range).
Loving these changes in PS. Seriously though Colin, where do you find the time to actually take photos, or are they all an illusion created in PS and LR?
lol, I have lots of time to take photos 🙂
Thanks Colin. I always learn a lot from your tutorials. ntm
The undo thing was easily changed via a custom keyboard setting.
Where has the editable centre point of the Free Transform bounding box gone?
Top left corner of the toolbar
As usual, your video was terrific. Could you make your first video for PS 2019 on Content Aware Fill? I have agonized in trying to create proper fills on too many occasions.
Colin – you are a wonder. So many incredibly helpful videos, all free!! I have been following you for years.
The shift thing with rescaling is so disturbing when you’ve been using it for the past 10 years.
Otherwise it seems like a good update
It takes time to get used to it
New to photoshop but live your tutorials breaking it all down so we can utilize the exciting new features.
Feeling confident in LR I am looking forward to getting that same feeling in PS and slowly it is coming along. You are the best Colin and your enthusiasm is contagious!
99% of my workflow uses unconstrained cropping, and I find having to hold the shift key to do this very difficult on a laptop. Please Adobe – give us a setting in preferences rather than forcing the user to hold the shift key down – this is a step backwards for anyone who needs to crop to image content!
Thank you!
Thank you! Very Helpful!
This is great info, thanks! But unfortunately, after updating to 2019, I had to uninstall it. It kept crashing on me. I think it was the old plugins I have – 2019 really doesn’t like them! So, I have had to revert back to an earlier version. Once they fix it – hopefully – I will be back!
Thanks for all of your great instructions. I like the new frames feature, but how do you add images to your library so that you can just drag them in to the frame?
Thanks for this. Last year I updated as soon as 2018 was available but I think I might wait a bit this time so that all the glitches are sorted out first
Which glitches? I really haven’t seen any and I use it every day
I did not see a link to your ebook on Layer Blending Mode. Please provide. I enjoy and learn each time I view your tutorials. Well done.
http://photoshopcafe.com/complete-guide-layer-blending-modes-photoshop/
I update as soon as I know there is a new update. I know new software can be buggy, but it will soon be fixed with another update.
Lightroom Tutorials now more useful than Photoshop as far as I’m concerned.
thanks Colin.
Really? A two minute ad before I watch the video. WTF? Really lame! Not wasting my time on this site.
There is a skip ad button you can press if an ad comes up
I LOVE your tutorials, by far the most comprehensive and easy to understand. However, one fault; I cannot find written instructions anywhere. Sadly my 82 year old husband who is as crazy about photography as me is stone deaf and I hate leaving him behind. I scribble away as quickly as I can and then try to make an instruction sheet for him but it is never as understandable as your explanation. I am sure he is not the only poor soul in this position and I wondered whether it would be possible to provide a precise of the updates so that we can both learn together.
Hi there,
The majority of the tutorials do have written instructions.
Some of the newest ones do and some don’t (yet) it a work in progress as it takes me a lot of time to make the written steps 🙂
The article you are posting on (CC updates) does have written steps, are you not seeing them on this page?
I really like your Tutorial, it is very nicely presented. Here comes the big but: THIS is all you get as improvement for a new release Photoshop release? SHAME ON YOU ADOBE!!!! Company gain from 2013 till 2018 in Mio USD> 289,99 268,40 629,55 1.168,78 1.693,95 2.590,77. Difficult to find a polite comment for this….