
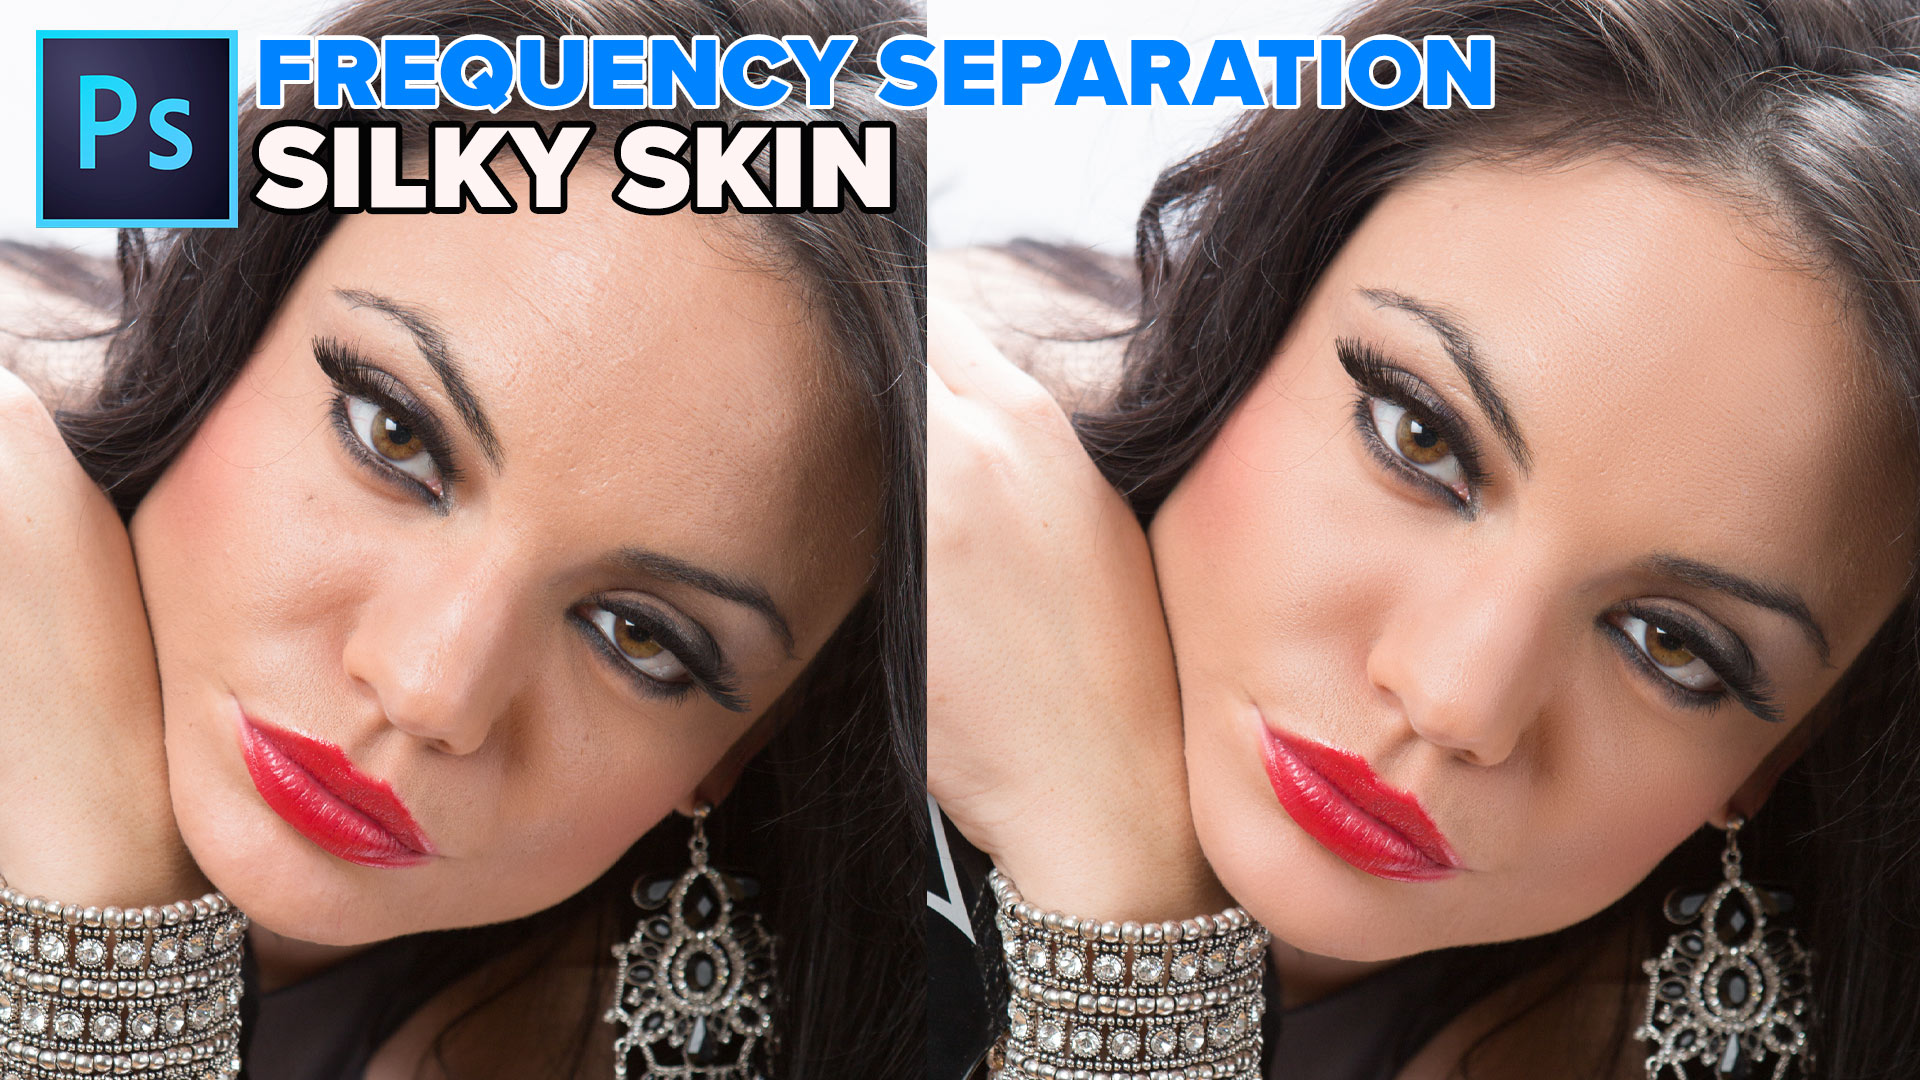
Frequency Separation, silky smooth skin in Photoshop
How to use Frequency Separation for retouching in Photoshop for smooth silky skin without losing the pores.
You may have heard the term Frequency Separation and wondered what it is. Or you have heard that all the high end retouchers are using this technique. Or, you may wonder how to smoothen out skin and remove blemishes and uneven coloring. In this Photoshop tutorial, Colin Smith explains what frequency separations is and how to use it without all the jargon. We pull back the veil and the mystery and lay it out in easy to follow steps.
© Colin Smith | Thanks to Lina for modeling for me in the photograph.
If you need a quick reference for the settings it’s here:
The ethics of retouching
Retouching, often misnamed as “airbrushing” is the technique of smoothing out the skin in a way that is more of an aesthetic than reality. The frequency separation technique I’m showing here is a requested style often used in Glamour and Fashion photography. It’s used in so-called “high end retouching” and not the kind of technique you would normally use on family portraits and corporate headshots. It’s a way to transform skin into a particular look that is sometimes required in retouching. Some people absolutely love this look and others dislike it.
Rule of thumb
As a rule of thumb, a good retouch is something that doesn’t look retouched. In certain situations, this isn’t true, some styles require it to look retouched and “too” perfect is what’s required. It’s a great way to smoothen out skin and you can choose to use it as heavily or lightly as you wish. In this case we are going to a style that you might find on the cover of a fashion magazine. There is a lot of argument around “airbrushing” and ethics. My goal here is not to get into all of that, but rather, just present a tutorial on a technique that viewers have requested to learn here at PhotoshopCAFE.
What is Frequency Separation
Frequency Separation is a bit of a mystery to those who haven’t used it and it may seem out of reach. My goal is to present it here in a way that anyone can start using and understanding the technique. I’m going to avoid jargon and make it as simple as I possibly can. I hope you enjoy this tutorial.
Basically what we are doing is taking a photograph on a layer and splitting it into 2 layers. One layer will hold all the detail and none of the color. The second layer will contain all the color, but not the detail. This way we can blur the color and even out blemishes without affecting any of the details such as pores in the skin and wrinkles on the color layer. On the detail layer we can remove acne, reduce wrinkles and other detail blemishes without mudding up the color and creating color spots.
In a nutshell:
Frequency: High Frequency is the detail (think treble). Low frequency is the underlying color and form (think Bass).
Separation: Spilting, dividing etc. In this case splitting into 2 parts.
Ok, definition is over, time to do it! There are 3 steps.
- 1. Setting it up
- 2. High Frequency removal of blemishes
- 3. Low frequency smoothing of color
Let’s get started.

The Frequency Separation tutorial
Step 1. Setting up the Photoshop Layers
Duplicate the layer 2x, so that there are 3 layers. Press Cmd/Ctrl+J twice.

Click, hold Shift and click on the next layer to select the 2 top layers.
Press Ctrl/Cmd+G to put them in a group. Name the Group FS

Name the top layer detail (This is the high frequency layer, but the tech name isn’t needed)
Name the 2nd layer Color (LowFrequency. I won’t use the term frequency again in this tutorial except for the name, because its just jargon).

Step 2. Doing the frequency Separation part
Turn off visibility on the detail layer and choose the color layer.
Choose Filter>Blur>Gaussian Blur

Move the amount just enough that the detail of the pores disappears. (4.2 here – choose a higher number if needed) Click ok, this layer is ready.
Choose the detail layer

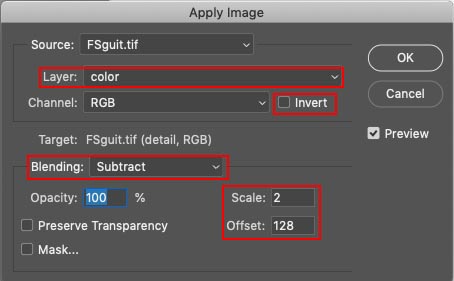
Choose Image>Apply Image
In the dialog box, choose the color layer from the layer drop down. (we named it color in step 1).

Under blending choose Subtract

Settings for Frequency Separation
Scale 2, offset 128
Make sure invert is turned off and you should see a gray image of just the details as shown

Click ok
You will still see the gray image. Change the blending mode to linear Light and it should now look exactly like the original image.


The Frequency Separation layers are all set and ready for use.
Note about 16 bit vs 8 bit (not a tutorial step):
I like to suggest that these settings I present work on both 8-bit and 16-bit images. I have seen different settings floating around for 8-bit vs 16-bit images. I have tried both sets of settings on both 8-bit and 16-bit images and I can’t see the difference. I’m open to being corrected, but please start with a 16-bit version of the image and apply both sets of settings. Then make an 8-bit version and apply both sets of settings. There may be a difference between 8-bit and 16-bit images, but do the settings actually look any different?
Retouching using Frequency Separation layers in Photoshop
Step 3. Fixing the detail layer
Now it’s time to do the retouching using the layers we have prepared. Starting with the detail layer selected.
Choose the healing brush (Or spot healing or clone stamp, whatever you prefer).

In the tool options at the top, choose Current Layer (This is important)

To use the Haeling brush, hold down Alt/Option and click on a good area near the blemish to sample it. Click with the healing bush on the area that you want to cover up.
On the detail layer, do your removal of things like acne, blackheads etc, In this case, I didn’t need to do much because Lina has great skin naturally.


Step 4. Fixing discoloration and uneven skin surface
This step is where the frequency Separation really kicks in.
Choose the color layer

Double click the quick mask to set it up. ![]()
Make sure Selected areas is chosen

Chose a brush (B) and click at the top right to go to brush settings
![]()
Make sure a feathered brush is chosen with hardness turned all the way down to 0

Everyone I have seen do FS, uses the lasso tool, makes a selection and then feathers it. (So feel free to do that if you like) I prefer to use Quickmask, because I can paint on my selection and it already has a soft edge.
Choose Quick Mask (Q key) making sure foreground is set to black
![]()
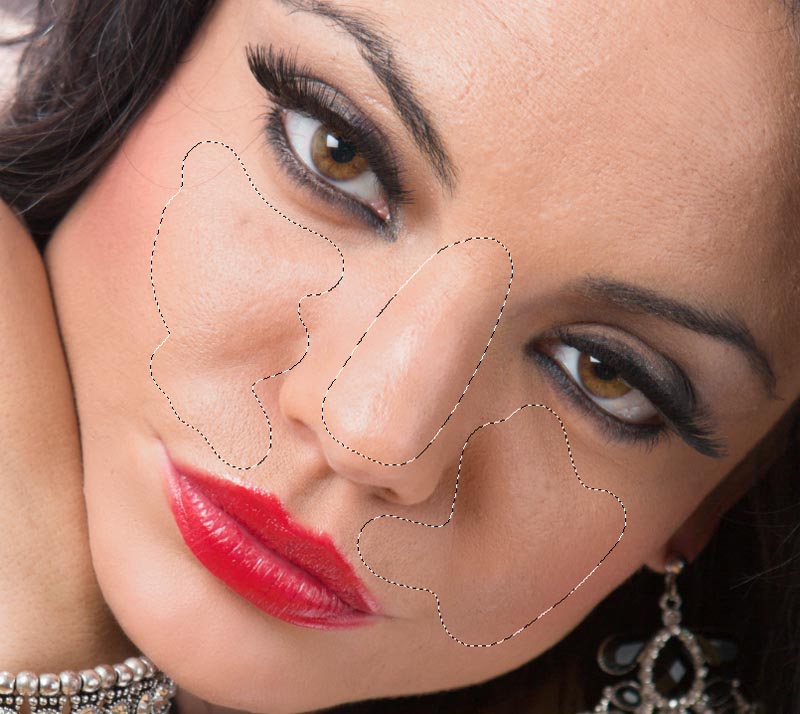
Let’s start with the chin. Adjust your brush size [ or ] keys. Paint on the chin, you should see a reddish color as shown. If not, press undo and go back over all the parts of step 4 to see what step you may have missed. (Also watch my video at the top of the tutorial page, which you should have done anyway 😉 ).

Press Q to toggle to a selection. (Q toggles between quick mask and a selection).

Let’s blur it. Choose Filter>Blur>Gaussian Blur

Choose an amount that causes everything to be smoothened out. In this case it’s 12. If you want a more subtle effect, use a lower number. (normally I would use a lower number, but I want the difference to be clear for this tutorial)
Click OK
Press Cmd/Ctrl+D to deselect
See the before and after? This is the major part of Frequency separation. We are able to smoothen out the color and tones without losing the detail such as pores.


You can use quick select to choose multiple areas as shown. I always do the face and forehead separately though, because they have a different grain structure and will require different amounts of blur.
Press Q for Quick mask
Paint over the area you desire (as we did for the chin)
Press Q again for the selection
Apply a blur of the same value as before. The top of the Filter Menu will apply the last-used filter with previous settings. (12 in this case)

(Please note, if you have more time, you can get an even better result by using the healing brush/clone stamp tool here instead of blur, but it does take more time and work).

Press Cmd/Ctrl+D to deselect

Repeat for the forehead
Press Q for Quick mask
Paint over the area you desire on the forehead with a larger brush

Press Q again for the selection

Apply a blur, this time I’m going to go more subtle so you can see the difference (4.5 in this case)
Deselect
Here is the before and after.


This is what it looks like with a higher setting of 8.2
The final result of a heavier Frequency Separation

Also here is a before and after version with a more subtle blur of 5 applied to the entire face (on the color layer).
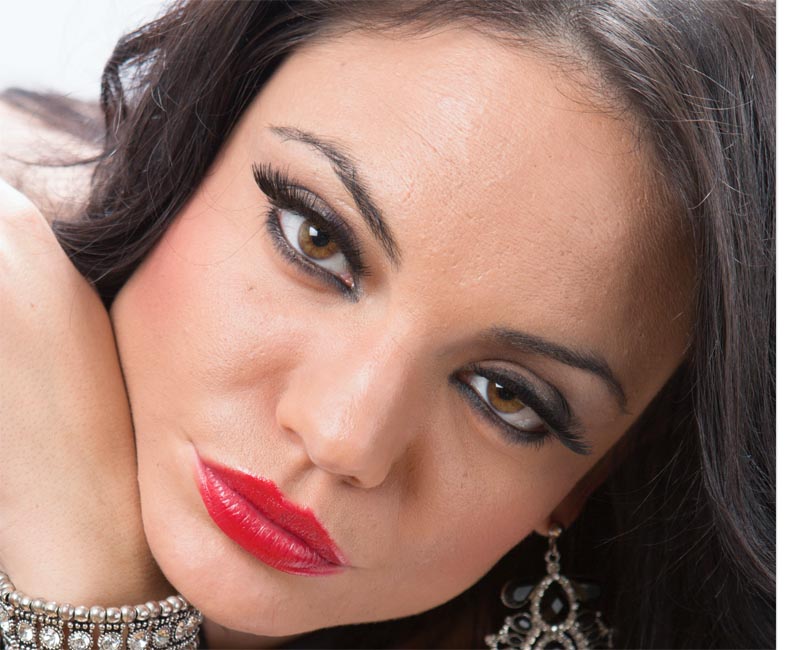

Choose if you want to go heavy or more subtle. Notice we can smoothen out the skin without losing the skin texture such as pores.
You never want to blur the skin without using frequency separation, or it will look like a plastic mannequin.
So, there’s Frequency Separation for you in a nutshell. Not so hard after all huh?
Thanks for checking this out, drop a comment!
Great to see you here at the CAFE!
Colin
PS Don’t forget to follow us on Social Media for more tips.. (I've been posting some fun Instagram and Facebook Stories lately)
You can get my free Layer Blending modes ebook along with dozens of exclusive Photoshop Goodies here

14 thoughts on “Frequency Separation, silky smooth skin in Photoshop”
Leave a Reply

Celebrating 25 years of PhotoshopCAFE with a new website Design

If you are a Photoshop User and have been considering using Lightroom, this tutorial will teach you the basics to...

Updated ai selection tool in Photoshop is stunningly good now


great tutorial!
Thank you
Nice one and great job
Colin, good stuff, thanks. I do commercial portraits, business people, doctors, bankers, etc for web sites, brochures, or sometimes wall portraits in offices.
happy to help
Thanks Colin great tutorial
Hey Colin,
There are many technique to smooth the silky skin. But, It’s the easy way to do this work. Thanks, dear for sahring your creativity.
awesome tutorial, many thanks
Thank you for this tutorial, worked perfectly!
I tried this, only intending to smooth the color and lose no detail, but the whole image was softened (even outside the selected areas). Did I do something wrong?
I tired it again, this time using the supplied action. Worked perfectly!
Hi. The link to the free package isn’t working?
Maybe try a different browser? It works when I test it
I have discontinued the package and taken it off the page, it was outdated. I will update it and repost it soon though.
I have downloaded your Frequency Separation action and have attempted to follow both your pdf and video instructions. However, with the detail layer active the healing brush does not work. Changing to the colour layer, it does work. I am using the latest version of Photoshop.