
What’s new in Photoshop Cs6 for the Wacom tablet user
By Weston Maggio
With each update to Adobe Photoshop, tablet users enjoy a plethora of enhancements that make their workflow more productive and in some cases more enjoyable. Photoshop CS6 is no exception! What I am particularly interested in is what does this version bring to the tablet user? Again, CS6 does not disappoint. In my review of our favorite app, I have found a variety of features, both new and updated that will have tablet users cheering. Read on to learn, “What’s New in PS CS6 for Tablet Users”.
User Interface
Upon opening the app for the first time, your eyes will likely widen as you find the user interface (UI) has been updated to the fast-becoming standard, dark look. Adobe and other application developers have been gravitating toward darker UIs as studies have shown that gray values have less effect on your perception of tonal values and saturation. For some this new dark UI may be distracting at first, or present some contrast issues with text (especially in panels). If you’d prefer the “old” look, or would like to adjust the contrast, you can change the appearance in the Photoshop > Preferences > Interface.
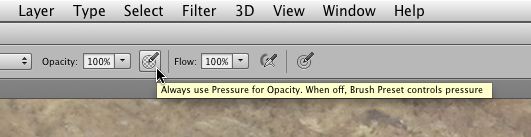
What does the color of the UI have to do with tablet use? Nothing, but you can’t skip the cover of a book before you open it! I’m not judging. It’s just the first thing you see. Ok, let’s look at something more relevant in the UI that every tablet user should be aware of. If you skipped the upgrade to CS5, or perhaps did not notice the addition of two new buttons that appear on the options bar, you missed a big feature for tablet users. When you have the brush tool selected, these two icons enable pressure sensitive control of the size and/or opacity of a brush stroke. The buttons are available once again in CS6 but they come with a more descriptive tool tip that should make them easier to understand, and thus used more effectively.
In short, when toggling either (or both) of these buttons to their on, or depressed position, you elect to control the size or opacity of the brush by pen pressure. This method overrides whatever controls have been assigned to a brush preset, meaning when the button is in the off position, pressure is controlled in the Brush Panel. Tip: For general retouching, I often select a basic soft round brush from the brush panel, and then toggle the control of the size and opacity of the brush (tip) using these pressure control buttons.
Painting
Perhaps the biggest news for tablet users is the work that Adobe has put into the drawing and painting features. There have been updates to the Brush Panel, tools, tips, presets, performance and more!
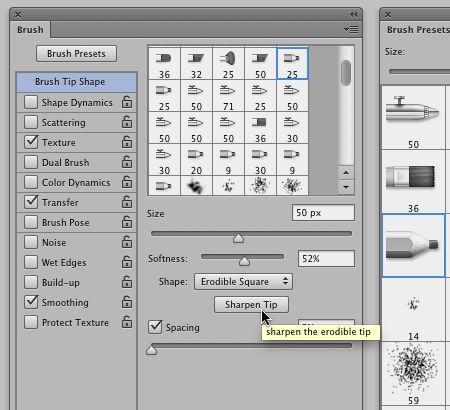
I’ll start with perhaps the most visual enhancement, the introduction of “erodible tips” (as in tips that wear down) and “airbrush tips”. Found in the Brush Presets panel, erodible and airbrush tips can be identified by a profile view of a shaved pencil and a traditional airbrush respectively. The unique characteristics of the erodible tips include the combination of wear and texture as you continue to use them. The result is the appearance of what you would achieve when using traditional soft, dry media. The more you rub, for example a soft pastel pencil, onto a textured surface, the more it would wear down (and build up). Like traditional media, when you need to sharpen a tip you can do so in the Brush Tip Shape pane of the Brush Panel. (That’s a mouth full!)
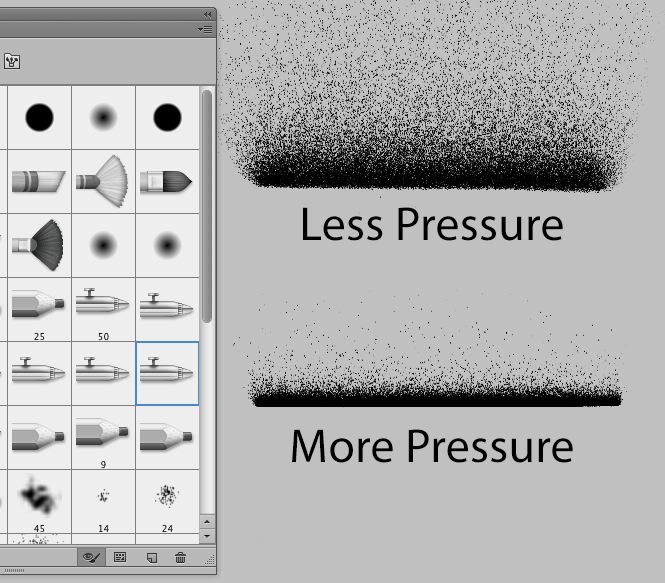
Airbrush tips take on the characteristics of a traditional airbrush, most notably by incorporating the use of the tilt function found in Wacom’s professional pen tablets (Intuos and Cintiq). Angling the pen to the tablet when painting will “throw” or project the paint in the direction that you are pointing. A lighter amount of pressure simulates the effect of the airbrush being higher off the surface, while a heavier touch results in the effect that you would get if the airbrush were very close to the surface. (Opposite of what you might think or what you are used to with static brushes.) These two new brush tip types as well as a variety of new brush presets offer the artist, illustrator and painter some great new media options and styles to experiment with!
Something else that may grab your attention is an additional pane in the Brush Panel. “Brush Pose” enables you to set stylus parameters for Tilt (X and Y axis), Rotation and Pressure. Enabling these options override any pressure controls assigned in the brush preset. For example, users of an Intuos tablet or Cintiq interactive pen display, whose pen recognizes tilt, may opt to ignore tilt altogether or lock the angle of a brush while drawing. Additionally, users of Wacom’s optional Art Pen (which recognizes tilt, and rotation) can override the rotation of the pen. (For Bristle Tips, Erodible Tips and Airbrush Tips, you can see the effects applied in Brush Pose in the Live Tip Brush Preview. *Bristle Tips were introduced in Photoshop CS5.

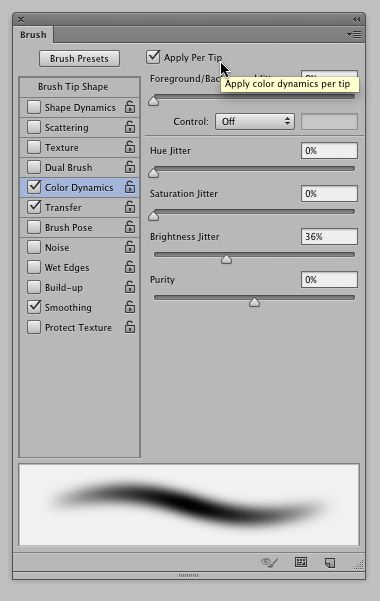
Finally, a notable enhancement in the Brush Panel is the addition of a new option in the Color Dynamics pane. A checkbox now enables you to vary Color Dynamics on a per tip (or stroke) basis. When checked, Color Dynamics behaves as it has in the past. Random colors (between the foreground and background) are across the length of the stroke. Unchecking the box, maintains a constant color per stroke. Each subsequent stroke varies based on the settings in the pane. A nice addition for those looking to add variety to their illustration and design work.
HUD Brush Controls Update
On the subject of brush control, those that have enjoyed the dynamic HUD brush resize function will be thrilled to see it enhanced to offer what is being dubbed as “rich-cursor information”. When you modify the size (diameter) and hardness of a brush using the drag-resize method, in addition to the visual representation of the brush attributes, you now get a textual readout of the Diameter, Hardness and Opacity settings at the cursor.
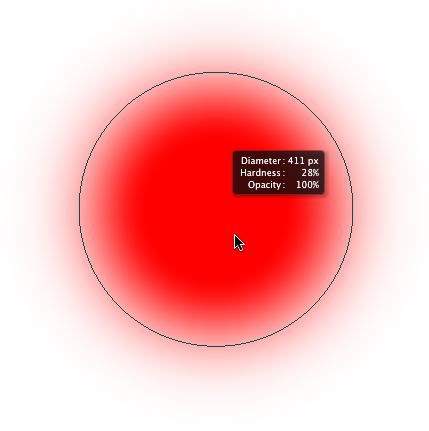
Additionally, you can now elect to change the function of dragging up/down from its default (hardness) to opacity. To change from Hardness to Opacity, in the General Preferences, uncheck “Vary Round Brush Hardness based on HUD vertical movement.”
Tip: To visually adjust the size and hardness (or opacity) of a brush, use the following key commands when pressing your pen to the tablet and dragging.
Macintosh:
Change brush size: option-ctrl-drag left/right
Change brush hardness or opacity: option-ctrl-drag up/down
Windows:
Change brush size: alt-right mouse button drag left/right
Change brush hardness or opacity: shift-alt-right mouse button drag up/down
Tool Recording
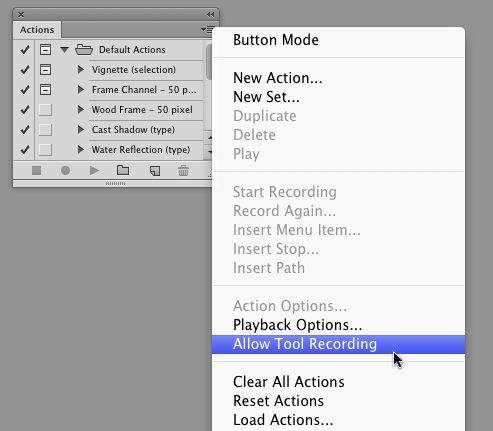
I want to make mention of the new tool recording feature. This new function enables you to record brush strokes as part of an Action. My initial thoughts on this feature was, how cool would it be to record an action that makes a tonal adjustment to an image, and then brushes on a mask to reveal only a portion of the enhancement? When playing back the action, you can literally watch the mask appear. If it reveals (or conceals) too much of the effect, simply modify the mask after the fact. Or, how about playing back a sketch? You can now record each brush stroke laid down in the creation of a sketch for later playback!
To enable the recording of normally non-actionable tools, select the Allow Tool Recording menu option in the Actions Panel fly-out menu. A note on playing back actions that contain brush strokes: When playing an Action that contains brush strokes, keep in mind that the tool used in the original action is honored, however the settings for that particular tool (including brush presets) are not. The brush settings in effect during playback will be used. i.e. Size, color, opacity and more.
Camera Raw
With the recent introduction of Lightroom 4 you may have seen a preview of what was to come in the next version of Adobe Camera Raw (vr. 7.) –Lightroom and ACR use the same RAW processing engine. You can now make local adjustments to Temperature and Noise Reduction. Additionally, ACR 7 brings new Black/White as well as Highlight and Shadow controls to the basic panel; replacing/updating the previous Recovery, Fill Light, Blacks and Brightness controls.
Performance – Liquify and Oil Painting
Not all necessarily pen-centric, but welcome performance updates have been made for anyone who pushes pixels—literally! Many of the resource intensive functions found in previous versions of Photoshop have been updated to take advantage of later model computers, and more specifically, new video cards. These functions, now take advantage of the GPU. Non-technically speaking, they are faster. Meaning, you can actually use them effectively!
One such function that I look forward to using more often is Liquify. In the past Liquify was extremely resource intensive, lagging at the slightest wisp of the pen. Now, a little nip and tuck, here and there can be gracefully applied with the subtle nuance of pressure.
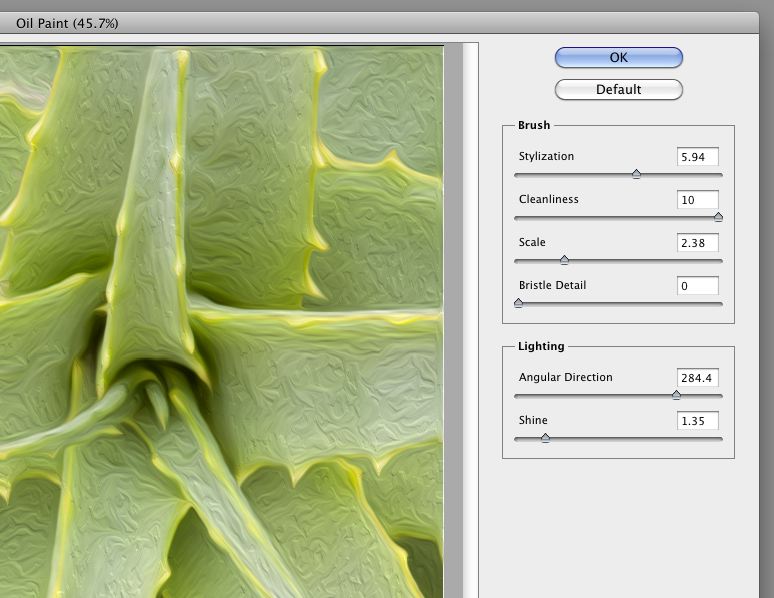
With this update on performance also comes a new filter, Oil Paint. Oil Paint offers photographers and artists a nice starting point when turning photos into paintings. The interface enables you to vary the level of stylization and cleanliness (smoothness) of the virtual brush being applied, as well as a variety of depth, detail and lighting effects. All based on a combination of sliders. Once you’ve created a base layer for your painting in the Oil Paint interface, you can make it your own by applying a personal touch with the bristle tips brushes (which mimic traditional media) introduced in CS5.
Kudos to John
To bring this What’s New review to a close, I would be remiss if I did not give kudos to the ever-brilliant John Derry who put in a significant amount of work into the development and use of the new erodible tips and airbrushes. His experience in art and technology have lent to a number of advancements in the evolution of creative applications. Specifically, those apps that combine the realistic look and feel of traditional media. The result of his efforts have given artists the ability to combine media that they never could traditionally, and at the same time, take advantage of all that digital media has to offer.
About the Author
Wes Maggio is a long-time tablet user and Senior Solutions Manager at Wacom Technology Services Corp. He is a passionate trainer and speaker, presenting at various photography and design events around the world. He is also a contributing writer to numerous creative magazines and he is the co-author of the leading title on tablet training; Wacom Tablets and Photoshop CS6 from PhotoshopCAFE. Wes is the host and frequent presenter of “Wacom Webinars”, a series of live webinars offered monthly, as well as the manager of the popular blog, Tablet Gurus, “the go-to place for tablet users”. In his spare time, if he is not on a plane somewhere, he is literally running around town.

Other Content
Lightroom 4 Learning site
PS Don’t forget to follow us on Social Media for more tips.. (I've been posting some fun Instagram and Facebook Stories lately)
You can get my free Layer Blending modes ebook along with dozens of exclusive Photoshop Goodies here

2 thoughts on “What’s new in Photoshop Cs6 for the Wacom tablet user”
Leave a Reply

June 2021 release of Lightroom Classic brings super resolution, native Apple Silicon M1 support, new presets, Nikon live capture and...
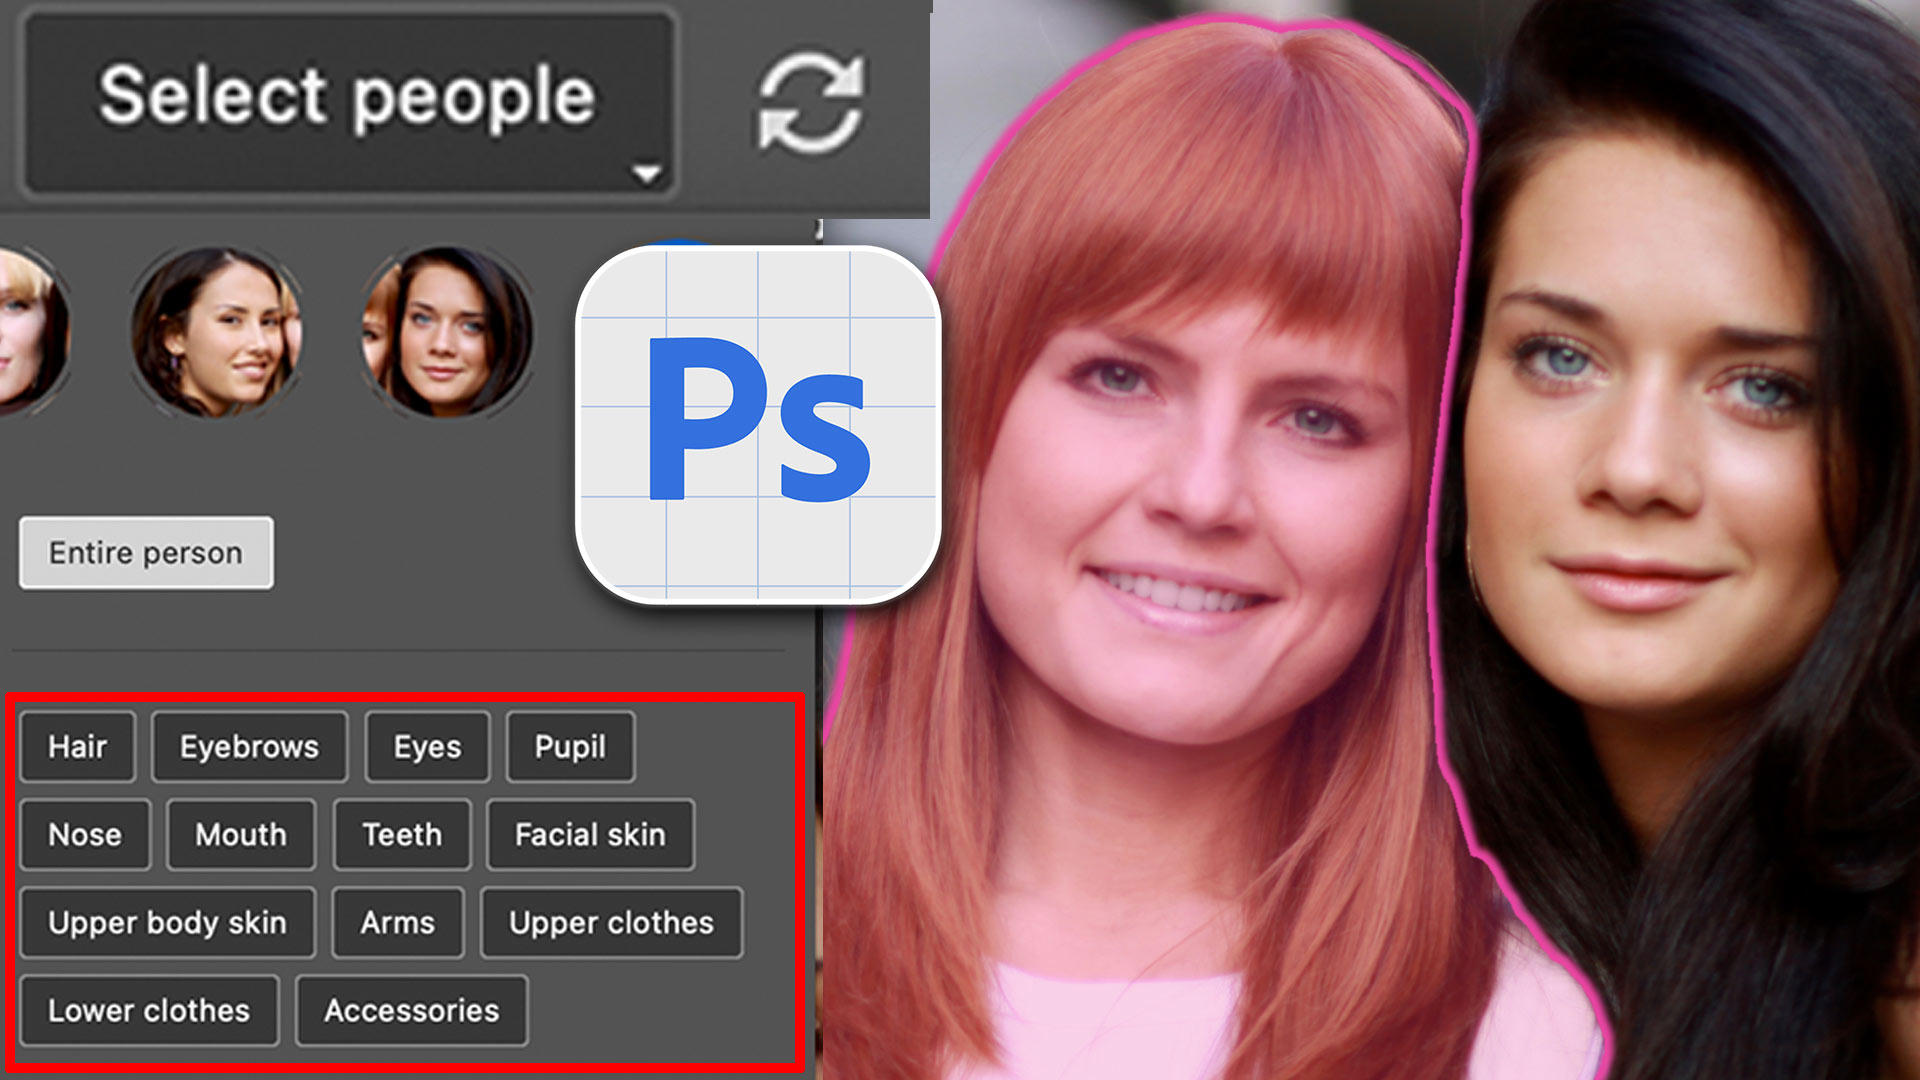
How to automatically select people and facial features in Photoshop, like in ACR + Lightroom

This is where the collision happens between Lightroom and Photoshop. When do you use each? If you know one application...


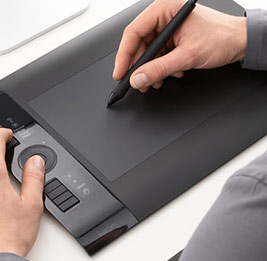
Do you still offer the CS6 Superguide? If so, I’d love to have it. Also what would you recommend for an inexpensive pen table to use with CS6?
I will send it to you,
The Wacom Intuos is a good, inexpensive tablet