
Drawing Paths with the Pen tool in Photoshop Tutorial
It seems that one of the most requested and under-explained things is using the pen tool in Photoshop.
The pen tool is very powerful and accurate. With a little know-how and practice, it will be your ally for the rest of your career.
Step 1 Vectors and paths explained
Vectors Explained
As you know, Photoshop is primarily known for its ability to manipulate pixels, those tiny building blocks that join together so tightly that they seem to form a smooth image, usually a digital photograph. But Photoshop is also handy with the other important family of computer-graphics building blocks: the little guys called vectors.
See it in action: Extracting photos with the pen tool video tutorial
 Vectors are lines, whose curvature, thickness, and length are determined by mathematical formulae. You don’t need to know any math; it’s all done for you. If you want a shape like a circle, your job is to simply draw the circle; Photoshop defines the center point and the radius to create a circle. At that point, you can specify the circle’s color, line thickness, and so on.
It might seem odd to find vector-drawing tools in a pixel-pushing program like Photoshop; vector drawing is usually associated with very different programs, like Illustrator and Freehand. Photoshop can’t create entire vector documents. It uses vector elements and stores them in layers and as paths. But be grateful that Photoshop offers this feature; it can come in handy in a number of situations. Most commonly vectors are used for cutting something out from its background in a photograph. Check out the car, vectors were used to cut it out.
The pen tool is great for these kinds of cutout tasks because of the clean, controllable, reusable nature of vectors.
Other times you might prefer to use Photoshop’s vector tools are for a large poster, because you can create it small and then scale it up huge without losing any quality. Vectors are great for when you have to change a design many times because you get no degradation each time you change something. Vectors also work great for text and box heavy designs such as postcards, because the edges will print nice and sharp.
In Photoshop (and other Adobe programs), the mathematical name for the lines that determine vectors is Bézier curves.
They’re named after their French creator, Pierre Bézier, who came up with a clever way to make computer-drawn lines bend to their will. A Bezier curve’s direction and angle is determined by the position of little anchor points that lie nearby
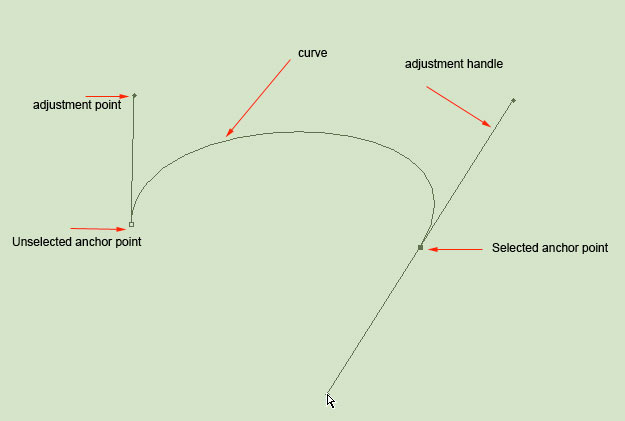
Here are all the different parts that make up a curve. A path is a series of curves joined together.
Notice as you click a point it changes color and becomes black. This is called “filled or selected” you can now modify this portion of the path.
Drawing with the pen tool
When it comes to actually creating a path from scratch, the pen tool is the most common option. This tool may look familiar to you. That’s because its almost identical to the pen tool in other Adobe apps like Illustrator, Indesign and Flash.
It’s not, unfortunately, a very natural process, especially to anyone who grew up drawing with markers or crayons. This is because unlike the pencil tool, you are creating your shape with points and handles. You don’t just draw on the page, you have to add points and manipulate them to create your shapes. The pen tool is the way that you add these points and the way you drag the tool as you create the points determines how they will look.
Remember, the fewer points, the smoother a path will be. Imagine moving a pencil in a single motion to produce a smooth curve. If you attempt that same curve with many short strokes, you’ll wind up with not such a smooth curve—and that’s what you get if you add too many points do to path.
Here’s a rundown of several common line/curve shapes you might want to create—and how to create them. Once you have mastered these basic shapes, you will be able to draw almost anything with the pen tool.
Step 2 Straight line paths
 Drawing a straight line is easy, you could use the line tool or the pen tool.
Choose the Pen tool on the toolbox.
Select the drawing option from the options bar to draw either a path, Shape layer or fill pixels.
Click once to mark the starting point, then Ctrl-click Cmd-click) somewhere else (without dragging) to mark the ending point. A straight line connects the dots.
You can also keep clicking to keep adding straight line segments—to create, for example, an irregular straight-line enclosed shape. Just remember to Ctrl-click) at the point where you want the line-adding to end.
<h3Step >3 Curved Paths
 Choosing the pen tool will enable you to draw paths easily. Choosing a different kind of pen tool will give you a different behavior.
Curves are more difficult than straight lines, but they come with practice.
The key is to drag after placing each point. That is, as you create a point, don’t just click; rather, click and drag in the direction that you want your curve to go. The further you drag, the larger the arc will be between the current point and the next one that you create.
Here are some basic curves. Once you master these, you will be all set to draw almost any shape.
Step 4 U-shaped curves
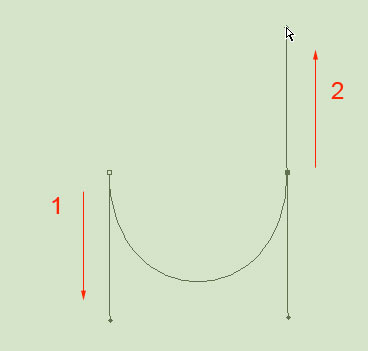 Create a simple U curve. The further you drag the bigger the curve will be.
To create a U-shaped curve:
1. Drag downward.
As you drag you will notice that two handles are being created. These handles determine how acute the curve will be and the direction that you are wanting to draw the curve.
2. Move your pointer to the right, parallel with the first point that you made; click and drag upward.
Click and drag up and you will now see a U shaped curve being generated. The curve goes in the direction that you are dragging. Don’t worry if it’s not perfect; you can modify any curve.
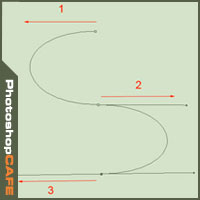
Step 5 Simple S curves
 Creating a simple S-curve. Notice that as you change the angle of your drag, the shape of the curve also changes.
An S-curve is only slightly more complex:
1. Drag to the left.
The direction handles are being created.
2. Position your pointer underneath the first point. Drag to the left again.
Notice that you have a loose S curve. As you change the angle of your dragging, you change the shape of the curve.
Step 6 Complex S curves
 The complex S-curve. Smooth loose curves are easily created with the pen tool.
Don’t be misled by the title; the complex S curve is actually easy to create. It’s called complex because it involves three points instead of two. In the previous examples, there were only two points that controlled the whole curve. Greater control is available with the addition of a third point.
1. Choose a starting point; drag to the left.
The direction handles are being created.
2. Position your pointer underneath the first point and drag to the right.
So far, you are creating a U curve, as described above.
3. Move the pointer underneath the second point and drag left once again. You are now creating the equivalent to two U curves in different directions. This is the S shaped curve.
4. Ctrl-click away from the path to stop drawing.
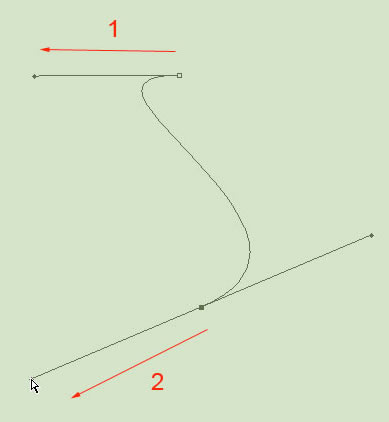
Step 7 M curves
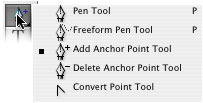
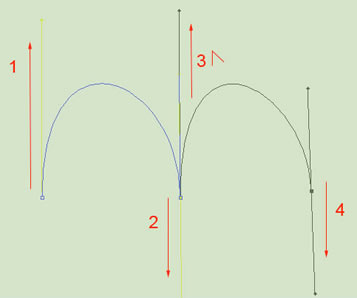 The M curve is a little trickier because it involves a new tool: the Convert Point tool. The convert point tool is found under the pen tool in the tool box as shown in step 3.
1 From your starting point, drag upwards.
You are creating the direction handle.
2. Move to the right and parallel, drag downward.
You are creating an inverted U curve right now.
3. Now the tricky part: Hold the Alt (Option) Key and drag upward.
You are not drawing a curve right now; you are changing the direction handle for the next curve. The way the pen tool works is this. First you define a direction with a direction handle (The initial drag of the mouse). The next click actually draws the curve based on the direction of the first drag and the second. If you want a sharp curve (called a cusp), you need to first change the direction of the handle without affecting the previously drawn curve. The Convert point tool, is such the tool for this task. The Alt (Option) Key is a quick way to temporarily choose the Convert Point tool.
- Position your pointer to the right of the second point and drag down
You’ve just made an M curve.
- Ctrl-click (c-click) away from the path to stop drawing.
Tip: While holding down the Ctrl (c) key on your keyboard, you can drag any point to a new position.
Step 8 Closed paths
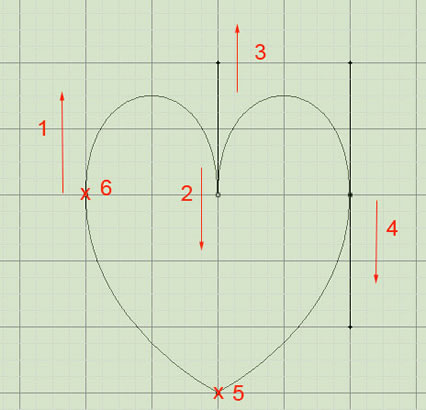 A closed path. X marks the start/end point. To help in creating your curves, you may want to show the grid under the View>Show menu.
The paths described so far are open paths—that is, they’re not fully enclosed shapes. They’re just lines, and therefore you can’t use them to select areas of your image, or fill them up with solid colors (Unless you are using the Shape Layer method of drawing.)
A closed path, on the other hand, can be filled with color, texture or patterns. It can be turned into a selection to use on an image. Perhaps you want to apply an adjustment or a filter to an isolated part of your image. You will need a closed path for that. In celebration of your new love of curves, here’s how to create a closed path.
1. Repeat the steps for the M curve.
Follow the directions in the previous example to get to the point of an M shaped curve. Don’t deselect yet.
2. Click to add a point beneath the other three points.
In the middle, the shape of the heart begins forming.
3. Finally, point to the first point you created, without clicking.
A small circle appears by the pointer. It tells you that your mouse is hovering over the initial starting point. Click on the circle to close the path and form a closed loop.
4 Click the point to close the path and complete your heart.
The pen tool will automatically stop drawing on completion of a closed path. You could now select the path from the Paths palette and convert it to a selection, export it to Illustrator or save it for later use.
Tip: Try turning on the grid to assist in drawing paths:View->Show->Grid.
 EXTRA TIP
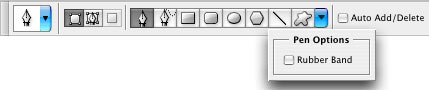
The Pen tool offers two behavior-modification options in the Options bar:
Auto Add/Delete. If this option is turned on, when you point to a path without clicking, you see a + sign, meaning that you can add a point here by clicking. If you point to an existing point, you see a – sign, meaning that if you click here, you will delete the existing point.
Rubberband option. If you turn on this option, then curves start to form as you move the cursor around the screen—a sort of real-time preview of the shape you’ll get when you plant the next click. It’s a useful guide for creating paths. This is found under the Geometry option in the options bar.
I hope this little run-through of the pen tool helps you.
Check out the Bezier Game.
This free online game will help you build your Pen tool skills.

PS Don’t forget to follow us on Social Media for more tips.. (I've been posting some fun Instagram and Facebook Stories lately)
You can get my free Layer Blending modes ebook along with dozens of exclusive Photoshop Goodies here

39 thoughts on “Drawing Paths with the Pen tool in Photoshop Tutorial”
Leave a Reply

in this free Lightroom tutorial learn how to stitch a panoramic photograph in Lightroom 6 / Lightroom CC. Merge photos...

How to fix GoPro lens distortion in Photoshop. Even though are using video in this tutorial, this works on any...

Explore the top new features in Photoshop 2026, Full release


YAY!! THANK YOU!!!
Hi — I’m glad to have found this page — love using paths and will go back and try the Bezier game soon. But right now I’m perplexed because all of a sudden, when I start to make a path, a Shape Layer is automatically created, and the path is filled with whatever the foreground cover is. What happened? I just want to draw paths, NOT filled shapes; just want to save them as work paths, select them, and maybe make them clipping paths. I DON’T WANT a new layer or fill or anything fancy! Where did the simplicity go? I’m on Creative Cloud — did Adobe just rip out the old Photoshop from my system? I’ve been working with some RAW images lately and wonder if some preference got bumped because of that? I DON’T WANT A SHAPE LAYER! Can someone advise how to go back to plain ole’ wunnerful paths??
Thanks!
There are 3 options in the top left corner. Pixel, Shape Layer and Path. Make sure you select the path option. Also set the stroke and fill to noting if you’re still having problems. The pen tool is actually better now in CC, you just need to select the right options. Let me know id you still have problems.
Thank you, Colin — I stumbled upon this sometime after I posted my comment — I wonder how I got to the Shape option in the first place, but was happy to get back “home” to the plain ol’ path option. Not a CC conspiracy after all — just user error!
bait and switch all over again
i need to learn how to use line and paths for setting up single and doublle point perspective .
shame none of the ten photoshop books i have missed this concept.
one even assumed i already knew the technique !
umm, TDH. Why is this bait and switch? Do you even know what that term means? This is a free tutorial, Im not trying to sell you anything, so there is nothing to bait and switch. The title of the tutorial is drawing paths with the pen tool and that’s exactly what it teaches. If you want to draw a perspective grid, then search for that. I wouldn’t use the pen tool to do what you want, that not the right approach.
So your bad search, doesn’t equate to my bad. Also I’m not responsible for the 10 books you have unless one of them is mine, which it isn’t because I haven’t written about that in my 19 books. Now if you would consider asking nicely, I might consider helping you. Sorry to be harsh, but it’s insulting to come into someone else’s home demanding. I provide free tutorials and I don’t have advertising, so you aren’t doing anything for me by reading them. your welcome.
Well said Colin – I also get very annoyed with people who have attitude and wonder if they ever have been taught to rather say thank you in life – they will find life such a breeze and not full of stumbling blocks, the saying negative attracts negative is so true – thank you for taking the hours and time of putting your explanation on “paper” so that I can always refer to when I need to, with ease
I am so glad I found this! I’ve used paths quite a lot but didn’t know half of this. This opens many doors for me and I thank you for providing this service. :o)
I’m trying to draw a new street on a map layer. However, when I use the pen tool in the path setting it does not create the path on a layer. The path is just “out there”. Is there a better way to create straight lines and nice curves on a map so that I can match the new path with existing line widths on the map layer? The map layer is a flattened pdf image. At this point, the path will not print to the plotter. Any advice on how to best do this would be much appreciated! Oh, I’m using CS4 on Mac platform. Thank you!
Once again, I know this reply is super late, but it might be a useful reference for people. Shape Layers will do what you are needing. They are paths, but visible with fill and stoke properties. Newer version of Photoshop provide more options in this area. For example, CC added dotted and dashed lines
Colin, is there any way to create a thicker or different colour line with the pen tool in cs5?
Yes, you can choose to stroke the path with the currently selected brush. Change the brush size and then add stroke from the Paths Palete
I know this reply is super late, but it might be a useful reference for people. You cannot change the way the pen tool displays a path.
Wonderful tutorial. I like your idea. Keep sharing with us.
We are providing service for Photoshop clipping path.
Updated this pen tool tutorial with a brand new video
OK this is really infuriating but I’ve been surfing for an hour trying to find how to draw LINES and all I find is how to draw paths. When I say LINE I mean like when you draw with a physical pen or marker on actual paper – you get a line, not a path. How do I draw a LINE? It can be black, blue, pink, but it needs to be visible like a line is visible – meaning with some width. Is this what I see called “stroke”? How do I give a path visibility? Sorry for the panic tone….
I think you’ll want to use the Pencil Tool….and you may also increase the size of the “stroke.”
Just curious. After taking the time to create a path, why not use that path to create a vector mask? I keep seeing paths converted to selections then turned into layer masks which are pixel based and editable with the brush tool. It seems to me that you lose the magic of the bezier path sharpness.
Editing the mask around that cool car, why introduce a brush?
Absolutely, use it as a vector mask by all means.
@Colin great article! Keep sharing such a valuable article and make us skilled designers.
Colin! I had struggled with the pen tool and gave up – then I found your tutorial. Your simple descriptions of line direction are elegant and made everything click. Thank you! Now, I have a question. I’m cutting out a car of a busy car show. I have been able to cut the car out but am lost on how to include cutting out the background in 3 of the windows. Does each window need to be done separately or is there a way to include the car and the window cutouts in one go?
I’d do the windows after you have done the car separately.
Thanks for your article. it helps me alot .your articles are really helpful.thank you once again.
Thank you! I’ve been writing text on a shaped line drawn with the pen tool. When I come to print, will the line be visible?
no they won’t
Very good tutorial! I never got the hang of the pen tool over two decades, but today I really wanted to learn clean line art and now I have everything I need. Thank you so much!
i’ve just finished taking a quick course on using ps and found the pen tool to be “the most difficult one to manipulate”; until i watched your tutorial, which really saved my day! thanks a lot! you’ve just got a new “student” (subscriber) to your channel! be watching!
How many tutorials must I view before making strokes visible is explained. The options for stroke are disabled if they even appear at all. Nothing works like the tutorials and the software changes all the time so a lot of them are old.
Is this a passive aggressive way of asking a question? (Seriously, don’t complain, just ask and more people will help ypou) What version are you on and where is the menu item that’s grayed out?
So I have a quick question about something the pen tool regarding a speed draw I was watching. The artist did use the stroke path function to create an array of lines similar to a vanishing point. The thing I noticed was that he only ended up with the Stroke Path box once and the rest of the time it seemed to duplicate the preferences he used in that box repeatedly without having to go through the menu over and over again. Is there a way to do this via hotkey or something that I seem to be missing? Not sure what version they are using or if there are any possible plugins that may be providing them with that specific outcome but this seems quite useful for some things.
SHIFT + OPT + CMD + T
Hey Colin I have been subscribed to your channel for most of the year and I’ve worked my way through most of your Café tutorials (great by the way). Just recently I attempted and succeeded to create a selection with the pen tool and saved it to paths. However I now have an annoying constant selection outline present that is evenly on both sides of the actual pen line when zoomed in. Feathering was set to 0.5 pixels and I set to path not shape.
If you click away for the path in the paths panel, it should hide the outline
Hey Colin, I understand your content and guidelines, but could you please tell me how to create a smooth and curvy path?
Hi Colin. I’m using CS2, love it and this tutorial. Right now I’m trying to figure out how to make each brush stroke on my document create a new layer. I’m using the brush and would like each line I draw to be it’s own layer. I thought my install use to do this but now each stroke is rastered onto the background. Is there some way to have this done without having to create a new layer before each stroke?
No, Unless you use procreate or Fresco on the ipad
Great comprehensive guide on using the Pen Tool in Photoshop! Your explanation demystifies the often daunting world of vectors and curves, making it accessible for beginners. The step-by-step tutorial approach makes it easy to follow along and practice.
Thanks so much for this tutorial. Very clear and easy to understand.