Tonality pro is a new application by MacPhun for creating stunning monochrome photographs. It also supports 16-bit raw files so there is no loss of fidelity. It works as a stand-alone application as well as a plug in for Photoshop and Lightroom. As the name of the company implies, this is mac only software. Tonality is the #1 paid application in the app store currently. This article will be focusing on the Lightroom plugin which is part of Pro version of Tonality available from the macphun website.

To install the Lightroom plug-in, launch Tonality Pro and choose Tonality Pro>Install Plug-ins. You will see a list of applications including Lightroom. Click the button that says install. Now, tonality Pro will be installed as a Lightroom plugin with all the functionality that it brings.
The Tonality Pro plugin can be found where all plugins live in Lightroom. Choose Photo>Edit in Tonality Pro
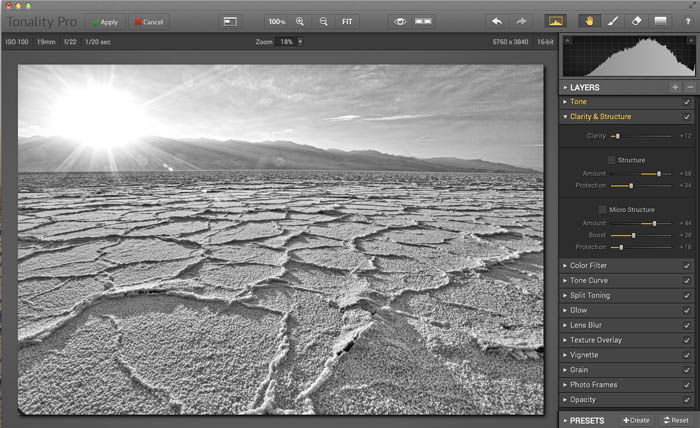
The interface is very easy to figure out. At the top, you have all the viewing options that include cropping and straightening. On the top right, you will see the 4 tools; Move tool, Brush. eraser and gradient (for masks).
You will also notice a button which is used to toggle the histogram on and off. I want to mention the histogram here, because it had a very unique tool. When you roll vower in the histogram, you will see a bar across the bottom that is actually the 10-zone system. If you roll over any of the numbered zones, an overlay will appear in the photograph. Different zones can be turned on by clicking on the squares in the histogram.
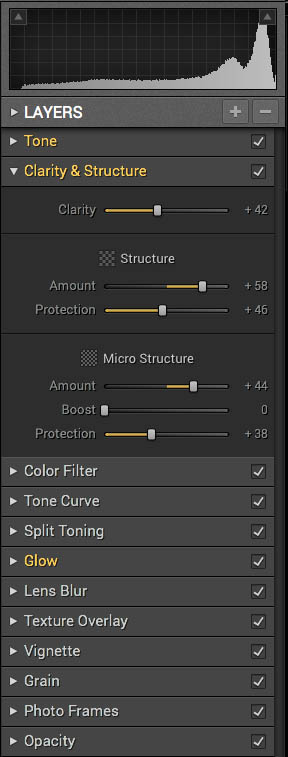
Before we look at the different effects and adjustments available, it’s worth mentioning up front one of the strengths of Tonality Pro. You can really target different effects to different part of an image. You can add multiple layers (8 including original). These layers have different blending modes available. Each layer also has an opacity slider for fine control.
Often I break up different types of adjustments on their own layers. I like to do tone adjustments on a layer, special effects on another layer and any color effects on the top layer.
The layers can easily be controlled by the use of masks. There are two types of masks, the gradient for gradual changes across the board and a brush for targeted adjustments. When you create a layer and make adjustments to it, you can use the bushes in 1 of 2 ways. Begin painting with the eraser and you can paint out the adjustments. The other option is to use the brush tool. In a stoke (excuse the pun) of genius, you don’t have to mask out the layer, when you begin painting with the brush tool, it automatically hides the adjustment from the layer except where you are painting.
I’m a big fan of layers and masks for things like skies and faces which generally look better with their own adjustments.

Presets
One of the strengths of Tonality Pro is the abundance of presets. Out of the “box” it comes with 150 different styles, divided up into 10 categories. These categories range from things like Dramatic, Vintage, Film Emulation, portrait and HDR to provide plenty of options.
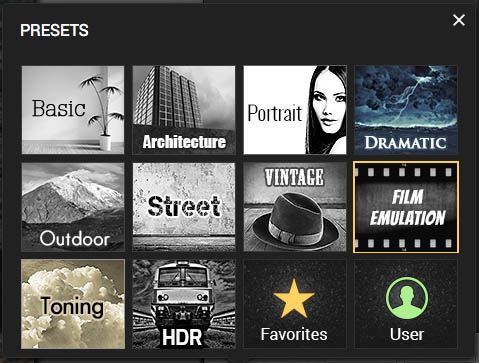
Often, it’s a good idea to start with a preset and then make some small tweaks to suit your individual photograph and tastes. It’s also easy to tweak presets because Tonality comes with a brilliant feature. Each module with an adjustment appears in yellow and every slider that has been changed has a yellow strip on it, that leads back to its default position.
When a preset is applied, there is a slider in the preset thumbnail which allows you to adjust the amount of the effect that is applied to the image. If you want to add more effects to the image, I suggest doing it on a different layer, so that you can adjust the opacity of the extra adjustments independently for the preset.
Of course, you can also make your own presets and share them with others. Macphun has additional professionally designed preset packs available on their website too.
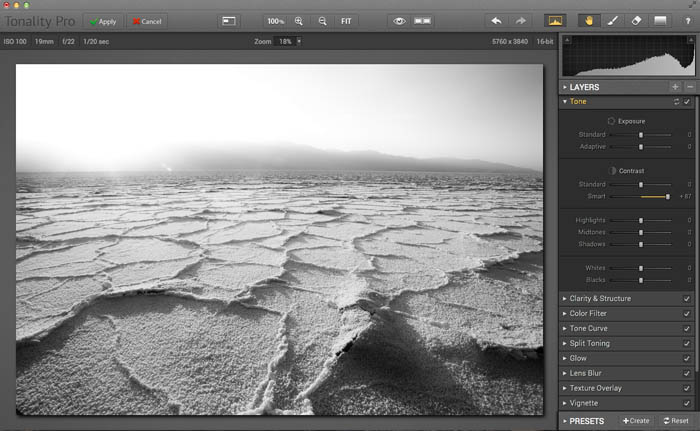
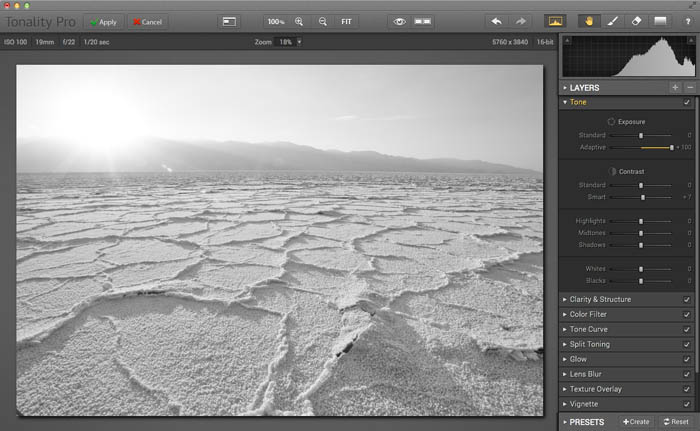
Typically speaking, the tone panel is the place that you should begin, and the real power of Tonality Pro is in this panel and the Clarity and Structure panel. The tone panel should look very familiar to you. This is very similar to the basic Lightroom adjustments. But look closely, you will see two options that you won’t be so familiar with. Adaptive Exposure and Smart contrast. If these 2 sliders were the only features of Tonality Pro, I would be satisfied.
Unlike Exposure and contrast, these 2 options allow you to change the tonality of your image without losing detail, blowing out the highlights or plugging up shadows. The adaptive Exposure, allows you to brighten or darken the pixels in the image while maintaining highlight and shadow detail. It’s really quite impressive. The Smart contrast allows you to bring out the hidden detail in the shadows and highlights (recover dynamic range).

The Clarity and Structure panel is where you bring out the details in a photograph. Use the clarity slider to boost the mid tone contrast. It works very similar to Lightroom’s much-loved clarity slider. Use the structure and micro structure sliders to boost the detail and bring out textures in an image. These work exceptionally well to bring back the cloud detail in skies. Use the Protection sliders to reduce the amount of noise that can also be unwittingly brought out. The Structure tools are a favorite of mine to bring out the details that would be otherwise lost in aerial photography.
A word of caution here. These sliders are very powerful and its easy to make your images look over-processed. So, remember a little bit goes a long way. Avoid the trap of making too many adjustments just because you can.
When you are converting a color photo to black and white, its flavor can be dramatically changed by the way you map the colors to different grayscale tones. Have you ever used the Channel Mixer in Photoshop to convert to black and white? You can basically choose a certain color and make all the regions brighter or darker. For example, choosing blue and making adjustments can make the sky very light or dark in the black and white version. This allows you to add emphasis to any part of the photograph that you like.
The color filter is where you do this. Choose the Luminance option and slide the different colored sliders to see how each color influences the final black and white version. There are also different presets that push towards the colors of the rectangles that can be clicked on. The way to use this, is to click on the different colored rectangles until you see the option that you like best. Then move the individual slider to tweak it exactly for you image. You might have to go back and fine tune the tone sliders after you have set this option.
An additional option in this panel is the Saturation tools. This is very unique and can produce some very interesting results. If you slide any of the sliders to the right, the underlying colors will be restored in the image. This is fun if you want to have a photograph where certain colors are showing and everything else is black and white. On the opposite, you can restore all the color in the Photography by moving all the sliders to the right. You can now use Tonality Pro on your color images or drop out just one or two colors. Hint: If you are going to do this, you can save time by turning on the color only and saving it as a starting point preset.
The tone curve works just like the curves in Lightroom, allowing you to target precise tones to be adjusted.
The next section of tools are more what I would call special effects. Because of space, I can’t get into as much detail as I would like for each effect. I will however tell you what each one does,
The split toning works just like the split toning in Lightroom. This allows you to add a colored tint to the shadows and highlights independently, creating a duotone style of color.
The glow is a good option for adding a glamorous feel to a portrait photograph. You choose the amount of glow, and then fine tune it with the smooth and threshold sliders. Move the smooth slider to the right to increase the amount of blur and move the threshold slider to the left to allow the glow to be applied to more of the image.
With all the detail that you can pull, it’s easy to make a photograph look too busy. The lens blur is really useful for adding depth of field effects that simulate shooting with a large aperture on the camera. This is especially useful for blurring out distractions and focusing the viewer’s eye on a portion of the photograph.
You can add texture overlays from 3 different categories, There are a number of blend modes that you can select to make the textures blend in different ways. You can also apply your own textures via the custom options.


There ever popular vignette is here, either darken or lighten the edges of a photo. You can also place it wherever you like in the image, so it doesn’t have to be in the center.
Add film like grain, no more explanation is really needed here.
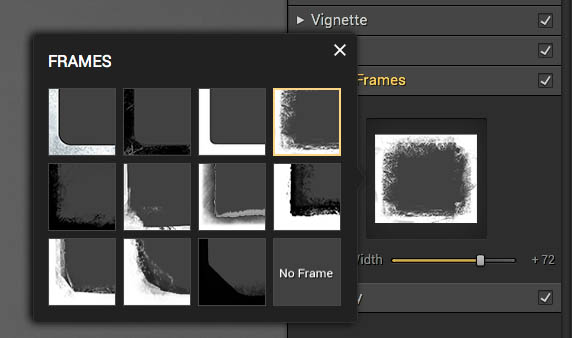
The frame are a lot of fun. There are a number of different frame styles that you can apply to finish off your images. They can also be adjusted by moving the size slider.

As you can see, Tonality is a unique plugin that extends the functionality of Lightroom and allows you to easily do things that you couldn’t before. Happy creative expirations.
© All photographs, Colin Smith | PhotoshopCAFE.com

This site uses Akismet to reduce spam. Learn how your comment data is processed.
Lightroom 6 first look, Lightroom CC review and walkthrough of new features. Lightroom 6 tutorials, articles, free videos and launch...
How to retouch a portrait photo in Lightroom or Camera RAW. This Lightroom tutorial shows how to smoothen skin, whiten...
How to make a grid pattern in Photoshop. Turn it into perspective and make all the lines glow in Photoshop....


(disclosure: I’m with Macphun)
Colin – as usual, a very thorough look at the software – thanks! I’m really glad you mentioned the Layers functionality right away because we’re finding that many photographers are using those to “build up” their images – greater depth, better separation between foreground and background, etc.
One update you might want to be aware of is that we recently added a new Luminosity Mask feature. It creates what I would call a “map” that allows you to really dig into your image and provide localized adjustments. I’d love to hear how it works out for your aerial work and landscapes. 😉
Colin, I received a sample tutorial from Macphun over a year ago, played around with it and concluded that I will stay with Nik/Google Silver Efex Pro 2, much preferring it’s versatility, Chuck Guildner (disclosure: I’m not with Nik/Google)
Hi Chuck, that’s fine, I also use NIK and like it too. I do find the 2 applications get quite different results though, so I use both 🙂
Thanks for the reply Colin. When trying out the Macphun black and white plug-in, I did not feel I was getting as satisfying results as I am with Nik Silver Efex. Personal taste, vision, comfort zone from familiarity are all at work here. But good to see other’s attempts at providing expanded choices.